SpringSecurity能用于保护各种Java应用程序(权限管理框架),但在基于Web的应用程序中使用得最为广泛。
SpringSecurity能以声明的方式来保护Web应用程序的URL访问,只需简单的配置即可实现。
SpringSecurity通过一系列Servlet过滤器为Web应用程序提供了多种安全服务。
HelloWorld!
我们依然从这个经典的程序开始,其实HelloWorld!程序只是学习者直观简单的进入一门语言或工具。我们的这SecurityHelloWrld程序比较一般的HelloWorld程序内容要多一些。我们需要建立两个页面(index.jsp和admin.jsp),index.jsp用于登陆,admin.jsp只有具有ROLE_ADMIN权限的用户才能查看。
我们先想一下需求:
· 防止一个帐户同时在多个机器上登陆
· 帐户只能根据自己的权限操作相应的功能模块
· 帐户只能在页面上看到具有对应权限的数据内容
1.搭建环境
因为我们使用的是Spring-security,所以需要搭建Spring环境。创建一个动态WEB工程(EclipseJavaEE版)。
1).添加jar包: spring.jar、commons-loggin.jar、spring-security-core-2.0.5.jar。
2).WEB文件:
| <!-- 搭建Spring --> <context-param> <param-name>contextConfigLocation</param-name> <param-value>/WEB-INF/classes/applicationContext.xml</param-value> </context-param> <listener> <listener-class>org.springframework.web.context.ContextLoaderListener</listener-class> </listener>
<!-- 添加Spring-Security过滤器 --> <filter> <filter-name>springSecurityFilterChain</filter-name> <filter-class>org.springframework.web.filter.DelegatingFilterProxy</filter-class> </filter> <filter-mapping> <filter-name>springSecurityFilterChain</filter-name> <url-pattern>/*</url-pattern> </filter-mapping> |
看见没,在这用到过滤器代理了!过滤器名称必须指定为”springSecurityFilterChain“,Spring-secrutiy默认为我们提供了一个过滤器。我们也可以编写一个自己的过滤器,然后将它配置为Spring的Bean,Bean的名称必须为 springSecurityFilterChain。
3).applicationContext.xml文件:
| <!-- 配置SpringSecurity的http安全服务 --> <sec:http auto-config="true"> <!-- 只有ROLE_ADMIN或ROLE_USER权限用户才能访问index.jsp --> <sec:intercept-url pattern="/index.jsp" access="ROLE_ADMIN,ROLE_USER"/> <!-- 只有ROLE_ADMIN权限用户才能访问admin.jsp --> <sec:intercept-url pattern="/admin.jsp" access="ROLE_ADMIN"/> </sec:http>
<!-- 配置SpringSecutiry的权限信息 --> <sec:authentication-provider> <sec:user-service> <!-- 帐户信息 --> <sec:user password="admin" name="admin" authorities="ROLE_ADMIN"/> <sec:user password="user" name="user" authorities="ROLE_USER"/> </sec:user-service> </sec:authentication-provider>
|
需要为这个spring的配置文件添加:xmlns:sec="http://www.springframework.org/schema/security",具体操作步骤不细说了。
在Spring的配置文件中描述帐户、权限信息,但把这么重要的信息放在这里是不安全的!
2.添加JSP页面
index.jsp,body部分的内容:
| <body> <h1>*****INDEX*****</h1> <security:authorize ifAllGranted="ROLE_ADMIN"> <br> <a href="admin.jsp">ADMIN</a> </security:authorize> <br> <a href="logout">LOGOUT</a> </body> |
需要为这个JSP文件导入:<%@ taglib prefix="security"uri="http://www.springframework.org/security/tags"%>。
admin.jsp,body部分的内容:
| <body> <h1>*****ADMIN*****</h1> <a href="index.jsp">RETURN</a> </body> |
OK,我们的Spring-securityHelloWorld!程序已经完成了!跑一下,看到这个页面没有?
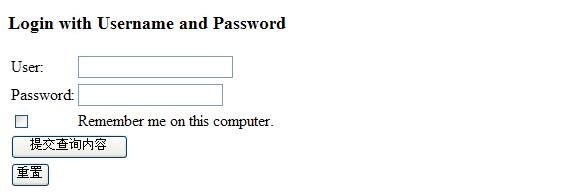 |
我们没有为工程添加这们的页面啊!先不管这些,使用我们配置的两个帐户登陆看看功能如何。
3.登出配置
因为我们在页面中添加了登出连接,所以我们添加一个登出配置:
| <!-- 配置登出信息 --> <logout logout-url="/logout" logout-success-url="/bye.jsp" invalidate-session="true" /> |
我们添加一个bye.jsp页面,点击logout连接时,就会转到此页面。
4.登陆配置
上面的页面是spring-security自动为我们添加的登陆页面,我们也可以设置自己的登陆页面:
| <!-- 配置登陆信息 --> <form-login login-page="/login.jsp" login-processing-url="/login" /> |
login.jsp
| <!-- 配置登陆信息 --> <form-login login-page="/login.jsp" login-processing-url="/login" default-target-url="/index.jsp" authentication-failure-url="/loginfail.jsp" always-use-default-target="true"/> |
login-page:登陆页面,这里的login.jsp页面中的表单请求和字段名称必须是spring-security指定的,可以查看spring-security默认为我们提供的页面代码。
login-processing-url:登陆请求处理URL。
default-target-url:登陆成功后,转到的页面。
authentication-failure-url:登陆失败后,转到的页面。
always-use-default-target:一直使用”default-target-url“,这是什么意思?假如我们现在有两个页面可以跳到登陆页面,默认情况下spring-security在登陆成功后会跳转到——跳转登陆页面的页面。如果这个值真,那么登陆成功后会一直跳转到”default-target-url“指定的页面。有些情况下,用户直接进入登陆页面进行登陆,此时登陆成功后会跳转到”default-target-url“指定的页面,如果没有指定这个页面则跳转到index.jsp页面,如果没有index.jsp页面将出错。
问题:
将这么重要的信息放在spring的配置文件中是相当不安全的,Spring-security为们提供了安全的方法,将数据放到数据库中。
三、使用数据库替换配置文件
下面我们就实现将用户的帐户信息存储到数据库中,关于页面的访问权限配置存放到数据库中我们明天再总结。在此我们就不大动干戈去使用Hibernate了,我们使用JDBC。
1.添加JDBC
向Spring添加数据源Bean还记得吗?我们使用的数据源是c3p0。
| <context:property-placeholder location="classpath:jdbc.properties" /> <bean id="dataSource" class="com.mchange.v2.c3p0.ComboPooledDataSource"> <property name="user" value="${user}" /> <property name="password" value="${password}" /> <property name="driverClass" value="${driverClass}" /> <property name="jdbcUrl" value="${jdbcUrl}" />
<property name="minPoolSize" value="5" /> <property name="initialPoolSize" value="3" /> <property name="maxPoolSize" value="10" /> <property name="acquireIncrement" value="2" /> </bean> <bean id="jdbcTemplate" class="org.springframework.jdbc.core.simple.SimpleJdbcTemplate"> <constructor-arg ref="dataSource"/> </bean> |
2.建数据库和数据表
用户表与角色表是什么关系?当前是多对多喽!因此我们需要三个表:
1).user(用户表)
 |
2).role(角色表)
 |
3).user_role(中间表)
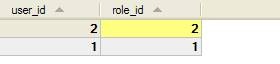 |
3.从数据库中读取权限信息
我们的数据源、jdbcTemplate和数据库已经建好了,接下来就是让spring-security可以读取到数据库中的信息,根据这些信息判断用户输入的登陆信息是否正确以及用户所具有的权限。
1).要想spring-security可以读取到数据库中的信息,我们必须编写一个实现了UserDetailsService接口的类:
| package cn.itcast.cc.spring.security;
import java.util.List; import java.util.Map; import javax.annotation.Resource; import org.springframework.dao.DataAccessException; import org.springframework.jdbc.core.simple.SimpleJdbcTemplate; import org.springframework.security.GrantedAuthority; import org.springframework.security.GrantedAuthorityImpl; import org.springframework.security.userdetails.User; import org.springframework.security.userdetails.UserDetails; import org.springframework.security.userdetails.UserDetailsService; import org.springframework.security.userdetails.UsernameNotFoundException; import org.springframework.stereotype.Component;
@Component("userDetailsService") public class UserDetailsServiceImpl implements UserDetailsService {
@Resource private SimpleJdbcTemplate jdbcTemplate = null;
@Override public UserDetails loadUserByUsername(String username) throws UsernameNotFoundException, DataAccessException { // 根据用户名获取帐户和权限信息 String sql = "SELECT username,password,status,name rname" + " FROM user u,role r,user_role ur" + " WHERE u.id=ur.user_id AND r.id=ur.role_id AND username=?"; // 如果一个用户具有多个权限,连接查询会返回一个List List list = this.jdbcTemplate.queryForList(sql, new Object[] { username });
// 取出帐户和权限信息填充到User中返回 if (list == null || list.size() <= 0) // spring-security定义的异常 throw new UsernameNotFoundException("用户不存在!"); // 如果用户存在 Map<String, Object> map = (Map<String, Object>) list.get(0); // 密码 String password = (String) map.get("password"); // 帐户是否可用 boolean enabled = ((Integer) map.get("status") == 1); // 帐户所具有的权限 GrantedAuthority[] gas = new GrantedAuthority[list.size()]; for (int i = 0; i < gas.length; i++) { Map<String, Object> temp = (Map<String, Object>) list.get(i); gas[i] = new GrantedAuthorityImpl((String) temp.get("rname")); } // spring-security提供的类 User user = new User(username, password, enabled, true, true, true, gas); return user; } } |
一定要记住实现的是UserDetailsService 接口,在spring-security帮助手册中应该有。佟佟今天领着大家看着源码,下着断点,找到了这个接口。
2).将applicationContext.xml文件中的”<!-- 配置SpringSecutiry的权限信息 -->“部分,全部替换为:
| <authentication-provider user-service-ref="userDetailsService" /> |
********************************************************************************************************************************************************************
1.applicationContext.xml
将昨天applicationContext.xml“配置SpringSecurity的http安全服务”部分的内容替换为:
| <sec:http auto-config="true" session-fixation-protection="none" /> <bean class="org.springframework.security.intercept.web.FilterSecurityInterceptor" autowire="byType"> <sec:custom-filter before="AUTHENTICATION_PROCESSING_FILTER"/> <property name="objectDefinitionSource" ref="objectDefinitionSource"/> </bean> |
这里的objectDefinitionSource是下边的类,cutom-filter是在调用AUTHENTICATION_PROCESSING_FILTER过滤器之前调用FilterSecurityInterceptor。
2.添加数据表
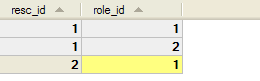
resc表与role表是多对多关系。
1).resc

2).resc_role
3.相关类
要让spring-security可以从数据库中获取相关资源信息,我们必须编写一个实现FactoryBean接口的类。
| package cn.itcast.cc.spring.security;
import java.util.LinkedHashMap; import java.util.Map; import javax.annotation.Resource; import org.springframework.beans.factory.FactoryBean; import org.springframework.security.ConfigAttributeDefinition; import org.springframework.security.ConfigAttributeEditor; import org.springframework.security.intercept.web.DefaultFilterInvocationDefinitionSource; import org.springframework.security.intercept.web.RequestKey; import org.springframework.security.util.AntUrlPathMatcher; import org.springframework.security.util.UrlMatcher; import org.springframework.stereotype.Component;
@Component("objectDefinitionSource") public class DefaultFilterInvocationDefinitionSourceImpl implements FactoryBean {
@Resource ResourceDetailsService resourceDetailsService;
private UrlMatcher getUrlMatcher() { UrlMatcher urlMatcher = new AntUrlPathMatcher(); return urlMatcher; }
@Override public Object getObject() throws Exception { UrlMatcher urlMatcher = this.getUrlMatcher(); // 获取数据Map Map<String, String> srcMap = resourceDetailsService.buildRequestMap(); LinkedHashMap<RequestKey, Object> requestMap = new LinkedHashMap<RequestKey, Object>(); ConfigAttributeEditor editor = new ConfigAttributeEditor(); // 转换数据Map for (Map.Entry<String, String> entry : srcMap.entrySet()) { String url = entry.getKey(); String roles = entry.getValue(); if (roles != null) { editor.setAsText(roles); requestMap.put(new RequestKey(url), editor.getValue()); } else { requestMap.put(new RequestKey(url), ConfigAttributeDefinition.NO_ATTRIBUTES); } } // 生成并返回对象 return new DefaultFilterInvocationDefinitionSource(urlMatcher, requestMap); }
@Override public Class getObjectType() { return null; }
@Override public boolean isSingleton() { return false; }
} |
其中ResourceDetailsService接口的实现类如下:
| package cn.itcast.cc.spring.security;
import java.util.HashMap; import java.util.List; import java.util.Map; import javax.annotation.Resource; import org.springframework.jdbc.core.simple.SimpleJdbcTemplate; import org.springframework.stereotype.Component;
@Component("userDetailsService") public class ResourceDetailsServiceImpl implements ResourceDetailsService {
@Resource private SimpleJdbcTemplate jdbcTemplate; @Override public Map<String, String> buildRequestMap() { // 注意:这里需要使用左外连接查询,是因为有些页面没有指定role。 // 即,任何权限都不可以访问的页面! String sql = "SELECT res_string as url,r.name as role " + "FROME resc LEFT JOIN resc_role rr ON rr.resc_id = resc.id " + "LEFT JOIN role r ON rr.role_id = r.id"; List<Map<String, Object>> results = this.jdbcTemplate.queryForList(sql); Map<String, String> srcMap = new HashMap<String, String>(); // 将查询后的数据拼接并放入到Map中 for(Map<String,Object> val:results){ String url = (String) val.get("url"); String role = (String) val.get("role"); if(srcMap.containsKey(url)){ role = srcMap.get(url) + "," + role; } srcMap.put(url, role); } return srcMap; } } |