文章目录
一、基本概念
单点登录
- 什么叫做单点登录呢。就是在一个多应用系统中,只要在其中一个系统上登录之后,不需要在其它系统上登录也可以访问其内容。
- 举个例子,京东那么复杂的系统肯定不会是单体结构,必然是微服务架构,比如订单功能是一个系统,交易是一个系统…那么我在下订单的时候登录了,付钱难道还需要再登录一次吗,如果是这样,用户体验也太差了吧。
- 实现的流程就是我在下单的时候系统发现我没登录就让我登录,登录完了之后系统返回给我一个Token,就类似于身份证的东西;然后我想去付钱的时候就把Token再传到交易系统中,然后交易系统验证一下Token就知道是谁了,就不需要再让我登录一次。
JWT(JSON Web Token)
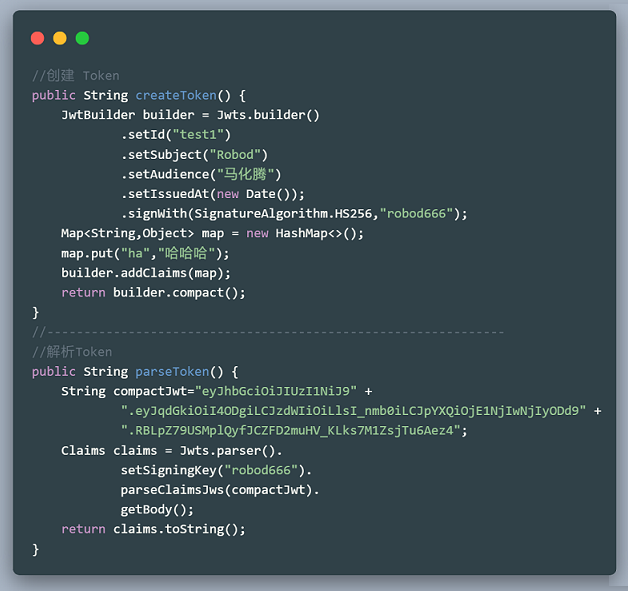
Token的生成与解密
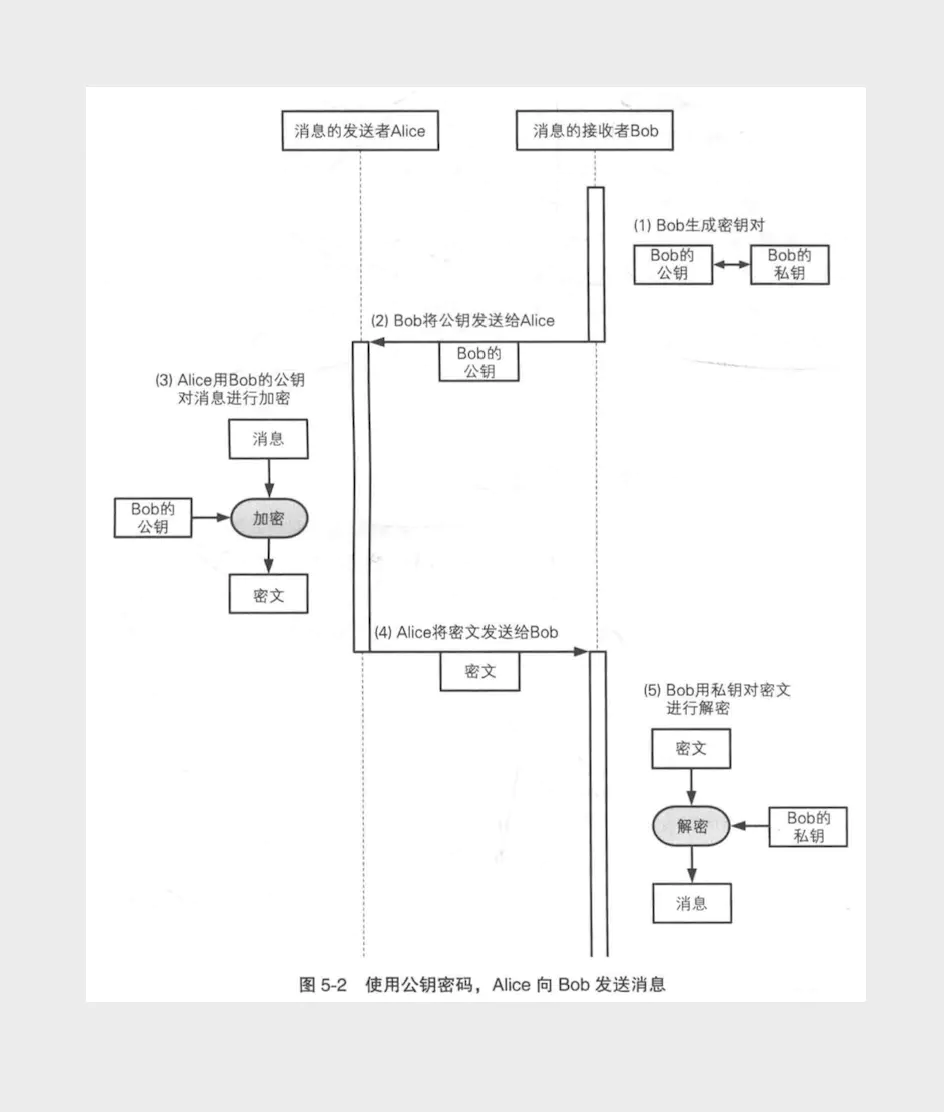
RSA(非对称加密算法)
从上面的例子中可以看出,JWT在加密解密的时候都用到了同一个密钥 “ robod666 ”,这将会带来一个弊端,如果被黑客知道了密钥的内容,那么他就可以去伪造Token了。所以为了安全,我们可以使用非对称加密算法RSA。
二、Spring Security第一个程序
Spring Security导入依赖就能生效了。
	<dependency>
		<groupId>org.springframework.boot</groupId>
		<artifactId>spring-boot-starter-security</artifactId>
	</dependency>
查看Controller层结果
@RestController
public class UserController {


    @Autowired
    UserMapper userMapper;

    @RequestMapping("/user/select/{id}")
    public User list(@PathVariable("id") int id){


        return userMapper.queryUserById(id);
    }
}
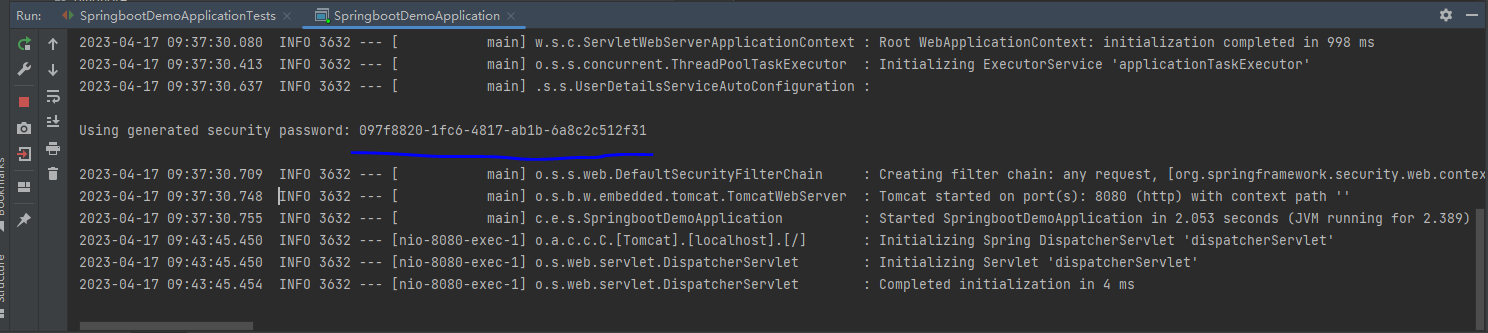
启动项目,默认账号是user,密码在输出控制信息中
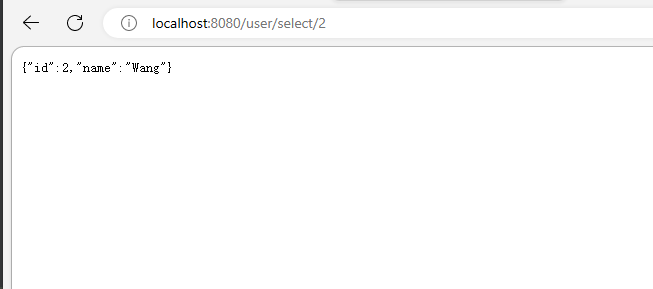
在浏览器中访问localhost:8080/user/selet/2,会自动跳转到localhost:8080/login

输入账号密码,跳转到我们原来请求的内容localhost:8080/user/selet/2
三、Spring Security没有生效
Spring Security在导入依赖之后就能生效,并且会使用一些默认配置。但是有时候导入依赖之后访问页面,也没有跳转到指定验证页面,这就是Spring Security没有生效。
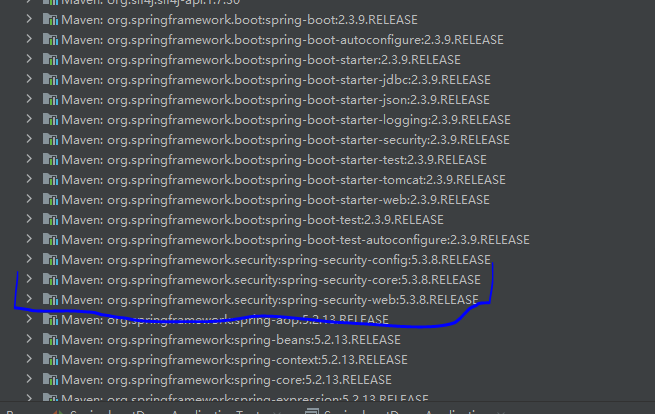
这是因为,你在pom.xml中导入了依赖包,等于告诉maven要导入Spring Security依赖,但是不等于已经导入了Spring Securtiy,因为maven可能还没来得及导入,你就已经启动项目了。我们可以通过查看External Libraries这里,看看Spring Security是否已经导入成功。

四、修改默认账号密码(appliction.yml)
在application.yml配置文件中修改默认账号密码
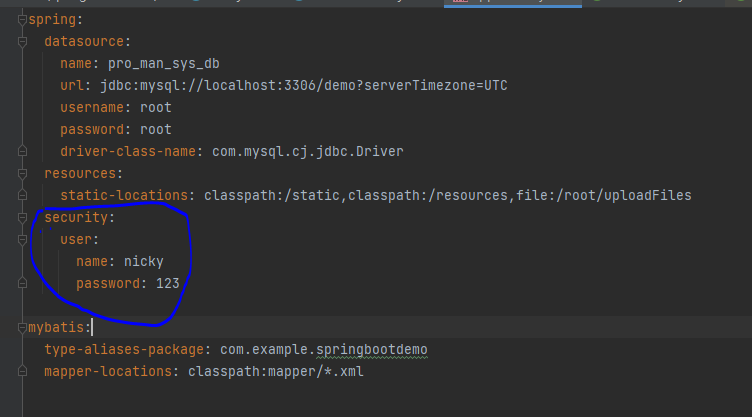
启动项目,在浏览器中访问localhost:8080/user/selet/2,会自动跳转到localhost:8080/login,账号是nicky,密码在123
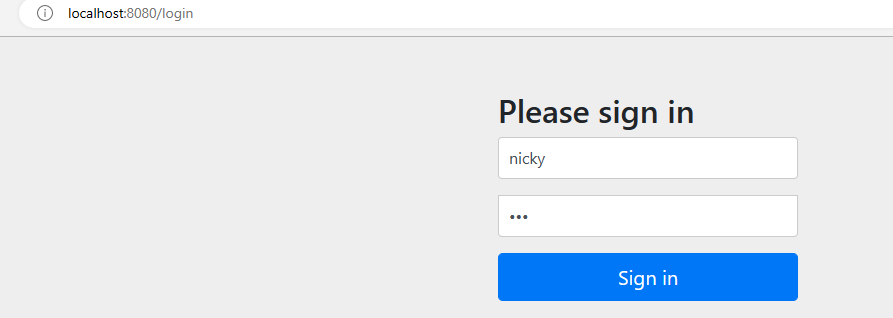
输入账号密码,跳转到我们原来请求的内容localhost:8080/user/selet/2
五、修改默认账号密码(配置类)
也可以新建Spring Security配置类,注意Spring Security5.2.1版本,配置密码要用BCryptPasswordEncoder加密,不过登录还是明文,Spring Security不同版本各有差别,详情配置还是参考官方文档
@Configuration  // 设置为配置类,变成Spring Bean
public class SecurityConfiguration extends WebSecurityConfigurerAdapter {


    @Override
    protected void configure(AuthenticationManagerBuilder auth) throws Exception {

        //auth.inMemoryAuthentication()
        auth.inMemoryAuthentication()
                .withUser("nicky")
                .password(bcryptPasswordEncoder().encode("123456"))
                .roles("admin")
            .and()
                .withUser("rocky")
                .password(bcryptPasswordEncoder().encode("123456"))
                .roles("admin");
    }
    @Bean
    public PasswordEncoder bcryptPasswordEncoder() {


        return new BCryptPasswordEncoder();
    }
}
启动项目,在浏览器中访问localhost:8080/user/selet/2,会自动跳转到localhost:8080/login,账号是nicky,密码在123
输入账号密码,跳转到我们原来请求的内容localhost:8080/user/selet/2
六、Spring Security的三个configure方法
Spring Security通过继承WebSecurityConfigurationAdapter这个类,可以选择实现该类中的三个重载的configure方法
configure(AuthenticationManagerBuilder auth):用来记录账号,密码,角色信息。
AuthenticationManagerBuilder allows
    public void configure(AuthenticationManagerBuilder auth) {


        auth
            .inMemoryAuthentication()
            .withUser("user")
            .password("password")
            .roles("USER")
        .and()
            .withUser("admin")
            .password("password")
            .roles("ADMIN","USER");
}
configure(HttpSecurity http):(授权)配置 URL 访问权限,对应用户的权限
protected void configure(HttpSecurity http) throws Exception {


    http
    	//任何请求都必须经过身份验证
        .authorizeUrls()
        .antMatchers("/admin/**").hasRole("ADMIN")
        .anyRequest().authenticated();
configure(WebSecurity):一般用于配置忽略掉的 URL 地址,一般用于js,css,图片等静态资源
public void configure(WebSecurity web) throws Exception {


    web
    	 //web.ignoring() 用来配置忽略掉的 URL 地址,一般用于静态文件
        .ignoring()
        .antMatchers("/resources/**");
}
七、Spring Security的三种身份的验证
1. 默认身份验证
在pom.xml文件映入SpringSecutrity依赖启动器,启动项目,访问文章列表页面时,出现默认的登录页,需要用默认用户名:user,密码源于控制台输出,也就是最基础的登录
2. 内存身份验证
自定义用户名和密码(用户名和密码是写在代码内,不好维护)
@Configuration  // 设置为配置类,变成Spring Bean
public class SecurityConfiguration extends WebSecurityConfigurerAdapter {


    @Override
    protected void configure(AuthenticationManagerBuilder auth) throws Exception {


        auth.inMemoryAuthentication()
                .withUser("nicky").password(bcryptPasswordEncoder().encode("123456")).roles("admin")
            	.and()
                .withUser("rocky").password(bcryptPasswordEncoder().encode("123456")).roles("admin");
    }

    @Bean
    public PasswordEncoder bcryptPasswordEncoder() {


        return new BCryptPasswordEncoder();
    }

    @Override
    protected void configure(HttpSecurity http) throws Exception {


        http.headers().frameOptions().disable();//开启运行iframe嵌套页面

        //任何请求都必须经过身份验证
        http.authorizeRequests()
                .anyRequest().authenticated();

		 http.authorizeRequests()
                .antMatchers("/vip/vip0/**").hasRole("vip0")
                .antMatchers("/vip/vip1/**").hasRole("vip1")
                .antMatchers("/vip/vip2/**").hasRole("vip2")
                .antMatchers("/vip/vip3/**").hasRole("vip3");


        //开启表单验证
        http.formLogin()
                .and()
                .formLogin()//开启表单验证
                .loginPage("/toLogin")//跳转到自定义的登录页面
                .usernameParameter("name")//自定义表单的用户名的name,默认为username
                .passwordParameter("pwd")//自定义表单的密码的name,默认为password
                .loginProcessingUrl("/doLogin")//表单请求的地址,一般与form的action属性一致
                .successForwardUrl("/index")//登录成功后跳转的页面(重定向)
                .failureForwardUrl("/toLogin")//登录失败后跳转的页面(重定向)
                .and()
                .logout()//开启注销功能
                .logoutSuccessUrl("/toLogin")//注销后跳转到哪一个页面
                .logoutUrl("/logout") // 配置注销登录请求URL为"/logout"(默认也就是 /logout)
                .clearAuthentication(true) // 清除身份认证信息
                .invalidateHttpSession(true) //使Http会话无效
                .permitAll() // 允许访问登录表单、登录接口
                .and().csrf().disable(); // 关闭csrf
    }
}
3. 数据库方式校验
实现WebSecurityConfigurerAdapter类:将身份校验方式改变为数据库方式校验,即使用UserDetailsService
/*开启安全管理配置*/
@EnableWebSecurity
public class SecurityConfig extends WebSecurityConfigurerAdapter {


    @Autowired
    UserDetailsServiceImpl userDetailsService;

    /*自定义身份认证*/
    @Override
    protected void configure(AuthenticationManagerBuilder auth) throws Exception {


        /*1. 密码编译器*/
        BCryptPasswordEncoder encoder = new BCryptPasswordEncoder();

        /*2.使用UserDetails进行身份认证*/
        auth.userDetailsService(userDetailsService).passwordEncoder(encoder);
    }

	/*自定义用户权限*/
	@Override
    protected void configure(HttpSecurity http) throws Exception {


        http.authorizeRequests()
                .antMatchers("/").permitAll()  // 表示放行“/”访问
                .antMatchers("/admin/**").hasAuthority("admin")		// 表示admin才能访问/admin/**
                .antMatchers("/common/**").hasAuthority("common")	// 表示common可以访问/commom/**
                .and()
                .formLogin();
    }
}
实现UserDetailsService类:该类只有 loadUserByUsername 一个接口方法, 用于通过用户名获取用户数据. 返回 UserDetails 对象, 表示用户的核心信息 (用户名, 用户密码, 权限等信息).
注意:其实UserDetailsService就是一个Service层的类,没有大不了的,我们也可以用UserService继承UserDetailsService
@Service
public class UserDetailsServiceImpl implements UserDetailsService {


    @Autowired
    UserMapper userMapper;
    @Autowired
    AuthorityMapper authorityMapper;

    /*根据前端登录页面传入的用户名,查询出数据库对应的用户信息和用户权限,
    把用户信息和权限封装成UserDetails对象,交给SpringSecurity进行身份认证*/
    @Override
    public UserDetails loadUserByUsername(String s) throws UsernameNotFoundException {


        BCryptPasswordEncoder encoder = new BCryptPasswordEncoder();

        /*根据用户名查询用户信息*/
        User user = userMapper.selectUserByUserName(s);
        /*根据用户名查询权限信息*/
        List<Authority> authorities = authorityMapper.selectAuthorityByUserName(s);

        /*遍历封装用户权限*/
        List<SimpleGrantedAuthority> authorityList = new ArrayList<>();
		for (int i=0; i<authorities.size(); i++){


            authorityList.add(new SimpleGrantedAuthority(authorities.get(i).getAuthority()));
        }

		// 如果用户不存在
        if(user!=null){


            /*将用户名、密码、用户权限封装成UserDetails对象*/
            UserDetails userDetails = new User(user.getUsername(),encoder.encode(user.getPassword()),authorityList);
            return userDetails;
        }else {


            throw new UsernameNotFoundException("用户不存在");
        }
    }
}
编写UserMapper类:这里仅仅编写了Mapper层逻辑,至于domain与数据库sql就不再赘述了
@Mapper
public interface UserMapper {


 /*根据用户名去查询用户讯息*/
@Select("select * from t_user where username=#{username}")
	public TUser selectUserByUserName(String username);
}
@Mapper
public interface AuthorityMapper {


 /*根据用户名去查询用户权限*/
 @Select(" select a.* from t_user u,t_authority a,user_authority au where u.id=au.uid and a.id=au.aid and u.username=#{username}")
public List<Authority> selectAuthorityByUserName(String username);
}