感谢网上大神教程(参考博客入口),这篇博客依旧是一个记录性博客。参考博客在我实践的过程中出现一些问题,我会把我操作的过程以及处理问题的方式记录下来。依旧是老话,本人菜鸟一枚,所以博客会记录地比较详细和啰嗦,里面的内容包括自己一些理解。
首先,你要学会如何使用IntelliJ IDEA去建立一个Spring Boot+MyBatis项目,这里如果有问题,请移至我的博客,这里不赘述。
一、使用工具
1、jdk 8
安装(免费):https://blog.csdn.net/kangmiao89757/article/details/9993887
2、IntelliJ IDEA 2018.3.5
安装:https://blog.csdn.net/qq_35246620/article/details/61200815
注(激)册(活):https://blog.csdn.net/zhanggonglalala/article/details/88547992
3、Maven 3.6.0
安装:http://wiki.jikexueyuan.com/project/maven/environment-setup.html
4、Mybatis
5、SpringBoot:spring-1.4.3.RELEASE
6、MySql:mysql-8.0.15-winx64
安装:https://blog.csdn.net/zhanggonglalala/article/details/88554219
7、SQLyog(可以没有),但它是一个很好用的MySql可视化软件,建议还是安装。
二、在Spring Boot中引入MyBatis
在pom.xml中引入核心依赖。首先,这里解释一下需要引入的核心依赖的作用。
| 依赖 | 作用 |
| mybatis-spring-boot-starter | MyBatis用于Spring Boot的核心内容 |
| mysql-connector-java | 用于连接MySQL |
检查你的pom.xml里面是否有如下的内容,"<version>"部分内容可以不一致,如果有不要重复添加。
<parent>
    <groupId>org.springframework.boot</groupId>
    <artifactId>spring-boot-starter-parent</artifactId>
    <version>2.1.3.RELEASE</version>
    <relativePath/> <!-- lookup parent from repository -->
</parent>

<dependencies>
    <dependency>
        <groupId>org.springframework.boot</groupId>
        <artifactId>spring-boot-starter-web</artifactId>
    </dependency>
    <dependency>
        <groupId>org.mybatis.spring.boot</groupId>
        <artifactId>mybatis-spring-boot-starter</artifactId>
        <version>2.0.0</version>
    </dependency>

    <dependency>
        <groupId>mysql</groupId>
        <artifactId>mysql-connector-java</artifactId>
        <version>8.0.15</version>
        <scope>runtime</scope>
    </dependency>

    <dependency>
        <groupId>junit</groupId>
        <artifactId>junit</artifactId>
        <version>4.8.2</version>
        <scope>test</scope>
    </dependency>
</dependencies>
一些依赖是需要版本的,我们如何查看这个版本呢?在我们的用户目录(C:\"你的名字")下有一个".m2\repository"文件夹,这里有Maven所有版本库文件。根据依赖的"<groupId>"和"<artifactId>"在目录下依次找到依赖,即可查看。
这里说的也许有点抽象,更直白一点说"<groupId>"和"<artifactId>"可以看作文件路径。比如你需要的"<artifactId>"为 "spring-boot-starter-parent"的,它的"<groupId>"为org.springframework.boot, ".m2\repository\org\springframework\boot"就是我们就需要找到的文件路径。

点进去spring-boot-starter-parent的依赖文件就可以找到了。这里有所有其当前可用的全部版本,我们选择一个版本号填入即可,我这里使用的是"2.1.3.RELEASE",记得把".RELEASE"也加上。

有的同学可能找不到依赖库,在Maven版本库官网,你可以找到所有你需要的包,下载到"<groupId>"定位的文件位置,解压即可使用,十分方便。
三、配置数据库链接
1、创建数据库,两种方法,使用SQLyog或者命令行。
(1)使用SQLyog:在"root@localhost"右键->"创建数据库",弹出框里输入你的数据库名称,基字符集设置为"utf-8"。

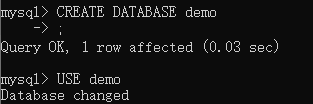
(2)使用命令行:用管理员权限打开命令行,在系统搜索框里输入”cmd“,点击”以管理员身份运行“。

首先输入”net start mysql“启动mysql服务器,然后输入”mysql -u root -p“使用root权限登录,按照提示输入你的密码。

输入”CREATE DATABASE 你的数据库名称”创建数据库,接着输入“USE 你的数据库名称”,表示你要使用你刚刚创建的数据库,之后所有的操作都在这个数据库里。
2、在配置文件中增加配置。
(1)如果你的配置文件是application.yml的话,加入下列代码。"serverTimezone=UTC"是进行时区设置,如果这里不设置,会报错,具体情况在博客末尾会进行解释。
spring:
  datasource:
    driver-class-name: com.mysql.cj.jdbc.Driver
    url: jdbc:mysql://localhost:3306/zgdb?serverTimezone=UTC&user=你的用户名&password=你的密码
    username: 你的用户名
    password: 你的密码
(2) 如果你的配置文件为application.properties的话,输入下面的代码。
spring.datasource.driver-class-name=com.mysql.cj.jdbc.Driver
spring.datasource.url=jdbc:mysql://localhost:3306/zgdb?serverTimezone=UTC&user=root&password=629052
spring.datasource.username=你的名字
spring.datasource.password=你的密码
3、创建controller、dao、model程序包
dao:Data Access Object,数据访问对象,用于封装数据库,这里存放数据库访问映射Mapper。
model:视图层会展示的对象,用于存放实体。
controller:业务层与视图层的中间层,作为dao和model之间传输的桥梁。


四、创建User表并创建对应实体
1、在MySQL中新建数据库,这里介绍几种方法:
(1)使用SQLyog。在刚刚建立的数据库“右键->创/建->表”,然后在弹出框里添加如下信息:


或者你可以选择在弹出框选择输入如下代码,注意这时需要检查一下当前使用的数据库是什么。

DROP TABLE IF EXISTS `user`;
CREATE TABLE `user` (
  `id` INT(11) NOT NULL AUTO_INCREMENT,
  `name` VARCHAR(255) DEFAULT NULL,
  `age` INT(11) DEFAULT NULL,
  `hobby` VARCHAR(500) DEFAULT NULL,
  PRIMARY KEY (`id`)
) ENGINE=INNODB DEFAULT CHARSET=utf8;
(2)使用命令行。在命令行中输入上方代码,注意","和";"的输入,并且“·”是“~”下面的那个点,而不是单引号:
2、建立User实体。
(1)在model下右键新建Java类型的文件,并命名为"User"。
(2)为类添加属性,代码如下:
private int id;
private String name;
private int age;
private String hobby;
(3)输入完User的四个属性,使用IDEA自动生成其getter和setter方法,在IDEA上“右键->generate->Gettter and Setter”,图示和完整的代码如下:


package com.example.demo_again.model;

public class User {
    private int id;
    private String name;
    private int age;
    private String hobby;

    public int getId() {
        return id;
    }

    public void setId(int id) {
        this.id = id;
    }

    public String getName() {
        return name;
    }

    public void setName(String name) {
        this.name = name;
    }

    public int getAge() {
        return age;
    }

    public void setAge(int age) {
        this.age = age;
    }

    public String getHobby() {
        return hobby;
    }

    public void setHobby(String hobby) {
        this.hobby = hobby;
    }
}
五、创建数据库操作映射
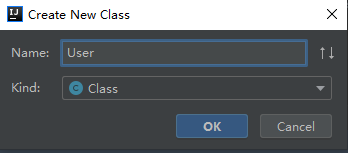
1、在dao下创建UserMapper文件,“右键->New->Java Class”,弹出框中输入名字和选择类型为Interface


2、输入代码使其内容如下:
package com.example.demo_again.dao;
import com.example.demo_again.model.User;
import org.apache.ibatis.annotations.*;
import org.springframework.stereotype.Service;
import java.util.List;
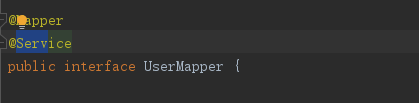
@Mapper
@Service
public interface UserMapper {
@Select("SELECT * FROM user WHERE id = #{id}")
User queryById(@Param("id") int id);
@Select("SELECT * FROM user")
List<User> queryAll();
@Insert({"INSERT INTO user(name,age,hobby) VALUES(#{name},#{age},#{hobby})"})
int add(User user);
@Delete("DELETE FROM user WHERE id = #{id}")
int delById(int id);
@Update("UPDATE user SET name=#{name},age=#{age},hobby=#{hobby} WHERE id = #{id}")
int updateById(User user);
}
六、创建测试API
在controller中下创建Java文件UserController.java,添加如下代码。
package com.example.demo_again.controller;

import com.example.demo_again.dao.UserMapper;
import com.example.demo_again.model.User;
import org.apache.ibatis.annotations.Param;
import org.springframework.beans.factory.annotation.Autowired;
import org.springframework.stereotype.Controller;
import org.springframework.web.bind.annotation.RequestMapping;
import org.springframework.web.bind.annotation.ResponseBody;

import java.util.List;

@Controller
@RequestMapping("/user")
public class UserController {
    @Autowired
    UserMapper userMapper;

    @RequestMapping("/querybyid")
    @ResponseBody
    User queryById(int id) {
        return userMapper.queryById(id);
    }

    @RequestMapping("/queryall")
    @ResponseBody
    List<User> queryAll() {
        return userMapper.queryAll();
    }

    @RequestMapping("/add")
    @ResponseBody
    String add(User user) {
        return userMapper.add(user) == 1 ? "success" : "failed";
    }

    @RequestMapping("/updatebyid")
    @ResponseBody
    String updateById(User user) {
        return userMapper.updateById(user) == 1 ? "success" : "failed";
    }

    @RequestMapping("/delbyid")
    @ResponseBody
    String delById(int id) {
        return userMapper.delById(id) == 1 ? "success" : "failed";
    }
}
七、通过API运行
1、右键点击运行,在Console界面里会显示当前项目使用的端口,一般都是8080.


2、按照下方的API列表,在浏览器中输入网址,比如如果你想添加用户网址即为“http://localhost:8080/user/add?name=tom&age=1&hobby=football”,其中“name=tom&age=1&hobby=football”函数参数:
| API | 示例 |
|---|---|
| 添加用户 | /user/add?name=tom&age=1&hobby=football |
| 更新用户 | /user/updatebyid?name=ken&age=18&hobby=coding&id=1 |
| 查询指定用户 | /user/querybyid?id=1 |
| 查询所有用户 | /user/queryall |
| 删除指定用户 | /user/delbyid?id=2 |

八、出现的问题以及解决方法
1、在API运行时报错,“ Failed to obtain JDBC Connection; nested exception is java.sql.SQLException: The server time zone value 'Öйú±ê׼ʱ¼ä' is unrecognized or represents more than one time zone.”,详细信息如下

对应的日志信息为:“The server time zone value 'Öйú±ê׼ʱ¼ä' is unrecognized or represents more than one time zone. You must configure either the server or JDBC driver”,我粗略了翻译一下,就是服务时间不唯一,确认一下JDBC驱动器的意思吧……这是由于连接MySQL的jdbc数据库引发的问题。
之前的application.yml里面的datasource的url配置信息是:
![]()
添加时区信息,变为如下所示即可:
url: jdbc:mysql://localhost:3306/demo?serverTimezone=UTC&user=root&password=你的密码2、日志显示报错信息“Loading class `com.mysql.jdbc.Driver'. This is deprecated. The new driver class is `com.mysql.cj.jdbc.Driver'. The driver is automatically registered via the SPI and manual loading of the driver class is generally unnecessary.”粗略翻译一下:“你用的是老的启动器版本,不能用啦,去改成新的”
于是将原来的:
![]()
改成:“driver-class-name: com.mysql.jdbc.Driver”即可。
3、报错信息“Could not autowire. No beans of 'UserMapper' type found.”,程序里会有个讨厌的红线。
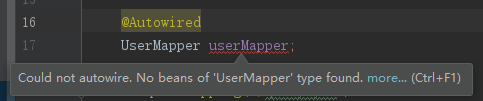
网上有各种解决办法,什么降低警示级别啥的,我这里都没用。我在Mapper文件前加个"@Service"备注就好了。