我们都知道随着技术的进步,现在SSM框架非常火热,那么对于我们来说就得搞清楚其中的整合配置的流程,以便于提高我们的开发效率并且在我们在程序中出现Bug时可以快速定位,下面就SSM框架中的一些问题作出说明,如有不当之处,敬请大家指正。
1.SpringMvc的配置及说明(基于XML配置文件)
首先我们要知道SpringMVC是基于MVC的框架Web层框架,解决了前端页面和后端代码的分离问题,实现了一个请求对应一个方法。
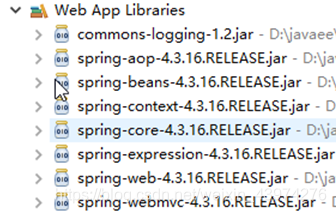
1.导入必要的jar包
要使用SpringMVC第一步首先要导入所必要的jar包,SpringMVC必要的jar包为:
4个spring核心包+1个日志包+2个springmvc包(web,webmvc)+1个aop注解包。
2.在前端页面构建一个请求
<%@ page language="java" contentType="text/html; charset=UTF-8"
    pageEncoding="UTF-8"%>
<!DOCTYPE html PUBLIC "-//W3C//DTD HTML 4.01 Transitional//EN" "http://www.w3.org/TR/html4/loose.dtd">
<html>
<head>
<meta http-equiv="Content-Type" content="text/html; charset=UTF-8">
<title>Insert title here</title>
</head>
<body>
  <a href="${pageContext.request.contextPath }/say.do">点击发送请求say</a>
</body>
</html>
3. 配置核心控制器
<?xml version="1.0" encoding="UTF-8"?>
<web-app version="3.0" xmlns="http://java.sun.com/xml/ns/javaee" xmlns:xml="http://www.w3.org/XML/1998/namespace" xmlns:xsi="http://www.w3.org/2001/XMLSchema-instance" xsi:schemaLocation="http://java.sun.com/xml/ns/javaee http://java.sun.com/xml/ns/javaee/web-app_3_0.xsd ">


   <!-- 配置核心控制器拦截所有的请求 -->
   <servlet>
     <servlet-name>dispatcherServlet</servlet-name>
     <servlet-class>org.springframework.web.servlet.DispatcherServlet</servlet-class>
     <!-- 指定配置文件的路径 -->
     <init-param>
       <param-name>contextConfigLocation</param-name>
       <param-value>classpath:spring-mvc.xml</param-value>
     </init-param>
   </servlet>
   <servlet-mapping>
     <servlet-name>dispatcherServlet</servlet-name>
     <url-pattern>*.do</url-pattern>
   </servlet-mapping>

</web-app>
4.创建一个业务控制器
package com.xkt.controller;

import org.springframework.stereotype.Controller;
import org.springframework.web.bind.annotation.RequestMapping;

@Controller //组件注解
public class HelloController {

	@RequestMapping(value="/say")
	public String say(){
		System.out.println("HelloWorld!");
		return "/hello.jsp";
	}

}
5.创建Spring配置文件
<?xml version="1.0" encoding="UTF-8"?>
<beans xmlns="http://www.springframework.org/schema/beans"
	xmlns:xsi="http://www.w3.org/2001/XMLSchema-instance" xmlns:context="http://www.springframework.org/schema/context"
	xsi:schemaLocation="http://www.springframework.org/schema/beans http://www.springframework.org/schema/beans/spring-beans.xsd
		http://www.springframework.org/schema/context http://www.springframework.org/schema/context/spring-context-4.3.xsd">

	<!-- 配置组件扫描器 -->
	<context:component-scan base-package="cn.gzsxt.controller"></context:component-scan>

</beans>
6.创建一个返回页面
<%@ page language="java" contentType="text/html; charset=UTF-8"
    pageEncoding="UTF-8"%>
<!DOCTYPE html PUBLIC "-//W3C//DTD HTML 4.01 Transitional//EN" "http://www.w3.org/TR/html4/loose.dtd">
<html>
<head>
<meta http-equiv="Content-Type" content="text/html; charset=UTF-8">
<title>Insert title here</title>
</head>
<body>
  你好世界
</body>
</html>
说明:
1.SpringMVC默认情况下是线程不安全的
2.配置核心控制器后可以在web.xml拦截所有的请求,实现一个请求对应一个方法。
3.在配置文件中,我们配置< init-parm >是希望指定自定义的配置文件路径。如果使用框架默认的路径(放到WEB-INF下,且命名为dispatcherServlet-servlet.xml)可以不配置
4.配置< context:component-scan >是因为我们是通过组件注解(@Controller)的方式,将类的对象加载到容器里面。所以必须要配置。
2. 配置Mybatis(基于xml)及说明
我们要知道Mybatis是一个持久层框架。能够对数据库进行增删改查操作,并且是用少量的代码就可以实现对数据库的操作,可以大大提高开发效率。
1.导入必要jar包
1个Mybatis包+1个数据库驱动包

2.创建DTD规范配置文件
注意:Mybatis框架的配置文件使用DTD规范文件的。所以需要通过DTD规则文件生成。(xml的约束文件DTD 以及 schema)
<?xml version="1.0" encoding="UTF-8"?>
<!DOCTYPE configuration PUBLIC "-//mybatis.org//DTD Config 3.0//EN" "mybatis-3-config.dtd" >
<configuration>

    <environments default="sms">
      <!-- 任何配置文件,的参数都可以在框架代码里面找到!! -->
      <!-- 大部分的框架,对配置文件的解释的所在类的分包的包名,configuration以及缩写、builder以及缩写 -->
      <environment id="sms">
        <transactionManager type="JDBC"></transactionManager>
        <dataSource type="POOLED">
          <!-- property 对应的就是set方法-->
          <property name="driver" value="org.gjt.mm.mysql.Driver"/>
          <property name="url" value="jdbc:mysql://localhost:3306/sms"/>
          <property name="username" value="root"/>
          <property name="password" value="123456"/>
        </dataSource>
      </environment>
    </environments>
</configuration>
3.创建帮助类MybatisUtils
package com.xkt.utils;

import java.io.IOException;
import java.io.Reader;

import org.apache.ibatis.io.Resources;
import org.apache.ibatis.session.SqlSession;
import org.apache.ibatis.session.SqlSessionFactory;
import org.apache.ibatis.session.SqlSessionFactoryBuilder;

public class MybatisUtils {

	public static final SqlSessionFactory SSF=MybatisUtils.getSSF();
	private static final ThreadLocal<SqlSession> THREAD_LOCAL=new ThreadLocal<>();

	/**
	 * 获得会话工厂
	 * @return
	 */
	private  static SqlSessionFactory getSSF() {
		try {
			Reader reader = Resources.getResourceAsReader("mybatis-config.xml");
			SqlSessionFactoryBuilder builder = new SqlSessionFactoryBuilder();
			return builder.build(reader);
		} catch (IOException e) {
			e.printStackTrace();
		}
		return null;
	}

	/**
	 * 获得会话
	 * @return
	 */
	public static SqlSession getSession(){
		if(THREAD_LOCAL.get()==null){
			SqlSession session = SSF.openSession();
			THREAD_LOCAL.set(session);
		}

		return THREAD_LOCAL.get();
	}

	/**
	 * 关闭会话
	 */
	public static void close(){
		if(THREAD_LOCAL.get()!=null){
			SqlSession session = THREAD_LOCAL.get();
			session.close();
			THREAD_LOCAL.remove();
		}
	}

	public static void main(String[] args) {
		System.out.println(MybatisUtils.getSession());
	}


}
4.创建实体类
package com.xkt.pojo;

public class Student {
	private String stuId;//BIGINT(20) NOT NULL AUTO_INCREMENT COMMENT '学生编号',
	private String stuName;//VARCHAR(50) NULL DEFAULT NULL COMMENT '学生名字',
	private String stuAge;//INT(11) NULL DEFAULT NULL COMMENT '学生年龄',
	private String stuPassword;//VARCHAR(50) NULL DEFAULT NULL COMMENT '密码',
	public String getStuId() {
		return stuId;
	}
	public void setStuId(String stuId) {
		this.stuId = stuId;
	}
	public String getStuName() {
		return stuName;
	}
	public void setStuName(String stuName) {
		this.stuName = stuName;
	}
	public String getStuAge() {
		return stuAge;
	}
	public void setStuAge(String stuAge) {
		this.stuAge = stuAge;
	}
	public String getStuPassword() {
		return stuPassword;
	}
	public void setStuPassword(String stuPassword) {
		this.stuPassword = stuPassword;
	}
}
5.创建映射接口
packagecom.xkt.mapper;

import com.xkt.pojo.Student;

public interface StudentMapper {

	/**
	 * 插入学生
	 * @param student
	 * @return
	 */
	int insert(Student student);

}
6.创建并加载映射文件
<?xml version="1.0" encoding="UTF-8"?>
<!DOCTYPE mapper PUBLIC "-//mybatis.org//DTD Mapper 3.0//EN" "mybatis-3-mapper.dtd" >
<mapper namespace="com.xkt.mapper.StudentMapper">

   <insert id="insert">
    INSERT INTO tb_student	(stu_name, stu_age, stu_password) VALUES (#{stuName}, #{stuAge}, #{stuPassword})
   </insert>
</mapper>
7.测试插入数据
package com.xkt.test.mapper;

import org.apache.ibatis.session.SqlSession;
import org.junit.Test;

import  com.xkt.mapper.StudentMapper;
import  com.xkt.pojo.Student;
import  com.xkt.utils.MybatisUtils;

public class StudentMapperTest {

	@Test
	public void insert(){
		//获得操作对象
		SqlSession session = MybatisUtils.getSession();
		StudentMapper studentMapper = session.getMapper(StudentMapper.class);
		Student student=new Student();
		student.setStuName("张三");
		int count = studentMapper.insert(student);
		System.out.println(count);
		session.commit();
		MybatisUtils.close();

	}

}
3.SpringMVC整合Mybatis(基于xml)
SpringMVC整合Mybatis就是,就是让Mybatis抛弃自己实现的数据源,再使用Spring提供的数据源。(因为我们要让Mybatis使用Spring框架里面的事务代理机制,Spring框架的事务代理依赖Spring JDBC里面的数据源)
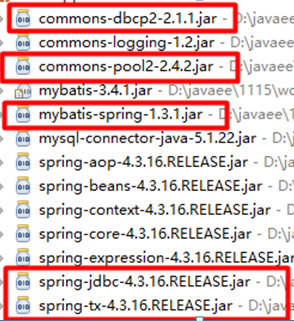
1.导入需要的jar包
2.配置文件按照如下步骤配置
第一步:配置数据源
第二步:获得会话工厂
第三步:获得操作对象,并且注入到Spring容器里面
第四步;配置事务代理
<?xml version="1.0" encoding="UTF-8"?>
<beans xmlns="http://www.springframework.org/schema/beans"
	xmlns:xsi="http://www.w3.org/2001/XMLSchema-instance"
	xmlns:tx="http://www.springframework.org/schema/tx"
	xsi:schemaLocation="http://www.springframework.org/schema/beans http://www.springframework.org/schema/beans/spring-beans.xsd
		http://www.springframework.org/schema/tx http://www.springframework.org/schema/tx/spring-tx-4.3.xsd">


	<!-- 1.配置数据源 -->
	<bean name="dataSource" class="org.apache.commons.dbcp2.BasicDataSource" destroy-method="close">
		<!-- 四要素 -->
		<property name="driverClassName" value="org.gjt.mm.mysql.Driver" />
		<property name="url" value="jdbc:mysql://localhost:3306/sms" />
		<property name="username" value="root" />
		<property name="password" value="1234" />

	</bean>

	<!-- 2.配置会话工厂 -->
	<!-- 默认情况下:mybatis是不支持spring的数据源的 -->
	<!-- 问题:那么我们如何可以让mybatis支持spring的数据源呢? -->
	<!-- 答:需要一个整合包 mybatis-spirng.jar
	SqlSessionFactoryBean:作用就是让Mybatis可以通过Spring的数据源创建会话工厂的
	 -->
	<bean name="sqlSessionFactory" class="org.mybatis.spring.SqlSessionFactoryBean">
	   <!-- 指定数据源 -->
	   <property name="dataSource" ref="dataSource"></property>
	   <!-- 加载映射文件的路径 -->
	   <property name="mapperLocations" value="classpath:com/xkt/mapper/xml/*Mapper.xml"></property>
	</bean>

	<!-- 3.配置扫描器,将映射接口的动态对象创建,并且注入到spring容器里面 -->
	<!-- 默认情况下:spring是不支持通过接口创建对象!!而Mybatis就是通过接口创建对象的
	     问题:Spring必须要实现类创建可以注入到容器,而Mybatis就是使用接口创建动态对象的。不能兼容Spring的要求。怎么办呢?
	     答:整合包提供了一个映射接口扫描器,用于通过映射接口创建了对象,并且可以创建的对象注入到容器里面
	     -根据表述扫描器必需要的两个条件
	     1.需要会话工厂
	     2.必须要指定映射接口的路径
	 -->

	 <bean class="org.mybatis.spring.mapper.MapperScannerConfigurer">
	    <property name="sqlSessionFactoryBeanName" value="sqlSessionFactory"></property>
	    <property name="basePackage" value="com.xkt.mapper"></property>
	    <!-- 指定扫描注解 -->
	    <property name="annotationClass" value="org.apache.ibatis.annotations.Mapper"></property>
	 </bean>


	<!-- 4.配置事务代理,编程式事务 -->
	<!-- 注意:Mybatis是的spring jdbc的事务代理 -->
	<!-- 创建事务代理对象 -->
	<bean name="tx" class="org.springframework.jdbc.datasource.DataSourceTransactionManager">
	   <!-- 指定数据源 -->
	    <property name="dataSource" ref="dataSource"></property>
	 </bean>

	 <!-- 启动事务代理 -->
	<tx:annotation-driven/>

</beans>