1. nacos作为配置中心可以动态的刷新配置属性的值;
2.项目介绍:nacos-config配置中心,使用nacos0.9.0+spring boot2.x
源码地址:https://gitee.com/acelee723/acelee-SpringCloudAlibaba-nacosDemo
3.搭建nacos-config
1)pom添加依赖
<?xml version="1.0" encoding="UTF-8"?>
<project xmlns="http://maven.apache.org/POM/4.0.0" xmlns:xsi="http://www.w3.org/2001/XMLSchema-instance"
         xsi:schemaLocation="http://maven.apache.org/POM/4.0.0 http://maven.apache.org/xsd/maven-4.0.0.xsd">
    <modelVersion>4.0.0</modelVersion>
    <parent>
        <groupId>org.springframework.boot</groupId>
        <artifactId>spring-boot-starter-parent</artifactId>
        <version>2.1.3.RELEASE</version>
        <relativePath/> <!-- lookup parent from repository -->
    </parent>
    <groupId>com.acelee</groupId>
    <artifactId>nacos-config</artifactId>
    <version>0.0.1-SNAPSHOT</version>
    <name>nacos-config</name>
    <description>Demo project for nacos -config</description>

    <properties>
        <java.version>1.8</java.version>
    </properties>

    <dependencies>
        <dependency>
            <groupId>org.springframework.boot</groupId>
            <artifactId>spring-boot-starter-web</artifactId>
        </dependency>
        <dependency>
            <groupId>com.alibaba.boot</groupId>
            <artifactId>nacos-config-spring-boot-starter</artifactId>
            <version>0.2.1</version>
        </dependency>
        <dependency>
            <groupId>org.springframework.boot</groupId>
            <artifactId>spring-boot-starter-test</artifactId>
            <scope>test</scope>
        </dependency>
    </dependencies>

    <build>
        <plugins>
            <plugin>
                <groupId>org.springframework.boot</groupId>
                <artifactId>spring-boot-maven-plugin</artifactId>
            </plugin>
        </plugins>
    </build>

</project>
2)application.properties增加属性
server.port=8890

spring.application.name=nacos-config
nacos.config.server-addr=127.0.0.1:8848
3)启动类增加@NacosPropertySource(dataId = "nacos-config", autoRefreshed = true)
- 加载
dataId为 nacos-config 的配置源,并开启自动更新:
package com.acelee.config;

import com.alibaba.nacos.spring.context.annotation.config.NacosPropertySource;
import org.springframework.boot.SpringApplication;
import org.springframework.boot.autoconfigure.SpringBootApplication;

@SpringBootApplication
@NacosPropertySource(dataId = "nacos-config", autoRefreshed = true)
public class NacosConfigApplication {

    public static void main(String[] args) {
        SpringApplication.run(NacosConfigApplication.class, args);
    }

}
4)新增controller包,下面新增ConfigController类
- 使用Nacos 的
@NacosValue注解设置属性值,并开启自动刷新。
package com.acelee.config.controller;

import com.alibaba.nacos.api.config.annotation.NacosValue;
import org.springframework.web.bind.annotation.GetMapping;
import org.springframework.web.bind.annotation.RestController;

/**
 * @Auther: Ace Lee
 * @Date: 2019/3/14 19:09
 */
@RestController
public class ConfigController {

    @NacosValue(value = "${nacos.test.property:123}", autoRefreshed = true)
    private String testProperties;

    @GetMapping("/test")
    public String test(){
        return testProperties;
    }
}
5)启动config工程,访问http://localhost:8890/test返回:123


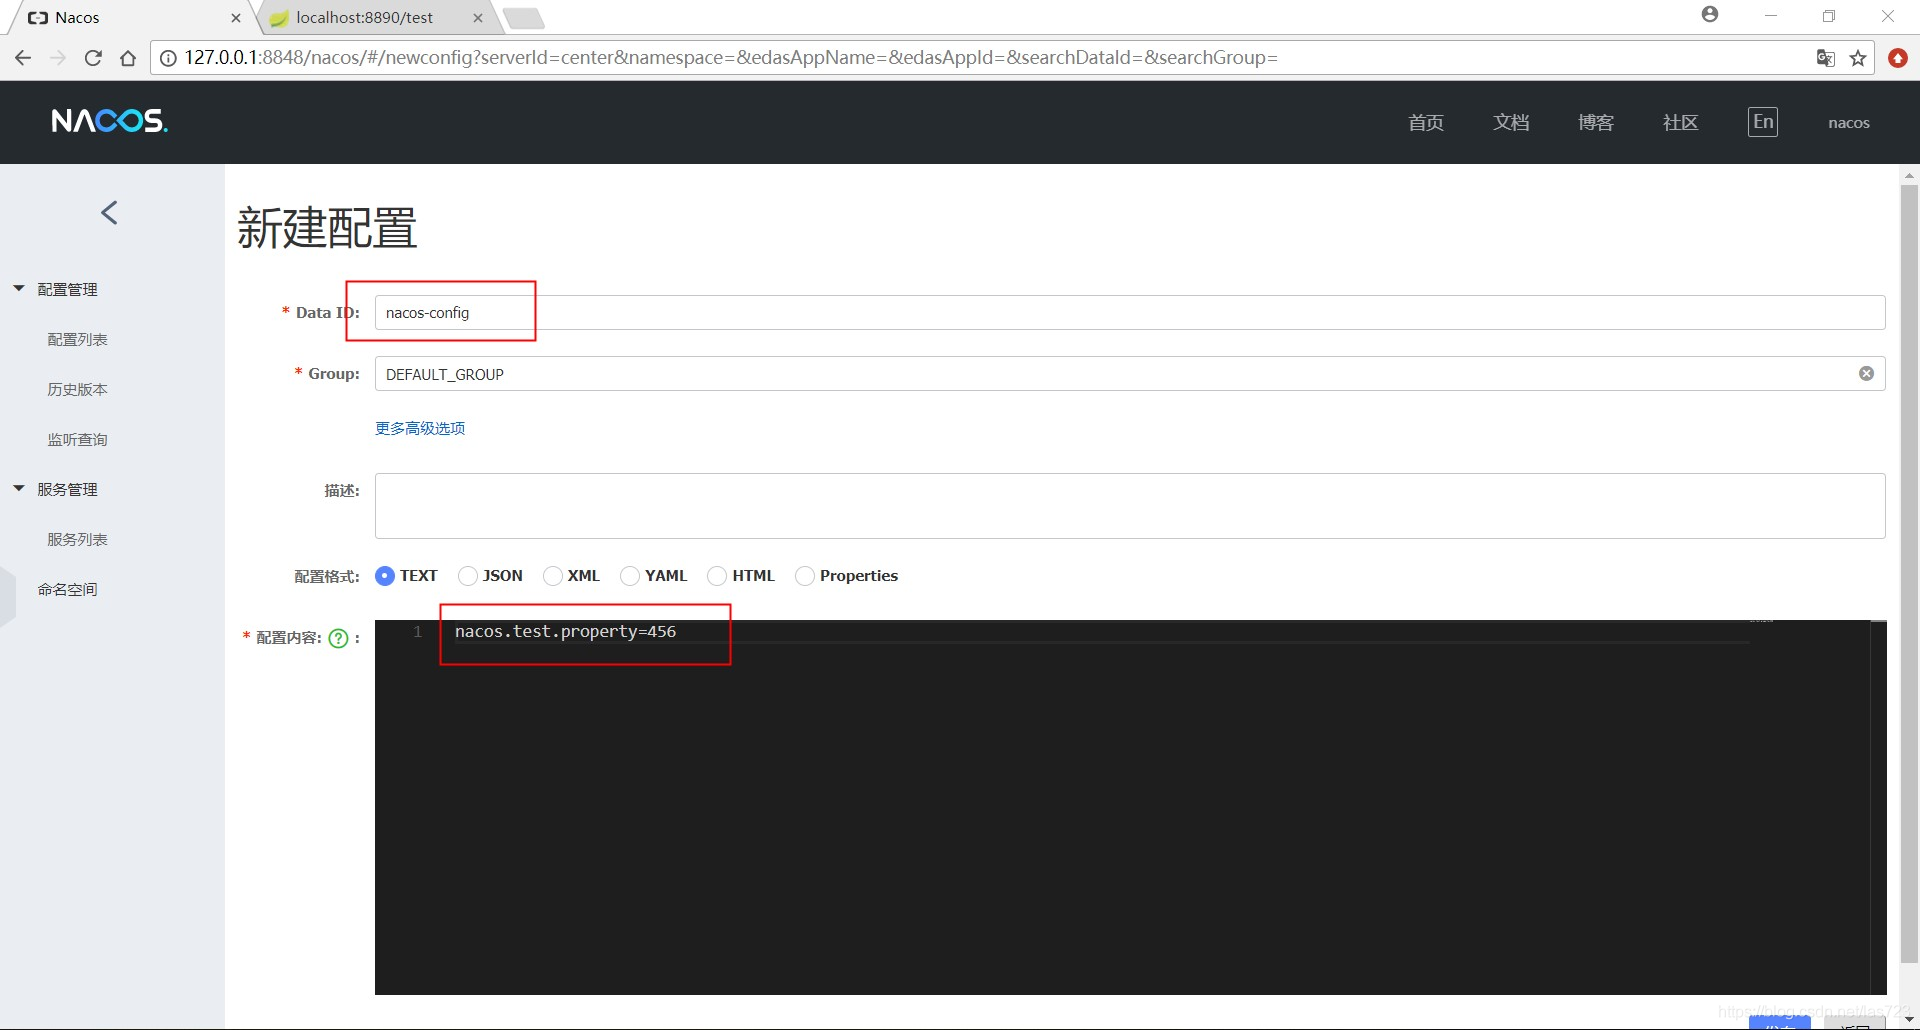
6)打开Nacos--“配置管理”--“配置列表”,点击+新建配置,配置完毕后,点击右下角蓝色“发布”按钮。
- Data Id:保持和启动类的dataId一致。
- 配置内容:属性名称和测试类里的NacosValue里的value名称一致。=多少随便填写。

7)再次访问 http://localhost:8890/test返回:456
- 证明属性nacos.test.property的值由123动态刷新为456

欢迎关注博主博客,后期博主会持续更新spring cloud alibaba 系列文章,敬请期待!