Spring Cloud Alibaba 使用nacos 注册中心
### 背景 上一文我们讲到了如何去搭建注册中心,这一次我们讲述如何使用nacos作为注册中心 ### spring-cloud-alibaba-basis 创建基础依赖 首先我们创建一个spring-cloud-alibaba-basis 基础依赖 工程里面制定我们要用到的公用的版本 - spring boot 版本 2.1.7.RELEASE - spring cloud 版本 Greenwich.RELEASE - spring cloud 阿里巴巴的版本 2.1.0.RELEASE - Spring IO Platform 版本依赖 ```
4.0.0
com.xian.cloud
spring-cloud-alibaba-basis
pom
1.0-SNAPSHOT
spring cloud alibaba 总pom
spring cloud alibaba 教程总pom版本控制
cloud-discovery-server
cloud-discovery-client-common
UTF-8
1.8
1.8
1.8
2.1.0.RELEASE
Greenwich.RELEASE
2.1.7.RELEASE
Cairo-SR8
com.alibaba.cloud
spring-cloud-alibaba-dependencies
${spring-cloud-alibaba.version}
pom
import
org.springframework.boot
spring-boot-dependencies
${spring-boot.version}
pom
import
org.springframework.cloud
spring-cloud-dependencies
${spring-cloud.version}
pom
import
io.spring.platform
platform-bom
${spring-platform.version}
pom
import
com.alibaba.cloud
spring-cloud-starter-alibaba-nacos-discovery
org.springframework.boot
spring-boot-starter-web
org.projectlombok
lombok
true
``` Spring IO Platform 这个jar包有兴趣的同学可以去关注一下他里面进行了第三方常用jar包的版本管理。每个spring 对应的第三方jar版本都罗列在上面了。这样方便我们对于第三方jar包的版本管理。#为了解决jar包版本冲突而存在 sping boot 除了提供我们熟知的
方式以外 还有spring-boot-dependencies 依赖方式。 这样我们在新建俩个module ### 服务提供者 cloud-discovery-server ```
com.xian.cloud
spring-cloud-alibaba-basis
1.0-SNAPSHOT
cloud-discovery-server
服务提供者
服务提供者
``` 因为我们在父类的pom里面定义了公共依赖的jar包,所以我们不需要再次引入jar包只需要制定parent pom就可以继承这些jar包。同样下面的消费者服务我也会同样如此利用maven的jar包传递方式进行案例的开发 创建服务启动类 和对外服务的controller 类 - 启动类 ``` package com.xian.cloud; import org.springframework.boot.SpringApplication; import org.springframework.boot.autoconfigure.SpringBootApplication; import org.springframework.cloud.client.discovery.EnableDiscoveryClient; /** * @Author: xlr * @Date: Created in 2:44 PM 2019/10/27 */ @EnableDiscoveryClient @SpringBootApplication public class DiscoveryServerApplication { public static void main(String[] args) { SpringApplication.run(DiscoveryServerApplication.class, args); } } ``` - 对外提供服务的http接口 ``` package com.xian.cloud.controller; import lombok.extern.slf4j.Slf4j; import org.springframework.web.bind.annotation.GetMapping; import org.springframework.web.bind.annotation.RequestMapping; import org.springframework.web.bind.annotation.RequestParam; import org.springframework.web.bind.annotation.RestController; /** * @Author: xlr * @Date: Created in 2:57 PM 2019/10/27 */ @RestController @RequestMapping("server") @Slf4j public class DiscoverCotroller { /** * 对外提供的服务 HTTP接口 * @param name * @return */ @GetMapping("/hello") public String hello(@RequestParam String name) { log.info("invoked name = " + name); return "hello " + name; } } ``` 编写YAML文件 ``` server: port: 9012 spring: profiles: active: dev application: name: cloud-discovery-server cloud: nacos: discovery: server-addr: 47.99.209.72:8848 ``` ### 服务消费者 cloud-discovery-client ```
spring-cloud-alibaba-basis
com.xian.cloud
1.0-SNAPSHOT
4.0.0
cloud-discovery-client
服务消费者
``` 创建服务启动类 和调用服务提供者的的controller http接口 - 启动类 ``` import org.springframework.boot.SpringApplication; import org.springframework.boot.autoconfigure.SpringBootApplication; import org.springframework.cloud.client.discovery.EnableDiscoveryClient; /** * @Author: xlr * @Date: Created in 3:03 PM 2019/10/27 */ @EnableDiscoveryClient @SpringBootApplication public class DiscoveryClientApplication { public static void main(String[] args) { SpringApplication.run(DiscoveryClientApplication.class, args); } } ``` - 消费者服务接口 ``` package com.xian.cloud.controller; import lombok.extern.slf4j.Slf4j; import org.springframework.beans.factory.annotation.Autowired; import org.springframework.cloud.client.ServiceInstance; import org.springframework.cloud.client.loadbalancer.LoadBalancerClient; import org.springframework.web.bind.annotation.GetMapping; import org.springframework.web.bind.annotation.RequestMapping; import org.springframework.web.bind.annotation.RestController; import org.springframework.web.client.RestTemplate; /** * @Author: xlr * @Date: Created in 3:04 PM 2019/10/27 */ @RequestMapping("client") @RestController @Slf4j public class DiscoveryClientController { //服务提供者 项目名称 spring.application.name public static final String CLOUD_DISCOVERY_SERVER = "cloud-discovery-server"; /** * 在Spring Cloud Commons中提供了大量的与服务治理相关的抽象接口,包括DiscoveryClient、LoadBalancerClient等。 * 从LoadBalancerClient接口的命名中,是一个负载均衡客户端的抽象定义 */ @Autowired private LoadBalancerClient loadBalancerClient; @RequestMapping(value = "/test",method = RequestMethod.GET) public String test() { ServiceInstance serviceInstance = loadBalancerClient.choose(CLOUD_DISCOVERY_SERVER); log.info( "ServiceInstance :{}",serviceInstance ); String url = serviceInstance.getUri() + "/server/hello?name=" + "tom"; RestTemplate restTemplate = new RestTemplate(); String result = restTemplate.getForObject(url, String.class); return "调用 " + url + ", 返回 : " + result; } } ``` 编写YAML文件 ``` server: port: 9011 spring: profiles: active: dev application: name: cloud-discovery-client cloud: nacos: discovery: server-addr: 47.99.209.72:8848 ``` 然后启动服务 查看nacos控制台 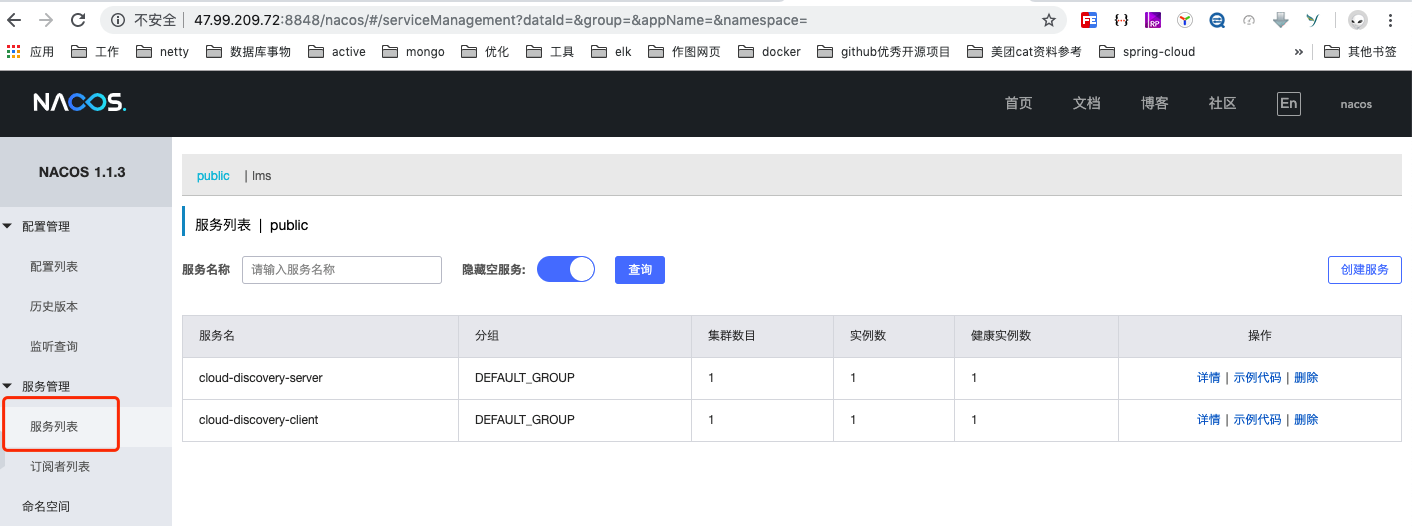 显示俩个服务都已经注册到了 nacos注册中心 然后我们就请求http://localhost:9011/client/test 看看是否能够显示我们想要的结果  到此时已经完成了我们注册中心。可以在提供服务者处改变端口是否能进行负载均衡 服务端又分别启动了 9013、9014俩个端口 服务 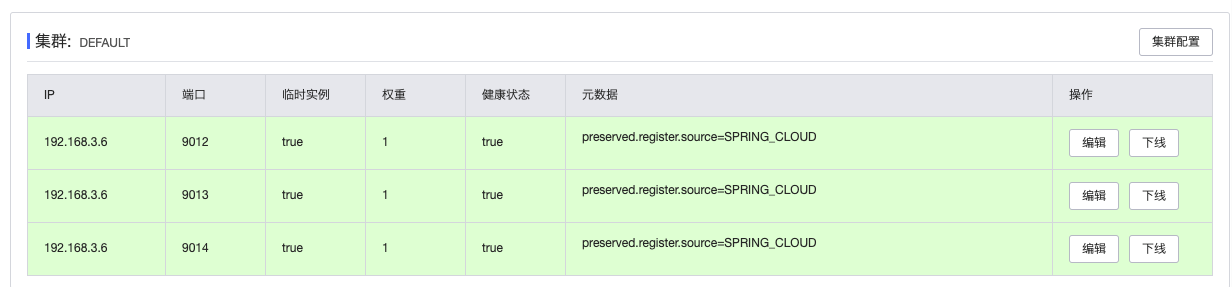 再次进行测试http://localhost:9011/client/test 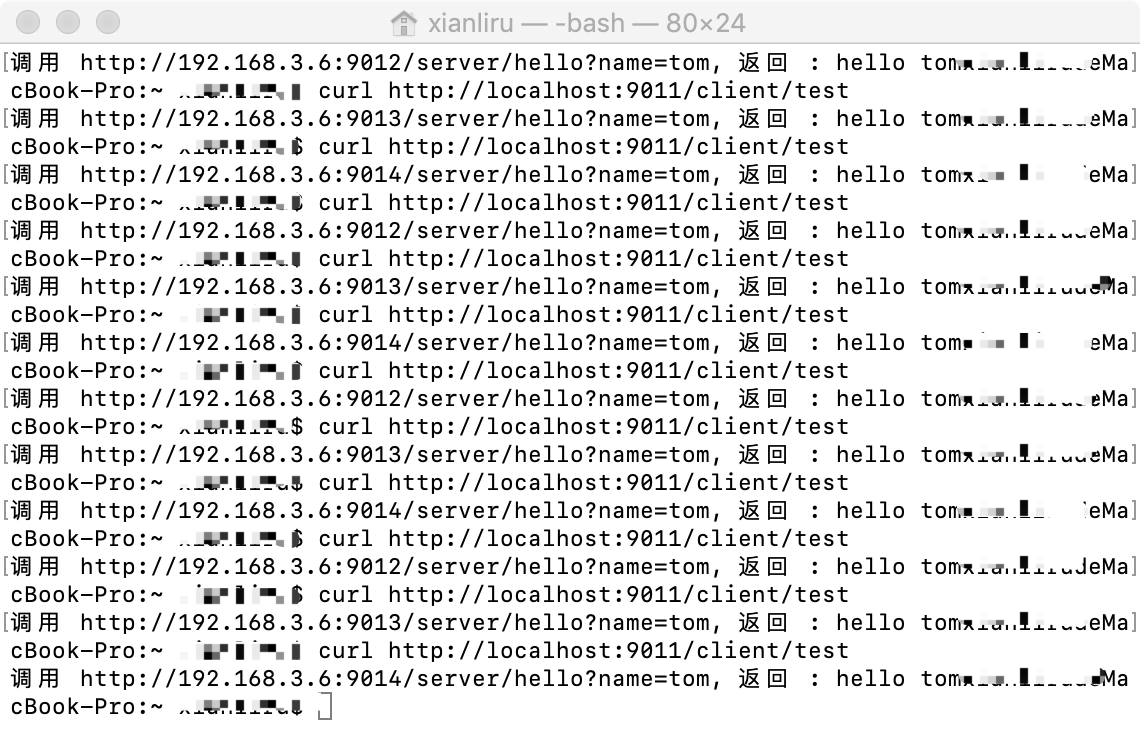 到此时我的注册中心、负载均衡已经全部实现完毕。 ### 参考资料 [nacos官方文档](https://nacos.io/zh-cn/docs/quick-start-spring-cloud.html) [spring cloud alibaba 官方文档](https://github.com/alibaba/spring-cloud-alibaba/) 示例代码 [github](https://github.com/HPxianliru/Spring-cloud-alibaba-basis) 如何喜欢可以关注分享本公众号。  版权声明:本文为博主原创文章,遵循 CC 4.0 BY-SA 版权协议,转载请附上原文出处链接和本声明。转载请附带公众号二维码
猜你喜欢
转载自www.cnblogs.com/cloudxlr/p/11747800.html
周排行