简介:
ansible是新出现的自动化运维工具,基于Python开发,集合了众多运维工具(puppet、cfengine、chef、func、fabric)的优点,实现了批量系统配置、批量程序部署、批量运行命令等功能。
ansible是基于模块工作的,本身没有批量部署的能力。真正具有批量部署的是ansible所运行的模块,ansible只是提供一种框架。
1.安装部署ansible
1.下载并安装ansible
安装包:
ansible-2.7.8-1.el7.noarch.rpm
ansible-tower-setup-bundle-3.4.2-1.el7.tar.gz
libtomcrypt-1.17-25.el7.x86_64.rpm
libtommath-0.42.0-5.el7.x86_64.rpm
python2-crypto-2.6.1-13.el7.x86_64.rpm
python2-jmespath-0.9.0-1.el7.noarch.rpm
python-httplib2-0.9.2-0.1.el7.noarch.rpm
python-keyczar-0.71c-2.el7.noarch.rpm
python-paramiko-2.1.1-0.9.el7.noarch.rpm
sshpass-1.06-1.el7.x86_64.rpm
#1.在官网上下载
[root@server1 ~]# ls
ansible
[root@server1 ~]# cd ansible/
[root@server1 ansible]# ls

#2.安装
[root@server1 ansible]# yum install -y *.rpm
2.定义主机组变量
[root@server1 ~]# cd /etc/ansible/
[root@server1 ansible]# ls
ansible.cfg  hosts  roles
#主文件
[root@server1 ansible]# ll ansible.cfg
-rw-r--r-- 1 root root 20277 Feb 22 07:04 ansible.cfg
#定义主机组变量
[root@server1 ansible]# ll hosts
-rw-r--r-- 1 root root 1016 Feb 22 07:04 hosts
#定义角色
[root@server1 ansible]# cd roles/
[root@server1 roles]# ls
[root@server1 ansible]# pwd
/etc/ansible
#编写文件;分组是为了在外层直接调用组名
[root@server1 ansible]# vim hosts
#######################
[web]            #组名
server1          #主机名

[db]             #组名
server2          #主机名
2.常用模块
1.ping模块
方式1:这样太麻烦
[root@server1 ansible]# ansible server1 -m ping
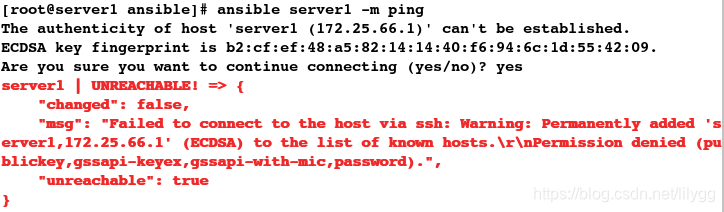
#添加ping模块,实际上就是执行ping命令
[root@server1 ansible]# ansible server1 -m ping -k

方式2:
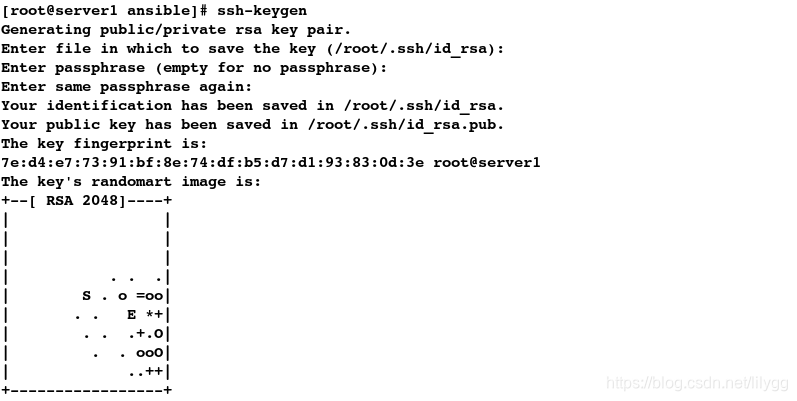
先做免密:(默认为root用户)
[root@server1 ansible]# ssh-keygen
[root@server1 ansible]# ssh-copy-id server1

[root@server1 ansible]# ssh-copy-id server2
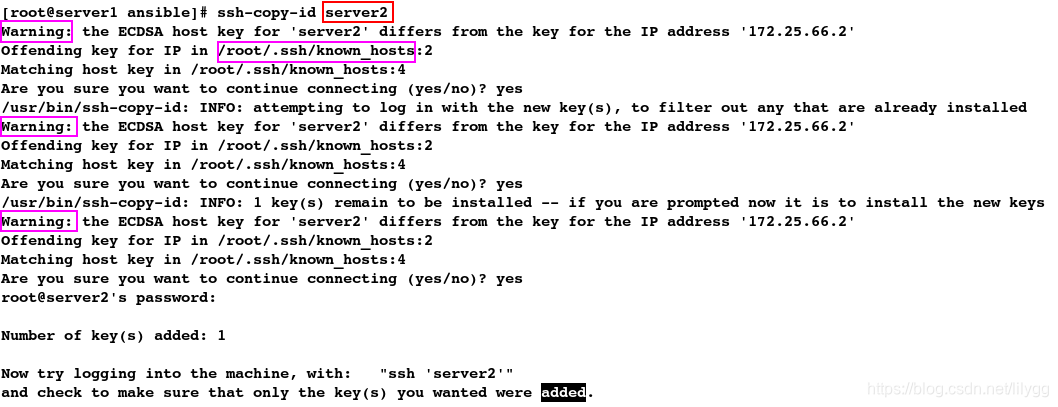
#解决警告
[root@server1 httpd]# rm -rf /root/.ssh/known_hosts
测试免密:
[root@server1 ansible]# ssh server1
[root@server1 ~]# exit

[root@server1 ansible]# ssh server2
[root@server2 ~]# exit

再添加ping模块
此时便无需输入密码与yes确认
1.以组名的方式添加ping模块
[root@server1 ansible]# ansible web -m ping
[root@server1 ansible]# ansible db -m ping
2.以主机名的方式添加ping模块
[root@server1 ansible]# ansible server1 -m ping

[root@server1 ansible]# ansible server2 -m ping

[root@server1 ansible]# ansible server* -m ping

2.user模块
(1).创建用户
#创建用户
[root@server1 ansible]# ansible all -m user -a "name=admin password=westos"

测试:
[root@server2 ansible]# id admin
uid=1000(admin) gid=1000(admin) groups=1000(admin)
[root@server1 ansible]# id admin
uid=1000(admin) gid=1000(admin) groups=1000(admin)
(2).更改用户密码
[root@server1 ansible]# passwd admin

[root@server2 ansible]# passwd admin

3.给admin用户做免密
[root@server1 ansible]# ssh-copy-id admin@server1

[root@server1 ansible]# ssh-copy-id admin@server2

测试免密:
[root@server1 ~]# ssh admin@server1
[admin@server1 ~]$ exit

[root@server1 ~]# ssh admin@server2
[admin@server2 ~]$ exit

(4).给admin用户添加执行权限
[root@server1 ~]# ll /etc/sudoers
-r--r-----. 1 root root 3907 Jul 19  2016 /etc/sudoers
[root@server1 ~]# chmod 755 /etc/sudoers
[root@server1 ~]# ll /etc/sudoers
-rwxr-xr-x. 1 root root 3907 Jul 19  2016 /etc/sudoers
[root@server1 ~]# vim /etc/sudoers
#################
admin    ALL=(ALL)      NOPASSWD: ALL   #允许admin用户免密执行任意路径下的任意命令

[root@server2 ~]# ll /etc/sudoers
-r--r-----. 1 root root 3907 Jul 19  2016 /etc/sudoers
[root@server2 ~]# chmod 755 /etc/sudoers
[root@server2 ~]# ll /etc/sudoers
-rwxr-xr-x. 1 root root 3907 Jul 19  2016 /etc/sudoers
[root@server2 ~]# vim /etc/sudoers
#################
admin   ALL=(ALL)       NOPASSWD: ALL

(5).远程登陆并执行命令
#以admin用户身份远程登陆; -b表示切换为超户执行以下命令,all表示所有主机
[root@server1 ~]# ansible all -m ping -u admin -b

#显示主机名,-a表示执行命令
[root@server1 ~]# ansible all -u admin -b -a "hostname"

部署apache:
3.yum模块
#1.安装apache
[root@server1 ~]# ansible server2 -u admin -b -m yum -a "name=httpd state=present"
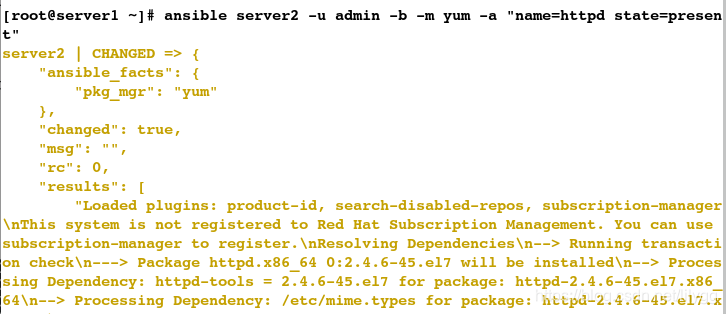
测试:
[root@server2 ~]# rpm -aq httpd
httpd-2.4.6-45.el7.x86_64
4.service模块
#2.启动apache
[root@server1 ~]# ansible server2 -u admin -b -m service -a "name=httpd state=started"
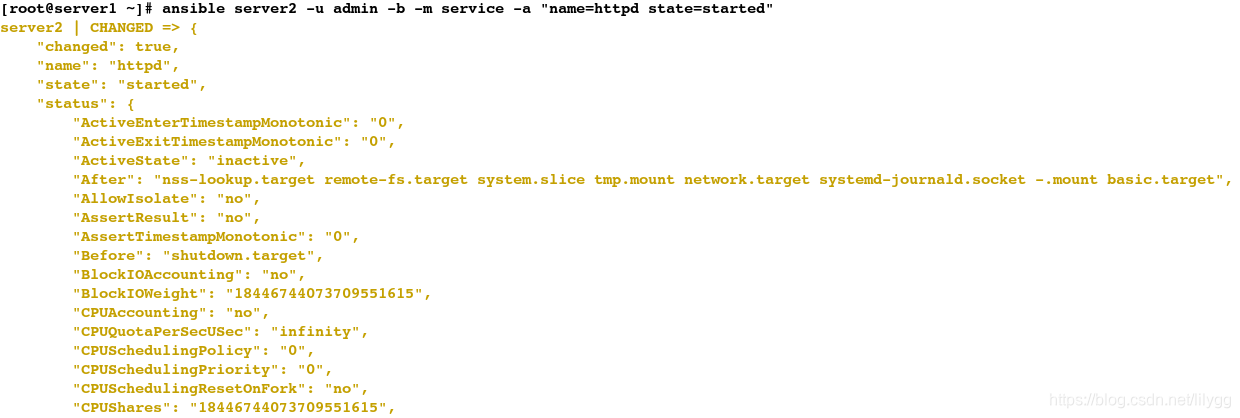
测试:
[root@server2 ~]# netstat -antlp | grep 80
tcp6       0      0 :::80                   :::*                    LISTEN      13278/httpd
5.copy模块
#3.更改发布页面;copy拷贝文件,src表示源地址,dest表示目标地址(将当前目录下的index.html拷贝到/var/www/html/index.html文件中)
[root@server1 ~]# ansible server2 -u admin -b -m copy -a "src=index.html dest=/var/www/html/index.html"
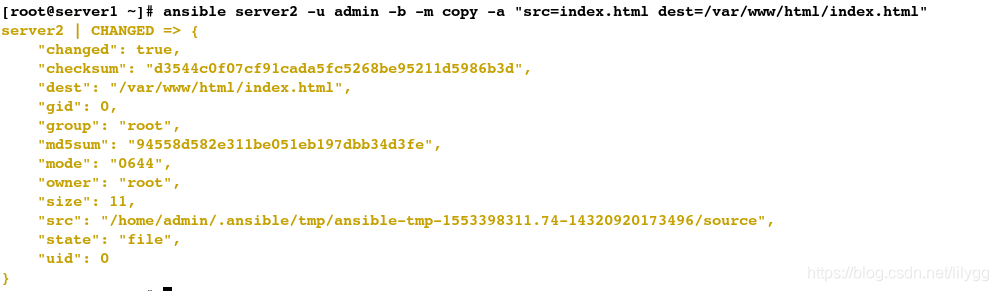
测试:
[root@foundation66 ~]# curl 172.25.66.2
westos.org
管理目录/文件:
6.file模块
#1.制作软链接
[root@server1 ~]# ansible server2 -u admin -b -m file -a "src=/etc/fstab dest=/tmp/fstab state=link"

测试:
[root@server2 ~]# ll /tmp/fstab
lrwxrwxrwx 1 root root 10 Mar 24 12:23 /tmp/fstab -> /etc/fstab
#2.删除软链接文件
[root@server1 ~]# ansible server2 -u admin -b -m file -a "dest=/tmp/fstab state=absent"

测试:
[root@server2 ~]# ll /tmp/fstab
ls: cannot access /tmp/fstab: No such file or directory
#3.递归创建目录,并指定权限
[root@server1 ~]# ansible server2 -u admin -b -m file -a "dest=/tmp/dir1/dir2 state=directory mode=755"
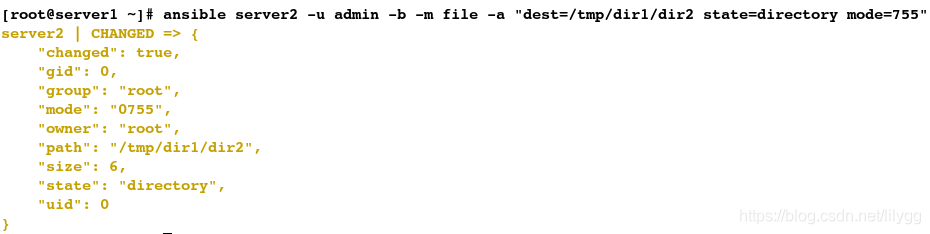
测试:
[root@server2 ~]# cd /tmp/
[root@server2 tmp]# ll
total 0
drwxr-xr-x 3 root root 18 Mar 24 12:28 dir1
drwx------ 3 root root 17 Mar 24 11:40 systemd-private-22435642fdc54c67aa537d23e6eb7800-httpd.service-TzTnUB
[root@server2 tmp]# cd dir1/
[root@server2 dir1]# ll
total 0
drwxr-xr-x 2 root root 6 Mar 24 12:28 dir2
#4.递归删除目录,默认会先删除底层目录
[root@server1 ~]# ansible server2 -u admin -b -m file -a "dest=/tmp/dir1/dir2 state=absent"

测试:
[root@server2 ~]# cd /tmp/
[root@server2 tmp]# ls
dir1  systemd-private-22435642fdc54c67aa537d23e6eb7800-httpd.service-TzTnUB
[root@server2 tmp]# cd dir1/
[root@server2 dir1]# ls
#5.删除目录
[root@server1 ~]# ansible server2 -u admin -b -m file -a "dest=/tmp/dir1 state=absent"

[root@server2 ~]# cd /tmp/
[root@server2 tmp]# ls
systemd-private-22435642fdc54c67aa537d23e6eb7800-httpd.service-TzTnUB
部署数据库:
#1.安装数据库
[root@server1 ~]# ansible server2 -m yum -a "name=mariadb-server state=present"
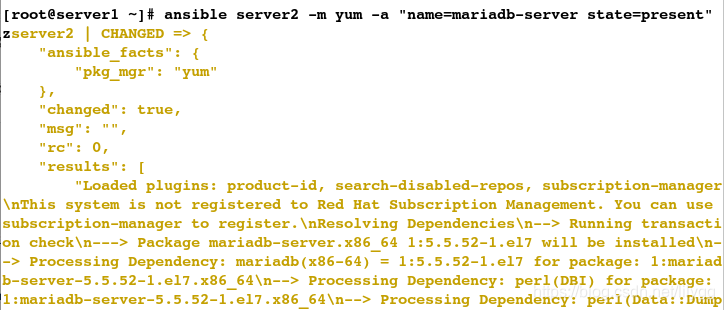
测试:
[root@server2 ~]# rpm -aq mariadb-server
mariadb-server-5.5.52-1.el7.x86_64
#2.开启数据库
[root@server1 ~]# ansible server2 -m service -a "name=mariadb state=started"
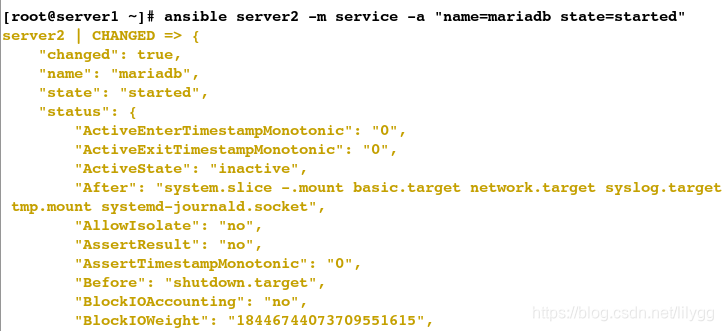
测试:
[root@server2 ~]# netstat -antlp | grep 3306
tcp        0      0 0.0.0.0:3306            0.0.0.0:*               LISTEN      14303/mysqld
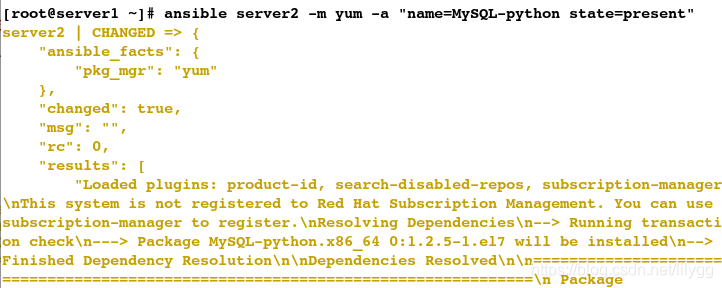
#3.创建数据库用户并设定密码,priv表示指定权限;报错:发现有依赖性
[root@server1 ~]# ansible server2 -m mysql_user -a "name=lee password=westos priv=test.*:ALL state=present"

#4.安装依赖包
[root@server1 ~]# ansible server2 -m yum -a "name=MySQL-python state=present"
#5.重新创建数据库用户
[root@server1 ~]# ansible server2 -m mysql_user -a "name=lee password=westos priv=test.*:ALL state=present"

测试:
[root@server2 ~]# mysql
MariaDB [(none)]> use mysql;
MariaDB [mysql]> select * from user;

3.整合模块
部署apache:
#先卸载之前安装好的apache
[root@server2 ~]# rpm -e httpd
1.创建目录
[root@server1 ~]# cd /etc/ansible/
[root@server1 ansible]# ls
ansible.cfg  hosts  roles
[root@server1 ansible]# mkdir playbooks
[root@server1 ansible]# cd playbooks/
[root@server1 playbooks]# ls
[root@server1 playbooks]# mkdir httpd
[root@server1 playbooks]# cd httpd
[root@server1 httpd]# ls
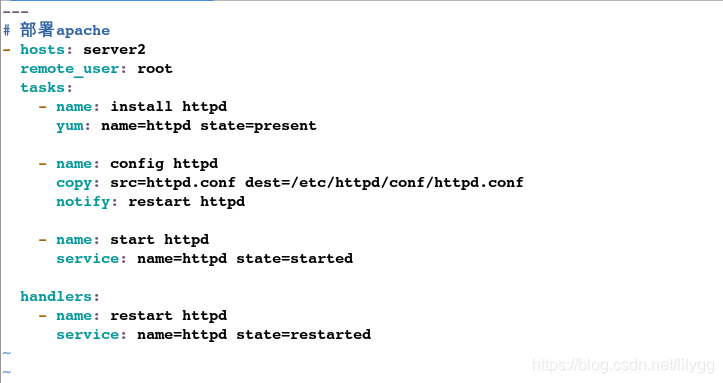
2.编写yml文件
[root@server1 httpd]# vim httpd.yml
#####################
---
# 部署apache
- hosts: server2
  remote_user: root
  tasks:
    - name: install httpd
      yum: name=httpd state=present

    - name: config httpd
      copy: src=httpd.conf dest=/etc/httpd/conf/httpd.conf
      notify: restart httpd

    - name: start httpd
      service: name=httpd state=started

  handlers:
    - name: restart httpd
      service: name=httpd state=restarted
3.执行文件
#检测语法
[root@server1 httpd]# ansible-playbook httpd.yml --syntax-check

playbook: httpd.yml
#检查生效的主机
[root@server1 httpd]# ansible-playbook httpd.yml --list-hosts

#推送
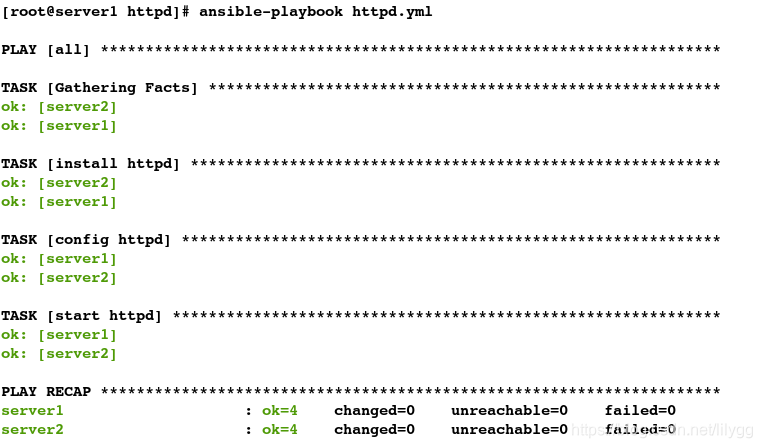
[root@server1 httpd]# ansible-playbook httpd.yml
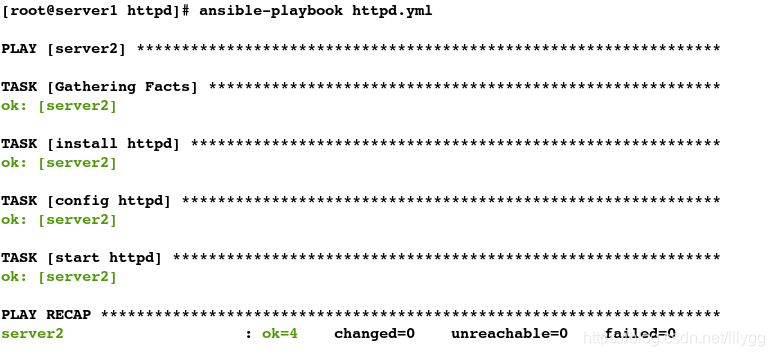
测试:
[root@server2 ~]# rpm -aq httpd
httpd-2.4.6-45.el7.x86_64
[root@server2 ~]# netstat -antlp | grep 80
tcp6       0      0 :::80                   :::*                    LISTEN      15186/httpd
从启动开始执行:
[root@server1 httpd]# ansible-playbook httpd.yml --start-at-task="start httpd"

更改Apache默认端口:
(1).通过更改配置文件修改端口
md5可以校验apahce配置文件是否有改动
#传输配置文件
[root@server2 ~]# cd /etc/httpd/conf/
[root@server2 conf]# ls
httpd.conf  magic
[root@server3 conf]# scp httpd.conf server1:/etc/ansible/playbooks/httpd
1.一开始配置文件相同
[root@server1 httpd]# ls
httpd.conf  httpd.yml
[root@server1 httpd]# md5sum httpd.conf
f5e7449c0f17bc856e86011cb5d152ba  httpd.conf

[root@server2 ~]# cd /etc/httpd/conf/
[root@server2 conf]# ls
httpd.conf  magic
[root@server2 conf]# md5sum httpd.conf
f5e7449c0f17bc856e86011cb5d152ba  httpd.conf
2.更改配置文件
[root@server1 httpd]# ls
httpd.conf  httpd.yml
[root@server1 httpd]# vim httpd.conf
####################
 42 Listen 8080     #修改端口

3.此时md5校验值因配置文件的改动而发生变更
[root@server1 httpd]# pwd
/etc/ansible/playbooks/httpd
[root@server1 httpd]# md5sum httpd.conf
04e9239e7bd5d5b9b85864226d60eee5  httpd.conf

[root@server2 conf]# pwd
/etc/httpd/conf
[root@server2 conf]# md5sum httpd.conf
f5e7449c0f17bc856e86011cb5d152ba  httpd.conf
4.再次执行文件,发现端口修改成功
#再次推送
[root@server1 httpd]# ansible-playbook httpd.yml

[root@server2 conf]# netstat -antlp | grep 8080
tcp6       0      0 :::8080                 :::*                    LISTEN      15652/httpd
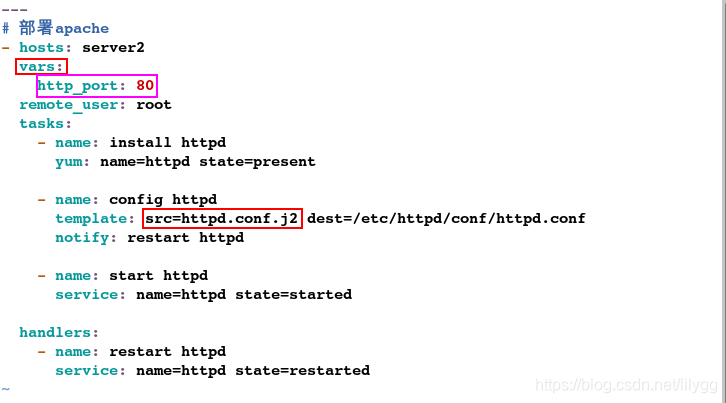
(2).通过定义变量来修改端口
[root@server1 httpd]# ls
httpd.conf  httpd.yml
[root@server1 httpd]# mv httpd.conf httpd.conf.j2
[root@server1 httpd]# ls
httpd.conf.j2  httpd.yml
[root@server1 httpd]# vim httpd.conf.j2
#####################
Listen {{ http_port }}

方式1:将变量定义在httpd.yml 文件中
[root@server1 httpd]# vim httpd.yml
#####################
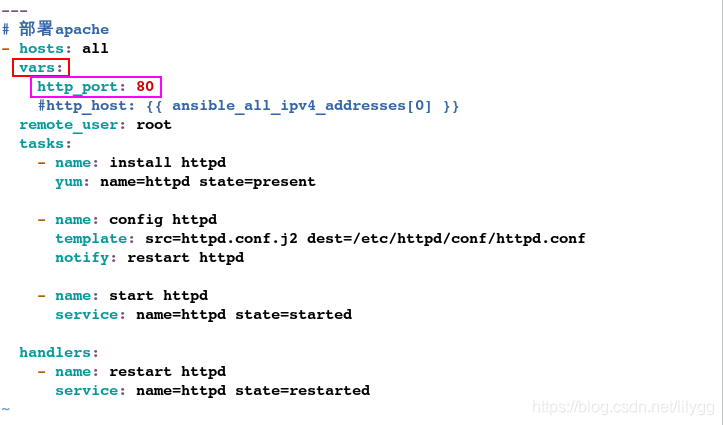
---
# 部署apache
- hosts: server2
vars: #定义变量
http_port: 80
remote_user: root
tasks:
- name: install httpd
yum: name=httpd state=present
- name: config httpd
template: src=httpd.conf.j2 dest=/etc/httpd/conf/httpd.conf #模板
notify: restart httpd
- name: start httpd
service: name=httpd state=started
handlers:
- name: restart httpd
service: name=httpd state=restarted
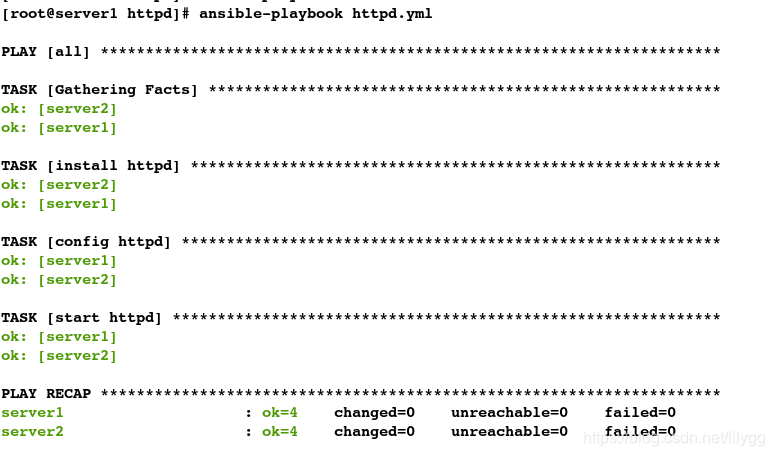
[root@server1 httpd]# ansible-playbook httpd.yml --syntax-check

playbook: httpd.yml
[root@server1 httpd]# ansible-playbook httpd.yml
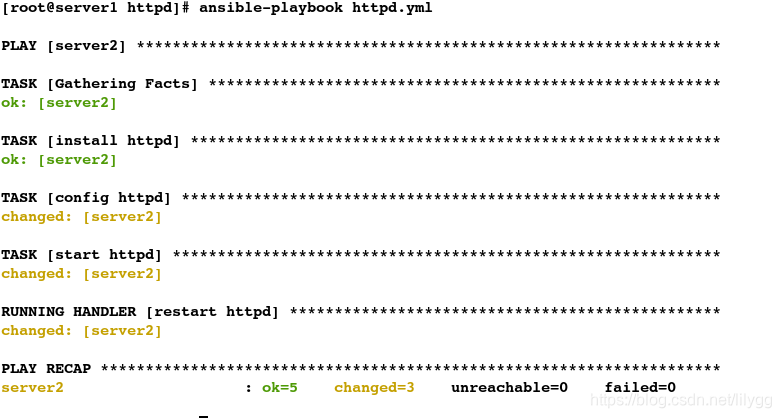
测试:
[root@server2 conf]# netstat -antlp | grep 80
tcp6       0      0 :::80                   :::*                    LISTEN      16346/httpd
方式2:将变量直接定义在hosts 文件中
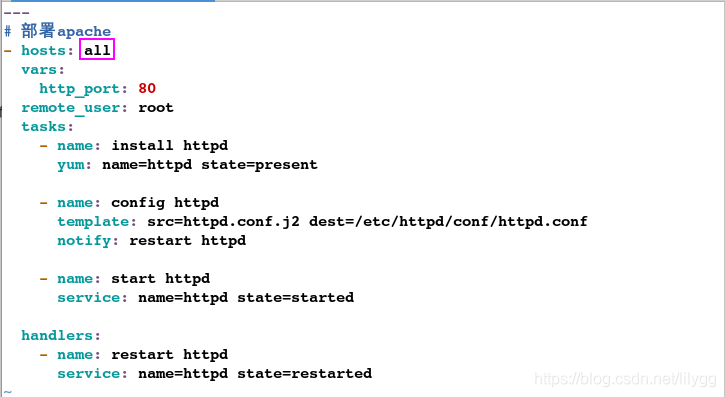
[root@server1 httpd]# vim httpd.yml
#####################
---
# 部署apache
- hosts: all
  remote_user: root
  tasks:
    - name: install httpd
      yum: name=httpd state=present

    - name: config httpd
      template: src=httpd.conf.j2 dest=/etc/httpd/conf/httpd.conf
      notify: restart httpd

    - name: start httpd
      service: name=httpd state=started

  handlers:
    - name: restart httpd
      service: name=httpd state=restarted
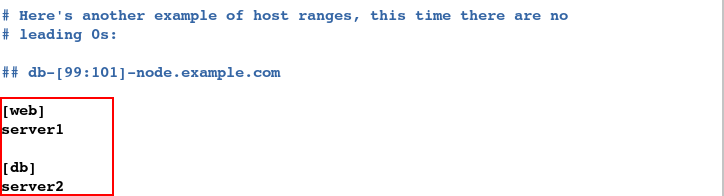
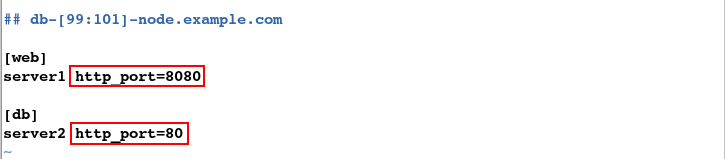
[root@server1 httpd]# vim /etc/ansible/hosts
#####################
[web]                     ##定义2个主机,server1的端口:8080 server2的端口:80
server1 http_port=8080

[db]
server2 http_port=80
[root@server1 httpd]# ansible-playbook httpd.yml
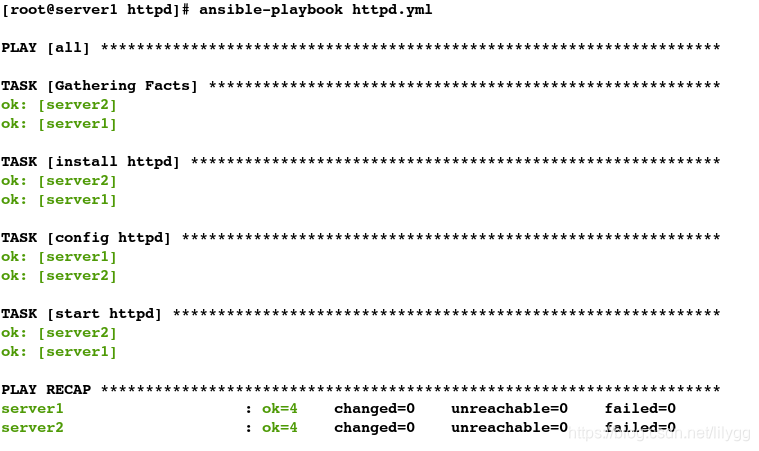
测试:
[root@server1 httpd]# netstat -antlp | grep 8080
tcp6       0      0 :::8080                 :::*                    LISTEN      6246/httpd
[root@server2 conf]# netstat -antlp | grep 80
tcp6       0      0 :::80                   :::*                    LISTEN      16346/httpd
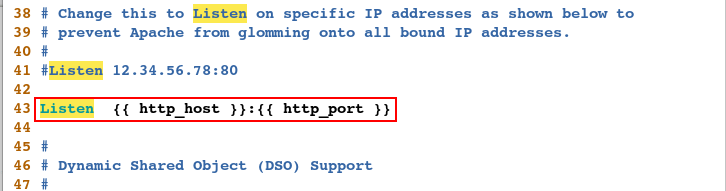
通过定义变量更改监听主机与监听端口:
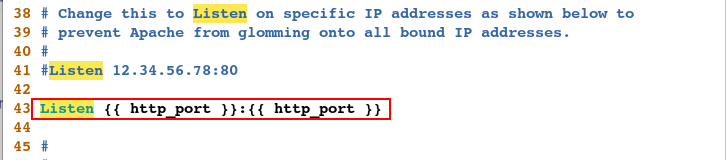
[root@server1 httpd]# vim httpd.conf.j2
#####################
Listen {{ http_host }}:{{ http_port }}
(1)主机ip固定
方式1:将变量直接定义在hosts 文件中
写法1:
[root@server1 httpd]# vim /etc/ansible/hosts
#####################
[web]
server1 http_host=172.25.66.1

[db]
server2 http_host=172.25.66.2

[all:vars]     #all表示所有主机
http_port=80
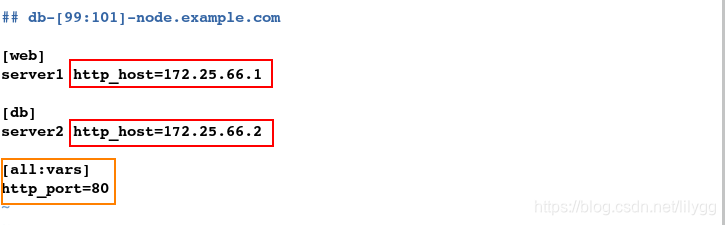
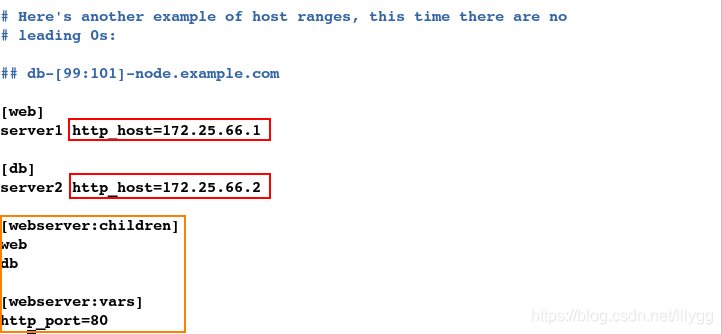
写法2:
[root@server1 httpd]# vim /etc/ansible/hosts
#####################
[web]
server1 http_host=172.25.66.1

[db]
server2 http_host=172.25.66.2

[webserver:children]
web
db

[webserver:vars]
http_port=80
[root@server1 httpd]# ansible-playbook httpd.yml
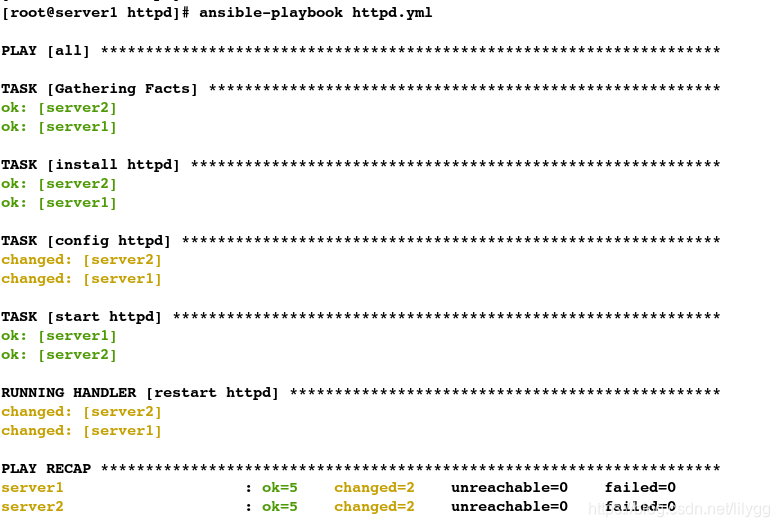
测试:
[root@server1 httpd]# netstat -antlp | grep 80
tcp        0      0 172.25.66.1:80          0.0.0.0:*               LISTEN      7514/httpd
[root@server2 conf]# netstat -antlp | grep 80
tcp        0      0 172.25.66.2:80          0.0.0.0:*               LISTEN      17413/httpd
(2).主机ip不固定
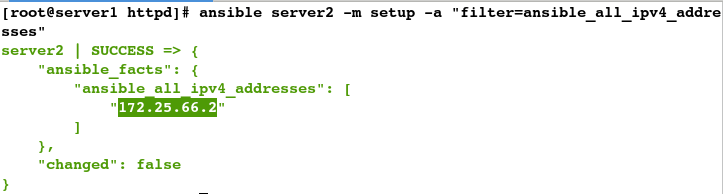
如何获取动态变量呢?
#拉取远程信息
[root@server1 httpd]# ansible serve2 -m setup

#filter表示过滤
[root@server1 httpd]# ansible server2 -m setup -a "filter=ansible_all_ipv4_addresses"
方式1:将获取的变量放到httpd.conf.j2 文件中
[root@server1 httpd]# vim httpd.conf.j2
#####################
Listen {{ ansible_all_ipv4_addresses[0] }}:{{ http_port }}
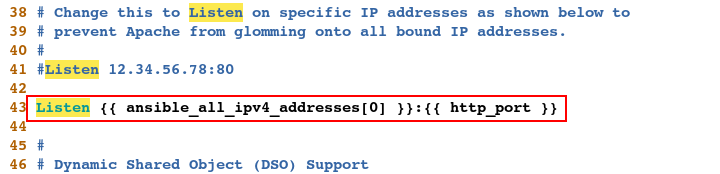
[root@server1 httpd]# vim /etc/ansible/hosts
#####################
[web]
server1

[db]
server2

[root@server1 httpd]# vim httpd.yml
#####################
---
# 部署apache
- hosts: all
  vars:                      #定义变量
    http_port: 80            #指定80端口
  remote_user: root
  tasks:
    - name: install httpd
      yum: name=httpd state=present

    - name: config httpd
      template: src=httpd.conf.j2 dest=/etc/httpd/conf/httpd.conf
      notify: restart httpd

    - name: start httpd
      service: name=httpd state=started

  handlers:
    - name: restart httpd
      service: name=httpd state=restarted
[root@server1 httpd]# ansible-playbook httpd.yml
测试:
[root@server1 httpd]# netstat -antlp | grep :80
tcp        0      0 172.25.66.1:80          0.0.0.0:*               LISTEN      7514/httpd
[root@server2 conf]# netstat -antlp | grep :80
tcp        0      0 172.25.66.2:80          0.0.0.0:*               LISTEN      17413/httpd
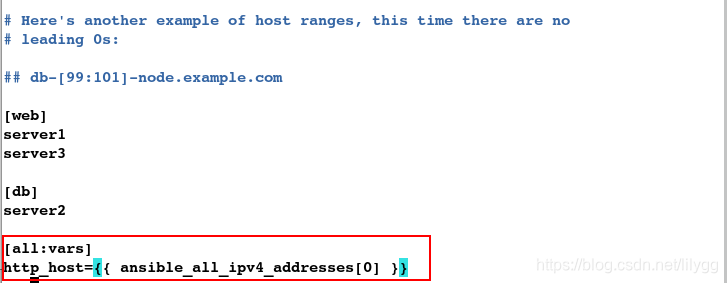
方式2:将获取的变量放入hosts文件中
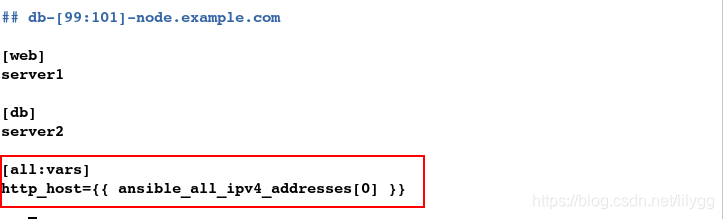
[root@server1 httpd]# vim /etc/ansible/hosts
#####################
[web]
server1

[db]
server2

[all:vars]
http_host={{ ansible_all_ipv4_addresses[0] }}
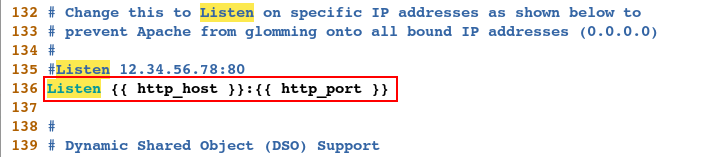
[root@server1 httpd]# vim httpd.conf.j2
#####################
Listen {{ http_host }}:{{ http_port }}

[root@server1 httpd]# ansible-playbook httpd.yml
测试:
[root@server1 httpd]# netstat -antlp | grep :80
tcp        0      0 172.25.66.1:80          0.0.0.0:*               LISTEN      7514/httpd
[root@server2 conf]# netstat -antlp | grep :80
tcp        0      0 172.25.66.2:80          0.0.0.0:*               LISTEN      17413/httpd
不同版本主机apache的部署:
企业6版本主机 调用 6版本的配置文件
企业7版本主机 调用 7版本的配置文件
server1:172.25.66.1
server2:172.25.66.2     企业7
server3:172.25.66.3     企业6
1.免密
[root@server1 httpd]# ssh-copy-id server3
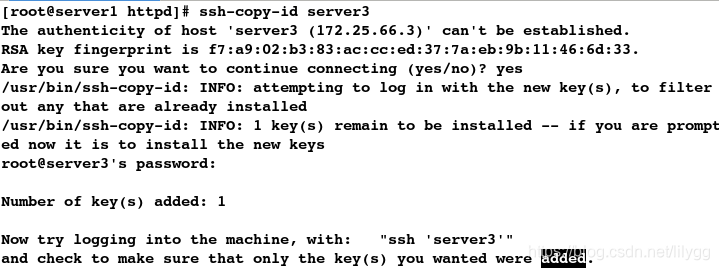
[root@server1 httpd]# ssh server3
[root@server3 ~]# exit

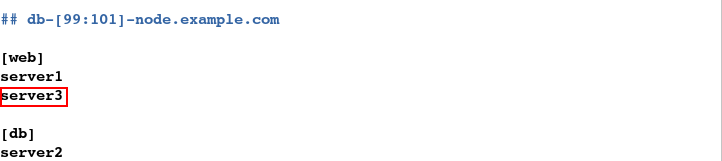
2.添加主机
[root@server1 httpd]# vim /etc/ansible/hosts
#####################
[web]
server1
server3

[db]
server2
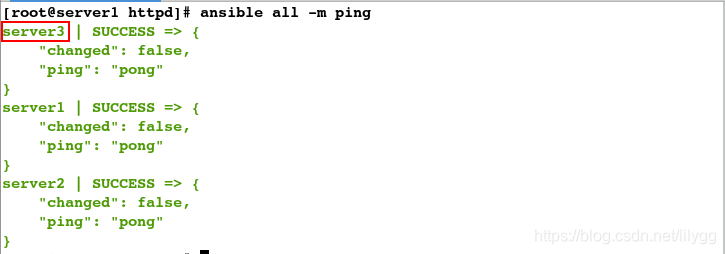
测试:
#ping模块;测试能否ping通
[root@server1 httpd]# ansible all -m ping
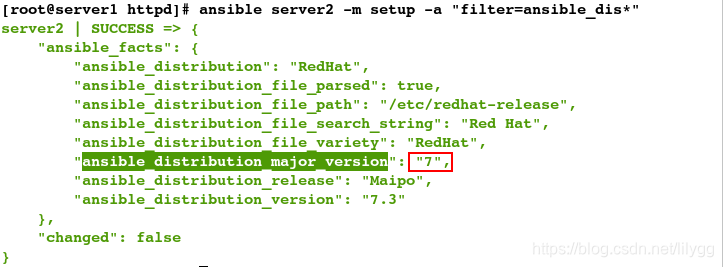
如何动态获取版本信息?
#过滤版本信息
[root@server1 httpd]# ansible server3 -m setup -a "filter=ansible_dis*"
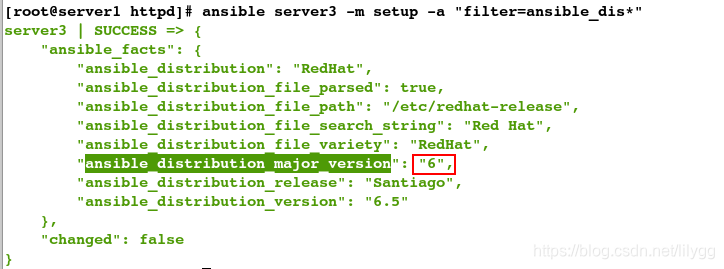
[root@server1 httpd]# ansible server2 -m setup -a "filter=ansible_dis*"
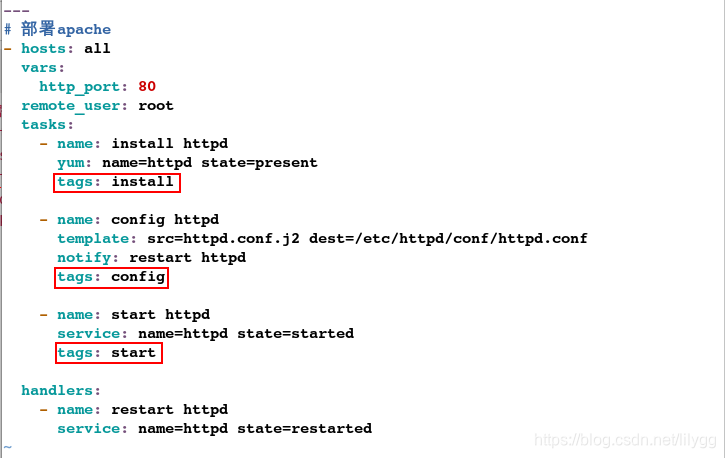
3.编写yml文件
[root@server1 httpd]# vim httpd.yml
#####################
---
# 部署apache
- hosts: all
  vars:
    http_port: 80
  remote_user: root
  tasks:
    - name: install httpd
      yum: name=httpd state=present
      tags: install                    #tags表示添加标签

    - name: config httpd
      template: src=httpd.conf.j2 dest=/etc/httpd/conf/httpd.conf
      notify: restart httpd
      tags: config

    - name: start httpd
      service: name=httpd state=started
      tags: start

  handlers:
    - name: restart httpd
      service: name=httpd state=restarted
#只执行安装指令
[root@server1 httpd]# ansible-playbook httpd.yml -t install
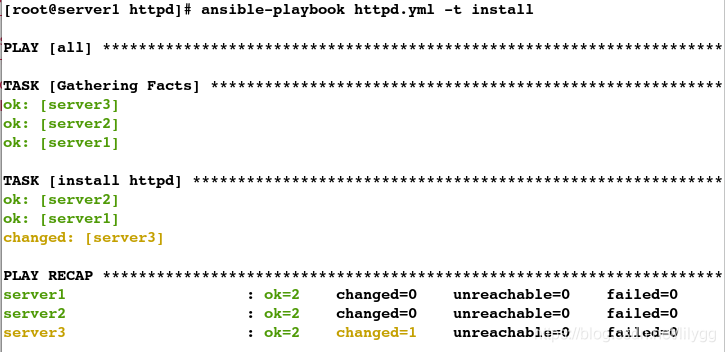
测试:
[root@server3 ~]# rpm -aq httpd
httpd-2.2.15-29.el6_4.x86_64
4.拷贝配置文件
[root@server3 ~]# cd /etc/httpd/conf/
[root@server3 conf]# ls
httpd.conf  magic
[root@server3 conf]# scp httpd.conf server1:/etc/ansible/playbooks/httpd
[root@server1 httpd]# pwd
/etc/ansible/playbooks/httpd
[root@server1 httpd]# ls
httpd.conf  httpd.conf.j2  httpd.retry  httpd.yml
#删除运行错误时产生的文件
[root@server1 httpd]# rm -rf httpd.retry
[root@server1 httpd]# ls
httpd.conf  httpd.conf.j2  httpd.yml
5.更改配置文件
#重命名
[root@server1 httpd]# mv httpd.conf httpd.conf6.j2
[root@server1 httpd]# mv httpd.conf.j2 httpd.conf7.j2
[root@server1 httpd]# ls
httpd.conf6.j2  httpd.conf7.j2  httpd.yml
#2.更改配置文件
[root@server1 httpd]# vim httpd.conf6.j2
#####################
Listen {{ http_host }}:{{ http_port }}
[root@server1 httpd]# vim httpd.conf7.j2
#####################
Listen {{ http_host }}:{{ http_port }}
6.更改hosts文件
[root@server1 httpd]# vim /etc/ansible/hosts
#####################
[web]
server1
server3

[db]
server2

[all:vars]
http_host={{ ansible_all_ipv4_addresses[0] }}
方式1:
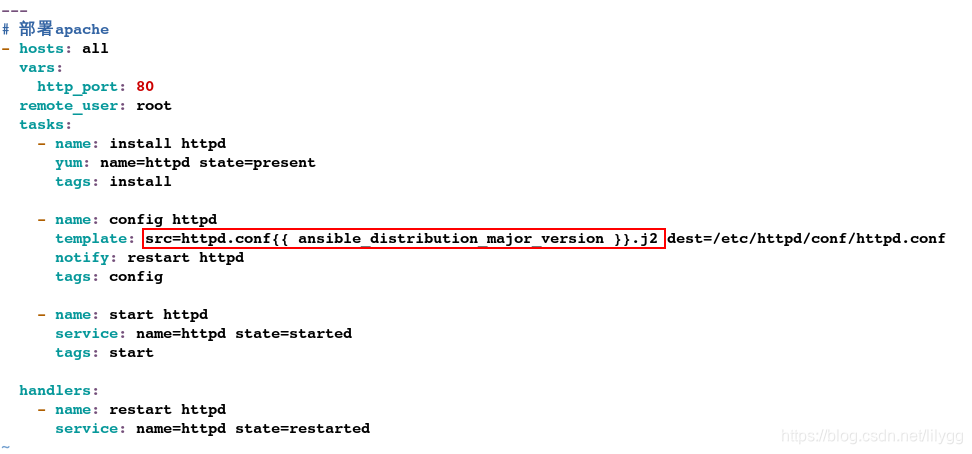
[root@server1 httpd]# vim httpd.yml
#####################
---
# 部署apache
- hosts: all
  vars:
    http_port: 80
  remote_user: root
  tasks:
    - name: install httpd
      yum: name=httpd state=present
      tags: install

    - name: config httpd
      template: src=httpd.conf{{ ansible_distribution_major_version }}.j2 dest=/etc/httpd/conf/httpd.conf
      notify: restart httpd
      tags: config

    - name: start httpd
      service: name=httpd state=started
      tags: start

  handlers:
    - name: restart httpd
      service: name=httpd state=restarted
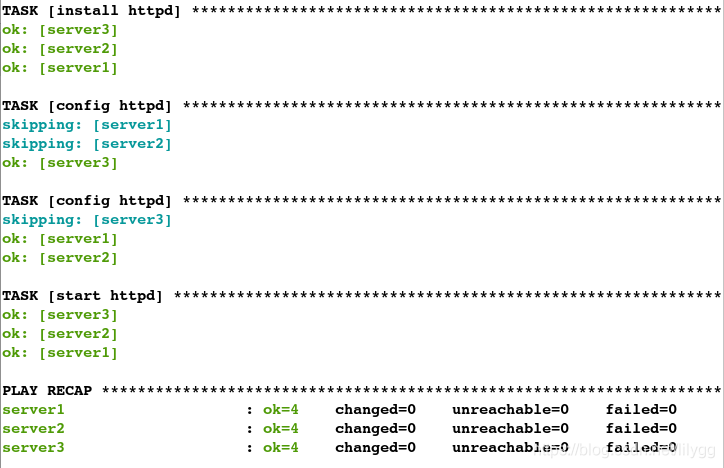
[root@server1 httpd]# ansible-playbook httpd.yml
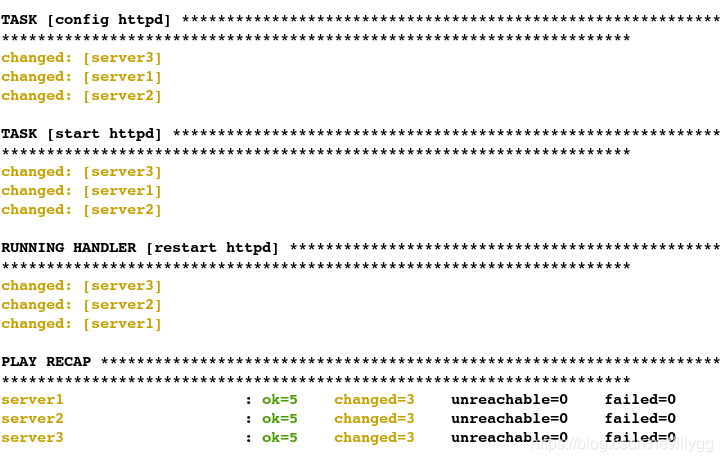
测试:
测试依据:两个版本的apahce的配置文件不同
#企业7版本
[root@server2 ~]# vim /etc/httpd/conf/httpd.conf
#企业6版本
[root@server3 ~]# vim /etc/httpd/conf/httpd.conf
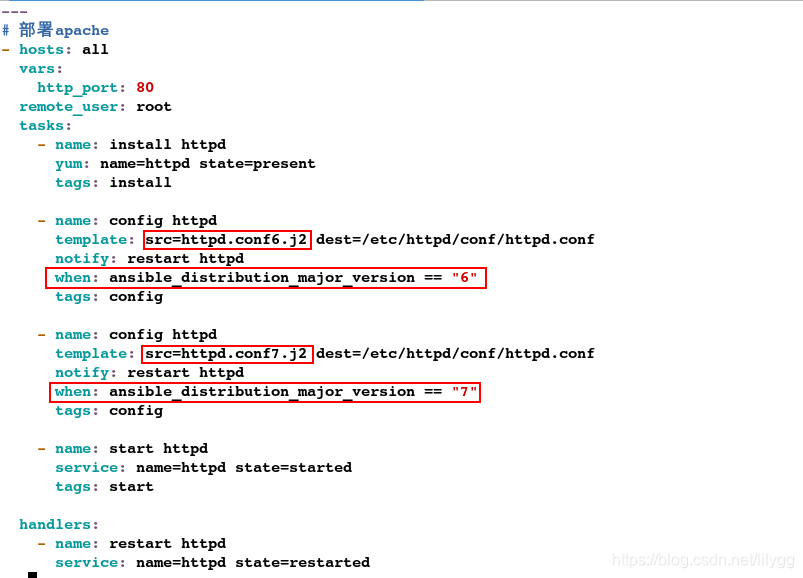
方式2:
[root@server1 httpd]# vim httpd.yml
#####################
---
# 部署apache
- hosts: all
  vars:
    http_port: 80
  remote_user: root
  tasks:
    - name: install httpd
      yum: name=httpd state=present
      tags: install

    - name: config httpd
      template: src=httpd.conf6.j2 dest=/etc/httpd/conf/httpd.conf
      notify: restart httpd
      when: ansible_distribution_major_version == "6"
      tags: config

    - name: config httpd
      template: src=httpd.conf7.j2 dest=/etc/httpd/conf/httpd.conf
      notify: restart httpd
      when: ansible_distribution_major_version == "7"
      tags: config

    - name: start httpd
      service: name=httpd state=started
      tags: start

  handlers:
    - name: restart httpd
      service: name=httpd state=restarted
[root@server1 httpd]# ansible-playbook httpd.yml --syntax-check

playbook: httpd.yml
[root@server1 httpd]# ansible-playbook httpd.yml