实验环境:redhat6.5,防火墙和selinux状态为关闭状态;
server1 172.25.60.1 salt-master
server2 172.25.60.2 salt-minion
server3 172.25.60.3 salt-minion
server4 172.25.60.4 salt-minion
配置yum源
[kiosk@foundation60 rhel6]$ pwd
/var/www/html/salt/rhel6
###安装saltstack软件配置yum源需要使用的包###
[kiosk@foundation60 rhel6]$ ls
libyaml-0.1.3-4.el6.x86_64.rpm
python-babel-0.9.4-5.1.el6.noarch.rpm
python-backports-1.0-5.el6.x86_64.rpm
python-backports-ssl_match_hostname-3.4.0.2-2.el6.noarch.rpm
python-chardet-2.2.1-1.el6.noarch.rpm
python-cherrypy-3.2.2-4.el6.noarch.rpm
python-crypto-2.6.1-3.el6.x86_64.rpm
python-crypto-debuginfo-2.6.1-3.el6.x86_64.rpm
python-enum34-1.0-4.el6.noarch.rpm
python-futures-3.0.3-1.el6.noarch.rpm
python-impacket-0.9.14-1.el6.noarch.rpm
python-jinja2-2.8.1-1.el6.noarch.rpm
python-msgpack-0.4.6-1.el6.x86_64.rpm
python-ordereddict-1.1-2.el6.noarch.rpm
python-requests-2.6.0-3.el6.noarch.rpm
python-setproctitle-1.1.7-2.el6.x86_64.rpm
python-six-1.9.0-2.el6.noarch.rpm
python-tornado-4.2.1-1.el6.x86_64.rpm
python-urllib3-1.10.2-1.el6.noarch.rpm
python-zmq-14.5.0-2.el6.x86_64.rpm
PyYAML-3.11-1.el6.x86_64.rpm
repodata
salt-2016.11.3-1.el6.noarch.rpm
salt-api-2016.11.3-1.el6.noarch.rpm
salt-cloud-2016.11.3-1.el6.noarch.rpm
salt-master-2016.11.3-1.el6.noarch.rpm
salt-minion-2016.11.3-1.el6.noarch.rpm
salt-ssh-2016.11.3-1.el6.noarch.rpm
salt-syndic-2016.11.3-1.el6.noarch.rpm
zeromq-4.0.5-4.el6.x86_64.rpm
[root@server1 ~]# cat /etc/yum.repos.d/rhel-source.repo
[rhel-source]
name=Red Hat Enterprise Linux $releasever - $basearch - Source
baseurl=http://172.25.60.250/rhel6.5
enabled=1
gpgcheck=1
gpgkey=file:///etc/pki/rpm-gpg/RPM-GPG-KEY-redhat-release

[LoadBalancer]
baseurl=http://172.25.60.250/rhel6.5/LoadBalancer
gpgcheck=0

[HighAvailability]
name=HighAvailability
baseurl=http://172.25.60.250/rhel6.5/HighAvailability
gpgcheck=0

[ResilientStorage]
name=ResilientStorage
baseurl=http://172.25.60.250/rhel6.5/ResilientStorage
gpgcheck=0

[ScalableFileSystem]
name=ScalableFileSystem
baseurl=http://172.25.60.250/rhel6.5/ScalableFileSystem
gpgcheck=0

[salt]
name=salt
baseurl=http://172.25.60.250/salt/rhel6
gpgcheck=0
[root@server1 ~]# yum clean all
[root@server1 ~]# yum  repolist
###如果yum源配置号以后会出现以下东西###
[root@server1 salt]# yum list salt-*
Loaded plugins: product-id, subscription-manager
This system is not registered to Red Hat Subscription Management. You can use subscription-manager to register.
Installed Packages
salt.noarch                            2016.11.3-1.el6                     @salt
salt-master.noarch                     2016.11.3-1.el6                     @salt
Available Packages
salt-api.noarch                        2016.11.3-1.el6                     salt
salt-cloud.noarch                      2016.11.3-1.el6                     salt
salt-minion.noarch                     2016.11.3-1.el6                     salt
salt-ssh.noarch                        2016.11.3-1.el6                     salt
salt-syndic.noarch                     2016.11.3-1.el6                     salt
saltstack安装部署
server1安装salit-master:
[root@server1 ~]# yum install -y salt-master
server2和server3安装salt-minion:
[root@server2 yum.repos.d]# yum install -y salt-minion
[root@server3 yum.repos.d]# yum install -y salt-minion

server1修改配置文件
[root@server1 ~]# cd /etc/salt/
[root@server1 salt]# ls
cloud           cloud.maps.d       master    minion.d  proxy.d
cloud.conf.d    cloud.profiles.d   master.d  pki       roster
cloud.deploy.d  cloud.providers.d  minion    proxy
[root@server1 salt]# vim master
15 interface: 172.25.60.1
server2和server3修改配置文件:
[root@server2 yum.repos.d]# cd /etc/salt/
[root@server2 salt]# ls
cloud           cloud.maps.d       master    minion.d   proxy
cloud.conf.d    cloud.profiles.d   master.d  minion_id  proxy.d
cloud.deploy.d  cloud.providers.d  minion    pki        roster
[root@server2 salt]# vim minion
16 master: 172.25.60.1

每个虚拟机启动服务:
[root@server1 ~]# /etc/init.d/salt-master start
Starting salt-master daemon:                               [  OK  ]
[root@server2 ~]# /etc/init.d/salt-minion start
Starting salt-minion:root:server2 daemon: OK
[root@server3 ~]# /etc/init.d/salt-minion start
Starting salt-minion:root:server2 daemon: OK

查看服务是否启动:
[root@server1 ~]# netstat -antplue
tcp        0      0 172.25.60.1:4505            0.0.0.0:*                   LISTEN      0          8559       996/python2.6
tcp        0      0 172.25.60.1:4506            0.0.0.0:*                   LISTEN      0          14279      1549/python2.6

将server2和server3添加到server1的认证salt-key里面:
[root@server1 salt]# salt-key -L
Accepted Keys:
Denied Keys:
Unaccepted Keys:
server2
server3
Rejected Keys:
[root@server1 salt]# salt-key -a server2
The following keys are going to be accepted:
Unaccepted Keys:
server2
Proceed? [n/Y] y
Key for minion server2 accepted.
[root@server1 salt]# salt-key -a server3
The following keys are going to be accepted:
Unaccepted Keys:
server3
Proceed? [n/Y] y
Key for minion server3 accepted.
[root@server1 salt]# salt-key -L
Accepted Keys:
server2
server3
Denied Keys:
Unaccepted Keys:
Rejected Keys:

查看server1的salt-minion情况:
[root@server1 ~]# yum install -y tree
[root@server1 pki]# pwd
/etc/salt/pki
[root@server1 pki]# tree .
.
|-- master
|   |-- master.pem
|   |-- master.pub
|   |-- minions
|   |   |-- server2
|   |   `-- server3
|   |-- minions_autosign
|   |-- minions_denied
|   |-- minions_pre
|   `-- minions_rejected
`-- minion
7 directories, 4 files

查看server2和server3的salt-minion情况:
[root@server2 pki]# pwd
/etc/salt/pki
[root@server2 pki]# tree .
.
|-- master
`-- minion
    |-- minion_master.pub
    |-- minion.pem
    `-- minion.pub

2 directories, 3 files
saltstack简单模块命令测试
[root@server1 ~]# salt  '*'  test.ping
server3:
    True
server2:
    True
[root@server1 ~]# salt '*' cmd.run hostname
server3:
    server3
server2:
    server2
[root@server1 ~]# salt '*' cmd.run 'df -Th'
server3:
    Filesystem                   Type   Size  Used Avail Use% Mounted on
    /dev/mapper/VolGroup-lv_root ext4    19G  967M   17G   6% /
    tmpfs                        tmpfs  499M   16K  499M   1% /dev/shm
    /dev/vda1                    ext4   485M   33M  427M   8% /boot
server2:
    Filesystem                   Type   Size  Used Avail Use% Mounted on
    /dev/mapper/VolGroup-lv_root ext4    19G  967M   17G   6% /
    tmpfs                        tmpfs  499M   16K  499M   1% /dev/shm
    /dev/vda1                    ext4   485M   33M  427M   8% /boot
创建salt-master的工作目录
修改配置文件:
[root@server1 ~]# vim /etc/salt/master
 524 file_roots:
 525    base:
 526      - /srv/salt/
重新启动服务:
[root@server1 salt]# /etc/init.d/salt-master restart
Stopping salt-master daemon:                               [  OK  ]
Starting salt-master daemon:                               [  OK  ]
创建工作主目录:
[root@server1 ~]# mkdir /srv/salt
server1为server2自动化部署http服务
[root@server1 ~]# cd /srv/salt/
[root@server1 salt]# mkdir httpd
[root@server1 salt]# cd httpd/
###编写http安装服务sls文件###
[root@server1 httpd]# vim apache.sls
apache-install:
  pkg.installed:
    - pkgs:
      - httpd
      - php

###将该文件推送给server2执行安装文件###
(httpd.apache中httpd表示httpd目录,apache表示我们编辑的文件)
[root@server1 httpd]# salt server2 state.sls httpd.apache test=True
###上面命令表示执行测试,不进行安装###
[root@server1 httpd]# salt server2 state.sls httpd.apache
server2:
----------
          ID: apache-install
    Function: pkg.installed
      Result: True
     Comment: The following packages were installed/updated: httpd, php
     Started: 13:58:44.762661
    Duration: 20169.999 ms
     Changes:
              ----------
              apr:
                  ----------
                  new:
                      1.3.9-5.el6_2
                  old:
              apr-util:
                  ----------
                  new:
                      1.3.9-3.el6_0.1
                  old:
              apr-util-ldap:
                  ----------
                  new:
                      1.3.9-3.el6_0.1
                  old:
              httpd:
                  ----------
                  new:
                      2.2.15-29.el6_4
                  old:
              httpd-tools:
                  ----------
                  new:
                      2.2.15-29.el6_4
                  old:
              mailcap:
                  ----------
                  new:
                      2.1.31-2.el6
                  old:
              php:
                  ----------
                  new:
                      5.3.3-26.el6
                  old:
              php-cli:
                  ----------
                  new:
                      5.3.3-26.el6
                  old:
              php-common:
                  ----------
                  new:
                      5.3.3-26.el6
                  old:

Summary for server2
------------
Succeeded: 1 (changed=1)
Failed:    0
------------
Total states run:     1
Total run time:  20.170 s
###上面的配置文件也可以修改为###
httpd:
  pkg.installed

php:
  pkg.installed

###再次执行该命令也可以测试apache是否安装成功###
[root@server1 httpd]# salt server2 state.sls httpd.apache
server2:
----------
          ID: apache-install
    Function: pkg.installed
      Result: True
     Comment: All specified packages are already installed   ###测试的安装包已经安装
     Started: 11:06:23.404093
    Duration: 278.786 ms
     Changes:

Summary for server2
------------
Succeeded: 1
Failed:    0
------------
Total states run:     1
Total run time: 278.786 ms
修改server2的httpd服务为8080端口:
[root@server1 ~]# mkdir /srv/salt/httpd/file
###将server2的配置文件传送到server1的新建目录###
[root@server2 conf.d]# scp /etc/httpd/conf/httpd.conf 172.25.60.1:/srv/salt/httpd/file
###修改httpd.conf文件的80端口为8080端口###
[root@server1 ~]# vim /srv/salt/httpd/file/httpd.conf
 136 Listen 8080
 ###修改server1的apache的安装文件###
[root@server1 file]# vim /srv/salt/httpd/apache.sls
[root@server1 file]# cat /srv/salt/httpd/apache.sls
apache-install:
  pkg.installed:
    - pkgs:
      - httpd
      - php

apapche-config:
  file.managed:
    - name: /etc/httpd/conf/httpd.conf    #####发送到server2的配置文件,文件名和路径需要保持一直,
    - source: salt://httpd/file/httpd.conf  #####该路径是加载(更改8080端口操作)文件的路径
指定httpd.conf文件路径,推送时该路径下文件将被发送到server2的httpd配置文件下,httpd启用该文件修改端口为8080

apache-service:   ###设置httpd服务开机自启
  service.running:
    - name:  httpd
    - enable: True
[root@server1 file]# /etc/init.d/salt-master restart
Stopping salt-master daemon:                               [  OK  ]
测试:
[root@server1 httpd]# salt server2  state.sls httpd.apache
server2:
----------
          ID: apache-install
    Function: pkg.installed
      Result: True
     Comment: All specified packages are already installed
     Started: 14:16:47.766538
    Duration: 271.519 ms
     Changes:
----------
          ID: apache-config
    Function: file.managed
        Name: /etc/httpd/conf/httpd.conf
      Result: True
     Comment: File /etc/httpd/conf/httpd.conf updated
     Started: 14:16:48.039457
    Duration: 44.548 ms
     Changes:
              ----------
              diff:
                  ---
                  +++
                  @@ -133,7 +133,7 @@
                   # prevent Apache from glomming onto all bound IP addresses (0.0.0.0)
                   #
                   #Listen 12.34.56.78:80
                  -Listen 80
                  +Listen 8080

                   #
                   # Dynamic Shared Object (DSO) Support
----------
          ID: apache-service
    Function: service.running
        Name: httpd
      Result: True
     Comment: Service httpd has been enabled, and is running
     Started: 14:16:48.084378
    Duration: 109.853 ms
     Changes:
              ----------
              httpd:
                  True

Summary for server2
------------
Succeeded: 3 (changed=2)
Failed:    0
------------
Total states run:     3
Total run time: 425.920 ms

进入server2查看是否修改成功:
[root@server2 ~]# netstat -antplue
tcp        0      0 :::8080                     :::*                        LISTEN      0          16662      1996/httpd
给server2的httpd服务设置相关的用户和组
修改配置文件:
[root@server1 file]# vim /srv/salt/httpd/apache.sls
apache-install:
  pkg.installed:
    - pkgs:
      - httpd
      - php

apache-config:
  file.managed:
    - name: /etc/httpd/conf/httpd.conf
    - source: salt://httpd/file/httpd.conf
    - mode: 644
    - user: root
    - group: root

apache-service:
  service.running:
    - name:  httpd
    - enable: True
    - reload: True  ###文件更改后进行重新加载reload
    - watch:  ####监控文件,修改更改的文件
      - file: /etc/httpd/conf/httpd.conf
给server2添加用户和用户组
saltstack一键部署(server3源码编译安装 nginx)
1.源码编译安装nginx
[root@server1 nginx]# pwd
/srv/salt/nginx
[root@server1 nginx]# cat install.sls
nginx-install:
  pkg.installed:
    - pkgs:
      - gcc
      - openssl-devel
      - pcre-devel

  file.managed:
    - name: /mnt/nginx-1.10.1.tar.gz     ###指定tar包放置
    - source: salt://nginx/nginx-1.10.1.tar.gz    ###指定tar包

  cmd.run:
    - name: cd /mnt && tar zxf nginx-1.10.1.tar.gz && cd nginx-1.10.1 && sed -i.bak 's/define NGINX_VER          "nginx\/" NGINX_VERSION/define NGINX_VER          "nginx"'/g src/core/nginx.h && sed -i.bak 's/CFLAGS="$CFLAGS -g"/#CFLAGS="$CFLAGS -g"/g' auto/cc/gcc && ./configure --prefix=/usr/local/nginx --with-threads --with-http_ssl_module --with-file-aio --with-http_stub_status_module &> /dev/null && make &> /dev/null && make install &> /dev/null
    - creates: /usr/local/nginx
###先切入/mnt目录中,解包,然后修改src/core/nginx.h使其不显示版本号,然后修改gcc,注释掉debug,然后进行./configure编译三部曲,(&> /dev/null使其不显示编译的过程),creates:检测目录下有没有nginx目录,防止重复编译。###
[root@server1 nginx]# salt server3 state.sls nginx.install
##推送时只要不报错就表示完成
server3:
----------
          ID: nginx-install
    Function: pkg.installed
      Result: True
     Comment: All specified packages are already installed
     Started: 15:02:21.163881
    Duration: 306.046 ms
     Changes:
----------
          ID: nginx-install
    Function: file.managed
        Name: /mnt/nginx-1.10.1.tar.gz
      Result: True
     Comment: File /mnt/nginx-1.10.1.tar.gz is in the correct state
     Started: 15:02:21.472147
    Duration: 45.622 ms
     Changes:
----------
          ID: nginx-install
    Function: cmd.run
        Name: cd /mnt && tar zxf nginx-1.10.1.tar.gz && cd nginx-1.10.1 && sed -i.bak 's/define NGINX_VER          "nginx\/" NGINX_VERSION/define NGINX_VER          "nginx"'/g src/core/nginx.h && sed -i.bak 's/CFLAGS="$CFLAGS -g"/#CFLAGS="$CFLAGS -g"/g' auto/cc/gcc && ./configure --prefix=/usr/local/nginx --with-threads --with-http_ssl_module --with-file-aio --with-http_stub_status_module &> /dev/null && make &> /dev/null && make install &> /dev/null
      Result: True
     Comment: /usr/local/nginx exists
     Started: 15:02:21.518365
    Duration: 0.316 ms
     Changes:

Summary for server3
------------
Succeeded: 3
Failed:    0
------------
Total states run:     3
Total run time: 351.984 ms
2.nginx启动脚本:
server3的nginx安装好了以后没有启动脚本,需要自己配置:
将server2的httpd服务启动脚本/etc/init.d/httpd发送给server3的/srv/salt/nginx/files/目录下,修改配置文件如下:
#!/bin/bash
#
# nginx        Startup script for the Apache HTTP Server
#
# processname: nginx
# config: /usr/local/nginx/conf/nginx.conf
# pidfile: /usr/local/nginx/logs/nginx.pid
#

# Source function library.
. /etc/rc.d/init.d/functions

nginx=${HTTPD-/usr/local/nginx/sbin/nginx}
prog=nginx
pidfile=${PIDFILE-/usr/local/nginx/logs/nginx.pid}
lockfile=${LOCKFILE-/var/lock/subsys/nginx}
RETVAL=0
start() {
        echo -n $"Starting $prog: "
        $nginx
        RETVAL=$?
        echo
        [ $RETVAL = 0 ] && touch ${lockfile}
        return $RETVAL
}

stop() {
        echo -n $"Stopping $prog: "
        killproc -p ${pidfile} $nginx
        RETVAL=$?
        echo
        [ $RETVAL = 0 ] && rm -f ${lockfile} ${pidfile}
}
reload() {
    echo -n $"Reloading $prog: "
    $nginx -s reload
        RETVAL=$?
        if [ $RETVAL -eq 7 ]; then
            failure $"nginx shutdown"
        fi
    echo
}
# See how we were called.
case "$1" in
  start)
        start
        ;;
  stop)
        stop
        ;;
  status)
        status -p ${pidfile} $nginx
        RETVAL=$?
        ;;
  restart)
        stop
        start
        ;;
  force-reload|reload)
        reload
        ;;
  graceful|help|configtest|fullstatus)
        $apachectl $@
        RETVAL=$?
        ;;
  *)
        echo $"Usage: $prog {start|stop|restart|reload|status}"
        RETVAL=2
esac

exit $RETVAL
3.启动nginx,创建用户以及用户组
1.在server1的/srv/salt/nginx/files目录下创建目录pkgs和users,分别为安装nginx所需要的依赖包,创建Nginx的用户!
[root@server1 salt]# ls
_grains  haproxy  httpd  keepalive  nginx  pkgs  top.sls  users
[root@server1 salt]# cd pkgs/
[root@server1 pkgs]# ls
make.sls
[root@server1 pkgs]# cat make.sls
make:
  pkg.installed:
    - pkgs:
      - gcc
      - pcre-devel
      - openssl-devel
[root@server1 salt]# cd users/
[root@server1 users]# ls
nginx.sls
[root@server1 users]# cat nginx.sls
nginx-group:
  group.present:
    - name: nginx
    - gid: 800

nginx-user:
  user.present:
    - name: nginx
    - shell: /sbin/nologin
    - home: /usr/local/nginx
    - createhome: false
    - uid: 800
    - gid: 800
2.修改install.sls配置文件包含新建的两个模块:
[root@server1 salt]# cd nginx/
[root@server1 nginx]# ls
files  install.sls  service.sls
[root@server1 nginx]# cat install.sls
include:
  - pkgs.make
  - users.nginx
nginx-install:
#  pkg.installed:
#    - pkgs:
#      - gcc
#      - openssl-devel
#      - pcre-devel

  file.managed:
    - name: /mnt/nginx-1.10.1.tar.gz
    - source: salt://nginx/files/nginx-1.10.1.tar.gz

  cmd.run:
    - name: cd /mnt && tar zxf nginx-1.10.1.tar.gz && cd nginx-1.10.1 && sed -i.bak 's/define NGINX_VER          "nginx\/" NGINX_VERSION/define NGINX_VER          "nginx"'/g src/core/nginx.h && sed -i.bak 's/CFLAGS="$CFLAGS -g"/#CFLAGS="$CFLAGS -g"/g' auto/cc/gcc && ./configure --prefix=/usr/local/nginx --with-threads --with-http_ssl_module --with-file-aio --with-http_stub_status_module &> /dev/null && make &> /dev/null && make install &> /dev/null
    - creates: /usr/local/nginx
3.编辑service.sls文件:
[root@server1 nginx]# cat service.sls
include:
  - nginx.install

/usr/local/nginx/conf/nginx.conf:
  file.managed:
    - source: salt://nginx/files/nginx.conf

nginx-service:
  file.managed:
    - name: /etc/init.d/nginx
    - source: salt://nginx/files/nginx
    - mode: 755   ###给配置文件添加执行权限

  service.running:
    - name: nginx
    - reload: True
    - watch:
      - file: /usr/local/nginx/conf/nginx.conf
4.将serve3的/usr/local/nginx/conf/nginx.conf文件发送到server1的/srv/salt/nginx/files/目录下,修改配置文件:
[root@server1 files]# pwd
/srv/salt/nginx/files
[root@server1 files]# ls
nginx  nginx-1.10.1.tar.gz  nginx.conf
推送测试:
[root@server1 nginx]# salt server3 state.sls nginx.service
server3:
----------
          ID: nginx-service
    Function: file.managed
        Name: /usr/local/nginx/conf/nginx.conf
      Result: True
     Comment: File /usr/local/nginx/conf/nginx.conf is in the correct state
     Started: 15:58:58.219243
    Duration: 47.734 ms
     Changes:
----------
          ID: nginx-service
    Function: cmd.run
        Name: /usr/local/nginx/sbin/nginx
      Result: True
     Comment: Command "/usr/local/nginx/sbin/nginx" run
     Started: 15:58:58.267515
    Duration: 8.309 ms
     Changes:
              ----------
              pid:
                  4724
              retcode:
                  0
              stderr:
              stdout:

Summary for server3
------------
Succeeded: 2 (changed=1)
Failed:    0
------------
Total states run:     2
Total run time:  56.043 ms
查看server3是否启动:ps ax
4725 ?        Ss     0:00 nginx: master process /usr/local/nginx/sbin/nginx
server1安装haproxy
1.将server1添加salt-key的认证
[root@server1 nginx]# salt server1 state.sls haproxy.install
No minions matched the target. No command was sent, no jid was assigned.
ERROR: No return received
server1安装salt-minion,修改配置文件/etc/salt/minion文件:
[root@server1 salt]# vim minion
16 master: 172.25.60.1
[root@server1 salt]# salt-key -a server1
The following keys are going to be accepted:
Unaccepted Keys:
server1
Proceed? [n/Y] y
Key for minion server1 accepted.
[root@server1 ~]# salt-key -L
Accepted Keys:
server1
server2
server3
server4
Denied Keys:
Unaccepted Keys:
Rejected Keys:
2.server1安装haproxy:
在server1的/srv/salt/目录下新建目录haproxy.进入haproxy目录编辑install.sls文件:
[root@server1 haproxy]# cat install.sls
haproxy-install:
  pkg.installed:
    - pkgs:
       - haproxy
[root@server1 haproxy]# salt server1 state.sls haproxy.install
server1:
----------
          ID: haproxy-install
    Function: pkg.installed
      Result: True
     Comment: The following packages were installed/updated: haproxy
     Started: 16:07:09.310949
    Duration: 6465.456 ms
     Changes:
              ----------
              haproxy:
                  ----------
                  new:
                      1.4.24-2.el6
                  old:

Summary for server1
------------
Succeeded: 1 (changed=1)
Failed:    0
------------
Total states run:     1
Total run time:   6.465 s
3.haproxy负载均衡
[root@server1 haproxy]# cat install.sls
haproxy-install:
pkg.installed:
- pkgs:
- haproxy
file.managed:
- name: /etc/haproxy/haproxy.cfg
- source: salt://haproxy/files/haproxy.cfg
service.running:
- name: haproxy
- reload: True
- watch:
- file: haproxy-install
将/etc/haproxy/haproxy.cfg文件复制到当前目录下,修改配置文件:
[root@server1 haproxy]# cp /etc/haproxy/haproxy.cfg files/
[root@server1 haproxy]# ls files/
haproxy.cfg
#---------------------------------------------------------------------
# Global settings
#---------------------------------------------------------------------
global
# to have these messages end up in /var/log/haproxy.log you will
# need to:
#
# 1) configure syslog to accept network log events. This is done
# by adding the '-r' option to the SYSLOGD_OPTIONS in
# /etc/sysconfig/syslog
#
# 2) configure local2 events to go to the /var/log/haproxy.log
# file. A line like the following can be added to
# /etc/sysconfig/syslog
#
# local2.* /var/log/haproxy.log
#
log 127.0.0.1 local2
chroot /var/lib/haproxy
pidfile /var/run/haproxy.pid
maxconn 4000
user haproxy
group haproxy
daemon
# turn on stats unix socket
stats socket /var/lib/haproxy/stats
#---------------------------------------------------------------------
# common defaults that all the 'listen' and 'backend' sections will
# use if not designated in their block
#---------------------------------------------------------------------
defaults
mode http
log global
option httplog
option dontlognull
option http-server-close
option forwardfor except 127.0.0.0/8
option redispatch
retries 3
timeout http-request 10s
timeout queue 1m
timeout connect 10s
timeout client 1m
timeout server 1m
timeout http-keep-alive 10s
timeout check 10s
maxconn 3000
frontend main *:80
# acl url_static path_beg -i /static /images /javascript /stylesheets
# acl url_static path_end -i .jpg .gif .png .css .js
# use_backend static if url_static
default_backend app
backend app
balance roundrobin
server app1 172.25.60.2:80 check
server app1 172.25.60.3:80 check
[root@server1 salt]# cat top.sls
base:
'server1':
- haproxy.install
# - keepalive.service
'server3':
- nginx.service
# 'server4':
# - haproxy.install
# - keepalive.service
# 'roles:apache':
# - match: grain
# - httpd.service
'server2':
- httpd.servic
推送:
[root@server1 haproxy]# salt server1 state.sls haproxy.install
server1:
----------
ID: haproxy-install
Function: pkg.installed
Result: True
Comment: All specified packages are already installed
Started: 16:27:29.339917
Duration: 281.639 ms
Changes:
----------
ID: haproxy-install
Function: file.managed
Name: /etc/haproxy/haproxy.cfg
Result: True
Comment: File /etc/haproxy/haproxy.cfg updated
Started: 16:27:29.622943
Duration: 42.696 ms
Changes:
----------
diff:
---
+++
@@ -60,27 +60,14 @@
#---------------------------------------------------------------------
# main frontend which proxys to the backends
#---------------------------------------------------------------------
-frontend main *:5000
- acl url_static path_beg -i /static /images /javascript /stylesheets
- acl url_static path_end -i .jpg .gif .png .css .js
+frontend main *:80
+# acl url_static path_beg -i /static /images /javascript /stylesheets
+# acl url_static path_end -i .jpg .gif .png .css .js
- use_backend static if url_static
+# use_backend static if url_static
default_backend app
+backend app
+ balance roundrobin
+ server app1 172.25.60.2:80 check
+ server app2 172.25.60.3:80 check
-#---------------------------------------------------------------------
-# static backend for serving up images, stylesheets and such
-#---------------------------------------------------------------------
-backend static
- balance roundrobin
- server static 127.0.0.1:4331 check
-
-#---------------------------------------------------------------------
-# round robin balancing between the various backends
-#---------------------------------------------------------------------
-backend app
- balance roundrobin
- server app1 127.0.0.1:5001 check
- server app2 127.0.0.1:5002 check
- server app3 127.0.0.1:5003 check
- server app4 127.0.0.1:5004 check
-
----------
ID: haproxy-install
Function: service.running
Name: haproxy
Result: True
Comment: Started Service haproxy
Started: 16:27:29.666208
Duration: 67.954 ms
Changes:
----------
haproxy:
True
Summary for server1
------------
Succeeded: 3 (changed=2)
Failed: 0
------------
Total states run: 3
Total run time: 392.289 ms
查看进程:
[root@server1 haproxy]# netstat -antplue
udp 0 0 0.0.0.0:60856 0.0.0.0:* 0 43577 12304/haproxy
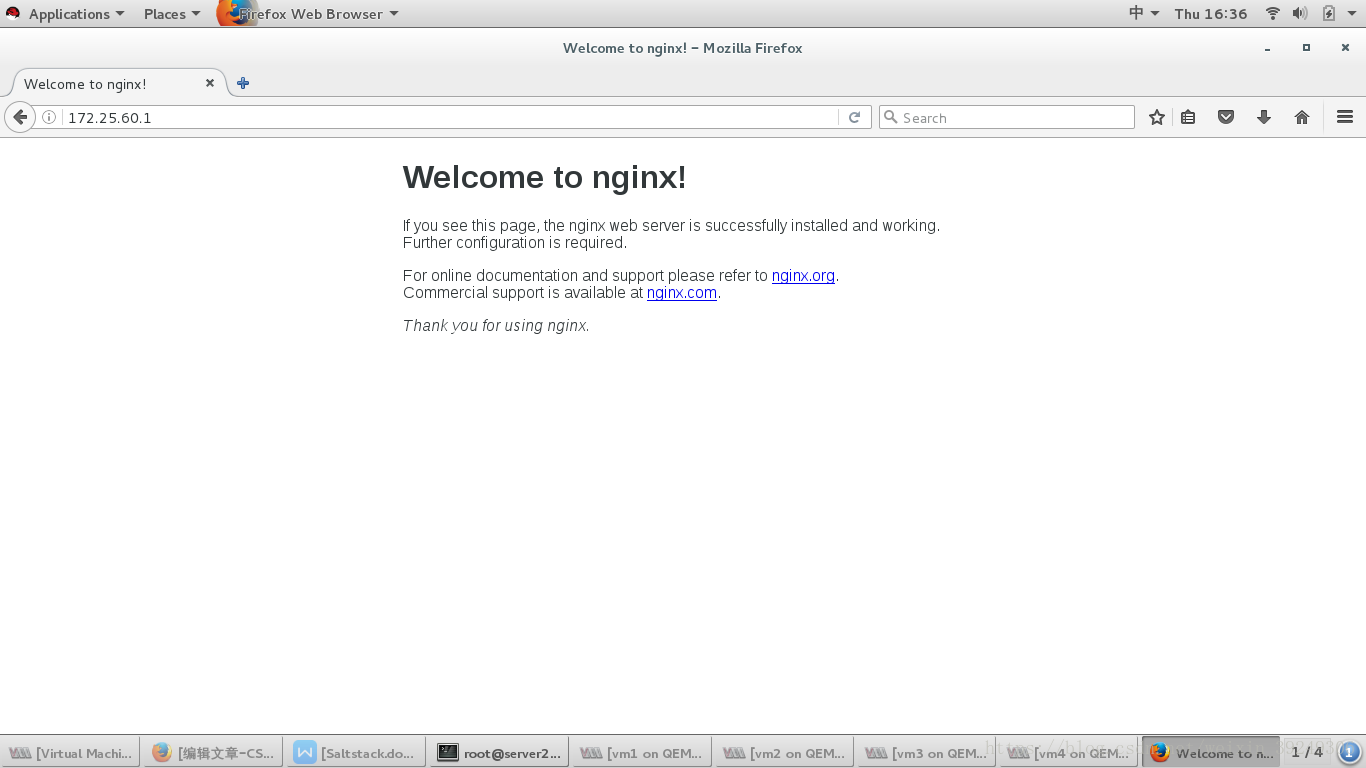
设置server2的默认发布网页:
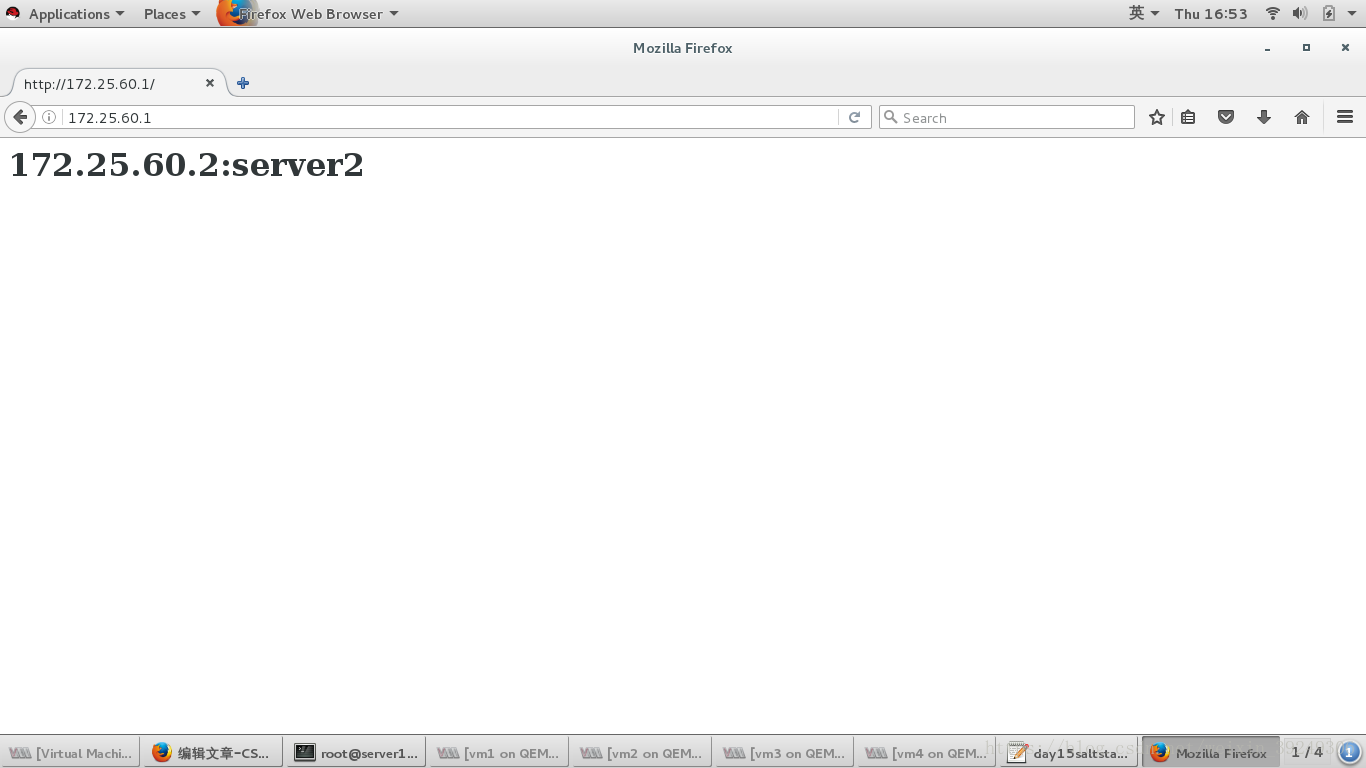
[root@server2 html]# cat index.html
<h1> 172.25.60.2:server2 </h1> 浏览器测试:输入172.25.60.1
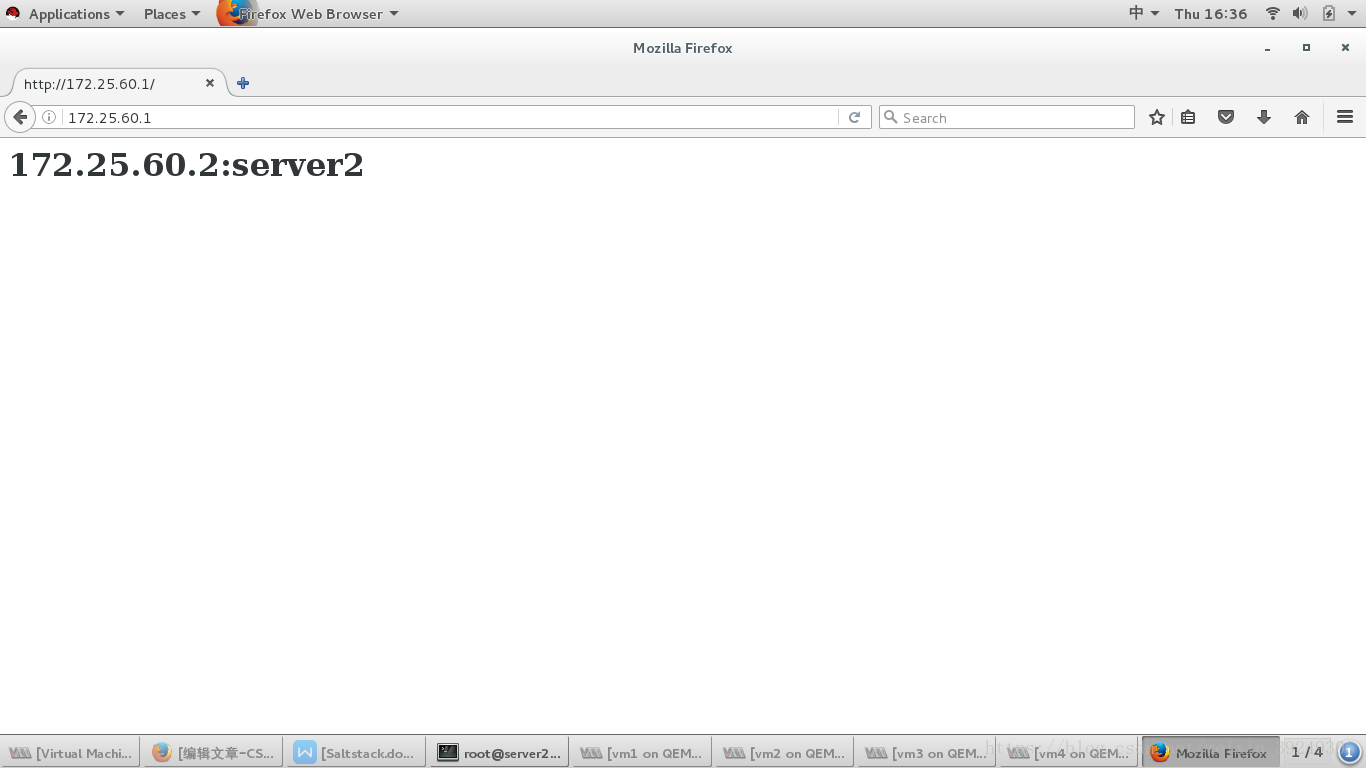
server2和serve3开始进行轮询
server1实现高级推
1.停止server1和server2和server3的服务
[root@server1 haproxy]# /etc/init.d/haproxy stop
Stopping haproxy:                                          [  OK  ]
[root@server2 pki]# /etc/init.d/httpd stop
Stopping httpd:                                            [  OK  ]
[root@server3 core]# /etc/init.d/nginx stop
Stopping nginx:                                            [  OK  ]
2.编辑配置文件:
[root@server1 haproxy]# cd /srv/salt/
[root@server1 salt]# ls
haproxy  httpd  nginx  pkgs  user
[root@server1 salt]# vim top.sls
[root@server1 salt]# cat top.sls
base:
  'server1':
    - haproxy.install
  'server2':
    - httpd.apache
  'server3':
    - nginx.service
[root@server1 salt]# salt '*' state.highstate
server1:
----------
          ID: haproxy-install
    Function: pkg.installed
      Result: True
     Comment: All specified packages are already installed
     Started: 16:52:19.287215
    Duration: 313.303 ms
     Changes:
----------
          ID: haproxy-install
    Function: file.managed
        Name: /etc/haproxy/haproxy.cfg
      Result: True
     Comment: File /etc/haproxy/haproxy.cfg is in the correct state
     Started: 16:52:19.602735
    Duration: 34.858 ms
     Changes:
----------
          ID: haproxy-install
    Function: service.running
        Name: haproxy
      Result: True
     Comment: The service haproxy is already running
     Started: 16:52:19.638266
    Duration: 30.261 ms
     Changes:

Summary for server1
------------
Succeeded: 3
Failed:    0
------------
Total states run:     3
Total run time: 378.422 ms
server2:
----------
          ID: apache-install
    Function: pkg.installed
      Result: True
     Comment: All specified packages are already installed
     Started: 16:52:19.671097
    Duration: 308.636 ms
     Changes:
----------
          ID: apache-config
    Function: file.managed
        Name: /etc/httpd/conf/httpd.conf
      Result: True
     Comment: File /etc/httpd/conf/httpd.conf is in the correct state
     Started: 16:52:19.981207
    Duration: 29.759 ms
     Changes:
----------
          ID: apache-service
    Function: service.running
        Name: httpd
      Result: True
     Comment: Service httpd is already enabled, and is running
     Started: 16:52:20.011704
    Duration: 97.357 ms
     Changes:
              ----------
              httpd:
                  True

Summary for server2
------------
Succeeded: 3 (changed=1)
Failed:    0
------------
Total states run:     3
Total run time: 435.752 ms
server3:
----------
          ID: make
    Function: pkg.installed
      Result: True
     Comment: All specified packages are already installed
     Started: 16:52:20.323043
    Duration: 342.616 ms
     Changes:
----------
          ID: nginx-group
    Function: group.present
        Name: nginx
      Result: True
     Comment: Group nginx is present and up to date
     Started: 16:52:20.666137
    Duration: 0.407 ms
     Changes:
----------
          ID: nginx-user
    Function: user.present
        Name: nginx
      Result: True
     Comment: User nginx is present and up to date
     Started: 16:52:20.667380
    Duration: 0.742 ms
     Changes:
----------
          ID: nginx-install
    Function: file.managed
        Name: /mnt/nginx-1.10.1.tar.gz
      Result: True
     Comment: File /mnt/nginx-1.10.1.tar.gz is in the correct state
     Started: 16:52:20.669110
    Duration: 53.481 ms
     Changes:
----------
          ID: nginx-install
    Function: cmd.run
        Name: cd /mnt && tar zxf nginx-1.10.1.tar.gz && cd nginx-1.10.1 && sed -i.bak 's/define NGINX_VER          "nginx\/" NGINX_VERSION/define NGINX_VER          "nginx"'/g src/core/nginx.h && sed -i.bak 's/CFLAGS="$CFLAGS -g"/#CFLAGS="$CFLAGS -g"/g' auto/cc/gcc && ./configure --prefix=/usr/local/nginx --with-threads --with-http_ssl_module --with-file-aio --with-http_stub_status_module &> /dev/null && make &> /dev/null && make install &> /dev/null
      Result: True
     Comment: /usr/local/nginx exists
     Started: 16:52:20.723290
    Duration: 0.348 ms
     Changes:
----------
          ID: /usr/local/nginx/conf/nginx.conf
    Function: file.managed
      Result: True
     Comment: File /usr/local/nginx/conf/nginx.conf is in the correct state
     Started: 16:52:20.723718
    Duration: 33.559 ms
     Changes:
----------
          ID: nginx-service
    Function: file.managed
        Name: /etc/init.d/nginx
      Result: True
     Comment: File /etc/init.d/nginx is in the correct state
     Started: 16:52:20.757397
    Duration: 31.903 ms
     Changes:
----------
          ID: nginx-service
    Function: service.running
        Name: nginx
      Result: True
     Comment: The service nginx is already running
     Started: 16:52:20.790320
    Duration: 23.984 ms
     Changes:

Summary for server3
------------
Succeeded: 8
Failed:    0
------------
Total states run:     8
Total run time: 487.040 ms
浏览器测试: