1.1 安装系统的方法
l 光盘(ISO文件,光盘的镜像文件)===>>每一台物理机都得给一个光驱,如果用外置光驱的话,是不是每台机器都需要插一下
l U盘:ISO镜像刻录到U盘==>>需要每台机器都需要插一下
l 并行安装==>>网络安装
l 自动化安装
2.1安装开始:
环境:关闭防火墙、selinux
注意:虚拟机进行网络安装的话,7.3以后的系统是需要2G以上的内存

[root@kickstart ~]# cat /etc/redhat-release
CentOS Linux release 7.4.1708 (Core)
[root@kickstart ~]# uname -r
3.10.0-693.el7.x86_64
[root@kickstart ~]# getenforce
Disabled
[root@kickstart ~]# systemctl status  firewalld.service
● firewalld.service - firewalld - dynamic firewall daemon
   Loaded: loaded (/usr/lib/systemd/system/firewalld.service; disabled; vendor preset: enabled)
   Active: inactive (dead)
     Docs: man:firewalld(1)
[root@kickstart ~]# hostname -I
10.0.0.201 172.16.1.201
博主使用的是虚拟机搭建
此篇博主在搭建中的每一步都列出了会出现的错误和解决方式,如果出错了,不要着急,耐心看。
有错、排错是提升的最快方式。
kickstart的原理及组件
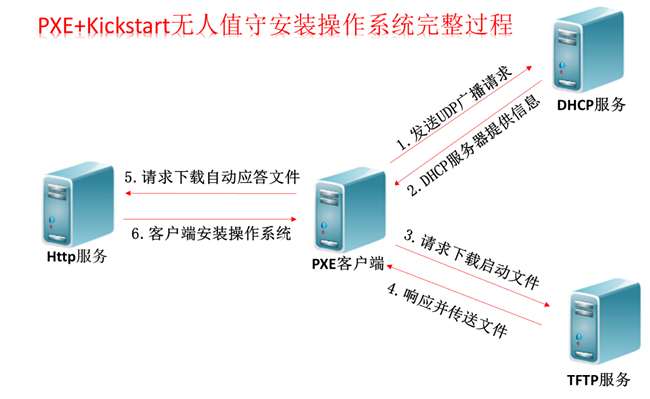
首先安装DHCP
yum install dhcp -y
配置DHCP配置文件
cat >>/etc/dhcp/dhcpd.conf<<EOF
subnet 172.16.1.0 netmask 255.255.255.0 {   ## 指定网段
range 172.16.1.100 172.16.1.199;     ## 地址范围
option subnet-mask 255.255.255.0;   ## 分配的掩码
default-lease-time 21600;   ## 地址租约
max-lease-time 43200;       ## 最大租约
next-server 172.16.1.201;   ## 下一步找什么
filename "/pxelinux.0";    ## 要下载的文件(请求下载启动文件)
}
EOF
启动dhcp查看日志
systemctl start dhcpd     --- 启动
systemctl status dhcpd    --- 查看状态
tailf /var/log/messages   --- 查看日志
dhcp相关错误须知

然后安装TFTP
yum install tftp-server -y
(1)安装xinetd、tftp-server和syslinux(或syslinux-tftpboot 使用这个包就不必手工将启动内核文件vmlinuz, initrd.img pxelinux.0复制到tftp server的根目录下,这个包自动搞好。)
# yum install -y xinetd
# yum install -y tftp-server syslinux  #syslinux 会在 /usr/share/syslinux/pxelinux.0 生成pxelinux.0文件 ,需要手动复制到/var/lib/tftpboot/ 目录中,详细见第8小点。
(2)配置xinetd,由xinetd管理tftp

# vim /etc/xinetd.d/tftp
#---------可用最简配置-------------------

service tftp

{
        socket_type             = dgram
        protocol                = udp
        wait                    = yes
        user                    = root
        server                  = /usr/sbin/in.tftpd
        server_args             = -s /var/lib/tftpboot
        disable                 = no  #默认disable是yes的,把它改为no即可
        per_source              = 11
        cps                     = 100 2
        flags                   = IPv4
}
systemctl enable tftp
systemctl enable xinetd
systemctl start tftp
systemctl start xinetd
启动服务
[root@kickstart ~]# systemctl start tftp.socket
[root@kickstart ~]# systemctl status tftp.socket
● tftp.socket - Tftp Server Activation Socket
   Loaded: loaded (/usr/lib/systemd/system/tftp.socket; disabled; vendor preset: disabled)
   Active: active (listening) since 二 2017-11-14 10:09:55 CST; 25s ago
   Listen: [::]:69 (Datagram)

11月 14 10:09:55 kickstart systemd[1]: Listening on Tftp Server Activation ...t.
11月 14 10:09:55 kickstart systemd[1]: Starting Tftp Server Activation Socket.
Hint: Some lines were ellipsized, use -l to show in full.
tftp相关错误须知

报错是在TFTP服务的根目录找不到启动文件pxelinux.0
解决:下载安装syslinux
安装syslinux,生成/pxelinux.0文件
[root@kickstart tftpboot]# yum install syslinux -y
[root@kickstart tftpboot]# cp /usr/share/syslinux/pxelinux.0 /var/lib/tftpboot/
[root@kickstart tftpboot]# ll
总用量 28
-rw-r--r-- 1 root root 26764 11月 14 10:16 pxelinux.0
错误须知

首先排除最简单故障原因:selinux是否关闭,防火墙是否关闭
上面的错误是因为pxelinux.0这个小系统的配置文件(default)不存在,或者文件名不对
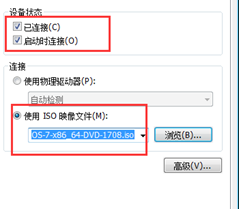
然后进行镜像挂载
检查一下虚拟机是否使用了镜像
然后进行挂载
[root@kickstart tftpboot]# mkdir -p /var/www/html/CentOS7
[root@kickstart tftpboot]# mount /dev/cdrom /var/www/html/CentOS7/
mount: /dev/sr0 写保护,将以只读方式挂载
[root@kickstart tftpboot]# df -h
文件系统        容量  已用  可用 已用% 挂载点
/dev/sda3        98G  1.5G   97G    2% /
devtmpfs        479M     0  479M    0% /dev
tmpfs           489M     0  489M    0% /dev/shm
tmpfs           489M  6.8M  482M    2% /run
tmpfs           489M     0  489M    0% /sys/fs/cgroup
/dev/sda1      1014M  120M  895M   12% /boot
tmpfs            98M     0   98M    0% /run/user/0
/dev/sr0        4.3G  4.3G     0  100% /var/www/html/CentOS7
这里要说明另一种挂载方式:上传镜像:
如果是镜像文件已上传到linux中,可以这样挂
#mount -o loop /opt/CentOS-7-x86_64-Minimal-1511.iso /var/www/html/cdrom
从镜像中找到相关的配置文件
[root@kickstart tftpboot]# cp -a /var/www/html/CentOS7/isolinux/* /var/lib/tftpboot/
[root@kickstart tftpboot]# mkdir -p /var/lib/tftpboot/pxelinux.cfg
[root@kickstart tftpboot]# cp /var/www/html/CentOS7/isolinux/isolinux.cfg /var/lib/tftpboot/pxelinux.cfg/default
安装http
作用1:提供自动应答文件下载
作用2:提供安装系统所需的所有rpm包下载
下载安装
[root@kickstart tftpboot]# yum install httpd -y
启动服务
[root@kickstart tftpboot]# systemctl start httpd.service
检测
[root@kickstart tftpboot]# curl http://172.16.1.201/CentOS7/
编辑default配置文件
[root@kickstart ks_config]# cat /var/lib/tftpboot/pxelinux.cfg/default
default ks
prompt 0
label ks
  kernel vmlinuz
  append initrd=initrd.img ks=http://172.16.1.201/ks_config/CentOS7-ks.cfg net.ifnames=0 biosdevname=0 ksdevice=eth1
自动安装(编写ks文件)
命令段
install开头,到%pre
包组段
以%packages开头,以%end结束
脚本段
以%post开头,以%end结束,在安装完系统之后执行的相关Linux命令、脚本
以%pre开头,以%end结束,在安装完系统之前执行的相关Linux命令、脚本

[root@kickstart ks_config]# cat CentOS7-ks.cfg
# Kickstart Configurator for CentOS 7 by yao zhang
install               ## 告知这是一次安装程序
url --url=http://172.16.1.201/CentOS7/     ## 通过ftp或http从远程服务器安装的地址
text                 ## 使用文本模式安装
lang en_US.UTF-8        ## 设置安装过程中使用的语言字符集
keyboard us       ## 设置系统键盘类型为us
zerombr            ## 清除mbr引导信息
bootloader --location=mbr --driveorder=sda --append="crashkernel=auto rhgb quiet"        --location=mbr  ## 指定引导记录被写入的位置
                --driveorder=sda     ## 指定在BIOS引导顺序中居首的驱动器
--append="crashkernel=auto rhgb quiet"  ## 指定内核参数,要指定多个参数空格分隔,为通过网络的kickstart安装以及所安装的系统配置联网信息。
network  --bootproto=static --device=eth0 --gateway=10.0.0.254 --ip=10.0.0.202 --nameserver=223.5.5.5 --netmask=255.255.255.0 --activate
network  --bootproto=static --device=eth1 --ip=172.16.1.202 --netmask=255.255.255.0 --activate
network  --hostname=Cobbler      ## 以上是静态配置ip网络信息的写法
#network --bootproto=dhcp --device=eth1 --onboot=yes --noipv6 --hostname=CentOS7    ## 动态配置ip网络信息的写法和配置主机名
timezone --utc Asia/Shanghai        ## 设置时区为亚洲上海
authconfig --enableshadow --passalgo=sha512          ## 系统认证信息,这里要是写密文密码需加  设置密码加密方式为sha512 启用shadow文件
rootpw  --iscrypted $6$X20eRtuZhkHznTb4$dK0BJByOSAWSDD8jccLVFz0CscijS9ldMWwpoCw/ZEjYw2BTQYGWlgKsn945fFTjRC658UXjuocwJbAjVI5D6/    ## 加密的root密码
clearpart --all --initlabel          ## 清空分区,清空所有分区
part /boot --fstype xfs --size 1024   ## 为分区设置文件系统类型为xfs,size设置大小
part swap --size 1024
part / --fstype xfs --size 1 --grow   ## grow把剩余容量都给这个分区
firstboot --disable        ## 协助配置服务器的重要信息
selinux --disabled         ## 关闭selinux
firewall --disabled        ## 关闭防火墙
logging --level=info       ## 设置日志级别
reboot        ## 设置安装完成后重启,必须存在

%packages            ## 这一部分是要安装的一些包
@^minimal
@compat-libraries
@debugging
@development
tree
nmap
sysstat
lrzsz
dos2unix
telnet
wget
vim
bash-completion
%end

%post            ## 安装后执行的命令,如果要一键化搭建集群,这里可以执行写好的shell或ansible剧本进行搭建
systemctl disable postfix.service
%end
实例:
#version=DEVEL
install
# System authorization information
# Use CDROM installation media
url --url="http://192.168.0.130/cdrom/"
# Use graphical install
text
#key --skip
# Run the Setup Agent on first boot
# Keyboard layouts
keyboard --vckeymap=us --xlayouts='us'
# System language
lang en_US.UTF-8

# Network information
network  --bootproto=dhcp --device=ens192 --ipv6=auto --activate
network  --hostname=k8s-master03

# Root password
rootpw --iscrypted $6$gX.1Y9JZru1M3Yc4$.LKz2JcjKJQb6FM3DlVXXhG490f8Sn1/A3qFiNG05BmrJiBK8GCWPhCaIZXHKFW9p6whLNFv1.QI8EFUf5zqm/
# System services
services --enabled="chronyd"
# System timezone
timezone Asia/Shanghai --isUtc
# System bootloader configuration
bootloader --append=" crashkernel=auto" --location=mbr --boot-drive=sda
autopart --type=lvm
# Partition clearing information
clearpart --none --initlabel
firstboot --disable
selinux --disabled
firewall --disabled
reboot

%packages
@^minimal
@core
chrony
kexec-tools
tree
nmap
sysstat
lrzsz
dos2unix
telnet
wget
vim
bash-completion


%end

%addon com_redhat_kdump --enable --reserve-mb='auto'

%end

%anaconda
pwpolicy root --minlen=6 --minquality=1 --notstrict --nochanges --notempty
pwpolicy user --minlen=6 --minquality=1 --notstrict --nochanges --emptyok
pwpolicy luks --minlen=6 --minquality=1 --notstrict --nochanges --notempty
%end
低级错误

报错原因:selinux没关
解决:关闭selinux
CentOS7.4网络安装
安装过程的常见报错

原因:CentOS6和7的default文件中的append这一行不同
解决方法:改append这一行

借鉴作者的链接地址:
https://blog.csdn.net/openbox2008/article/details/80089567
http://www.cnblogs.com/lyq863987322/p/8249867.html