目录
1 kickstart简介
1.1 什么是kickstart
kickstart是一种无人值守安装方式。Kickstart的工作原理是通过记录典型的安装过程中所需要人工干预填写的各种参数,并生成一个名为
ks.cfg的文件;在其后的安装过程中(不只局限于生成Kickstart安装文件的机器),当出现要求填写参数的情况时,安装程序会首先查找Kickstart生成的文件,当找到合适的参数时,就采用找到的参数,当没有找到合适的参数时,才需要安装者手工干预。这样,如果Kickstart文件涵盖了安装过程中出现的所有需要填写的参数时,安装者完全可以只告诉安装程序从何处取
ks.cfg文件,然后去忙自己的事情。等安装完毕,安装程序会根据ks.cfg中设置的重启选项来重启系统,并结束安装。
# 一般刚装完一个Linux系统之后都会在/root目录下生成三个文件,这三个文件就包括了系统在安装时都装了什么软件,一些记录等等。
[root@m01 ~]# ls
anaconda-ks.cfg  install.log  install.log.syslog
1.2 什么是PXE
严格的说,PXE并不是一种安装方式,而是一种引导方式,。进行PXE安装的必要条件是要安装的计算机中包含一个PXE支持的网卡(NIC),即网卡中必须要有PXE Client。
PXE(Pre-boot Execution Environment)协议使计算机可以通过网络启动。网卡中必须有PXE芯片。
协议分为client和server端,PXE client在网卡的ROM中,当计算机引导时,BIOS把PXE client调入内存执行,由PXE client将放置在远端的文件通过网络下载到本地运行。运行工PXE协议需要设置DHCP服务器和TFTP服务器。DHCP服务器用来给PXE client(将要安装系统的主机)分配一个IP地址,由于是给PXE client分配IP地址,所以在配置DHCP服务器时需要增加相应的PXE设置。此外,在PXE client的ROM中,已经存在了TFTP Client。PXE Client通过TFTP协议到Server上下载所需要的文件。
故要配置kickstart需要先配置DHCP服务 、TFTP服务和web服务。
2 安装配置kickstart
# 系统环境准备,m01作为Server
[root@m01 ~]# cat /etc/redhat-release
CentOS release 6.9 (Final)
[root@m01 ~]# sestatus   # selinux必须关闭
SELinux status:                 disabled
[root@m01 ~]# LANG=en    # 防火墙也要关闭
[root@m01 ~]# /etc/init.d/iptables status
iptables: Firewall is not running.
2.1 配置DHCP服务
[root@m01 ~]# yum -y install dhcp
[root@m01 ~]# rpm -ql dhcp |grep "dhcpd.conf"
/etc/dhcp/dhcpd.conf
/usr/share/doc/dhcp-4.1.1/dhcpd-conf-to-ldap
/usr/share/doc/dhcp-4.1.1/dhcpd.conf.sample
/usr/share/man/man5/dhcpd.conf.5.gz
[root@m01 ~]# cat /etc/dhcp/dhcpd.conf
#
# DHCP Server Configuration file.
# see /usr/share/doc/dhcp*/dhcpd.conf.sample
# see 'man 5 dhcpd.conf'
#
# 修改dhcp配置文件
[root@m01 ~]# cat >>/etc/dhcp/dhcpd.conf<<EOF
subnet 172.16.1.0 netmask 255.255.255.0 {
range 172.16.1.100 172.16.1.200;
option subnet-mask 255.255.255.0;
default-lease-time 21600;
max-lease-time 43200;
next-server 172.16.1.61;
filename "/pxelinux.0";
}
EOF
# 启动dhcp服务
[root@m01 ~]# /etc/init.d/dhcpd start
Starting dhcpd: [ OK ]
[root@m01 ~]# lsof -i :67
COMMAND PID USER FD TYPE DEVICE SIZE/OFF NODE NAME
dhcpd 28925 dhcpd 7u IPv4 101359 0t0 UDP *:bootps
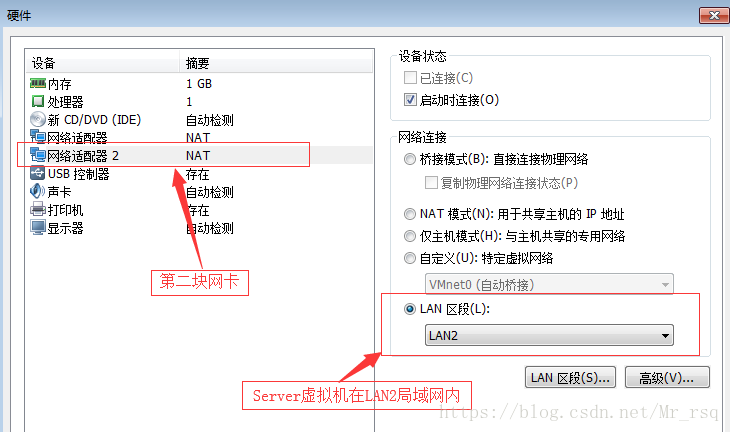
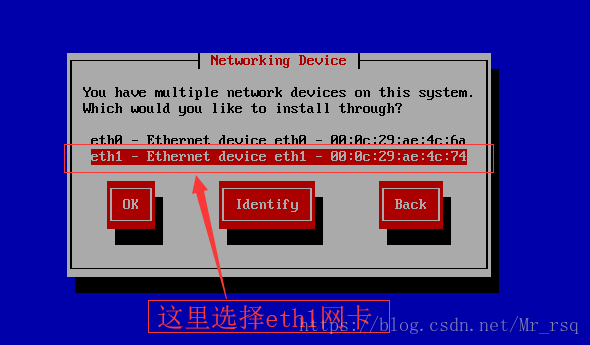
# 多网卡的时候默认监听eth0,测试的时候我会使用双网卡,故指定DHCP监听eth1网卡
[root@m01 ~]# cat /etc/sysconfig/dhcpd
# Command line options here
DHCPDARGS=eth1 # 这里就指定了监听eth1网卡
[root@m01 ~]# /etc/init.d/dhcpd restart # 重启服务
Shutting down dhcpd: [ OK ]
Starting dhcpd: [ OK ]
本来软件装完后都要加入开机自启动,但这个Kickstart系统就不能开机自启动,而且用完后服务都要关闭,防止未来重启服务器自动重装系统了。
如果机器数量过多的话,注意dhcp服务器的地址池,不要因为耗尽IP而导致dhcpd服务器没有IP地址release的情况。
2.2 配置TFTP服务
[root@m01 ~]# yum -y install tftp-server
[root@m01 ~]# cat /etc/xinetd.d/tftp
# default: off
# description: The tftp server serves files using the trivial file transfer \
#   protocol.  The tftp protocol is often used to boot diskless \
#   workstations, download configuration files to network-aware printers, \
#   and to start the installation process for some operating systems.
service tftp
{
    socket_type     = dgram
    protocol        = udp
    wait            = yes
    user            = root
    server          = /usr/sbin/in.tftpd
    server_args     = -s /var/lib/tftpboot
    disable         = no   # 由原来的yes改为no,即开启
    per_source      = 11
    cps         = 100 2
    flags           = IPv4
}
[root@m01 ~]# /etc/init.d/xinetd start
Starting xinetd:                                           [  OK  ]
[root@m01 ~]# lsof -i :69
COMMAND   PID USER   FD   TYPE DEVICE SIZE/OFF NODE NAME
xinetd  29141 root    5u  IPv4 103828      0t0  UDP *:tftp
2.3 web服务配置
[root@m01 ~]# yum -y install httpd
[root@m01 ~]# sed -i "s/#ServerName www.example.com:80/ServerName 127.0.0.1:80/g" /etc/httpd/conf/httpd.conf  # 修改ServerName为localhost
# 挂载ISO镜像文件
在挂载之前需要先把虚拟机连接ISO镜像文件
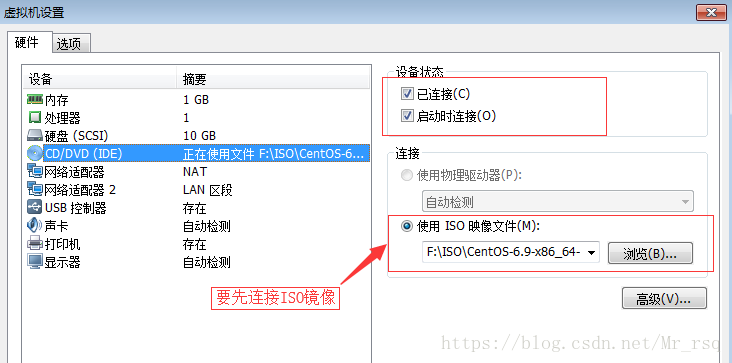
[root@m01 ~]# mkdir /var/www/html/CentOS-6.9
[root@m01 ~]# mount /dev/cdrom /var/www/html/CentOS-6.9/
mount: block device /dev/sr0 is write-protected, mounting read-only
[root@m01 ~]# df -h
Filesystem Size Used Avail Use% Mounted on
/dev/sda3 8.8G 2.3G 6.1G 27% /
tmpfs 491M 4.0K 491M 1% /dev/shm
/dev/sda1 190M 35M 146M 19% /boot
/dev/sr0 3.7G 3.7G 0 100% /var/www/html/CentOS-6.9
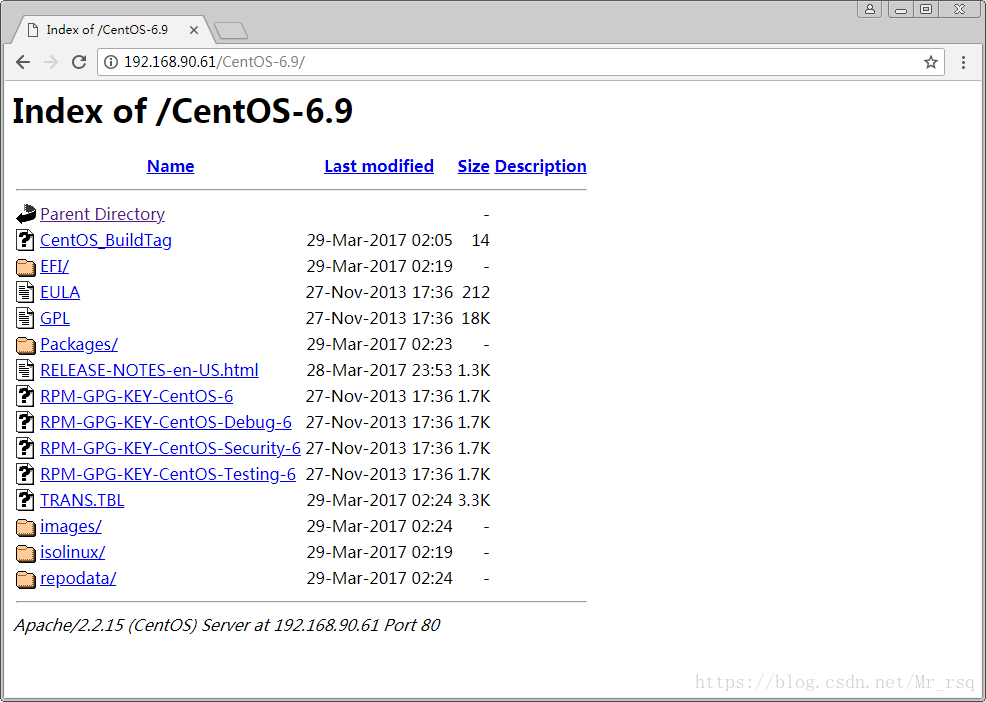
# 不管怎么弄,只要把安装光盘内容能通过web发布即可。因为是演示,如果复制镜像就有点浪费时间。但生产环境就一定要复制了,光盘读取速度有限。测试访问
2.4 配置支持PXE的启动程序
PXE引导配置(bootstrap)
syslinux是一个功能强大的引导加载程序,而且兼容各种介质。SYSLINUX是一个小型的Linux操作系统,它的目的是简化首次安装Linux的时间,并建立修护或其它特殊用途的启动盘。如果没有找到pxelinux.0这个文件,可以安装一下。
[root@m01 ~]# yum -y install syslinux
[root@m01 ~]# cp /usr/share/syslinux/pxelinux.0 /var/lib/tftpboot/

# 复制启动菜单程序文件
[root@m01 ~]# cp -a /var/www/html/CentOS-6.9/isolinux/* /var/lib/tftpboot/
[root@m01 ~]# ls /var/lib/tftpboot/
TRANS.TBL  boot.msg   initrd.img    isolinux.cfg  pxelinux.0  vesamenu.c32
boot.cat   grub.conf  isolinux.bin  memtest       splash.jpg  vmlinuz

# 新建一个pxelinux.cfg目录,存放客户端的配置文件。
[root@m01 ~]# mkdir -p /var/lib/tftpboot/pxelinux.cfg
[root@m01 ~]# cp /var/www/html/CentOS-6.9/isolinux/isolinux.cfg /var/lib/tftpboot/pxelinux.cfg/default
[root@m01 ~]# ll /var/lib/tftpboot/pxelinux.cfg
total 4
-r--r--r-- 1 root root 923 May 11 14:59 default

# /var/lib/tftpboot/pxelinux.cfg文件详解
[root@m01 ~]# cat /var/lib/tftpboot/pxelinux.cfg/default
default vesamenu.c32  # 默认加载一个菜单
#prompt 1             # 开启会显示命令行'boot: '提示符。prompt值为0时则不提示,将会直接启动'default'参数中指定的内容。
timeout 600           # timeout时间是引导时等待用户手动选择的时间,设为1可直接引导,单位为1/10秒。
display boot.msg
# 菜单背景图片、标题、颜色。
menu background splash.jpg
menu title Welcome to CentOS 6.7!
menu color border 0 #ffffffff #00000000
menu color sel 7 #ffffffff #ff000000
menu color title 0 #ffffffff #00000000
menu color tabmsg 0 #ffffffff #00000000
menu color unsel 0 #ffffffff #00000000
menu color hotsel 0 #ff000000 #ffffffff
menu color hotkey 7 #ffffffff #ff000000
menu color scrollbar 0 #ffffffff #00000000
# label指定在boot:提示符下输入的关键字,比如boot:linux[ENTER],这个会启动label linux下标记的kernel和initrd.img文件。
label linux       # 一个标签就是前面图片的一行选项。
  menu label ^Install or upgrade an existing system
  menu default
  kernel vmlinuz  # 指定要启动的内核。同样要注意路径,默认是/tftpboot目录。
  append initrd=initrd.img # 指定追加给内核的参数,initrd.img是一个最小的linux系统
label vesa
  menu label Install system with ^basic video driver
  kernel vmlinuz
  append initrd=initrd.img nomodeset
label rescue
  menu label ^Rescue installed system
  kernel vmlinuz
  append initrd=initrd.img rescue
label local
  menu label Boot from ^local drive
  localboot 0xffff
label memtest86
  menu label ^Memory test
  kernel memtest
  append -
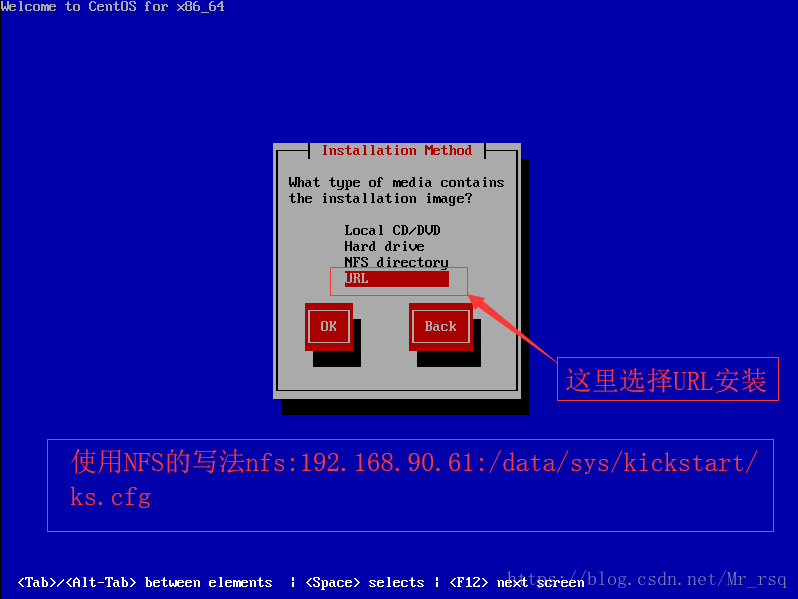
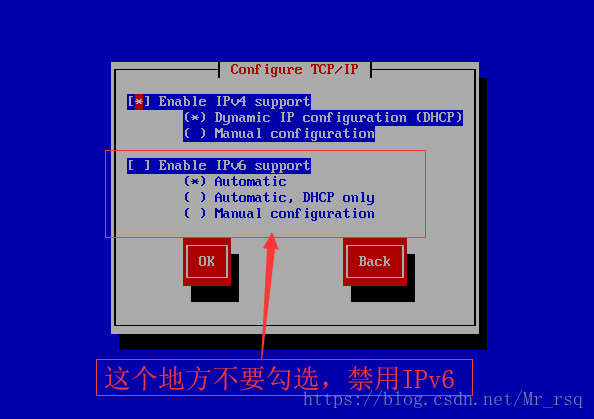
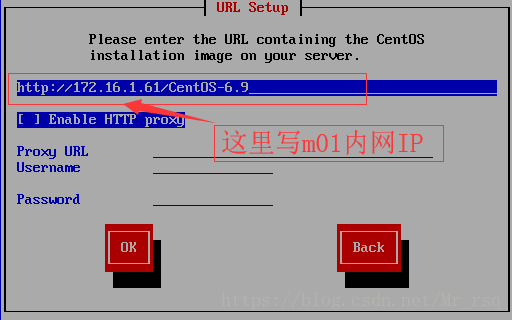
3 手动网络安装
新添加一个虚拟机进行安装测试
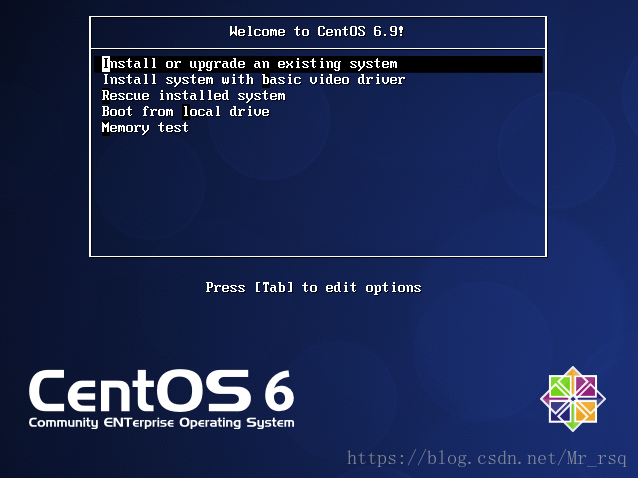
一些最基本的安装步骤这里就不再截图
4 无人值守安装
生成kickstart配置文件的三种方法:
方法1:每安装好一台Centos机器,Centos安装程序都会创建一个kickstart配置文件,记录你的真实安装配置。如果你希望实现和某系统类似的安装,可以基于该系统的kickstart配置文件来生成你自己的kickstart配置文件。(生成的文件名字叫anaconda-ks.cfg位于/root/anaconda-ks.cfg)
方法2:Centos提供了一个图形化的kickstart配置工具。在任何一个安装好的Linux系统上运行该工具,就可以很容易地创建你自己的kickstart配置文件。kickstart配置工具命令为redhat-config-kickstart(RHEL3)或system-config-kickstart(RHEL4,RHEL5).网上有很多用CentOS桌面版生成ks文件的文章,如果有现成的系统就没什么可说。但没有现成的,也没有必要去用桌面版,命令行也很简单。
方法3:阅读kickstart配置文件的手册。用任何一个文本编辑器都可以创建你自己的kickstart配置文件。
ks.cfg文件详解
ks.cfg文件组成大致分为3段
1、命令段
键盘类型,语言,安装方式等系统的配置,有必选项和可选项,如果缺少某项必选项,安装时会中断并提示用户选择此项的选项
2、软件包段
%packages
@groupname:指定安装的包组
package_name:指定安装的包
-package_name:指定不安装的包
在安装过程中默认安装的软件包,安装软件时会自动分析依赖关系。
3、脚本段(可选)
%pre:安装系统前执行的命令或脚本(由于只依赖于启动镜像,支持的命令很少)
%post:安装系统后执行的命令或脚本(基本支持所有命令)
4.2 配置支持PXE的启动程序
# 先生成一个密码备用
[root@m01 ~]# grub-crypt
Password: 123456
Retype password: 123456
$6$vMbO1MsLXFPZpMYH$HkeCBKSAa1.Zsnwk/Fp3nheeCRGF2s2/yvJiy8biF/IhWUP6FWOmQ62M3NKVC2XiWlI/dEdqpHnNp7AX9La6Y/

# 创建ks.cfg文件
[root@m01 ~]# mkdir /var/www/html/ks_config
[root@m01 ~]# cat /var/www/html/ks_config/CentOS-6.9-ks.cfg
# Kickstart Configurator for CentOS 6.9
install
url --url="http://172.16.1.61/CentOS-6.9/"
text
lang en_US.UTF-8
keyboard us
zerombr
bootloader --location=mbr --driveorder=sda --append="crashkernel=auto rhgb quiet"
network --bootproto=dhcp --device=eth0 --onboot=yes --noipv6 --hostname=CentOS6
timezone --utc Asia/Shanghai
authconfig --enableshadow --passalgo=sha512
rootpw  --iscrypted $6$X20eRtuZhkHznTb4$dK0BJByOSAWSDD8jccLVFz0CscijS9ldMWwpoCw/ZEjYw2BTQYGWlgKsn945fFTjRC658UXjuocwJbAjVI5D6/
clearpart --all --initlabel
part /boot --fstype=ext4 --asprimary --size=200
part swap --size=1024
part / --fstype=ext4 --grow --asprimary --size=200
firstboot --disable
selinux --disabled
firewall --disabled
logging --level=info
reboot
%packages
@base
@compat-libraries
@debugging
@development
tree
nmap
sysstat
lrzsz
dos2unix
telnet
%post
wget -O /tmp/optimization.sh http://172.16.1.61/ks_config/optimization.sh &>/dev/null
/bin/sh /tmp/optimization.sh
%end
4.3 创建开机优化脚本
[root@m01 ~]# cat /var/www/html/ks_config/optimization.sh
#!/bin/bash
#

. /etc/init.d/functions
Ip=172.16.1.61
Port=80
ConfigDir=ks_config
# Judge Http server is ok?
PortNum=`nmap $Ip  -p $Port 2>/dev/null|grep open|wc -l`
[ $PortNum -lt 1 ] && {
        echo "Http server is bad!"
        exit 1
}
# Defined result function
function Msg(){
        if [ $? -eq 0 ];then
          action "$1" /bin/true
        else
          action "$1" /bin/false
        fi
}
# Defined IP function
function ConfigIP(){
        Suffix=`ifconfig eth0|awk -F "[ .]+" 'NR==2 {print $6}'`
        cat >/etc/sysconfig/network-scripts/ifcfg-eth0 <<-END
        DEVICE=eth0
        TYPE=Ethernet
        ONBOOT=yes
        NM_CONTROLLED=yes
        BOOTPROTO=none
        IPADDR=10.0.0.$Suffix
        PREFIX=24
        GATEWAY=10.0.0.2
        DNS1=10.0.0.2
        DEFROUTE=yes
        IPV4_FAILURE_FATAL=yes
        IPV6INIT=no
        NAME="System eth0"
        END
        Msg "config eth0"
}
# Defined Yum source Functions
function yum(){
        YumDir=/etc/yum.repos.d
        [ -f "$YumDir/CentOS-Base.repo" ] && cp $YumDir/CentOS-Base.repo{,.ori}
        wget -O $YumDir/CentOS-Base.repo http://$Ip:$Port/$ConfigDir/CentOS-Base.repo &>/dev/null &&\
        wget -O $YumDir/epel.repo http://$Ip:$Port/$ConfigDir/epel.repo &>/dev/null &&\
        Msg "YUM source"
}
# Defined Hide the system version number Functions
function HideVersion(){
        [ -f "/etc/issue" ] && >/etc/issue
        Msg "Hide issue"
        [ -f "/etc/issue.net" ] && > /etc/issue.net
        Msg "Hide issue.net"
}
# Defined OPEN FILES Functions
function openfiles(){
        [ -f "/etc/security/limits.conf" ] && {
        echo '*  -  nofile  65535' >> /etc/security/limits.conf
        Msg "open files"
        }
}
# Defined Kernel parameters Functions
function kernel(){
        KernelDir=/etc
        [ -f "$KernelDir/sysctl.conf" ] && /bin/mv $KernelDir/sysctl.conf{,.ori}
        wget -O $KernelDir/sysctl.conf http://$Ip:$Port/$ConfigDir/sysctl.conf &>/dev/null
        Msg "Kernel config"
}
# Defined System Startup Services Functions
function boot(){
        for oldboy in `chkconfig --list|grep "3:on"|awk '{print $1}'|grep -vE "crond|network|rsyslog|sshd|sysstat"`
          do
           chkconfig $oldboy off
        done
        Msg "BOOT config"
}
# Defined Time Synchronization Functions
function Time(){
        echo "#time sync by zhangyao at $(date +%F)" >>/var/spool/cron/root
        echo '*/5 * * * * /usr/sbin/ntpdate ntp1.aliyun.com &>/dev/null' >>/var/spool/cron/root
        Msg "Time Synchronization"
}
# Defined main Functions
function main(){
        ConfigIP
        yum
        HideVersion
        openfiles
        kernel
        boot
        Time
}
main

# 上传CentOS-Base.repo、epel.repo、sysctl.conf文件至/var/www/html/ks_config/目录下
[root@m01 ~]# cp /etc/yum.repos.d/{CentOS-Base,epel}.repo /var/www/html/ks_config/
[root@m01 ~]# cp /etc/sysctl.conf /var/www/html/ks_config/
[root@m01 ~]# ls /var/www/html/ks_config/
CentOS-6.9-ks.cfg  CentOS-Base.repo  epel.repo  optimization.sh  sysctl.conf
4.4 精简default配置文件
[root@m01 ~]# cat /var/lib/tftpboot/pxelinux.cfg/default
default ks
prompt 0
label ks
  kernel vmlinuz
  append initrd=initrd.img ks=http://172.16.1.61/ks_config/CentOS-6.9-ks.cfg ksdevice=eth1
# append initrd=initrd.img ks=http://172.16.1.61/ks_config/CentOS-6.9-ks.cfg 告诉安装程序ks.cfg文件在哪里
# ksdevice=eth1 代表当客户端有多块网卡的时候,要实现自动化需要设置从eth1安装,不指定的话,安装的时候系统会让你选择,那就不全自动化了。
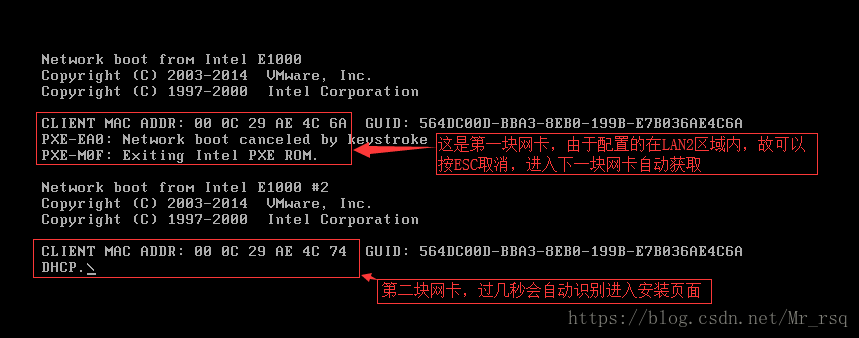
4.5 新建一个虚拟机测试
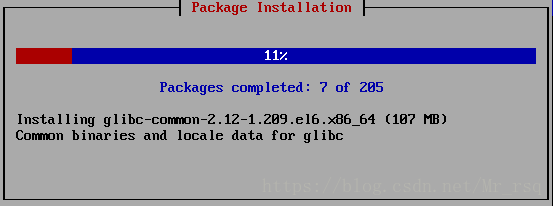
如果出现以下界面基本上就成功了,全程不用手动点击或敲键盘,实现自动化安装系统,如果在安装包的时候出现下载失败,或者是Retrying Download(重新尝试下载)的情况可能是镜像有问题,换个镜像。
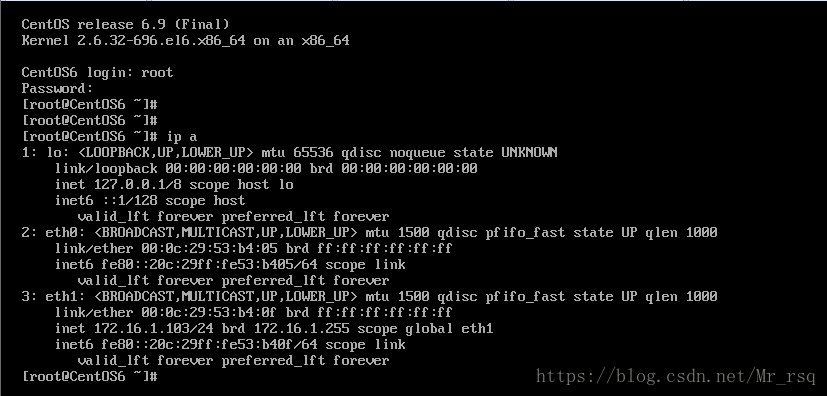
最后安装成功后显示登录界面,由于我没有对eth1进行IP地址分配,故eth0后便可以自己配置
5 知识拓展
由于kickstart不怎么灵活,调整某些参数就需要另外一个ks.cfg文件。因此Cobbler无人值守安装可以一看。Cobbler无人值守安装