一.apache的定义
1.定义:
Apache HTTP Server(简称Apache)是的一个开放源码的网页服务器软件,它可以运行在几乎所有广泛使用的计算机平台上,由于其跨平台和安全性被广泛使用,是最流行的Web服务器端软件之一,同时它支持html/Perl/Python等语言,以下介绍在linux中的apache的安装与基础的使用。
2.软件作用:提供超文本协议,添加这个http共享协议之后成为web服务器
二.apache的安装部署
1.安装
yum install httpd.x86_64 -y   	##apache软件
yum install httpd-manual -y	##apache的手册
systemctl start httpd
systemctl enable httpd![]()
![]()

2.防火墙策略设置
firewall-config 				##图像化方式添加http和https火墙策略
firewall-cmd --permanent --add-service=http 	##永久允许http
firewall-cmd --permanent --add-service=https	##永久允许https
firewall-cmd --reload				##火墙重新加载策略
firewall-cmd --list-all ##列出火墙信息 
cd /var/www/html/     	##apache的/目录,默认发布目录
vim index.html		##默认发布文件
hello hetoto
systemctl restart httpd
浏览器测试:172.25.254.147

三.apache的基础信息
1.apache的默认访问接口是80
netstat -antlupe | grep httpd ##默认访问接口是80
2.默认访问目录:/var/www/html
3.默认共享的文件: index.html
4.apache的配置文件
rpm -qc httpd
/etc/httpd/conf  		##主配置目录
/etc/httpd/conf/httpd.conf	##主配置文件
/etc/httpd/conf.d/		##子配置目录
/etc/httpd/conf.d/*.conf	##子配置文件
5.默认安全上下文: http_sys_content_t
6.程序开启默认用户:apache
7.apache日志: /etc/httpf/logs/*
四.apache基础设置
1.修改默认端口为8080
1)selinux设置成强制模式
![]()
2)修改端口为8080:
vim /etc/httpd/conf/httpd.conf
42 Listen 8080  ##修改默认端口为8080
systemctl restart httpd.service
netstat -antlupe | grep httpd ##此时访问接口是8080![]()

3)火墙添加httpd访问接口8080
##图像化方式 firewall-config
firewall-cmd --permanent --add-port=8080/tcp
firewall-cmd --reload
firewall-cmd --list-all
测试http:172.25.254.147:8080

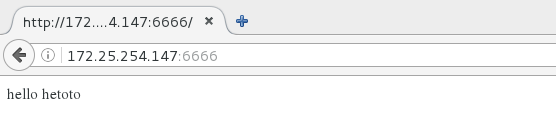
2.修改默认端口为特殊端口6666
1)修改端口为6666:
vim /etc/httpd/conf/httpd.conf
42 Listen 6666  ##修改默认端口为6666
systemctl restart httpd.service 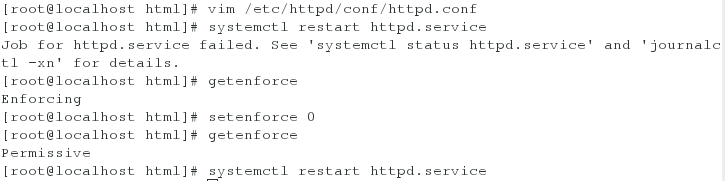
2)特殊端口需要把selinux设置成强制模式

3)火墙添加httpd访问接口6666
firewall-cmd --permanent --add-port=6666/tcp
firewall-cmd --reload
firewall-cmd --list-all
4)
semanage port -l | grep http 			##查看提供httpd服务的端口
semanage port -a -t http_port_t -p tcp 6666 	##添加端口6666为提供httpd服务的端口;-a 添加 -t往那个协议里添加
测试http:172.25.254.147:6666
3.修改默认发布文件:
cd /var/www/html/
vim westos.html
<h1>westos linux</h1>
vim /etc/httpd/conf/httpd.conf
43 Listen 80  	 ##还原默认端口为80
164 DirectoryIndex westos.html index.html
##设置访问默认发布文件的先后顺序。westos.html在前,index.html在后
systemctl restart httpd.service![]()
![]()

![]()
测试http:172.25.254.147 访问的是发布文件westos.html

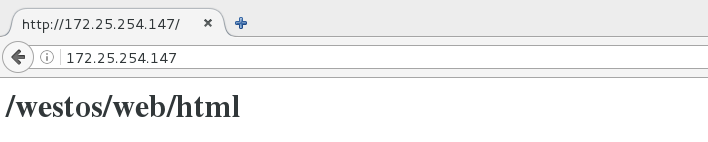
4.修改默认发布目录
mkdir -p /westos/web/html  		##建立新的发布目录
vim /westos/web/html/westos.html	##在发布目录下新建发布文件
<h1>/westos/web/html</h1>
vim /etc/httpd/conf/httpd.conf 	##注销119行的默认发布目录
120 DocumentRoot "/westos/web/html" ##DocumentRoot属性用于指定根目录路径
121 <Directory "/westos/web/html"> ##指定URL路径的后续请求中可以进行操作的权限范围属性
122       Require all granted		##提供所有权限
123 </Directory>
systemctl restart httpd.service 
![]()
修改安全上下文
semanage fcontext -a -t httpd_sys_content_t '/westos(/.*)?'
restorecon -RvvF /westos/
测试:http:172.25.254.147 ##访问的是你的修改的默认发布目录
五.apache的虚拟主机
1.还原环境
rm -fr /etc/httpd/conf/httpd.conf
yum reinstall httpd -y
systemctl start httpd
systemctl enable httpd![]()
2.建立指定访问news和music的发布目录
cd /var/www/
mkdir westos.com/news/html -p 		##news.westos.com的默认发布目录
mkdir westos.com/music/html -p		##music.westos.com的默认发布目录
3.在发布目录下默认发布文件
vim /var/www/westos.com/news/html/index.html 	##new.westos.com的默认发布文件
<h1>news</h1>
vim /var/www/westos.com/music/html/index.html 	##music.westos.com的默认发布文件
<h1>music</h1> 
4.apache的子配置目录中建立子配置文件
cd /etc/httpd/conf.d/ 		##切换到apache的子配置目录
vim a_defautl.conf
<VirtualHost _default_:80>
	DocumentRoot /var/www/html
	CustomLog logs/default.log combined
</VirtualHost>
![]()
vim news.conf
<VirtualHost *:80>
        ServerName news.westos.com	##访问的域名
 	DocumentRoot /var/www/westos.com/news/html ##访问域名时读取的发布文件
	Customlog logs/news.log combined 	##指定一个日志CustomLog combined混合型日志
</VirtualHost>
<Directory "/var/www/westos.com/news/html">
        Require all granted
</Directory> 
vim music.conf
<VirtualHost *:80>
	ServerName music.westos.com
	DocumentRoot /var/www/westos.com/music/html
	Customlog logs/music.log combined
</VirtualHost>
<Directory "/var/www/westos.com/music/html">
	Require all granted
</Directory>
systemctl restart httpd
真机测试:
vim /etc/hosts     ##本地解析
添加172.25.254.147 www.westos.com news.westos.com music.westos.com


六.内部的访问控制
(一)基于IP的访问控制
1.只允许IP为172.25.254.147的主机访问
cd /etc/httpd/conf.d
vim a_defautl.conf
<VirtualHost _default_:80>
	DocumentRoot /var/www/html
	CustomLog logs/default.log combined
</VirtualHost>
<Directory "/var/www/html"> ##访问的目录
	Order Deny,Allow ##按Deny,Allow的顺序访问
	Allow from 172.25.254.117 ##只172.25.254.117允许
	Deny from all ##不允许任何人访问
</Directory>

systemctl restart httpd 

测试:
IP为172.25.254.147的主机可以访问

真机不能访问

2.禁止IP为172.25.254.147的主机访问
<VirtualHost _default_:80>
	DocumentRoot /var/www/html
	CustomLog logs/default.log combined
</VirtualHost>
<Directory “/var/www/html”> ##访问的目录
Order Allow,Deny ##按Allow,Deny的顺序访问
Allow from all ##允许所有人
Deny from 172.25.254.147 ##不允许172.25.254.147访问
![]()
测试:
IP为172.25.254.147的主机不可以访问

真机(其他机器)可以访问

(二)基于用户的访问控制
cd /etc/httpd/conf.d
htpasswd -cm http_userlist admin ##创建用户列表,添加用户admin并设置其密码
cat http_userlist		 ##查看用户列表
htpasswd -m http_userlist admin1 ##在用户列表中添加用户admin1 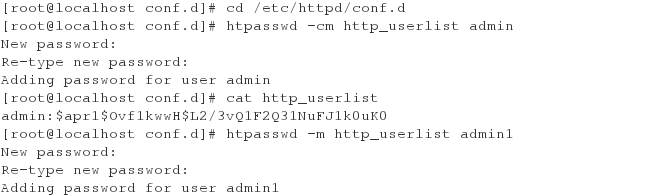
vim a_defautl.conf
<VirtualHost _default_:80>
DocumentRoot /var/www/html
CustomLog logs/default.log combined
</VirtualHost>
<Directory "/var/www/html">
AuthUserFile /etc/httpd/conf.d/http_userlist
AuthName "please input username and password !!" ##用户登陆提示信息
AuthType basic ##basic 基本认证,只看用户和密码其他不看
## Require user admin ##只允许admin用户可以登陆
Require valid-user ##所有列表用户都可以
</Directory>

systemctl restart httpd 
检测:
172.25.254.147
输入正确的用户和密码才可以访问成功

