一、Apache服务器简介
Apache HTTP Server(简称Apache)是Apache软件基金会的一个开放源码的网页服务器,可以在大多数计算机操作系统中运行,由于其多平台和安全性被广泛使用。Apache曾经是世界使用排名第一的Web服务器软件(2019年4月后nginx第一)。它可以运行在几乎所有广泛使用的计算机平台上。Apache 源于NCSAhttpd服务器,经过多次修改,成为世界上最流行的Web服务器软件之一。Apache取自“a patchy server”的读音,意思是充满补丁的服务器,因为它是自由软件,所以不断有人来为它开发新的功能、新的特性、修改原来的缺陷。Apache的特点是简单、速度快、性能稳定,并可做代理服务器来使用。当前最新稳定版是2.4.52,博文实验环境:
- 操作系统:centos7.6
- Apache版本:2.4.6
二、YUM安装Apache
在另外一篇博文Linux之WEB服务器Apache httpd源码编译安装中介绍了如何源码编译安装Apache服务,如果对于版本没有特别要求,centos环境下最简单快捷的安装方式还是yum安装,centos7环境下yum安装版本为2.4.6。
1、YUM安装Apache
[root@s152 ~]# yum install -y httpd
2、查看版本
[root@s152 ~]# httpd -v
Server version: Apache/2.4.6 (CentOS)
Server built: May 30 2023 14:01:11
3、服务管理
#启动服务
[root@s152 /]# systemctl start httpd
#停止服务
[root@s152 /]# systemctl stop httpd
#服务开机自启动
[root@s152 /]# systemctl enable httpd
#查看服务状态
[root@s152 /]# systemctl status httpd
#检查配置文件
[root@s152 /]# httpd -t
Syntax OK
#重载配置文件,不重启服务,如下三种方式都可以
[root@s152 /]# httpd -k graceful
[root@s152 /]# apachectl graceful
[root@s152 /]# systemctl reload httpd
三、常见配置参数说明
如下是Apache服务器安装完成后的默认配置文件,这里我们只针对其中常用的配置参数进行释义说明。
1、默认httpd.conf配置
[root@s152 ~]# cat /etc/httpd/conf/httpd.conf |grep -Ev "^$|#"
ServerRoot "/etc/httpd"
Listen 80
Include conf.modules.d/*.conf
User apache
Group apache
ServerAdmin root@localhost
<Directory />
    AllowOverride none
    Require all denied
</Directory>
DocumentRoot "/var/www/html"
<Directory "/var/www">
    AllowOverride None
    Require all granted
</Directory>
<Directory "/var/www/html">
    Options Indexes FollowSymLinks
    AllowOverride None
    Require all granted
</Directory>
<IfModule dir_module>
    DirectoryIndex index.html
</IfModule>
<Files ".ht*">
    Require all denied
</Files>
ErrorLog "logs/error_log"
LogLevel warn
<IfModule log_config_module>
    LogFormat "%h %l %u %t \"%r\" %>s %b \"%{Referer}i\" \"%{User-Agent}i\"" combined
    LogFormat "%h %l %u %t \"%r\" %>s %b" common
    <IfModule logio_module>
      LogFormat "%h %l %u %t \"%r\" %>s %b \"%{Referer}i\" \"%{User-Agent}i\" %I %O" combinedio
    </IfModule>
    CustomLog "logs/access_log" combined
</IfModule>
<IfModule alias_module>
    ScriptAlias /cgi-bin/ "/var/www/cgi-bin/"
</IfModule>
<Directory "/var/www/cgi-bin">
    AllowOverride None
    Options None
    Require all granted
</Directory>
<IfModule mime_module>
    TypesConfig /etc/mime.types
    AddType application/x-compress .Z
    AddType application/x-gzip .gz .tgz
    AddType text/html .shtml
    AddOutputFilter INCLUDES .shtml
</IfModule>
AddDefaultCharset UTF-8
<IfModule mime_magic_module>
    MIMEMagicFile conf/magic
</IfModule>
EnableSendfile on
IncludeOptional conf.d/*.conf
2、常用参数释义
| 参数 | 参数说明 | 配置示例 |
|---|---|---|
| ServerRoot | Apache服务器的根目录 | ServerRoot “/etc/httpd” |
| Listen | 指定Apache监听的IP地址和端口 | Listen 80 |
| DocumentRoot | 指定Web服务器的文档根目录,即网站文件存放的位置 | DocumentRoot “/var/www/html” |
| Directory | 配置目录的权限和特性 | <Directory “/var/www/html”> Options Indexes FollowSymLinks AllowOverride None Require all granted </Directory> |
| DirectoryIndex | 指定当访问一个目录时默认显示的文件 | DirectoryIndex index.html、 |
| AllowOverride | 指定是否允许使用.htaccess文件覆盖目录配置 | AllowOverride All |
| LogLevel | 设置日志级别,用于记录错误和警告信息 | LogLevel warn |
| ErrorLog | 指定错误日志文件的路径 | ErrorLog “/var/log/httpd/error_log” |
| CustomLog | 指定访问日志文件的路径和格式 | CustomLog “/var/log/httpd/access_log” combined |
| ServerSignature | 控制服务器生成的错误页面中是否包含服务器的签名信息 | ServerSignature Off |
| KeepAlive | 启用或禁用Keep-Alive功能,决定是否保持持久连接 | KeepAlive On |
| Timeout | 设置服务器等待客户端请求的超时时间 | Timeout 300 |
| MaxClients | 限制同时连接到服务器的最大客户端数 | MaxClients 150 |
| IncludeOptional | Apache主配置文件中引入其他配置文件 | IncludeOptional conf.d/*.conf |
| User | httpd服务运行用户 | User apache |
| Group | httpd服务所属群组 | Group apache |
| ServerName | 虚拟服务器主机名和端口,主机名可以是IP地址也可以是域名 | ServerName 192.168.0.152:80 |
四、服务配置举例
这里我们以部署猜拳游戏为例,介绍如何在Apache服务上部署服务。
1、创建一个虚拟主机配置文件
进入/etc/httpd/conf.d/目录下创建一个虚拟主机配置文件,主机名为mytest.com,对应监听的80端口,如果需要更换其他端口需要在主文件中listen添加或者修改,这是与nginx不同的地方。
[root@s152 mytest]# cd /etc/httpd/conf.d/
[root@s152 conf.d]# cat test.conf
<VirtualHost *:80>
    # 设置虚拟主机的域名
    ServerName mytest.com
    ServerAlias www.mytest.com

    # 设置文档根目录
    DocumentRoot "/var/www/mytest"

    # 日志文件
    ErrorLog "/var/log/httpd/mytest_error_log"
    CustomLog "/var/log/httpd/mytest_access_log" combined

    # 目录权限
    <Directory "/var/www/mytest">
        Options Indexes FollowSymLinks
        AllowOverride None
        Require all granted
    </Directory>

    # 可以添加其他定制的配置项,如重定向、代理等

</VirtualHost>
2、将猜拳服务代码打包上传到Directory
配置文件中虚拟服务目录位于/var/www/mytest目录下,我们创建该目录后将软件包上传到该目录下。
[root@s152 www]# mkdir mytest
[root@s152 www]# cd mytest/
[root@s152 mytest]# ll
总用量 40
drwxr-xr-x. 2 root root 100 11月 1 2022 caiquan
-rw-r–r–. 1 root root 38541 11月 29 15:33 caiquan.zip
3、重启httpd服务
使用httpd -t检查配置文件,检查无误后我们重启服务或者重新加载配置文件。
[root@s152 conf.d]# httpd -t
Syntax OK
[root@s152 conf.d]# systemctl restart httpd
4、修改hosts文件
这里实验用的域名非正式域名,我们需要在hosts文件添加自定义解析。

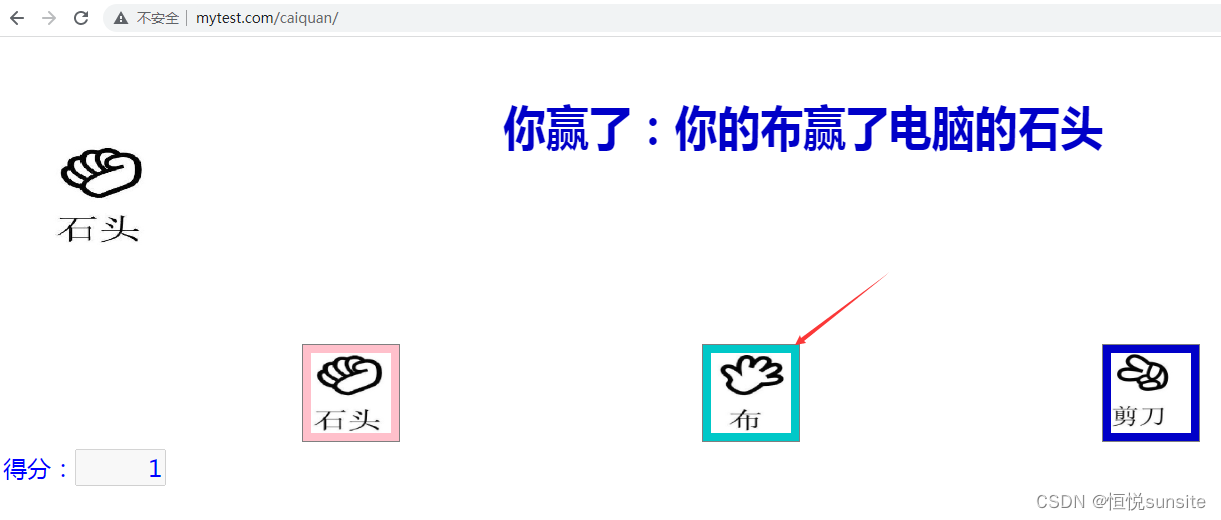
5、访问验证
打开浏览器,通过域名和路径就可以访问我们的猜拳游戏内容啦!
五、QA
1、启动报错httpd: Could not reliably determine the server’s fully qualified domain name
- 报错信息:httpd: Could not reliably determine the server’s fully qualified domain name
- 报错原因:httpd.conf配置文件中未配置ServerName
- 解决方案:修改httpd.conf配置文件,添加ServerName = domain.com:80 参数配置
2、启动报错httpd (pid xxxxx) already running导致无法启动
- 报错信息:httpd (pid xxxxx) already running 和 httpd.service: control process exited, code=exited status=1
- 报错原因:httpd服务未正常退出导致无法启动
- 解决方案:执行pgrep -f httpd |xargs kill后再次启动。