AliOS-Things新增一个模块
文章目录
这个版本是直接clone下来的分支,2.0.0以上进行新增加一个模块。
1 目标一
增加一个新模块供现有的app调用,运行查看结果。 nano是aos自带的一个最简单的app例子,它实现了最简单的延时循环打印功能,我们用它来作为例子中所用的app。 新增模块名设为 info_a,功能是打印一条特定的信息。
1.1 选择新模块放置位置
COMPONENT_DIRECTORIES := . \
                         example   \
                         board     \
                         kernel    \
                         platform  \
                         utility   \
                         middleware \
                         tools     \
                         test      \
                         device    \
                         security
我是在middleware 目录下创建的。
|----AliOS-Things
     |----app
     |-------example
             |      |----nano  # example目录下的工程文件将会被编译运行,它将调用info_a组件
             |      |      |----nano.c
             |      |      |----nano.h
             |      |      |----nano.mk
             |      |......
     |----middleware
           |----info_a  # framwork目录下的新组件,有.mk文件
           |      |----info_a.c
           |      |----info_a.h
           |      |----info_a.mk
           |......
1.2 增加新模块源文件
在 info_a 目录中创建 info_a.c :
#include <stdio.h>

void info_a_fun()
{
	printf("this is in info_a\n");
}
1.3 增加新模块的对外头文件
如在 info_a 目录中创建 info_a.h :
#ifndef INFO_A_H
#define INFO_A_H

#ifdef __cplusplus
extern "C" {
#endif

extern void info_a_fun();

#ifdef __cplusplus
}
#endif

#endif  /* INFO_A_H */
1.4 增加新模块的.mk文件
.mk文件是模块存在的标志。每一个模块都会有一个对应的mk文件,makefile通过搜索mk后缀的文件来查找模块。其中声明了一些针对该模块的定制化的东西。最基本的两个就是该模块所包含的源文件,头文件路径和该模块依赖的其他模块。如在info_a目录下创建 info_a.mk:
NAME := info_a
$(NAME)_SOURCES := info_a.c
GLOBAL_INCLUDES += .
1.5 修改 nano 源文件调用新接口
#include <stdio.h>
#include <aos/aos.h>
#include "info_a.h"

static void app_delayed_action(void *arg)
{
    printf("%s:%d %s\r\n", __func__, __LINE__, aos_task_name());
    info_a_fun();
}

int application_start(int argc, char *argv[])
{
    do
    {
        app_delayed_action(NULL);
        aos_msleep(10);
    }while(1);
}
1.6 修改 nano的 .mk 文件依赖新模块
在nano.mk中新增一行:
$(NAME)_COMPONENTS += info_a
1.7 运行
在原版的程序中直接运行会有如下错误,需要对nano的mk文件进行修改,报错如下:
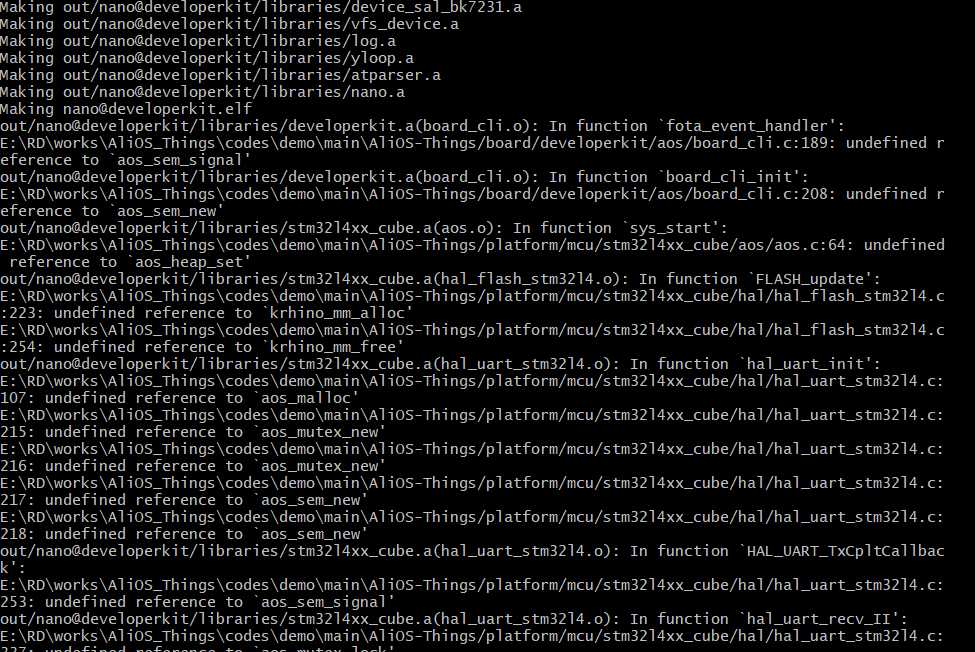
解决方法:
在mk文件中把“GLOBAL_INCLUDES += ./ ”去掉,这个代表全局头文件的路径,也可以改为”GLOBAL_INCLUDES += . “,将 会运行成功。
最终的nano.mk文件如下:
GLOBAL_DEFINES += AOS_NO_WIFI CONFIG_NO_TCPIP

$(NAME)_COMPONENTS += middleware.info_a

mesh ?= 0

ifeq ($(BENCHMARKS),1)
$(NAME)_COMPONENTS  += benchmarks
GLOBAL_DEFINES      += CONFIG_CMD_BENCHMARKS
endif

GLOBAL_INCLUDES += .
编译通过后下载到板子运行,得到的结果如下:
app_delayed_action:11 aos-init
this is in info_a
app_delayed_action:11 aos-init
this is in info_a
app_delayed_action:11 aos-init
this is in info_a
app_delayed_action:11 aos-init
1.8 新增一个模块总结
- 再编译,我的头文件还是这么写的
#include <../framework/info_a/info_a.h>,编译通过! - 那我改改头文件
#include <info_a/info_a.h>,编译失败! - 再改文件
#include <info_a.h>,编译成功!
添加一个新模块的总结
1、新模块的C文件、H文件、mk文件缺一不可!
2、调用模块时,工程里面的mk文件一定要添加模块:$(NAME)_COMPONENTS += info_a
3、头文件的包含方式就两种:
- 绝对路径:#include <…/framework/info_a/info_a.h>
- 单独头文件:#include <info_a.h>
2 目标二
再添加一个组件:info_b
2.1 选择新模块放置位置
目录结构
|----AliOS-Things
     |----app
     		|----example
             |      |----nano  # example目录下的工程文件将会被编译运行,它将调用info_a、info_b组件
             |      |      |----nano.c
             |      |      |----nano.h
             |      |      |----nano.mk
             |      |......
     |----middleware
           |----info_a  # framwork目录下的新组件a,有.mk文件
           |      |----info_a.c
           |      |----info_a.h
           |      |----info_a.mk # 通过在这里面添加关系,来带出info_b组件
           |----info_b  # framwork目录下的新组件b,有.mk文件
           |      |----info_b.c
           |      |----info_b.h
           |      |----info_b.mk
           |......
使用同样的方法添加一个info_b文件夹 :
- info_b.c
- info_b.h
- info_b.mk
2.2 代码实现
具体的实现代码如下:
info_b.c:
#include <stdio.h>

void info_b_fun()
{
	printf("this is in info_b\n");
}
info_b.h:
#ifndef INFO_B_H
#define INFO_B_H

#ifdef __cplusplus
extern "C" {
#endif

extern void info_b_fun();

#ifdef __cplusplus
}
#endif

#endif  /* INFO_A_H */
info_b.mk:
NAME := info_b
$(NAME)_SOURCES := info_b.c

GLOBAL_INCLUDES += .
现在想让组件b“依附”在组件a上面,即,nano工程只需要#include "info_a.h"就可以调用组件b的info_b_fun()函数。只需要在info_a.mk里面写:
NAME := info_a
$(NAME)_SOURCES := info_a.c
$(NAME)_COMPONENTS += info_b   # 添加这个依赖就可以了
GLOBAL_INCLUDES += .
对nano.c进行修改:
#include <stdio.h>
#include <aos/aos.h>
#include <info_a.h>    // 没有info_b.h的头文件

static void app_delayed_action(void *arg)
{
    printf("nano %s:%d %s\r\n", __func__, __LINE__, aos_task_name());
    info_b_fun();	  // 却可以调用info_b里面的组件
}

int application_start(int argc, char *argv[])
{
    do
    {
        app_delayed_action(NULL);
        aos_msleep(1000);
    }while(1);
}
2.3 输出结果
nano app_delayed_action:11 aos-init
this is in info_b
nano app_delayed_action:11 aos-init
this is in info_b
nano app_delayed_action:11 aos-init
this is in info_b
nano app_delayed_action:11 aos-init
this is in info_b
3 目标三
再添加一个组件:info_c/info_c_a
3.1 选择模块放置位置
目录结构如下:
|----AliOS-Things
     |----app
     		|----example
             |      |----nano  # example目录下的工程文件将会被编译运行,它将调用info_a、info_b组件
             |      |      |----nano.c
             |      |      |----nano.h
             |      |      |----nano.mk
             |      |......
     |----middleware
           |----info_a  # framwork目录下的新组件a,有.mk文件
           |      |----info_a.c
           |      |----info_a.h
           |      |----info_a.mk # 通过在这里面添加关系,来带出info_b组件
           |----info_b  # framwork目录下的新组件b,有.mk文件
           |      |----info_b.c
           |      |----info_b.h
           |      |----info_b.mk
           |----info_c # 该目录中没有.mk文件,它的子目录中有.mk文件(加了一层)
           |      |----info_c_a
           |      |     |----info_c_a.c
           |      |     |----info_c_a.h
           |      |     |----info_c_a.mk
           |      |----info_c_b # 更多的新组件
           |      |.......
           |......
3.2 代码实现
同样和以上的同样方式编写如下代码:
- info_c_a.c
- info_c_a.h
- info_c_a.mk
info_c_a.c:
#include <stdio.h>

void info_c_a_fun()
{
	printf("this is in info_c_a\n");
}
info_c_a.h:
#ifndef INFO_C_A_H
#define INFO_C_A_H

#ifdef __cplusplus
extern "C" {
#endif

extern void info_c_a_fun();

#ifdef __cplusplus
}
#endif

#endif  /* INFO_A_H */
info_c_a.mk:
NAME := info_c_a
$(NAME)_SOURCES := info_c_a.c

GLOBAL_INCLUDES += .
NAME := nano

$(NAME)_SOURCES := nano.c

$(NAME)_COMPONENTS += info_c/info_c_a  # info_c里面没有.mk文件所以....

GLOBAL_DEFINES += AOS_NO_WIFI CONFIG_NO_TCPIP

mesh ?= 0

ifeq ($(BENCHMARKS),1)
$(NAME)_COMPONENTS  += benchmarks
GLOBAL_DEFINES      += CONFIG_CMD_BENCHMARKS
endif
nano.c:
#include <stdio.h>
#include <aos/aos.h>
#include <info_c_a.h>  // 新组件c的头文件

static void app_delayed_action(void *arg)
{
    printf("nano %s:%d %s\r\n", __func__, __LINE__, aos_task_name());
    info_c_a_fun();	// 新组件c里面的函数
}

int application_start(int argc, char *argv[])
{
    do
    {
        app_delayed_action(NULL);
        aos_msleep(1000);
    }while(1);
}
总结
通过以上的实现,对AliOS0-Things组件的实现和调用了更清晰的认识,也对mk文件的配置有了更深的了解。这篇主要是参考如下的文章,感谢这位大佬。