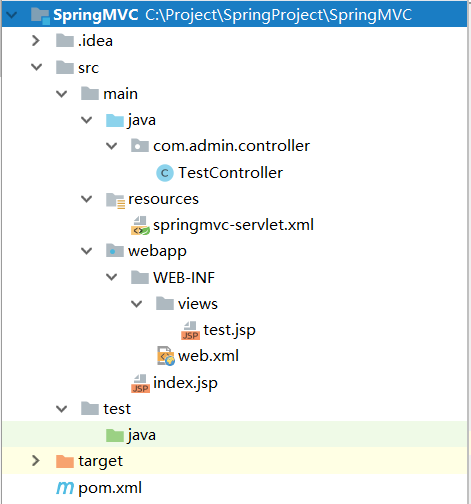
项目目录如下:
工具: IDEA
1、首先使用maven创建最简单的maven程序,groupId为com.admin,artifactId为SpringMVC, 然后修改pom.xml,添加jar包
 1 <?xml version="1.0" encoding="UTF-8"?>
 2 <project xmlns="http://maven.apache.org/POM/4.0.0"
 3          xmlns:xsi="http://www.w3.org/2001/XMLSchema-instance"
 4          xsi:schemaLocation="http://maven.apache.org/POM/4.0.0 http://maven.apache.org/xsd/maven-4.0.0.xsd">
 5     <modelVersion>4.0.0</modelVersion>
 6
 7     <groupId>com.admin</groupId>
 8     <artifactId>SpringMVC</artifactId>
 9     <version>1.0-SNAPSHOT</version>
10     <packaging>war</packaging>
11
12     <properties>
13         <spring.version>4.3.0.RELEASE</spring.version>
14     </properties>
15
16     <dependencies>
17         <!--Spring框架核心库 -->
18         <dependency>
19             <groupId>org.springframework</groupId>
20             <artifactId>spring-context</artifactId>
21             <version>${spring.version}</version>
22         </dependency>
23         <!-- Spring MVC -->
24         <dependency>
25             <groupId>org.springframework</groupId>
26             <artifactId>spring-webmvc</artifactId>
27             <version>${spring.version}</version>
28         </dependency>
29         <!-- Servlet核心包 -->
30         <dependency>
31             <groupId>javax.servlet</groupId>
32             <artifactId>javax.servlet-api</artifactId>
33             <version>3.0.1</version>
34             <scope>provided</scope>
35         </dependency>
36         <!--JSP应用程序接口 -->
37         <dependency>
38             <groupId>javax.servlet.jsp</groupId>
39             <artifactId>jsp-api</artifactId>
40             <version>2.1</version>
41             <scope>provided</scope>
42         </dependency>
43
44
45     </dependencies>
46 </project>
2、在src/main中创建webapp目录,创建index.jsp及WEB-INF目录,WEB-INF目录下创建web.xml
index.jsp
<%@ page contentType="text/html;charset=UTF-8" language="java" %>
<html>
<head>
    <title>最简单的web程序-首页</title>
</head>
<body>
<h1>Hello, World!</h1>
</body>
</html>
web.xml
<?xml version="1.0" encoding="UTF-8" ?>
<web-app xmlns:xsi="http://www.w3.org/2001/XMLSchema-instance" xmlns="http://java.sun.com/xml/ns/javaee"
         xsi:schemaLocation="http://java.sun.com/xml/ns/javaee http://java.sun.com/xml/ns/javaee/web-app_3_0.xsd"
         id="WebApp_ID" version="3.0">

    <!--引导页-->
    <welcome-file-list>
        <welcome-file>index.jsp</welcome-file>
    </welcome-file-list>
</web-app>
3、配置tomcat容器,(tomcat容器配置见https://www.cnblogs.com/best/p/5653916.html#_label3 )
启动web程序, 打开浏览器,输入http://localhost:8080,即可在浏览器中看到Hello World
4、添加一个简单的页面
在src/main/java中添加包com.admin.controller,新建类TestController
package com.admin.controller;

import org.springframework.stereotype.Controller;
import org.springframework.web.bind.annotation.RequestMapping;

@Controller
@RequestMapping("")
public class TestController {

    @RequestMapping("/test")
    public String test() {
        return "test";
    }
}
在src/main/resources下新建servlet解析配置文件spring-servlet.xml
<?xml version="1.0" encoding="UTF-8"?>
<beans xmlns="http://www.springframework.org/schema/beans"
       xmlns:xsi="http://www.w3.org/2001/XMLSchema-instance"
       xmlns:context="http://www.springframework.org/schema/context"
       xmlns:mvc="http://www.springframework.org/schema/mvc"
       xsi:schemaLocation="http://www.springframework.org/schema/beans
         http://www.springframework.org/schema/beans/spring-beans.xsd
        http://www.springframework.org/schema/context
        http://www.springframework.org/schema/context/spring-context-4.3.xsd
        http://www.springframework.org/schema/mvc
        http://www.springframework.org/schema/mvc/spring-mvc-4.3.xsd">

    <!-- 自动扫描包,实现支持注解的IOC -->
    <context:component-scan base-package="com.admin" />

    <!-- Spring MVC不处理静态资源 -->
    <mvc:default-servlet-handler />

    <!-- 支持mvc注解驱动 -->
    <mvc:annotation-driven enable-matrix-variables="true" />

    <!-- 配置映射媒体类型的策略 -->
    <bean
            class="org.springframework.web.servlet.mvc.method.annotation.RequestMappingHandlerMapping">
        <property name="removeSemicolonContent" value="false" />
    </bean>

    <!-- 视图解析器 -->
    <bean
            class="org.springframework.web.servlet.view.InternalResourceViewResolver"
            id="internalResourceViewResolver">
        <!-- 前缀 -->
        <property name="prefix" value="/WEB-INF/views/" />
        <!-- 后缀 -->
        <property name="suffix" value=".jsp" />
    </bean>
</beans>
在/WEB-INF/views/下新建test.jsp
<%@ page contentType="text/html;charset=UTF-8" language="java" %>
<html>
<head>
    <title>test</title>
</head>
<body>
<h1>测试</h1>
</body>
</html>
在web.xml中添加对视图解析器,修改后的文件为:
<?xml version="1.0" encoding="UTF-8" ?>
<web-app xmlns:xsi="http://www.w3.org/2001/XMLSchema-instance" xmlns="http://java.sun.com/xml/ns/javaee"
         xsi:schemaLocation="http://java.sun.com/xml/ns/javaee http://java.sun.com/xml/ns/javaee/web-app_3_0.xsd"
         id="WebApp_ID" version="3.0">

    <servlet>
        <servlet-name>springmvc</servlet-name>
        <servlet-class>org.springframework.web.servlet.DispatcherServlet</servlet-class>
        <init-param>
            <param-name>contextConfigLocation</param-name>
            <param-value>classpath*:springmvc-servlet.xml</param-value>
        </init-param>
        <load-on-startup>1</load-on-startup>
    </servlet>

    <servlet-mapping>
        <servlet-name>springmvc</servlet-name>
        <url-pattern>/</url-pattern>
    </servlet-mapping>

    <!--引导页-->
    <welcome-file-list>
        <welcome-file>index.jsp</welcome-file>
    </welcome-file-list>
</web-app>
5、浏览器下输入http://localhost:8080/test
即可看到test.jsp页面