1.简介
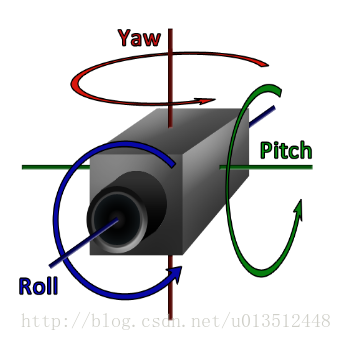
人脸姿态估计主要是获得脸部朝向的角度信息。本文获得的人脸姿态信息用三个欧拉角(pitch,yaw,roll)表示。
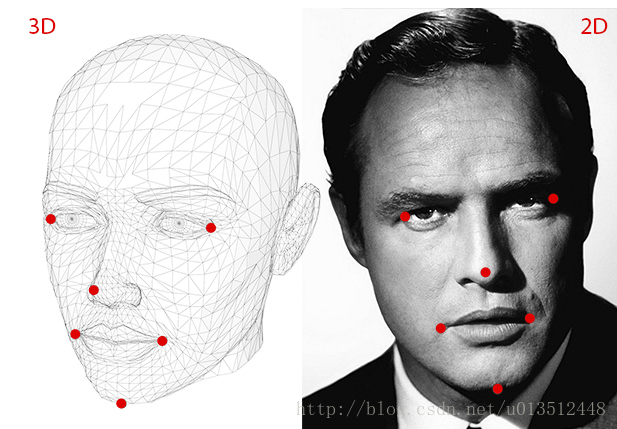
首先定义一个6关键点的3D脸部模型(左眼角,右眼角,鼻尖,左嘴角,右嘴角,下颌),然后采用Dlib检测出图片中对应的6个脸部关键点,采用OpenCV的solvePnP函数解出旋转向量,最后将旋转向量转换为欧拉角。
2.定义6关键点的3D Model
    // 3D model points.
    std::vector<cv::Point3d> model_points;
    model_points.push_back(cv::Point3d(0.0f, 0.0f, 0.0f));               // Nose tip
    model_points.push_back(cv::Point3d(0.0f, -330.0f, -65.0f));          // Chin
    model_points.push_back(cv::Point3d(-225.0f, 170.0f, -135.0f));       // Left eye left corner
    model_points.push_back(cv::Point3d(225.0f, 170.0f, -135.0f));        // Right eye right corner
    model_points.push_back(cv::Point3d(-150.0f, -150.0f, -125.0f));      // Left Mouth corner
    model_points.push_back(cv::Point3d(150.0f, -150.0f, -125.0f));       // Right mouth corner
3.基于Dlib的人脸关键点检测
Dlib提供了一个68关键点的检测模型,而且是按照顺序排列的。因此可以直接索引到需要的6个关键点。
3.1 Dlib的使用
首先前往Dlib官网下载源码并解压。有多种编译方式,这里介绍比较简单的在VS2015的编译方式。
首先把dlib/all/source.cpp添加到工程里,然后把Dlib的路径添加到工程属性表的include里。具体参见Dlib的how to compile页面。
Compiling on Windows Using Visual Studio 2015 or Newer
All you need to do is create an empty console project. Then add dlib/all/source.cpp to it and add the folder containing the dlib folder to the #include search path. Then you can compile any example program by adding it to your project.
Again, note that dlib will only be able to work with jpeg and png files if you link in libjpeg and libpng. In Visual Studio, the easiest way to do this is to add all the libjpeg, libpng, and zlib source files in the dlib/external folder into your project and also define the DLIB_PNG_SUPPORT and DLIB_JPEG_SUPPORT preprocessor directives. If you don’t know how to configure Visual Studio then you should use CMake as shown above since it will take care of everything automatically.
3.2 关键点检测
Dlib提供一个68关键点的检测模型,并提供基于webcam的示例代码,参见examples文件夹下的的webcam_face_pose_ex.cpp。需要提前下载模型数据文件。下载链接:http://dlib.net/files/shape_predictor_68_face_landmarks.dat.bz2
首先初始Dlib相关参数并进行人脸检测。注意后续需要用OpenCV的函数进行旋转向量运算,而Dlib在检测时会对图片进行一定的缩放,所以需要计算一个缩放比例ratio,以便将关键点的坐标还原为原图中的坐标。
// create a face detector
frontal_face_detector detector = get_frontal_face_detector();
char* fileName = "face_4.jpg";
cv::Mat im = cv::imread(fileName);
shape_predictor sp;
deserialize("shape_predictor_68_face_landmarks.dat") >> sp;
array2d<rgb_pixel> img;
load_image(img, fileName);
// Make the image larger so we can detect small faces.
pyramid_up(img);
//calculate the ratio of zoom
int ratio = int(img.nc()) / int(im.cols);
// bounding boxes of detected faces
std::vector<rectangle> dets = detector(img);
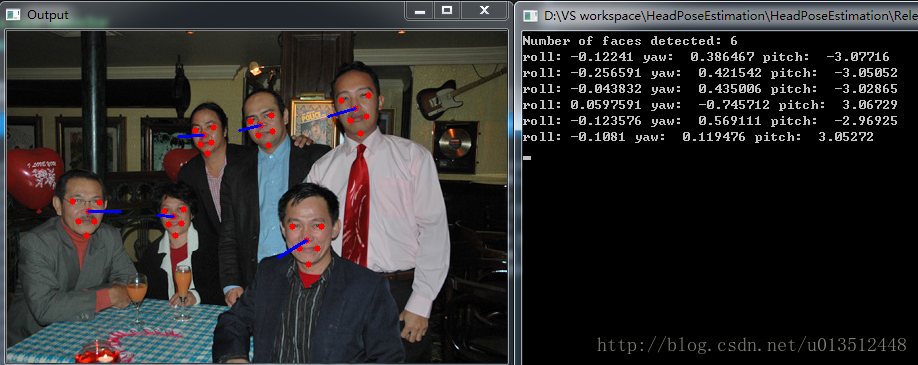
cout << "Number of faces detected: " << dets.size() << endl;接着对检测到的人脸进行关键点检测。经过我的实际测试,关键的索引顺序是固定的,所以我记录了需要的6个关键点的索引id,分别是:
下巴:8
鼻尖:30
左眼角:36
右眼角:45
左嘴角:48
右嘴角:54
            std::vector<full_object_detection> shapes;
            for (unsigned long j = 0; j < dets.size(); ++j)
            {
                full_object_detection shape = sp(img, dets[j]);
                shapes.push_back(shape);

                // landmarks
                //Dlib's feature points are arranged in order,so we can get 6 landmarks below by id
                std::vector<cv::Point2d> landmarks;
                landmarks.push_back(cv::Point2d(int(shape.part(30).x() / ratio), int(shape.part(30).y()) / ratio));    // Nose tip
                landmarks.push_back(cv::Point2d(int(shape.part(8).x() / ratio), int(shape.part(8).y()) / ratio));    // Chin
                landmarks.push_back(cv::Point2d(int(shape.part(36).x() / ratio), int(shape.part(36).y()) / ratio));     // Left eye left corner
                landmarks.push_back(cv::Point2d(int(shape.part(45).x() / ratio), int(shape.part(45).y()) / ratio));    // Right eye right corner
                landmarks.push_back(cv::Point2d(int(shape.part(48).x() / ratio), int(shape.part(48).y()) / ratio));    // Left Mouth corner
                landmarks.push_back(cv::Point2d(int(shape.part(54).x() / ratio), int(shape.part(54).y()) / ratio));    // Right mouth corner

            }
4. 用OpenCV的solvePnP函数估计Pose
OpenCV中solvePnP 和 solvePnPRansac都可以用来估计Pose。可以通过改变flag来使用不同的计算方法,我采用的默认的方法。具体的参数可以参见OpenCV文档。
solvePnP implements several algorithms for pose estimation which can be selected using the parameter flag. By default it uses the flag SOLVEPNP_ITERATIVE which is essentially the DLT solution followed by Levenberg-Marquardt optimization. SOLVEPNP_P3P uses only 3 points for calculating the pose and it should be used only when using solvePnPRansac.
C++: bool solvePnP(InputArray objectPoints, InputArray imagePoints, InputArray cameraMatrix, InputArray distCoeffs, OutputArray rvec, OutputArray tvec, bool useExtrinsicGuess=false, int flags=SOLVEPNP_ITERATIVE )
确定pose也就是确定从3D model到图片中人脸的仿射变换矩阵,它包含旋转和平移的信息。solvePnP函数输出结果包括旋转向量(roatation vector)和平移向量(translation vector)。这里我们只关心旋转信息,所以主要将对 roatation vector进行操作。
在调用solvePnP函数前需要初始化cameraMatrix,也就是相机内参,并调用solvePnP函数:
 // Camera internals
    double focal_length = im.cols; // Approximate focal length.
    cv::Point2d center = cv::Point2d(im.cols / 2, im.rows / 2);
    cv::Mat camera_matrix = (cv::Mat_<double>(3, 3) << focal_length, 0, center.x, 0, focal_length, center.y, 0, 0, 1);
    cv::Mat dist_coeffs = cv::Mat::zeros(4, 1, cv::DataType<double>::type); // Assuming no lens distortion

    cv::Mat rotation_vector; // Rotation in axis-angle form
    cv::Mat translation_vector;

    // Solve for pose
cv::solvePnP(model_points, landmarks, camera_matrix, dist_coeffs, rotation_vector, translation_vector);(参考:http://www.learnopencv.com/head-pose-estimation-using-opencv-and-dlib/)
5.将旋转向量转换为欧拉角
rotation vector 是物体旋转信息的表示方式之一,是OpenCV常用的表示方式。除了rotation vector还有欧拉角(Euler angle)、旋转矩阵(Rotation Matrix)、方向余弦矩阵(Direction Cosine Matrix)、四元数(Quaternion) 和 轴-角表示(Axis-Angle)。
因为我需要的是欧拉角,所以这里我只介绍将rotation vector 转换为欧拉角的方法。
(其它表示方法参见:http://blog.csdn.net/yuewei19/article/details/53023992)
5.1 旋转向量(Rotation Vector) 和四元数(Quaternion)
三维空间的任意旋转,都可以用绕三维空间的某个轴旋转过某个角度来表示,即Axis-Angle表示方法。Axis可用一个三维向量(x,y,z)来表示,theta可以用一个角度值来表示,直观来讲,一个四维向量(theta,x,y,z)就可以表示出三维空间任意的旋转。
注意,这里的三维向量(x,y,z)只是用来表示axis的方向朝向,因此更紧凑的表示方式是用一个单位向量来表示方向axis,而用该三维向量的长度来表示角度值theta。这样以来,可以用一个三维向量(theta*x,theta*y, theta*z)就可以表示出三维空间任意的旋转,前提是其中(x,y,z)是单位向量。这就是旋转向量(Rotation Vector)的表示方式。
四元数(Quaternion)也是一种常用的旋转表示方式。假设(x,y,z)是axis方向的单位向量,theta是绕axis转过的角度,那么四元数可以表示为[cos(theta/2),x*sin(theta/2), y*sin(theta/2), z*sin(theta/2)]。
因为从四元数转换到欧拉角公式较简单,所以我先将rotation vector转换为四元数。
    //calculate rotation angles
    double theta = cv::norm(rotation_vector, CV_L2);

    //transformed to quaterniond
    Quaterniond q;
    q.w = cos(theta / 2);
    q.x = sin(theta / 2)*rotation_vector.at<double>(0, 0) / theta;
    q.y = sin(theta / 2)*rotation_vector.at<double>(0, 1) / theta;
    q.z = sin(theta / 2)*rotation_vector.at<double>(0, 2) / theta;
5.2 欧拉角(Euler Angle)
在3D 空间中,表示物体的旋转可以由三个欧拉角来表示:
pitch围绕X轴旋转,叫俯仰角。
yaw围绕Y轴旋转,叫偏航角。
roll围绕Z轴旋转,叫翻滚角。
这三个角的顺序对旋转结果有影响。
(欧拉角与四元数的转换关系:
http://www.cnblogs.com/wqj1212/archive/2010/11/21/1883033.html)
四元数到欧拉角的转换公式如下:
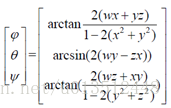
arctan和arcsin的结果为[-pi/2,pi/2],不能覆盖所有的欧拉角,因此采用atan2代替arctan:
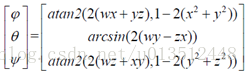
void quaterniondToEulerAngle(Quaterniond& q, double& roll, double& yaw, double& pitch)
{
    double ysqr = q.y * q.y;

    // pitch (x-axis rotation)
    double t0 = +2.0 * (q.w * q.x + q.y * q.z);
    double t1 = +1.0 - 2.0 * (q.x * q.x + ysqr);
    pitch = std::atan2(t0, t1);

    // yaw (y-axis rotation)
    double t2 = +2.0 * (q.w * q.y - q.z * q.x);
    t2 = t2 > 1.0 ? 1.0 : t2;
    t2 = t2 < -1.0 ? -1.0 : t2;
    yaw = std::asin(t2);

    // roll (z-axis rotation)
    double t3 = +2.0 * (q.w * q.z + q.x * q.y);
    double t4 = +1.0 - 2.0 * (ysqr + q.z * q.z);
    roll = std::atan2(t3, t4);
}