Bond
一.什么是bond:
bond是将多块网卡虚拟链接成一块网卡的技术,通过bond技术让多块网卡看起来是一个单独的以太网接口设备并具有相同的ip地址。
bond默认情况下支持两块网卡工作。
模式 0 ( 平衡轮循 ) - 轮循策略 , 所有接口都使用采用轮循方式在所有 Slave 中传输封包
模式 1 ( 主动备份 ) - 容错,一次只能使用一个 Slave 接口, 但是如果该接口出现故障 , 另一个 Slave 将 接替它(常使用的模式,这个模式有点像RAID磁盘阵列)
模式 3 ( 广播 ) - 容错,所有封包都通过所有 Slave 接口广播(不常使用)
二.为什么要配置bond:
在linux下配置bond,通过网卡绑定技术既能增加服务器的可靠性,又增加了可用网络宽带,为用户提供不间断的网络服务,实现主备功能。
三.配置主动备份模式bond的步骤和检验过程:
1.先给虚拟机重新加上两块网卡,eth0 和 eth1(在虚拟机管理界面)
Add Hareware > Network > 具体配置如图 > finish > 如法炮制,成功添加两个网卡
2. 添加bond
nmcil connection add con-name bond0 ifname bond0 type bond mode active-backup ip4 172.25.254.170/24

3.将eth0、eth1添加进bond0
nmcil connection add con-name eth0 ifname eth0 type bond-slave master bond0

nmcil connection add con-name eth1 ifname eth1 type bond-slave master bond0

4.运行一个监控来监视eth0和eth1的工作情况
watch -n 1 cat /proc/net/bonding/bond0
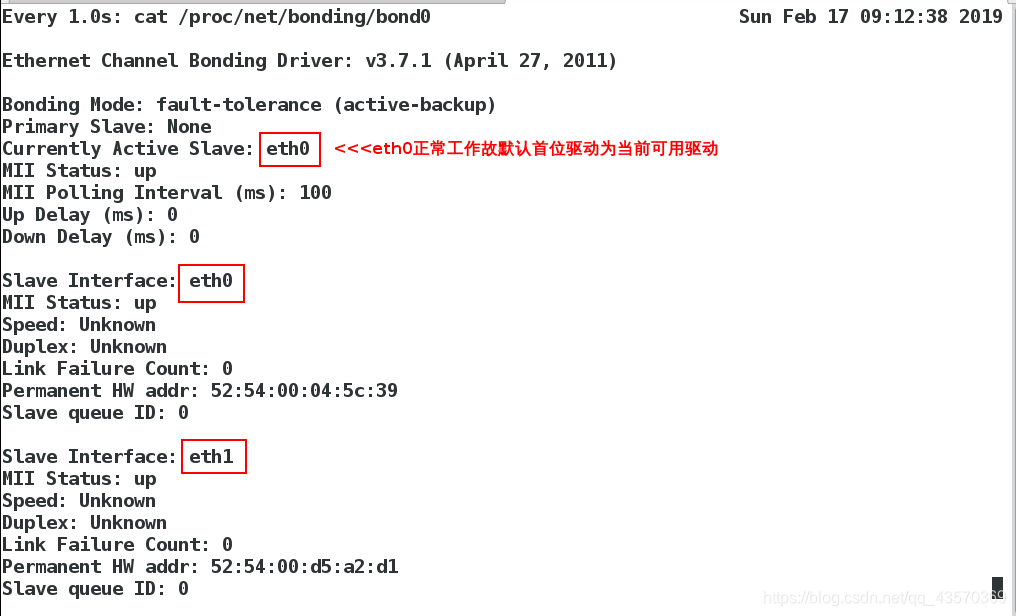
5.模拟eth0、eth1驱动分别不可用的网络连接情况
eth0不可用时
ifconfig eth0 down

当前驱动变为eth1
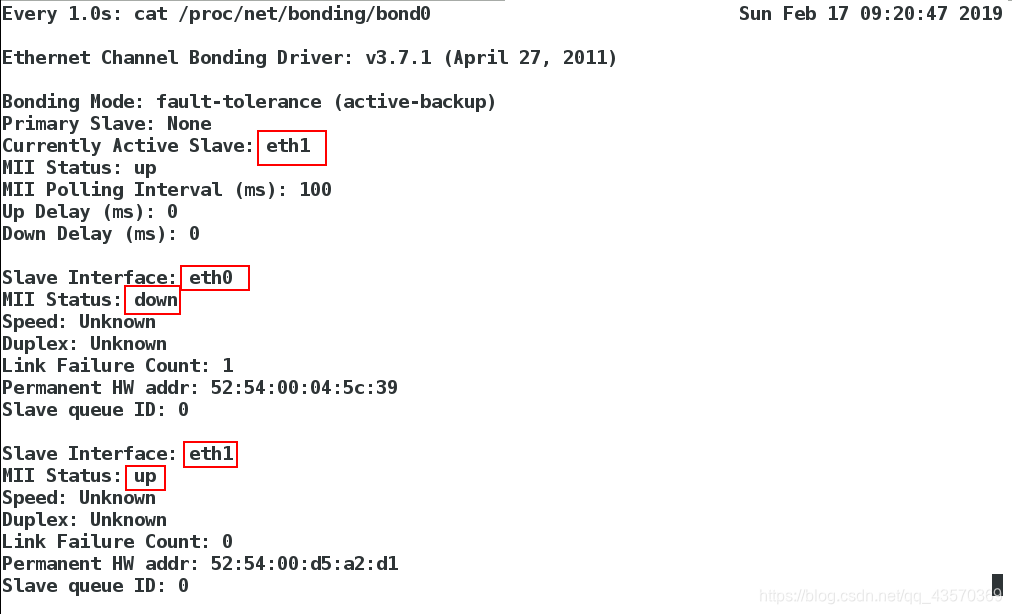
驱动转换只有在 当前驱动损坏,但至少一个可用的情况 下才会发生。
同理,eth1 转换 eth0

当前驱动变为eth0
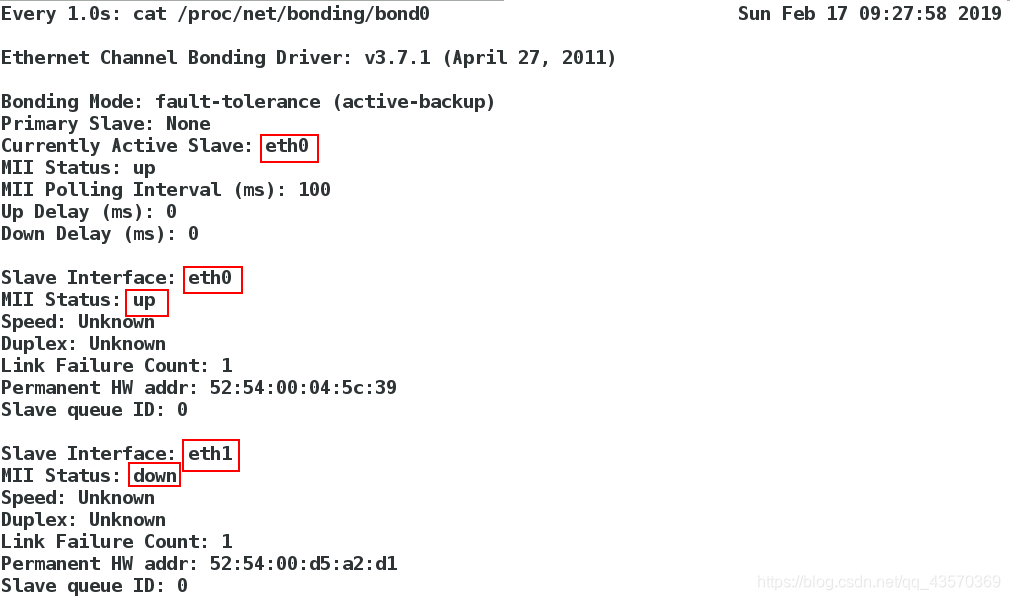
驱动转换过程网络未发生断开情况
四.删除bond网络
nmcli connection delete bond0   ##删除bond0
nmcli connection delete eth0  	##删除eth0
nmcli connection delete eth1  	##删除eth1


Team
一.什么是team
team是链路聚合的一种方式,最多支持8块网卡工作。
二.team支持的工作模式:
| 模式 | 具体内容 |
|---|---|
| broadcast | 广播容错 |
| roundrobin | 平衡轮叫 |
| activebackup | 主动备份 |
| loadbalance | 负载均衡 |
三.配置平衡轮循模式
1.先给虚拟机重新加上两块网卡,eth0 和 eth1(在虚拟机管理界面)
Add Hareware > Network > 具体配置如图 > finish > 如法炮制,成功添加两个网卡
2.添加team
nmcli connection add con-name team0 ifname team0 type team config '{"runner":{"name":"activebackup"}}' ip4 172.24.254.170/24

注意:config ‘{“runner”:{“name”:“activebackup”}}’
3.建立监控
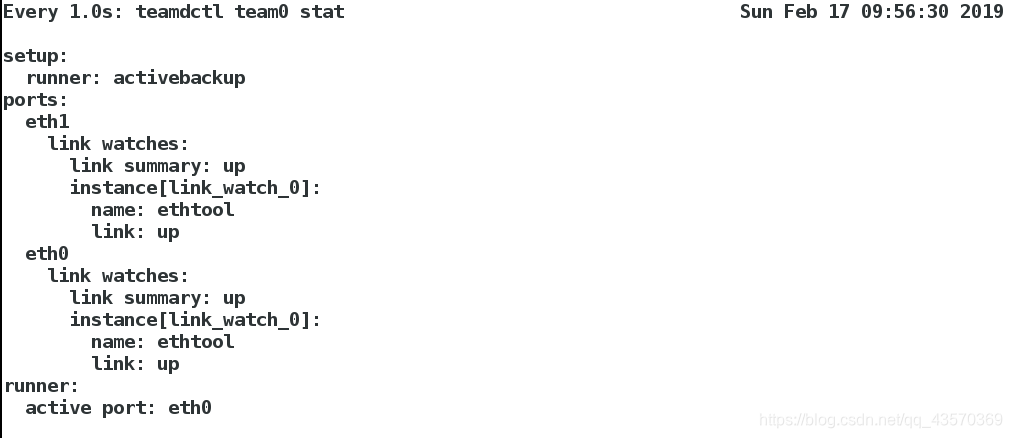
watch -n 1 teamdctl team0 stat (teamdctl team0 stat是team特有的监控)

4.添加网卡 eth0 , eth1
nmcli connection add con-name eth0 type team-slave ifname eth0 master team0

nmcli connection add con-name eth1 type team-slave ifname eth1 master team0

5.模拟eth0、eth1驱动分别不可用的网络连接情况
eth0不可用时
ifconfig eth0 down

当前驱动变为 eth1
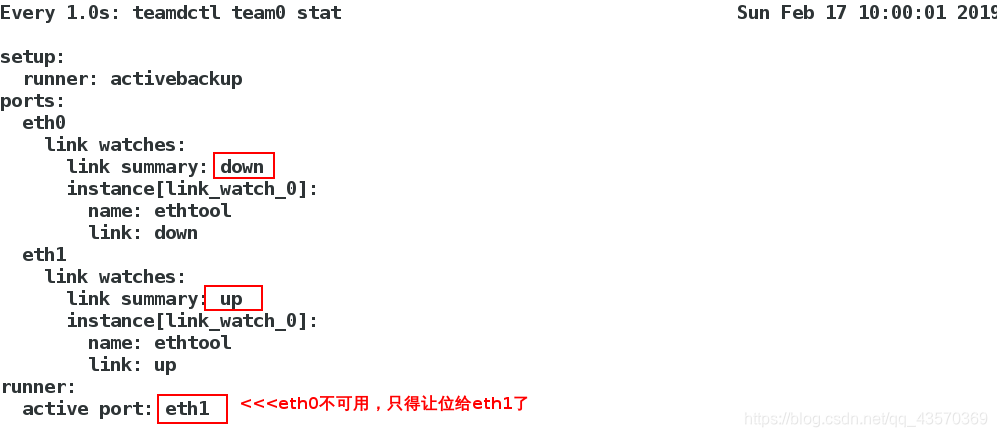
驱动转换只有在至少一个可用的情况下才会发生。
同理,eth1转换eth0

当前驱动变为eth0
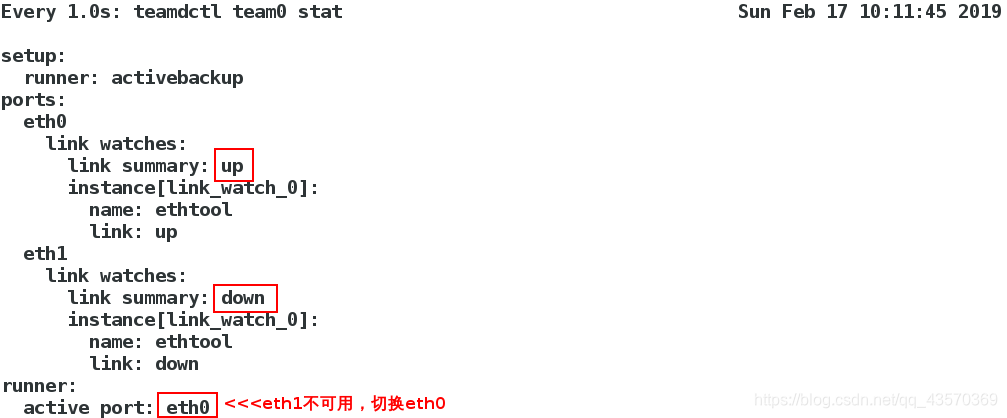
驱动转换过程,网络未发生断开连接情况
四、删除team网络
nmcli connection delete team0   ##删除team0
nmcli connection delete eth0   	##删除eth0
nmcli connection delete eth1 	##删除eth1


网桥
一.什么是网桥:
网桥是一个局域网与另一个局域网之间建立链接的桥梁。网桥是属于数据链路层的一种设备。
二.网桥的作用:
扩展网络和通信手段,在各种传输介质中转发数据信号,扩展网络的距离,同时又有选择地将现有地址的信号从一个传输介质 发送到另一个传输介质,并能有效地限制两个介质系统中无关紧要的通信。
三.配置网桥:
修改配置文件方法 永久
为了实验效果在真机上做
1.备份 ifcfg-br0 ifcfg-p4p2
cd /etc/sysconfig/network-scripts/
在这个目录底下
mv ifcfg-br0 ifcfg-p4p2 /mnt/
注意 :目的是备份这两个文件,在删除网桥后用来恢复原来的网络配置
2.在图形界面下删除除过 br0 的其余设备
nm-connection-editor
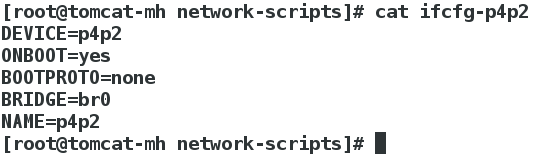
3.在 /etc/sysconfig/network-scripts/ 目录底下编辑文件 ifcfg-p4p2
vim ifcfg-p4p2
DEVICE=p4p2         设备名称
ONBOOT=yes          开启服务设备自动激活
BOOTPROTO=none      网卡工作状态
BRIDGE=br0          网卡开启的网桥连接
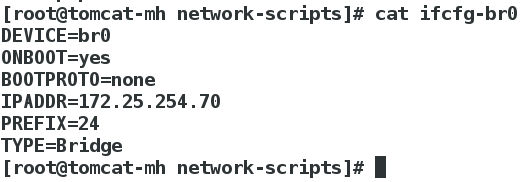
4.在该目录底下编辑文件 ifcfg-br0
vim ifcfg-br0
DEVICE=br0
ONBOOT=yes
BOOTPROTO=none
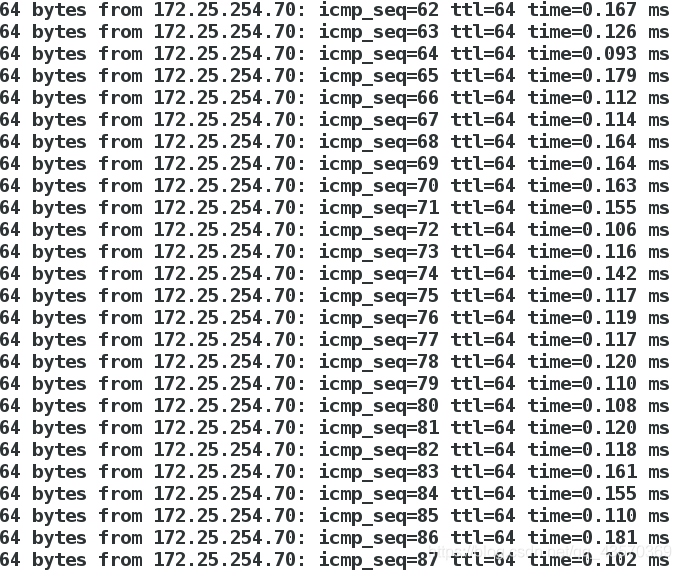
IPADDR=172.25.254.70
PREFIX=24
TYPE=Bridge 网络接口类型是桥接
5.关闭 NetworkManager 服务
systemctl stop NetworkManager.service
6.重启网络
systemctl restart network
7.显示已经建好的网桥
brctl show
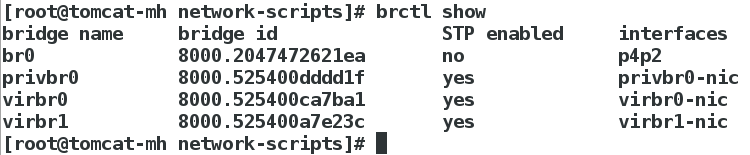
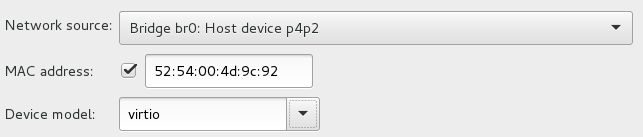
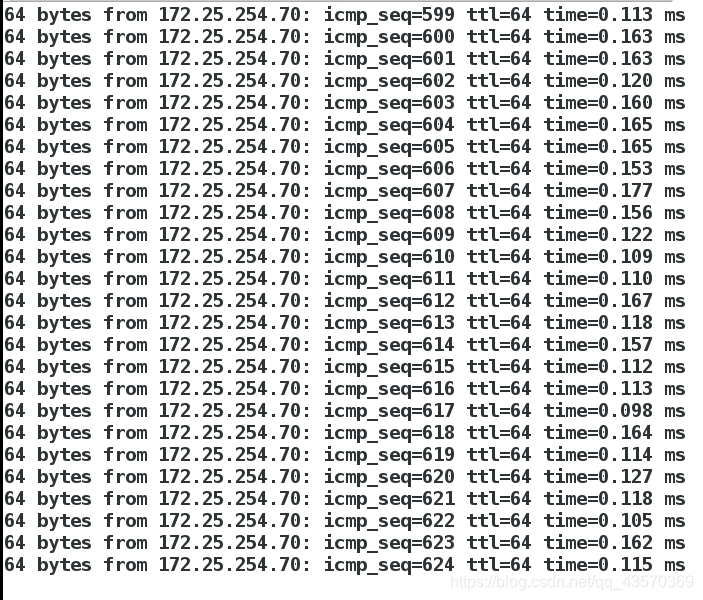
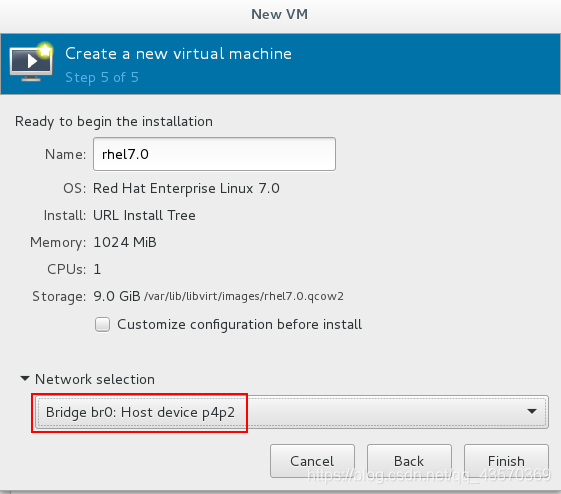
成功的标志,新建虚拟机选择网络时,出现桥接模式 Bridge ,而不是默认的模式 NAT
8.恢复
[root@tomcat-mh network-scripts]# rm -rf ifcfg-br0 ifcfg-p4p2
[root@tomcat-mh network-scripts]# mv /mnt/ifcfg-br0 /mnt/ifcfg-p4p2 .
<<<<恢复备份
[root@tomcat-mh network-scripts]# systemctl restart network
[root@tomcat-mh network-scripts]# systemctl start NetworkManager

命令行方法 临时的
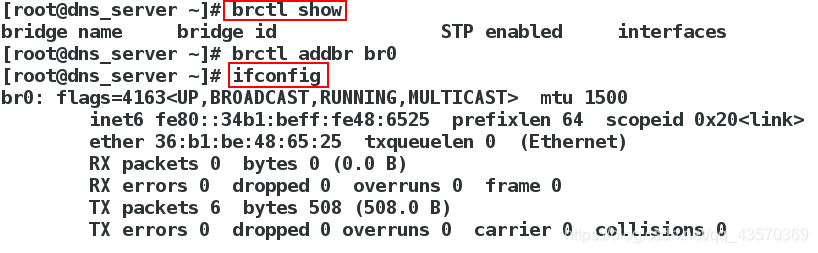
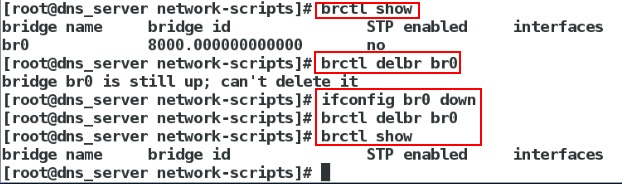
brctl show ##显示系统中的网桥
brctl addbr br0 ##添加网桥
ifconfig ##没有ip
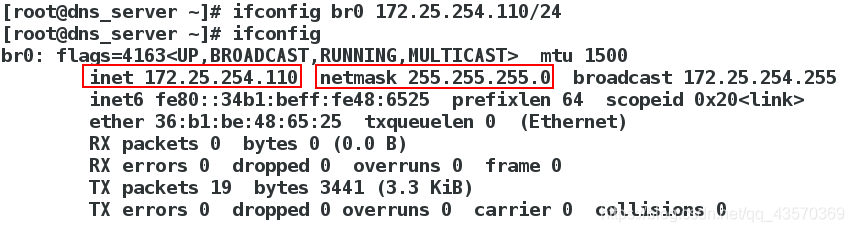
ifconfig br0 172.25.254.110/24 ##给网桥添加ip
删除网桥的过程
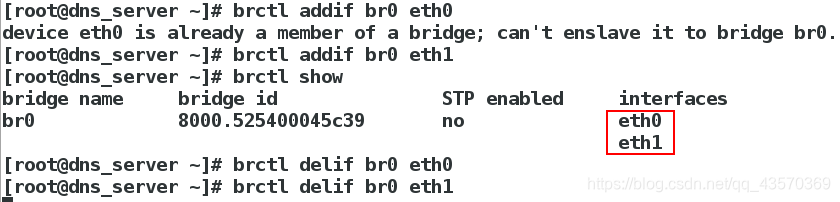
brctl delif br0 eth0                   		   ##删除eth0与br0的连接
ifconfig br0 down                		       ##将br0关闭
brctl delbr br0                     	       ##删除网桥

addbr 添加网桥  delbr 删除网桥  addif 添加网桥链接  delif 删除网桥链接
关于Linux的高级网络配置的内容就是这些。