爬取的步骤
- 确定url地址;
- 获取页面信息;(urllib, requests);
- 解析页面提取需要的数据; (正则表达式, bs4, xpath)
- 保存到本地(csv, json, pymysql, redis);
- 清洗数据(删除不必要的内容 -----正则表达式);
- 分析数据(词云wordcloud + jieba)
有没有用到多线程? -----
获取页面信息每个爬虫都会使用, 重复去写----
设置头部信息 ---- user-agent, proxy…
流程分析:
- 确定url地址:http://www.imooc.com/course/list;(spider)
- 获取页面信息;(urllib, requests); ---(scrapy中我们不要处理)---(Downloader)
- 解析页面提取需要的数据; (正则表达式, bs4, xpath)---: (spider)
    课程链接, 课程的图片url, 课程的名称, 学习人数, 课程描述
- 保存到本地(csv, json, pymysql, redis); ----(pipeline)

环境
- Scrapy 1.6.0
实现步骤:
pip install scrapy # 下载scrapy
scrapy #启动scrapy
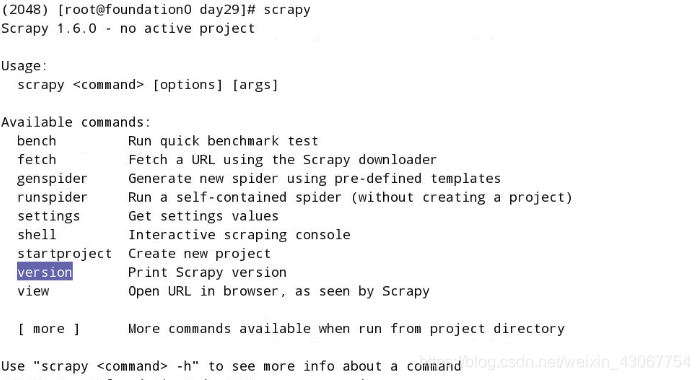
scrapy version #查看scrapy版本

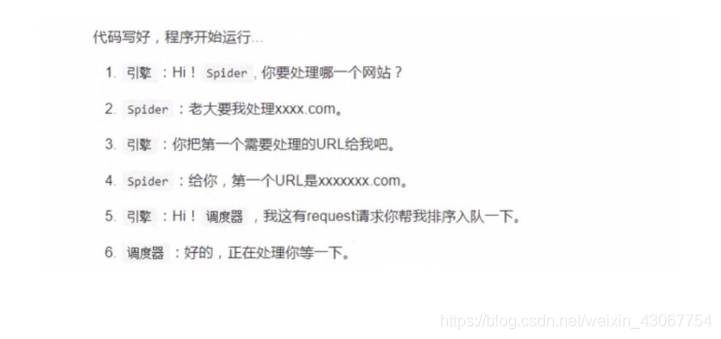
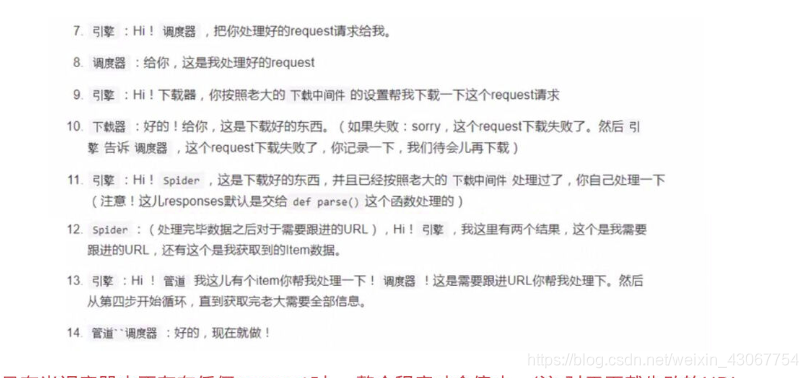
具体流程可以详看scrapy介绍
需求:
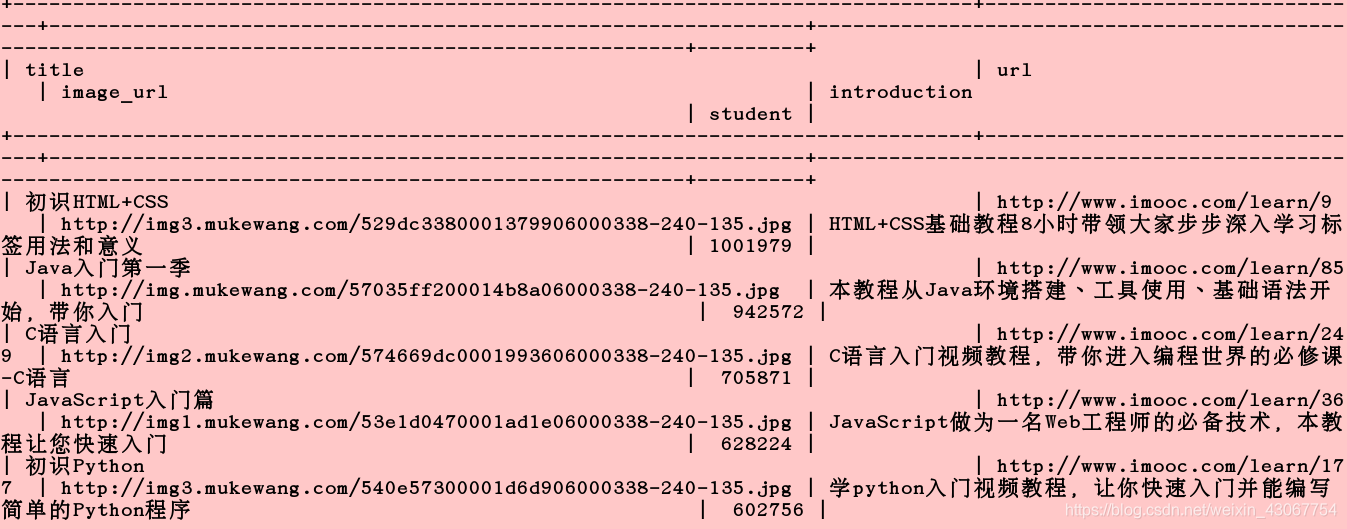
爬取mooc网:每个课程的名称、学习人数、课程描述、课程连接、课程图片。将这些内容保存为csv格式、json格式、保存在mysql数据库中。并且下载图片(图片名称为课程名称)。
1. 工程创建
scrapy startproject mySpider # mySpider文件名
cd mySpider
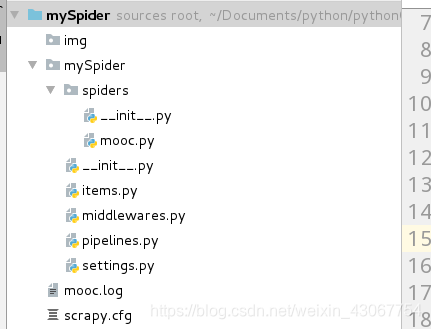
tree # 查看树结构要安装pip install tree
├── mySpider
│   ├── __init__.py
│   ├── items.py            # 提取的数据信息
│   ├── middlewares.py      # 中间键
│   ├── pipelines.py        # 管道, 如何存储数据
│   ├── __pycache__
│   ├── settings.py         # 设置信息
│   └── spiders             # 爬虫(解析页面的信息)
│       ├── __init__.py
│       └── __pycache__
└── scrapy.cfg
用pycharm打开mySpider目录
2. 创建一个爬虫–linux中执行
scrapy  genspider  mooc "www.imooc.com" # 爬的网址
cd mySpider/spiders/
vim mooc.py
#start_url
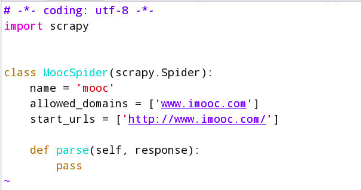
也可以在pycharm中这个目录mooc.py里编写:
import scrapy

from mySpider.items import CourseItem
class MoocSpider(scrapy.Spider):
    # name: 用于区别爬虫, 必须是唯一的;
    name = 'mooc'
    # 允许爬取的域名;其他网站的页面直接跳过;
    allowed_domains = ['www.imooc.com', 'img3.mukewang.com']
    # 爬虫开启时第一个放入调度器的url地址;
    start_urls = ['http://www.imooc.com/course/list']

    # 被调用时, 每个出世url完成下载后, 返回一个响应对象,
    # 负责将响应的数据分析, 提取需要的数据items以及生成下一步需要处理的url地址请求;
    def parse(self, response):
    	pass
3. 定义爬取的items内容
import scrapy


class CourseItem(scrapy.Item):
    # Item对象是一个简单容器, 保存爬取到的数据, 类似于字典的操作;
    # 实例化对象: course =  CourseItem()
    # course['title'] = "语文"
    # course['title']
    # course.keys()
    # course.values()
    # course.items()
    # define the fields for your item here like:
    # name = scrapy.Field()
    # 课程链接, 课程的图片url, 课程的名称, 学习人数, 课程描述
    # 课程标题
    title = scrapy.Field()
    # 课程的url地址
    url = scrapy.Field()
    # 课程图片url地址
    image_url = scrapy.Field()
    # 课程的描述
    introduction = scrapy.Field()
    # 学习人数
    student = scrapy.Field()
4. 编写spider代码, 解析
1.完善mooc.py:分析页面内容
import scrapy
from mySpider.items import CourseItem
class MoocSpider(scrapy.Spider):
# name: 用于区别爬虫, 必须是唯一的;
name = 'mooc'
# 允许爬取的域名;其他网站的页面直接跳过;
allowed_domains = ['www.imooc.com', 'img3.mukewang.com']
# 爬虫开启时第一个放入调度器的url地址;
start_urls = ['http://www.imooc.com/course/list']
# 被调用时, 每个出世url完成下载后, 返回一个响应对象,
# 负责将响应的数据分析, 提取需要的数据items以及生成下一步需要处理的url地址请求;
def parse(self, response):
# 1). 实例化对象, CourseItem
course = CourseItem()
# 分析响应的内容
# scrapy分析页面使用的是xpath语法
# 2). 获取每个课程的信息: <div class="course-card-container">
courseDetails = response.xpath('//div[@class="course-card-container"]')
for courseDetail in courseDetails:
# 课程的名称:
# "htmlxxxx"
# 爬取新的网站, Scrapy里面进行调试(parse命令logging)
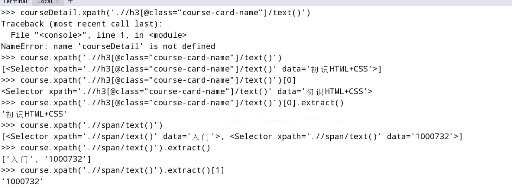
course['title'] = courseDetail.xpath('.//h3[@class="course-card-name"]/text()').extract()[0]
# 学习人数
course['student'] = courseDetail.xpath('.//span/text()').extract()[1]
# 课程描述:
course['introduction'] = courseDetail.xpath(".//p[@class='course-card-desc']/text()").extract()[0]
# 课程链接, h获取/learn/9 ====》 http://www.imooc.com/learn/9
course['url'] = "http://www.imooc.com" + courseDetail.xpath('.//a/@href').extract()[0]
# 课程的图片url:
course['image_url'] = 'http:' + courseDetail.xpath('.//img/@src').extract()[0]
yield course
2.实现翻页功能:
   # url跟进, 获取下一页是否有链接;href里存储的就是下一页网址变换的部分,全部网址前面补上http://www.imooc.com即可
    url  = response.xpath('.//a[contains(text(), "下一页")]/@href')[0].extract()
    if url:
        # 构建新的url
        page = "http://www.imooc.com" + url
        yield scrapy.Request(page, callback=self.parse)
3.pipelines.py文件:保存文件格式,默认是json
class MyspiderPipeline(object):
    """将爬取的信息保存为Json格式"""
    def __init__(self):
        self.f = open(MOOCFilename, 'w')

    def process_item(self, item, spider):
        # 默认传过来的item是json格式
        import json
        # 读取item中的数据, 并转成json格式;
        line = json.dumps(dict(item), ensure_ascii=False, indent=4)
        self.f.write(line + '\n')
        # return一定要加, 返回给调度为器;
        return item
      def open_spider(self, spider):
        """开启爬虫时执行的函数"""
        pass

    def close_spider(self, spider):
        """当爬虫全部爬取结束的时候执行的函数"""
        self.f.close()
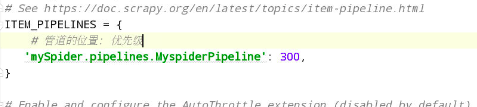
然后在settings文件中将这个注释去掉,处理文件的优先级
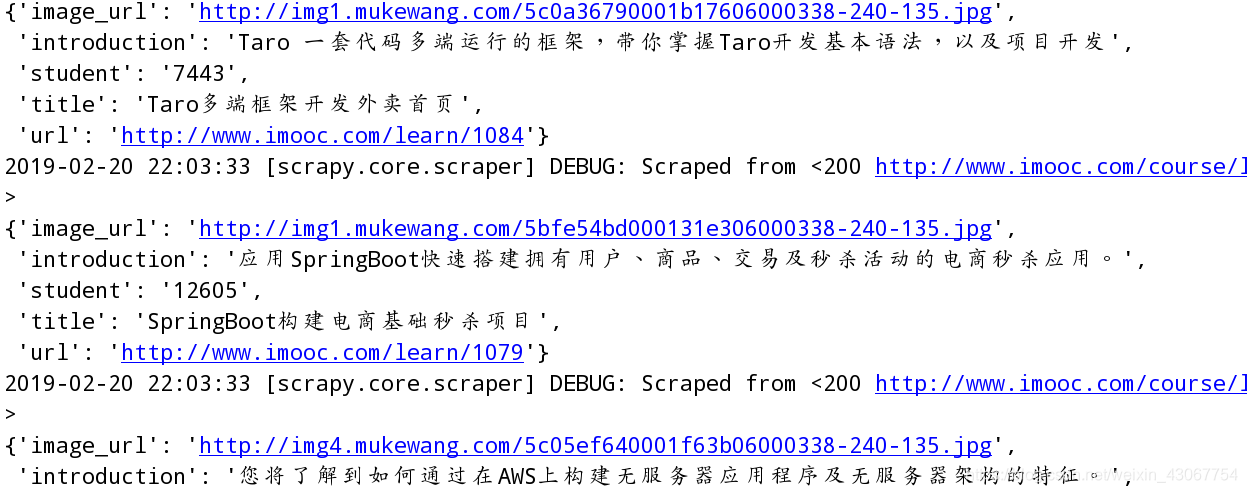
scrapy crawl mooc # 命令行运行mooc可以看到爬取成功
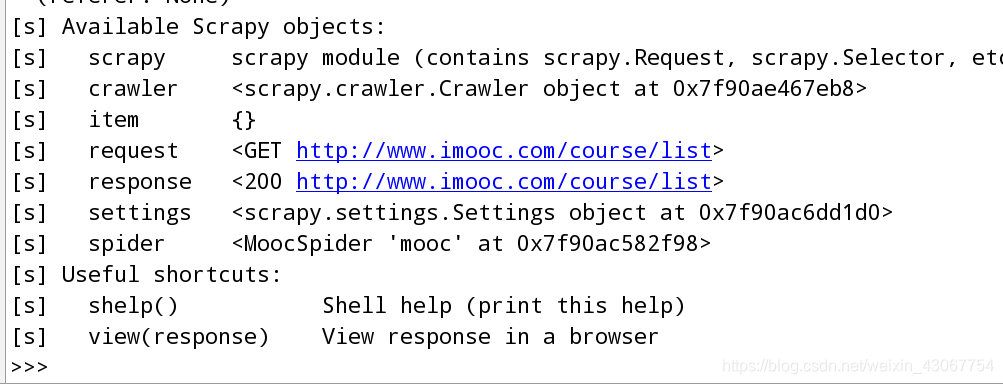
# 用来检测代码是否达到指定位置, 并用来调试并解析页面信息;
from scrapy.shell import  inspect_response
inspect_response(response, self)
4.我们把这段检测代码加到mooc.py中
import scrapy

from mySpider.items import CourseItem
class MoocSpider(scrapy.Spider):
    # name: 用于区别爬虫, 必须是唯一的;
    name = 'mooc'
    # 允许爬取的域名;其他网站的页面直接跳过;
    allowed_domains = ['www.imooc.com', 'img3.mukewang.com']
    # 爬虫开启时第一个放入调度器的url地址;
    start_urls = ['http://www.imooc.com/course/list']

    # 被调用时, 每个出世url完成下载后, 返回一个响应对象,
    # 负责将响应的数据分析, 提取需要的数据items以及生成下一步需要处理的url地址请求;
    def parse(self, response):
        # spiders

        # 用来检测代码是否达到指定位置, 并用来调试并解析页面信息;
        from scrapy.shell import  inspect_response
        inspect_response(response, self)

        # 1). 实例化对象, CourseItem
        course = CourseItem()
        # 分析响应的内容
        # scrapy分析页面使用的是xpath语法
        # 2). 获取每个课程的信息: <div class="course-card-container">
        courseDetails = response.xpath('//div[@class="course-card-container"]')
        for courseDetail in courseDetails:
            # 课程的名称:
            # "htmlxxxx"


            # 爬取新的网站, Scrapy里面进行调试(parse命令logging)
            course['title'] = courseDetail.xpath('.//h3[@class="course-card-name"]/text()').extract()[0]
            # 学习人数
            course['student'] = courseDetail.xpath('.//span/text()').extract()[1]
            # 课程描述:
            course['introduction'] = courseDetail.xpath(".//p[@class='course-card-desc']/text()").extract()[0]
            # 课程链接, h获取/learn/9 ====》 http://www.imooc.com/learn/9
            course['url'] = "http://www.imooc.com" + courseDetail.xpath('.//a/@href').extract()[0]
            # 课程的图片url:
            course['image_url'] = 'http:' + courseDetail.xpath('.//img/@src').extract()[0]
            yield  course
5.检测
运行时会停顿,我们可以在这里边测边改代码

6.保存为csv格式
要保存为csv格式,所以在pipeline.py管道文件添加:
class CsvPipeline(object):
    """将爬取的信息保存为csv格式"""

    def __init__(self):
        self.f = open('mooc.csv', 'w')

    def process_item(self, item, spider):
        # xxxx:xxxxx:xxxx
        item = dict(item)
        self.f.write("{0}:{1}:{2}\n".format(item['title'], item['student'], item['url']))
        # 一定要加, 返回给调度为器;
        return item

    def open_spider(self, spider):
        """开启爬虫时执行的函数"""
        pass

    def close_spider(self, spider):
        """当爬虫全部爬取结束的时候执行的函数"""
        self.f.close()
7保存到mysql数据库中
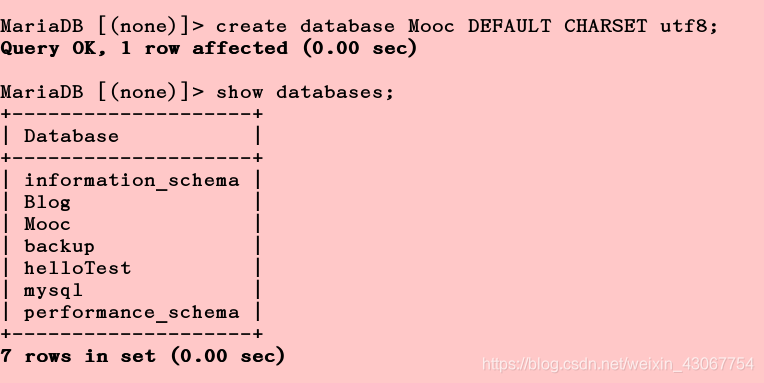
首先,在mysql数据库中创建Mooc database
import pymysql
class MysqlPipeline(object):
"""
将爬取的信息保存到数据库中
1. 创建mooc数据库
"""
def __init__(self):
super(MysqlPipeline, self).__init__()
self.conn = pymysql.connect(
host='localhost',
user='root',
password='redhat',
db='Mooc',
charset='utf8',
)
self.cursor = self.conn.cursor()
def process_item(self, item, spider):
# xxxx:xxxxx:xxxx
# item时一个对象,
item = dict(item)
info = (item['title'], item['url'], item['image_url'], item['introduction'], item['student'])
insert_sqli = "insert into moocinfo values('%s', '%s', '%s', '%s', '%s'); " %(info)
# open('mooc.log', 'w').write(insert_sqli)
# # 用来检测代码是否达到指定位置, 并用来调试并解析页面信息;
self.cursor.execute(insert_sqli)
self.conn.commit()
return item
def open_spider(self, spider):
"""开启爬虫时执行的函数"""
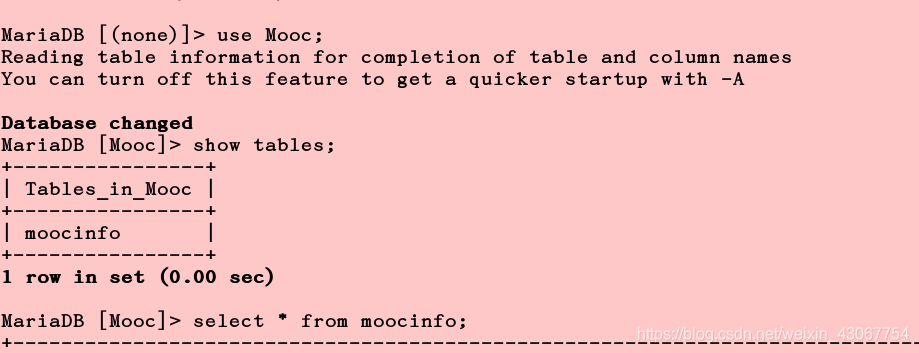
create_sqli = "create table if not exists moocinfo (title varchar(50), url varchar(200), image_url varchar(200), introduction varchar(500), student int)"
self.cursor.execute(create_sqli)
def close_spider(self, spider):
"""当爬虫全部爬取结束的时候执行的函数"""
self.cursor.close()
self.conn.close()
8.在setting中添加允许
编辑好保存的csv和mysql代码后,还需要在settings中添加:

运行scrapy,到mysql查看,已经存入了
9.下载图片
import  scrapy

# scrapy框架里面,
class ImagePipeline(ImagesPipeline):
    def get_media_requests(self, item, info):
        # 返回一个request请求, 包含图片的url地址
        yield  scrapy.Request(item['image_url'])

    # 当下载请求完成后执行的函数/方法
    def item_completed(self, results, item, info):

        # open('mooc.log', 'w').write(results)
        #  获取下载的地址
        image_path = [x['path'] for ok,x in results if ok]
        if not image_path:
            raise  Exception("不包含图片")
        else:
            return  item
还可以重命名图片:
    def item_completed(self, results, item, info):

        open('mooc.log', 'w').write(results)
        #  获取下载的地址 ok索引值 x是保存的路径
        image_path = [x['path'] for ok,x in results if ok]
        if not image_path:
            raise  Exception("不包含图片")
        else:
            import os
			# 重命名
            os.rename(IMAGES_STORE + image_path[0],IMAGES_STORE+item['title']+'.jpg')
            return item
最后在settimg里加上img的管道保存,再添加一个保存路径:
MOOCFilename =  "mooc.txt"
ITEM_PIPELINES = {
    # 管道的位置: 优先级, 0~1000, 数字越小, 优先级越高;
   'mySpider.pipelines.MyspiderPipeline': 300,
   'mySpider.pipelines.CsvPipeline': 400,
   'mySpider.pipelines.MysqlPipeline': 500,
   'mySpider.pipelines.ImagePipeline': 200,

}


IMAGES_STORE =  '/home/kiosk/Documents/python/python0219/day29/mySpider/img/'
结果:生成的图片都被重命名了
 完整代码:
完整代码:
1.mooc.py文件
# -*- coding: utf-8 -*-
import scrapy

from mySpider.items import CourseItem
class MoocSpider(scrapy.Spider):
    # name: 用于区别爬虫, 必须是唯一的;
    name = 'mooc'
    # 允许爬取的域名;其他网站的页面直接跳过;
    allowed_domains = ['www.imooc.com', 'img3.mukewang.com']
    # 爬虫开启时第一个放入调度器的url地址;
    start_urls = ['http://www.imooc.com/course/list']

    # 被调用时, 每个出世url完成下载后, 返回一个响应对象,
    # 负责将响应的数据分析, 提取需要的数据items以及生成下一步需要处理的url地址请求;
    def parse(self, response):
        # spiders

        # 用来检测代码是否达到指定位置, 并用来调试并解析页面信息;
        # from scrapy.shell import  inspect_response
        # inspect_response(response, self)

        # 1). 实例化对象, CourseItem
        course = CourseItem()
        # 分析响应的内容
        # scrapy分析页面使用的是xpath语法
        # 2). 获取每个课程的信息: <div class="course-card-container">
        courseDetails = response.xpath('//div[@class="course-card-container"]')
        for courseDetail in courseDetails:
            # 课程的名称:
            # "htmlxxxx"


            # 爬取新的网站, Scrapy里面进行调试(parse命令logging)
            course['title'] = courseDetail.xpath('.//h3[@class="course-card-name"]/text()').extract()[0]
            # 学习人数
            course['student'] = courseDetail.xpath('.//span/text()').extract()[1]
            # 课程描述:
            course['introduction'] = courseDetail.xpath(".//p[@class='course-card-desc']/text()").extract()[0]
            # 课程链接, h获取/learn/9 ====》 http://www.imooc.com/learn/9
            course['url'] = "http://www.imooc.com" + courseDetail.xpath('.//a/@href').extract()[0]
            # 课程的图片url:
            course['image_url'] = 'http:' + courseDetail.xpath('.//img/@src').extract()[0]

            yield  course


            # url跟进, 获取下一页是否有链接;href
            url  = response.xpath('.//a[contains(text(), "下一页")]/@href')[0].extract()
            if url:
                # 构建新的url
                page = "http://www.imooc.com" + url
                yield scrapy.Request(page, callback=self.parse)
# -*- coding: utf-8 -*-

# Define here the models for your scraped items
#
# See documentation in:
# https://doc.scrapy.org/en/latest/topics/items.html

import scrapy


class CourseItem(scrapy.Item):
    # Item对象是一个简单容器, 保存爬取到的数据, 类似于字典的操作;
    # 实例化对象: course =  CourseItem()
    # course['title'] = "语文"
    # course['title']
    # course.keys()
    # course.values()
    # course.items()
    # define the fields for your item here like:
    # name = scrapy.Field()
    # 课程链接, 课程的图片url, 课程的名称, 学习人数, 课程描述
    # 课程标题
    title = scrapy.Field()
    # 课程的url地址
    url = scrapy.Field()
    # 课程图片url地址
    image_url = scrapy.Field()
    # 课程的描述
    introduction = scrapy.Field()
    # 学习人数
    student = scrapy.Field()
import json

from mySpider.settings import MOOCFilename, IMAGES_STORE
from  scrapy.pipelines.images import ImagesPipeline

class MyspiderPipeline(object):
    """将爬取的信息保存为Json格式"""
    def __init__(self):
        self.f = open(MOOCFilename, 'w')

    def process_item(self, item, spider):
        # 默认传过来的item是json格式
        import json
        # 读取item中的数据, 并转成json格式;
        line = json.dumps(dict(item), ensure_ascii=False, indent=4)
        self.f.write(line + '\n')
        # return一定要加, 返回给调度为器;
        return item
    def open_spider(self, spider):
        """开启爬虫时执行的函数"""
        pass

    def close_spider(self, spider):
        """当爬虫全部爬取结束的时候执行的函数"""
        self.f.close()


class CsvPipeline(object):
    """将爬取的信息保存为csv格式"""

    def __init__(self):
        self.f = open('mooc.csv', 'w')

    def process_item(self, item, spider):
        # xxxx:xxxxx:xxxx
        item = dict(item)
        self.f.write("{0}:{1}:{2}\n".format(item['title'], item['student'], item['url']))
        # 一定要加, 返回给调度为器;
        return item

    def open_spider(self, spider):
        """开启爬虫时执行的函数"""
        pass

    def close_spider(self, spider):
        """当爬虫全部爬取结束的时候执行的函数"""
        self.f.close()


import pymysql


class MysqlPipeline(object):
    """
    将爬取的信息保存到数据库中
    1. 创建mooc数据库
    """
    def __init__(self):
        super(MysqlPipeline, self).__init__()
        self.conn = pymysql.connect(
            host='localhost',
            user='root',
            password='westos',
            db='Mooc',
            charset='utf8',
        )

        self.cursor = self.conn.cursor()

    def process_item(self, item, spider):
        # xxxx:xxxxx:xxxx
        # item时一个对象,
        item = dict(item)
        info = (item['title'], item['url'], item['image_url'], item['introduction'], item['student'])
        insert_sqli = "insert into moocinfo values('%s', '%s', '%s', '%s', '%s'); " %(info)
        # open('mooc.log', 'w').write(insert_sqli)
        # # 用来检测代码是否达到指定位置, 并用来调试并解析页面信息;
        self.cursor.execute(insert_sqli)
        self.conn.commit()
        return item

    def open_spider(self, spider):
        """开启爬虫时执行的函数"""
        create_sqli = "create table if not exists  moocinfo (title varchar(50), url varchar(200), image_url varchar(200), introduction varchar(500), student int)"
        self.cursor.execute(create_sqli)

    def close_spider(self, spider):
        """当爬虫全部爬取结束的时候执行的函数"""
        self.cursor.close()
        self.conn.close()

import  scrapy

# scrapy框架里面,
class ImagePipeline(ImagesPipeline):
    def get_media_requests(self, item, info):
        # 返回一个request请求, 包含图片的url地址
        yield  scrapy.Request(item['image_url'])

    # 当下载请求完成后执行的函数/方法
    def item_completed(self, results, item, info):

        # open('mooc.log', 'w').write(results)
        #  获取下载的地址 ok索引值 x是保存的路径
        image_path = [x['path'] for ok,x in results if ok]
        if not image_path:
            raise  Exception("不包含图片")
        else:
            import os
            os.rename(IMAGES_STORE+ image_path[0],IMAGES_STORE+item['title']+'.jpg')
            return item
# -*- coding: utf-8 -*-

# Scrapy settings for mySpider project
#
# For simplicity, this file contains only settings considered important or
# commonly used. You can find more settings consulting the documentation:
#
#     https://doc.scrapy.org/en/latest/topics/settings.html
#     https://doc.scrapy.org/en/latest/topics/downloader-middleware.html
#     https://doc.scrapy.org/en/latest/topics/spider-middleware.html

BOT_NAME = 'mySpider'

SPIDER_MODULES = ['mySpider.spiders']
NEWSPIDER_MODULE = 'mySpider.spiders'


# Crawl responsibly by identifying yourself (and your website) on the user-agent
#USER_AGENT = 'mySpider (+http://www.yourdomain.com)'

# Obey robots.txt rules
# ROBOTSTXT_OBEY = True
ROBOTSTXT_OBEY = False

# Configure maximum concurrent requests performed by Scrapy (default: 16)
#CONCURRENT_REQUESTS = 32

# Configure a delay for requests for the same website (default: 0)
# See https://doc.scrapy.org/en/latest/topics/settings.html#download-delay
# See also autothrottle settings and docs
#DOWNLOAD_DELAY = 3
# The download delay setting will honor only one of:
#CONCURRENT_REQUESTS_PER_DOMAIN = 16
#CONCURRENT_REQUESTS_PER_IP = 16

# Disable cookies (enabled by default)
#COOKIES_ENABLED = False

# Disable Telnet Console (enabled by default)
#TELNETCONSOLE_ENABLED = False

# Override the default request headers:
#DEFAULT_REQUEST_HEADERS = {
#   'Accept': 'text/html,application/xhtml+xml,application/xml;q=0.9,*/*;q=0.8',
#   'Accept-Language': 'en',
#}

# Enable or disable spider middlewares
# See https://doc.scrapy.org/en/latest/topics/spider-middleware.html
#SPIDER_MIDDLEWARES = {
#    'mySpider.middlewares.MyspiderSpiderMiddleware': 543,
#}

# Enable or disable downloader middlewares
# See https://doc.scrapy.org/en/latest/topics/downloader-middleware.html
#DOWNLOADER_MIDDLEWARES = {
#    'mySpider.middlewares.MyspiderDownloaderMiddleware': 543,
#}

# Enable or disable extensions
# See https://doc.scrapy.org/en/latest/topics/extensions.html
#EXTENSIONS = {
#    'scrapy.extensions.telnet.TelnetConsole': None,
#}

# Configure item pipelines
# See https://doc.scrapy.org/en/latest/topics/item-pipeline.html

MOOCFilename =  "mooc.txt"
ITEM_PIPELINES = {
    # 管道的位置: 优先级, 0~1000, 数字越小, 优先级越高;
   'mySpider.pipelines.MyspiderPipeline': 300,
   'mySpider.pipelines.CsvPipeline': 400,
   'mySpider.pipelines.MysqlPipeline': 500,
   'mySpider.pipelines.ImagePipeline': 200,

}


IMAGES_STORE =  '/home/kiosk/Documents/python/python0219/day29/mySpider/img/'
# Enable and configure the AutoThrottle extension (disabled by default)
# See https://doc.scrapy.org/en/latest/topics/autothrottle.html
#AUTOTHROTTLE_ENABLED = True
# The initial download delay
#AUTOTHROTTLE_START_DELAY = 5
# The maximum download delay to be set in case of high latencies
#AUTOTHROTTLE_MAX_DELAY = 60
# The average number of requests Scrapy should be sending in parallel to
# each remote server
#AUTOTHROTTLE_TARGET_CONCURRENCY = 1.0
# Enable showing throttling stats for every response received:
#AUTOTHROTTLE_DEBUG = False

# Enable and configure HTTP caching (disabled by default)
# See https://doc.scrapy.org/en/latest/topics/downloader-middleware.html#httpcache-middleware-settings
#HTTPCACHE_ENABLED = True
#HTTPCACHE_EXPIRATION_SECS = 0
#HTTPCACHE_DIR = 'httpcache'
#HTTPCACHE_IGNORE_HTTP_CODES = []
#HTTPCACHE_STORAGE = 'scrapy.extensions.httpcache.FilesystemCacheStorage'