写这篇文章主要的目的是出于自己学完了基础的SSM框架以及自己实操完成SSM的整合后,对比网上一大堆的文章写了关于SSM整合的文章,有写的好的也有写的很片面的,于是觉得需要写一篇文章来记录下自己的心得,希望这篇文章适合刚入门的新手去亲自整合SSM,好了我们直接切入主题,主要分为如下几个操作:
(1)准备所需要的JAR包
(2)编写配置文件
(3)编写web.xml
(4)整合测试应用
【步骤一】
在操作前首先为大家展示下项目结构如下

【步骤二】
>准备需要的JAR包目录如下(总共29个)
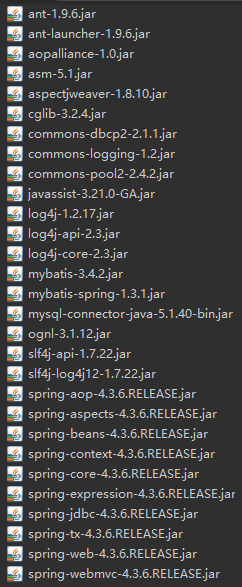
PS:简单说明下里面的JAR分别为:Spring、Spring MVC、Mybatis、MySQL驱动包如图所示:
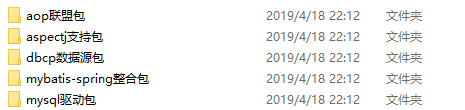

这些JAR包我为大家准备好了里面也包含了我们这个案例所需要的数据库链接如下:
SSM整合所需的JAR包:https://pan.baidu.com/s/1Aat7qg4Ab7UO32vze1EX6g 提取码:8a3v
【步骤三】
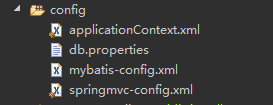
>编写配置文件,我们需要创建一个名为config的源文件夹(Source Folder)如图所示:
>编写db.properties配置文件(主要就是连接数据库所需要的配置的一些参数)
jdbc.driver=com.mysql.jdbc.Driver
jdbc.url=jdbc:mysql://localhost:3306/mybatis
jdbc.username=root
jdbc.password=1234
jdbc.maxTotal=30
jdbc.maxIdle=10
jdbc.initialSize=5>编写applicationContext.xml配置文件(主要就是Spring相关的配置)
<?xml version="1.0" encoding="UTF-8"?>
<beans xmlns="http://www.springframework.org/schema/beans"
	xmlns:xsi="http://www.w3.org/2001/XMLSchema-instance"
	xmlns:aop="http://www.springframework.org/schema/aop"
	xmlns:tx="http://www.springframework.org/schema/tx"
	xmlns:context="http://www.springframework.org/schema/context"
	xsi:schemaLocation="http://www.springframework.org/schema/beans
       http://www.springframework.org/schema/beans/spring-beans-4.3.xsd
       http://www.springframework.org/schema/tx
       http://www.springframework.org/schema/tx/spring-tx-4.3.xsd
       http://www.springframework.org/schema/context
       http://www.springframework.org/schema/context/spring-context-4.3.xsd
       http://www.springframework.org/schema/aop
       http://www.springframework.org/schema/aop/spring-aop-4.3.xsd">

	<!--读取properties配置文件 -->
	<context:property-placeholder
		location="classpath:db.properties" />
	<!--配置数据源 -->
	<bean id="dataSource"
		class="org.apache.commons.dbcp2.BasicDataSource">
		<!--数据库驱动 -->
		<property name="driverClassName" value="${jdbc.driver}" />
		<!--连接数据库的url -->
		<property name="url" value="${jdbc.url}" />
		<!-- 连接数据库的用户名 -->
		<property name="username" value="${jdbc.username}" />
		<!--连接数据库的密码 -->
		<property name="password" value="${jdbc.password}" />
		<!--最大连接数 -->
		<property name="maxTotal" value="${jdbc.maxTotal}" />
		<!--最大空闲数 -->
		<property name="maxIdle" value="${jdbc.maxIdle}" />
		<!--初始化连接数 -->
		<property name="initialSize" value="${jdbc.initialSize}" />
	</bean>


	<!--事务管理器 -->
	<bean id="transactionManager"
		class="org.springframework.jdbc.datasource.DataSourceTransactionManager">
		<property name="dataSource" ref="dataSource" />
	</bean>
	<!--开启基于注解的事务管理 -->
	<tx:annotation-driven
		transaction-manager="transactionManager" />
	<!--配置mybatis工厂 SqlSessionFactory -->
	<bean id="sqlSessionFactory"
		class="org.mybatis.spring.SqlSessionFactoryBean">
		<!--数据源 -->
		<property name="dataSource" ref="dataSource" />
		<!--mapper文件所在的位置 -->
		<property name="configLocation"
			value="classpath:mybatis-config.xml" />
	</bean>


	<!--配置mapper扫描器 -->
	<bean class="org.mybatis.spring.mapper.MapperScannerConfigurer">
		<property name="basePackage" value="com.ssm.dao" />
	</bean>

	<!--开启自动扫描,将加注解的bean放入容器 -->
	<context:component-scan
		base-package="com.ssm.service">
		<!--排除controller重复扫描 -->
		<context:exclude-filter type="annotation"
			expression="org.springframework.stereotype.Controller" />
	</context:component-scan>

</beans>
>编写mybatis-config.xml配置文件(主要就是mapper接口扫描器)
<?xml version="1.0" encoding="UTF-8" ?>
<!DOCTYPE configuration
		PUBLIC "-//mybatis.org//DTD Config 3.0//EN"
		"http://mybatis.org/dtd/mybatis-3-config.dtd">
<configuration>
 	<typeAliases>
 		<package name="com.ssm.po"/>
 	</typeAliases>
</configuration>
>编写springmvc-config.xml配置文件
<?xml version="1.0" encoding="UTF-8"?>
<beans xmlns="http://www.springframework.org/schema/beans"
	xmlns:xsi="http://www.w3.org/2001/XMLSchema-instance"
	xmlns:tx="http://www.springframework.org/schema/tx"
	xmlns:context="http://www.springframework.org/schema/context"
	xmlns:mvc="http://www.springframework.org/schema/mvc"
	xsi:schemaLocation="http://www.springframework.org/schema/beans
						http://www.springframework.org/schema/beans/spring-beans-4.3.xsd
		    			http://www.springframework.org/schema/mvc
		    			http://www.springframework.org/schema/mvc/spring-mvc-4.3.xsd
						http://www.springframework.org/schema/context
		    			http://www.springframework.org/schema/context/spring-context-4.3.xsd">

	<!--配置包扫描 -->
	<context:component-scan
		base-package="com.ssm.controller" />
	<!--加载注解驱动 -->
	<mvc:annotation-driven />
	<!--视图解析器 -->
	<bean
		class="org.springframework.web.servlet.view.InternalResourceViewResolver">
		<!-- 前缀 -->
		<property name="prefix" value="/WEB-INF/jsp/" />
		<!-- 后缀 -->
		<property name="suffix" value=".jsp" />
	</bean>
</beans>
【步骤四】
>编写web.xml
<?xml version="1.0" encoding="UTF-8"?>
<web-app xmlns:xsi="http://www.w3.org/2001/XMLSchema-instance" xmlns="http://xmlns.jcp.org/xml/ns/javaee" xmlns:jsp="http://java.sun.com/xml/ns/javaee/jsp" xsi:schemaLocation="http://xmlns.jcp.org/xml/ns/javaee http://xmlns.jcp.org/xml/ns/javaee/web-app_3_1.xsd" id="WebApp_ID" version="3.1">

  <!--配置加载spring文件的监听器  -->
  <context-param>
    <param-name>contextConfigLocation</param-name>
    <param-value>classpath:applicationContext.xml</param-value>
  </context-param>
  <listener>
    <listener-class>org.springframework.web.context.ContextLoaderListener</listener-class>
  </listener>

  <!--配置Spring MVC 前端核心控制器  -->
  <servlet>
    <servlet-name>springmvc</servlet-name>
    <servlet-class>org.springframework.web.servlet.DispatcherServlet</servlet-class>
    <init-param>
      <param-name>contextConfigLocation</param-name>
      <param-value>classpath:springmvc-config.xml</param-value>
    </init-param>
    <!--配置服务器启动后立即加载Spring MVC 配置文件  -->
    <load-on-startup>1</load-on-startup>
  </servlet>
  <servlet-mapping>
    <servlet-name>springmvc</servlet-name>
    <!--/:拦截了所有请求(除了jsp)  -->
    <url-pattern>/</url-pattern>
  </servlet-mapping>

  <!--配置编码过滤器  -->
  <filter>
    <filter-name>encoding</filter-name>
    <filter-class>org.springframework.web.filter.CharacterEncodingFilter</filter-class>
    <init-param>
      <param-name>encoding</param-name>
      <param-value>UTF-8</param-value>
    </init-param>
  </filter>
  <filter-mapping>
    <filter-name>encoding</filter-name>
    <url-pattern>/*</url-pattern>
  </filter-mapping>


</web-app>
【步骤五】
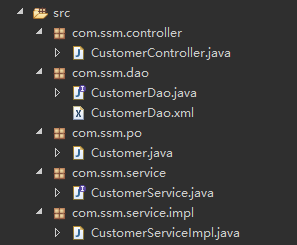
>整合测试应用如图所示:
>CustomerController.java
package com.ssm.controller;

import org.springframework.beans.factory.annotation.Autowired;
import org.springframework.stereotype.Controller;
import org.springframework.ui.Model;
import org.springframework.web.bind.annotation.RequestMapping;

import com.ssm.po.Customer;
import com.ssm.service.CustomerService;

@Controller
public class CustomerController {
	@Autowired
	private CustomerService customerService;
	@RequestMapping("/findCustomerById")
	public String findCustomerById(Integer id,Model model) {
		Customer customer = customerService.findCustomerById(id);
		model.addAttribute(customer);
		return "customer";
	}

}
>CustomerDao.java
package com.ssm.dao;

import com.ssm.po.Customer;

public interface CustomerDao {
	public Customer findCustomerById(Integer id);
}
>CustomerDao.xml
<?xml version="1.0" encoding="UTF-8"?>
<!DOCTYPE mapper PUBLIC "-//mybatis.org//DTD Mapper 3.0//EN"
"http://mybatis.org/dtd/mybatis-3-mapper.dtd">
<mapper namespace="com.ssm.dao.CustomerDao">
	<!--根据id查询客户信息 -->
	<select id="findCustomerById" parameterType="Integer"
		resultType="Customer">

		select * from t_customer where id = #{id}

	</select>
</mapper>
>Customer.java
package com.ssm.po;

public class Customer {
	private Integer id;
	private String username;
	private String jobs;
	private String phone;

	public Integer getId() {
		return id;
	}
	public void setId(Integer id) {
		this.id = id;
	}
	public String getUsername() {
		return username;
	}
	public void setUsername(String username) {
		this.username = username;
	}
	public String getJobs() {
		return jobs;
	}
	public void setJobs(String jobs) {
		this.jobs = jobs;
	}
	public String getPhone() {
		return phone;
	}
	public void setPhone(String phone) {
		this.phone = phone;
	}

	@Override
	public String toString() {
		return "Customer [id=" + id + ", username=" + username + ", jobs=" + jobs + ", phone=" + phone + "]";
	}


}
>CustomerService.java
package com.ssm.service;

import com.ssm.po.Customer;

public interface CustomerService {
	public Customer findCustomerById(Integer id);

}
>CustomerServiceImpl.java
package com.ssm.service.impl;

import org.springframework.beans.factory.annotation.Autowired;
import org.springframework.stereotype.Service;
import org.springframework.transaction.annotation.Transactional;

import com.ssm.dao.CustomerDao;
import com.ssm.po.Customer;
import com.ssm.service.CustomerService;
@Service
@Transactional
public class CustomerServiceImpl implements CustomerService {
	//注解注入CustomerDao
	@Autowired
	private CustomerDao customerDao;
	//查询客户
	public Customer findCustomerById(Integer id) {
		return this.customerDao.findCustomerById(id);
	}

}
【步骤五】
>创建测试customer.jsp界面

<%@ page language="java" contentType="text/html; charset=UTF-8"
	pageEncoding="UTF-8"%>
<!DOCTYPE html PUBLIC "-//W3C//DTD HTML 4.01 Transitional//EN" "http://www.w3.org/TR/html4/loose.dtd">
<html>
<head>
<meta http-equiv="Content-Type" content="text/html; charset=UTF-8">
<title>客户信息</title>
</head>
<body>
	<table border=1>
		<tr>
			<td>编号</td>
			<td>名称</td>
			<td>职业</td>
			<td>电话</td>
		</tr>
		<tr>
			<td>${customer.id }</td>
			<td>${customer.username }</td>
			<td>${customer.jobs }</td>
			<td>${customer.phone }</td>
		</tr>


	</table>

</body>
</html>
【步骤六】
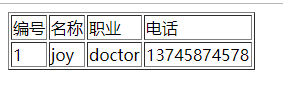
>测试,运行customer.jsp然后出现如下界面
>接下来我们在浏览器中输入http://localhost:8080/SSM/findCustomerById?id=1出现如下所示说明我们整合成功
【总结】
好了以上就是我个人的心得,希望能帮助到刚入门的新手
