project address: https://github.com/zhongqianli/keras-retinanet
Trainning a face detector by transfer learning based on keras-retinanet.
Install keras-retinanet
You’d better use ubuntu system rather than windows system.
- Clone keras-retinanet.
- In the repository, execute
pip install . --user.
Note that due to inconsistencies with howtensorflowshould be installed,
this package does not define a dependency ontensorflowas it will try to install that (which at least on Arch Linux results in an incorrect installation).
Please make suretensorflowis installed as per your systems requirements. - Alternatively, you can run the code directly from the cloned repository, however you need to run
python setup.py build_ext --inplaceto compile Cython code first. - Optionally, install
pycocotoolsif you want to train / test on the MS COCO dataset by runningpip install --user git+https://github.com/cocodataset/cocoapi.git#subdirectory=PythonAPI.
tested configure:
keras-retinanet-0.4.1
keras-2.2.2
tensorflow-1.4.0+
Pillow-5.2.0, lower version maybe has a bug in keras-retinanet
Python2.7+ or Python3.6+
OpenCV2.4+ or OpenCV3.0+
Testing
- Dowload pretrained model face_detector.resnet50_retinanet.inference.h5
- Move to keras-retinanet/model/
- Execute run.evaluate.image.sh to detect face in a image. For evaluating thousands of images, you should use run.evaluate.csv.sh. If you have a webcam, you can also execute run.evaluate.video.sh to detect face.
bugs:
File "keras_retinanet/bin/../../keras_retinanet/utils/anchors.py", line 20, in <module>
    from ..utils.compute_overlap import compute_overlap
ImportError: No module named compute_overlap
add the following texts to anchos.py before “from …utils.compute_overlap import compute_overlap”
import pyximport
pyximport.install()

from ..utils.compute_overlap import compute_overlap
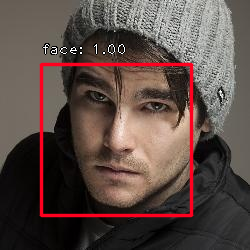
result:
Training
1. Save annotations to csv files.
(1)training annotations
training csv file: images.train.csv
format: image_path,left,top,right,bottom,class_name
If one image has more than one face, each face’s annotation use one line.
for example(009.jpg has two faces):
/opt/images/008.jpg,45,62,194,211,face
/opt/images/009.jpg,45,62,194,211,face
/opt/images/009.jpg,xx,xx,xxx,xxx,face
/opt/images/010.jpg,45,62,194,211,face
(2)classes file
classes csv file: classes.csv
for example:
face,0
(3)optionally, validation file
validation csv file: images.val.csv
for example:
/opt/images/008.jpg,45,62,194,211,face
/opt/images/009.jpg,45,62,194,211,face
2. execute train.py
use keras_retinanet/bin/train.py to train face detector, but train.py is hard to use because some arguements should place in right place.Otherwise, it will not work.
You can use run.train.sh to train face detector. The script shows the right way of using train.py. Before transfer learning, you should download ResNet-50-model.keras.h5, and move it to ~/.keras/models.
transfer learning with frozen backbone
python keras_retinanet/bin/train.py --gpu 0 --snapshot-path ./snapshots --backbone resnet50 --batch-size 1 --epochs 2000 --steps 1000 --tensorboard-dir=./log --freeze-backbone --weights ~/.keras/models/ResNet-50-model.keras.h5 csv images.train.csv classes.csv
transfer learning without frozen backbone
python keras_retinanet/bin/train.py --gpu 0 --snapshot-path ./snapshots --backbone resnet50 --batch-size 1 --epochs 2000 --steps 1000 --tensorboard-dir=./log --weights ~/.keras/models/ResNet-50-model.keras.h5 csv images.train.csv classes.csv
result

3. Converting a training model to inference model
The training procedure of keras-retinanet works with training models. These are stripped down versions compared to the inference model and only contains the layers necessary for training (regression and classification values). If you wish to do inference on a model (perform object detection on an image), you need to convert the trained model to an inference model. This is done as follows:
# Running directly from the repository:
keras_retinanet/bin/convert_model.py /path/to/training/model.h5 /path/to/save/inference/model.h5

# Using the installed script:
retinanet-convert-model /path/to/training/model.h5 /path/to/save/inference/model.h5
4. Evaluate the trained inference model
python keras_retinanet/bin/evaluate.py csv images.val.csv classes.csv ./model/face_detector.resnet50_retinanet.inference.h5