前言
上一篇文章
一个基本开发框架的整合演化之路–5、结构优化完善说明
说明了一下结构,那么这篇文章就说明一下各个配置文件以及实际上,将xxl-conf这个配置中心整合过来。
gradle配置及解释
根模块
注意,根模块的build.gradle现在是:
plugins {
    id 'java'
}

group 'net.w2p'
version '1.0-SNAPSHOT'

/***定义项目环境变量***/

String _ENV_="test" //默认是测试环境
if(System.getProperty("env")!=null&&!System.getProperty("env").isEmpty()){
    String tmpEnv=System.getProperty("env").toLowerCase().trim();
    if(!tmpEnv.equals("test")
            &&!tmpEnv.equals("ppe")
            &&!tmpEnv.equals("product")){
        println "!!!您自定义的环境无效!环境变量只能在test、ppe、product中三选一!!";
    }
    else{
        _ENV_=tmpEnv;
    }
}
println "当前指定环境为:$_ENV_"
/***定义项目环境变量 end***/


/***rootProject配置 开始***/
/***这个配置中心是需要手工配置的。***/
ext{
    AppSetting = [
            //--环境变量由系统自动判断及接收,在编译时候添加 -Denv=test或者ppe或者product即可。
            "env" : _ENV_,
            //配置中心服务器地址
            "xxl_conf_admin_address":"http://localhost:7788/",
            //配置中心的密钥--注意,要与xxl-conf-admin设置的密钥一致,没有的话就留空
            "xxl_conf_access_token":"",
            //--配置中心会在本地建立一个镜像文件
            "xxl_conf_mirrorfile":
                    "/home/too-white/data/applogs/xxl-conf/xxl-conf-mirror-sample.properties"
    ]
}

/***rootProject配置 结束***/


/***所有项目共通***/
allprojects {
    sourceCompatibility = 1.8
    targetCompatibility = 1.8
    apply plugin: 'java'
    apply plugin: 'idea'
    apply plugin: 'groovy'
    ext{
        /***常见或主要第三方依赖版本号定义 begin***/
        globalSpringVersion = "5.1.4.RELEASE"
        globalSpringDataJpaVersion ="2.1.2.RELEASE"
        globalSpringBootVersion = '2.1.1.RELEASE'
        globalFastJsonVersion="1.2.54"
        globalMyBatisVersion="3.4.6"
        globalMyBatisSpringVersion="1.3.2" //mybatis-spring
        globalGoogleGuavaVersion="27.0.1-jre"
        globalDom4jVersion="1.6.1"
        globalJavaMailVersion="1.4.7"
        globalJsoupVersion="1.11.3" //--一个过滤html危险字符串api,用于web安全
        globalQuartzVersion="2.3.0"
        globalFlexmarkVersion="0.34.32" //--java对markdown语法的解释以及翻译api
        globalPostgresqlJdbcDriverVersion="42.2.5"
        globalQiniuSdkVersion="7.2.18"//--七牛上传下载客户端sdk
        globalApacheAntVersion="1.10.5"
        globalGoogleZXingVersion="3.3.3"
        globalLog4jVersion="1.2.17"
        globalSlf4jVersion="1.7.25"
        globalRedisClientVersion="2.10.1"
        globalFreemarkerVersion="2.3.28"
        globalSpringBootStaterVersionOfMyBatis="1.3.2"
        globalMysqlJdbcDriverVersion="5.1.40"
        globalApacheCommonLang3Version="3.8.1"
        globalDruidVertion="1.1.12"
        globalFastDfsClientVersion = "1.27"
        globalSofaRpcVersion="5.5.0"
        globalCuratorVersion="2.13.0" //java zookeeper客户端---curator用版本2的就好了,否则sofarpc不认的。
        globalJacksonVersion="2.9.8"
        globalLog4j2Version="2.11.1"
        globalDisruptorVersion="3.3.6"
        globalSlf4jBindingLog4j2Version="2.11.1"
        /***常见或主要第三方依赖版本号定义 end***/


        /****常见或者程序主要引用依赖定义 begin****/
        //--这个是spring boot要直接compile进去的框架。
        ref4SpringBoot=[
                /***spring boot 相关依赖***/
                "org.springframework.boot:spring-boot:$globalSpringBootVersion",
                "org.springframework.boot:spring-boot-starter:$globalSpringBootVersion",
                "org.springframework.boot:spring-boot-starter-web:$globalSpringBootVersion",
                "org.springframework.boot:spring-boot-starter-freemarker:$globalSpringBootVersion",
                "org.springframework.boot:spring-boot-devtools:$globalSpringBootVersion"
        ]
        //--这个是spring boot要compileOnly的类库
        ref4SpringBootProvided=[
                "org.springframework.boot:spring-boot-dependencies:$globalSpringBootVersion",
        ]
        //--这个是spring boot的测试框架,用testCompile导入
        ref4SpringBootTest=[
                "org.springframework.boot:spring-boot-starter-test:$globalSpringBootVersion"
        ]
        //--spring框架api
        ref4SpringFramework=[
                "org.springframework:spring-web:$globalSpringVersion",
                "org.springframework:spring-webmvc:$globalSpringVersion",
                "org.springframework:spring-jdbc:$globalSpringVersion",
                "org.springframework:spring-context-support:$globalSpringVersion",
                "org.springframework.data:spring-data-jpa:$globalSpringDataJpaVersion",
                "org.springframework:spring-test:$globalSpringVersion"
        ]

        //--jsp&servlet等javaweb容器api,通常都用 compileOnly引用的。
        ref4JspAndServletApi=[
                "javax.servlet:javax.servlet-api:3.1.0",
                "javax.servlet.jsp:jsp-api:2.2",
                "javax.servlet.jsp.jstl:javax.servlet.jsp.jstl-api:1.2.1"
        ]

        //--jstl等java web的tag标准api,引入的话要用compile
        ref4Jstl=[
                'taglibs:standard:1.1.2',
                'jstl:jstl:1.2'
        ]
        //--mybatis
        ref4MyBatis=[
                "org.mybatis:mybatis:$globalMyBatisVersion"
        ]
        ref4MybatisSpring=[
                "org.mybatis:mybatis-spring:$globalMyBatisSpringVersion"
        ]

        //--这是apache common 类库引用的地址
        ref4ApacheCommons = [
                'commons-lang:commons-lang:2.6',
                'commons-logging:commons-logging:1.2',
                'commons-io:commons-io:2.5',
                'commons-fileupload:commons-fileupload:1.3.2',
                'commons-codec:commons-codec:1.10',
                'commons-beanutils:commons-beanutils:1.9.3',
                'commons-httpclient:commons-httpclient:3.1',
                'org.apache.httpcomponents:fluent-hc:4.3.6',
                'org.apache.httpcomponents:httpclient:4.5.3',
                'org.apache.httpcomponents:httpclient-cache:4.5.3',
                'org.apache.httpcomponents:httpcore:4.4.8',
                'org.apache.httpcomponents:httpmime:4.5.3',
                'org.jfree:jfreechart:1.0.19',
                'org.apache.velocity:velocity:1.7',
                'org.apache.poi:poi:3.16'
        ]
        //--redis client
        ref4RedisClient=["redis.clients:jedis:$globalRedisClientVersion"]

        ref4Freemarker=["org.freemarker:freemarker:$globalFreemarkerVersion"]

        //--这是阿里云短信引用的第三方类库
        ref4AliYunSms=[
                'com.aliyun:aliyun-java-sdk-core:3.2.8',
                'com.aliyun:aliyun-java-sdk-dysmsapi:1.1.0'
        ]
        //--阿里云图片裁剪
        ref4AliSimpleImage=[
                'com.alibaba:simpleimage:1.2.3'
        ]
        //--阿里fast json引用地址
        ref4FastJson=["com.alibaba:fastjson:$globalFastJsonVersion"]
        //--json-lib引用地址
        ref4JsonLib=["net.sf.json-lib:json-lib:2.4:jdk15"]
        //--jdom1&jdom2以及相关api
        ref4Jdom=[
                'org.jdom:jdom2:2.0.6',
                'org.jdom:jdom:1.1.3',
                'joda-time:joda-time:2.9.7'
        ]

        //--google guava
        ref4GoogleGuava=["com.google.guava:guava:$globalGoogleGuavaVersion"]
        //--dom4j
        ref4Dom4j=["dom4j:dom4j:$globalDom4jVersion"]

        ref4JavaMail=["javax.mail:mail:$globalJavaMailVersion"]

        ref4Jsoup=["org.jsoup:jsoup:$globalJsoupVersion"]

        ref4Quartz=[
                "org.quartz-scheduler:quartz:$globalQuartzVersion",
                "org.quartz-scheduler:quartz-jobs:$globalQuartzVersion"
        ]


        ref4Flexmark=[
                "com.vladsch.flexmark:flexmark-all:$globalFlexmarkVersion"
        ]

        ref4PostgresqlJdbcDriver=[
                "org.postgresql:postgresql:$globalPostgresqlJdbcDriverVersion"
        ]

        ref4QiuniuSdkVersion=[
                "com.qiniu:qiniu-java-sdk:$globalQiniuSdkVersion"
        ]

        ref4ApacheAnt=["org.apache.ant:ant:$globalApacheAntVersion"]

        //--二维码
        ref4ZXing=[
                "com.google.zxing:core:$globalGoogleZXingVersion",
                "com.google.zxing:javase:$globalGoogleZXingVersion"
        ]


        ref4Druid=["com.alibaba:druid:$globalDruidVertion"]

        ref4FastdfsClient=["cn.bestwu:fastdfs-client-java:$globalFastDfsClientVersion"]

        ref4SofaRpc=["com.alipay.sofa:sofa-rpc-all:$globalSofaRpcVersion"]
        //curator--zk客户端导入
        ref4Curator=["org.apache.curator:curator-framework:$globalCuratorVersion","org.apache.curator:curator-recipes:$globalCuratorVersion"]


        //--jackson引用--备注:sofarpc要用到jackson,必须引入Jackson
        ref4Jackson=["com.fasterxml.jackson.core:jackson-core:$globalJacksonVersion"
                     ,"com.fasterxml.jackson.core:jackson-databind:$globalJacksonVersion"
                     ,"com.fasterxml.jackson.core:jackson-annotations:$globalJacksonVersion"]


        /***log4j2 begin
         * 调用方法:
         *
         *     //--log4j2相关库
         *     compile ref4Slf4jBindingLog4j2
         *     compile ref4Log4j2
         *     compile ref4Disruptor //log4j2要异步记录日志必须有这个。
         *     //--log4j2在web项目中要有这个。
         *     runtime "org.apache.logging.log4j:log4j-web:$globalLog4j2Version"
         *     --log4j2与log4j1冲突,不可只能用其中一种
         *
         * ***/

        ref4Log4j2=[
                "org.apache.logging.log4j:log4j-core:$globalLog4j2Version"
                ,"org.apache.logging.log4j:log4j-api:$globalLog4j2Version"
        ]
        ref4Disruptor=[
                //使用异步写日志功能 必须引入此包-
                "com.lmax:disruptor:$globalDisruptorVersion"
        ]

        ref4Slf4jBindingLog4j2=[
                "org.apache.logging.log4j:log4j-slf4j-impl:$globalSlf4jBindingLog4j2Version"
        ]

        /***log4j2 end***/
        /***log4j1 begin
         * 调用方式:
         * //log4j1
         *         compile ref4Slf4jToLog4j
         *         compile ref4Log4j
         * --log4j2与log4j1冲突,不可只能用其中一种
         * ***/

        ref4Log4j=["log4j:log4j:$globalLog4jVersion","log4j:apache-log4j-extras:$globalLog4jVersion"]

        ref4Slf4jToLog4j=["org.slf4j:slf4j-log4j12:$globalSlf4jVersion"]

        /***log4j1 end***/

        /****常见或者程序主要引用依赖定义 end****/

    }
    idea {
        module {
            inheritOutputDirs = true
        }
    }
    tasks.withType(JavaCompile) {
        options.encoding = "UTF-8"
    }
    tasks.withType(GroovyCompile) {
        groovyOptions.encoding = "MacRoman"
    }
    repositories {
        maven{
            //更换为阿里的仓库
            url  'http://maven.aliyun.com/nexus/content/groups/public'
        }

        //有些jar包在中央仓库是没有的,需要手动添加上去
//        flatDir {  dirs 'local_jars' }
//        mavenCentral()
    }
    dependencies {
        testCompile group: 'junit', name: 'junit', version: '4.12'
        compile ref4Jackson
//        //--导入日志控件。
        /****项目统一使用log4j2日志插件 begin***/
        //--log4j2相关库
        compile ref4Slf4jBindingLog4j2
        compile ref4Log4j2
        compile ref4Disruptor //log4j2要异步记录日志必须有这个。
        //--log4j2在web项目中要有这个。
        runtime "org.apache.logging.log4j:log4j-web:$globalLog4j2Version"
        /****项目统一使用log4j2日志插件 end***/

    }


/****自定义全局任务 begin****/
    task compileConfig{

    }
    compileConfig << {
        println "正在编译替换配置中心的配置文件,请稍后......."
        println "根项目目录为:$rootProject.rootDir"
        println "当前模块目录为:$project.projectDir"
        /***将配置文件复制到子模块的对应位置--当然,会替换掉相关变量****/

        copy {
            from "${rootProject.rootDir}/conf/"
            exclude 'log4j2.xml'
            into "${project.projectDir}/src/main/resources/conf"
            filter(org.apache.tools.ant.filters.ReplaceTokens, tokens: rootProject.AppSetting)
        }
        //--替换复制log4j2.xml
        def renderVars=[
                "moduleName":project.name
        ]
        copy {
            from "${rootProject.rootDir}/conf/"
            include 'log4j2.xml'
            into "${project.projectDir}/src/main/resources/"
            filter(org.apache.tools.ant.filters.ReplaceTokens, tokens: renderVars)
        }
    }
/****自定义全局任务 end****/

}

dependencies{

}
有几点说明一下:
allproject表示这部分内容是所有项目共通的,变量也是;
上面有各种globalXXXVersion都是各个api的版本号码,在这里进行了统一管理;
ref4XXX是方便 使用的变量,到时候调用 compile ref4XXX即可引用依赖了
compileConfig是一个根据用户输入的参数来确定env环境变量的值的方法,具体使用可以参考:
更多的请访问:
一起开发一个文件服务器–3、配置中心和redis(1)gradle切换环境及变量替换【试验稿】

子模块【FileServerWebApp】
FileServerWebApp的相关build.gradle是这样的:
plugins {
    id 'war'
}

group 'net.w2p'
version '1.0-SNAPSHOT'


dependencies {


    compile project(":Shared")
    compile (project(":xxl-conf-core"))
    compile (project(":WebExt"))
    //--redis
    compile ref4RedisClient
    //【http相关api】
    providedCompile ref4JspAndServletApi
    compile ref4Jstl
    //【spring 框架】
    compile ref4SpringFramework

    //【mybatis】
    compile ref4MyBatis
    compile ref4MybatisSpring

    //【apache commons】
    compile ref4ApacheCommons

    //postgresql
    compile ref4PostgresqlJdbcDriver
    //druid
    compile ref4Druid

    //fastdfs client
    compile ref4FastdfsClient

}
具体来说,就是引用了其他三个模块,还有引用了各个第三方库。
spring的配置文件说明
spring的配置文件有两个,一个是applicationContext.xml,一个是spring-mvc.xml,下面进行要点说明:
注意,applicationContext和spring-mvc都是存放在resource下面的,假如没有的话请新建:
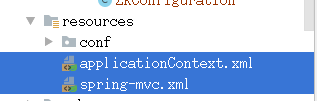
applicationContext.xml已经变更了,内容如下:
<?xml version="1.0" encoding="UTF-8"?>
<beans xmlns="http://www.springframework.org/schema/beans"
xmlns:context="http://www.springframework.org/schema/context"
xmlns:p="http://www.springframework.org/schema/p"
xmlns:aop="http://www.springframework.org/schema/aop"
xmlns:tx="http://www.springframework.org/schema/tx"
xmlns:xsi="http://www.w3.org/2001/XMLSchema-instance"
xmlns:mvc="http://www.springframework.org/schema/mvc"
xmlns:task="http://www.springframework.org/schema/task"
xsi:schemaLocation="http://www.springframework.org/schema/beans http://www.springframework.org/schema/beans/spring-beans-4.0.xsd
http://www.springframework.org/schema/context http://www.springframework.org/schema/context/spring-context-4.0.xsd
http://www.springframework.org/schema/aop http://www.springframework.org/schema/aop/spring-aop-4.0.xsd http://www.springframework.org/schema/tx http://www.springframework.org/schema/tx/spring-tx-4.0.xsd
http://www.springframework.org/schema/util http://www.springframework.org/schema/util/spring-util-4.0.xsd
http://www.springframework.org/schema/mvc http://www.springframework.org/schema/mvc/spring-mvc-4.1.xsd
http://www.springframework.org/schema/task http://www.springframework.org/schema/task/spring-task-4.0.xsd"
>
<!--<!–导入xxl conf spring配置文件–>-->
<!--<import resource="classpath:/spring/applicationContext-XxlConf.xml"></import>-->
<!--注意,该上下文配置文件只用于 contextLoaderListener,是程序基本上下文,作为父context被其他上下文引用-->
<!--分工:整个Web应用程序需要共享的一些组件,比如DAO,数据库的ConnectionFactory等,mybatis,等等-->
<!--
net.w2p.local.Shared.mybatis.TypeHandlers =》 自定义mybatis数据类型转换,譬如,数组类型,布尔值类型等。
net.w2p.local.plugins.BeanConfiguration=》自定义的java类作为configuration的方法,包含了数据库datasource源
-->
<context:component-scan
base-package="
net.w2p.Shared.mybatis.TypeHandlers,
net.w2p.local.plugins.BeanConfiguration
"/>
</beans>
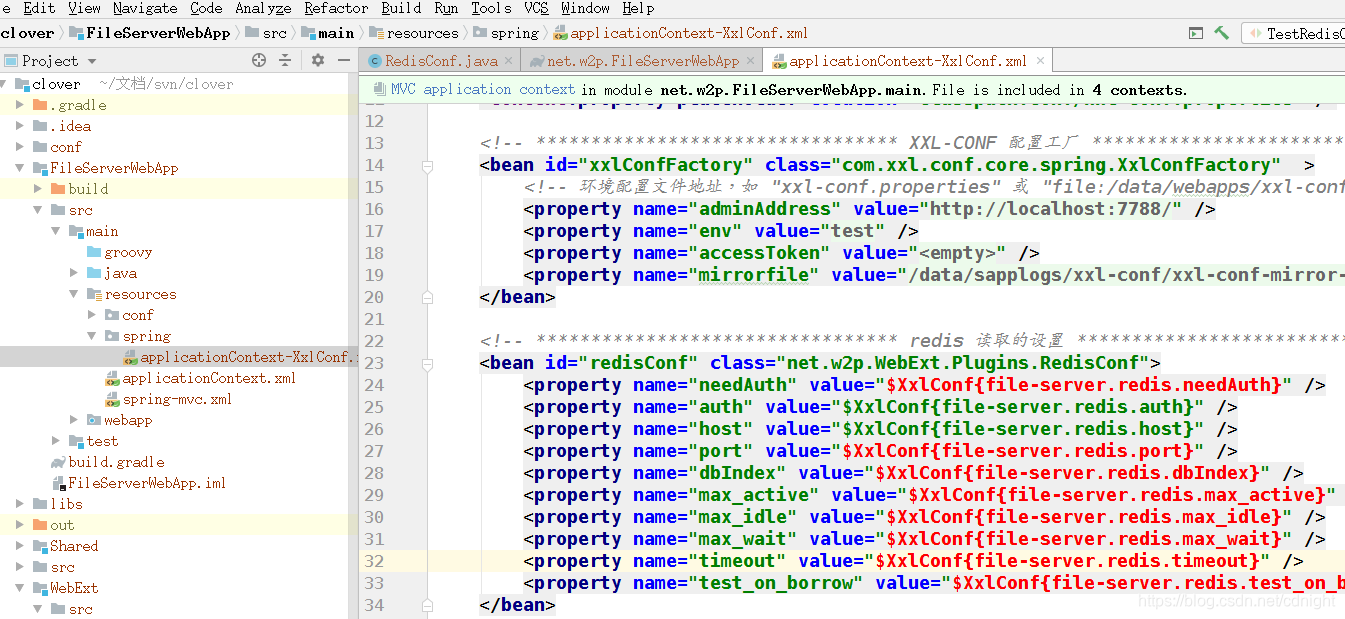
注意一下,扫描里面添加了net.w2p.local.plugins.BeanConfiguration这个包,这个包其实就是使用java代码进行配置,代替xml配置的那一个包。而/spring/applicationContext-XxlConf.xml这个xml配置文件已经不需要引用了,可删掉----因为都用了java配置了。
而spring-mvc.xml没有改,因为是web方面的配置,不涉及基础设施:
<?xml version="1.0" encoding="UTF-8"?>
<beans xmlns="http://www.springframework.org/schema/beans"
       xmlns:context="http://www.springframework.org/schema/context"
       xmlns:p="http://www.springframework.org/schema/p"
       xmlns:aop="http://www.springframework.org/schema/aop"
       xmlns:tx="http://www.springframework.org/schema/tx"
       xmlns:xsi="http://www.w3.org/2001/XMLSchema-instance"
       xmlns:mvc="http://www.springframework.org/schema/mvc"
       xmlns:task="http://www.springframework.org/schema/task"
       xsi:schemaLocation="http://www.springframework.org/schema/beans http://www.springframework.org/schema/beans/spring-beans-4.0.xsd
    http://www.springframework.org/schema/context http://www.springframework.org/schema/context/spring-context-4.0.xsd
    http://www.springframework.org/schema/aop http://www.springframework.org/schema/aop/spring-aop-4.0.xsd http://www.springframework.org/schema/tx http://www.springframework.org/schema/tx/spring-tx-4.0.xsd
    http://www.springframework.org/schema/util http://www.springframework.org/schema/util/spring-util-4.0.xsd
    http://www.springframework.org/schema/mvc http://www.springframework.org/schema/mvc/spring-mvc-4.1.xsd
 http://www.springframework.org/schema/task http://www.springframework.org/schema/task/spring-task-4.0.xsd"

>
    <!--注意,该上下文配置文件只用于 dispatch servlet,是web前端上下文,作为子context将继承父context [app-context.xml]-->
    <!--分工:DispatcherServlet创建的ApplicationContext主要用于和该Servlet相关的一些组件,比如Controller、ViewResovler等。-->


    <!--注意,mvc 上下文中扫描托管的bean,文件夹不能与app 上下文的有重合部分!否则会出现两个上下文同时初始化一份自己的bean对象的情况-->
    <!--这个位置请根据你实际目录结构而定。-->
    <context:component-scan base-package="net.w2p.FileServerWebApp.controller"/>


    <!-- configure the InternalResourceViewResolver 配置引擎及模板所在目录,模板的后缀
    话说我个人感觉 jsp很好用,如果苛求更好的模板体验,应该直接用vuejs或其他前端框架的,别为难后台模板了。-->
    <bean class="org.springframework.web.servlet.view.InternalResourceViewResolver"
          id="internalResourceViewResolver">
        <!-- 前缀 -->
        <property name="prefix" value="/WEB-INF/views/" />
        <!-- 后缀 -->
        <property name="suffix" value=".jsp" />
    </bean>
    <!--控制器路由,view层配置 end-->


</beans>
web配置说明
如果是根据之前的文章配置的话,那么web的配置应该已经完成了,不需要看这一节,如果是新建文件,那么就需要配置了。
web.xml以及视图文件配置
假如是新建的项目,那么就如下图:
是没有web.xml的,需要新建WEB-INF文件,然后再添加web.xml文件,如下图:
web.xml内容如下:

<?xml version="1.0" encoding="UTF-8"?>
<web-app xmlns="http://xmlns.jcp.org/xml/ns/javaee"
         xmlns:xsi="http://www.w3.org/2001/XMLSchema-instance"
         xsi:schemaLocation="http://xmlns.jcp.org/xml/ns/javaee http://xmlns.jcp.org/xml/ns/javaee/web-app_3_1.xsd"
         version="3.1">


    <!--注意,spring项目可以用dispatcherServlet也可以用contextLoaderListener,
 两者区别在:https://blog.csdn.net/cdnight/article/details/82658355,建议不要同时使用,
 https://www.cnblogs.com/weknow619/p/6341395.html
 https://blog.csdn.net/chaijunkun/article/details/6925889
 https://blog.csdn.net/chaozhi_guo/article/details/51287745?utm_source=blogxgwz5
 否则很可能导致重复初始化实例的异常执行情况。

 参考:http://blog.csdn.net/zjw10wei321/article/details/40145241
tomcat在加载的时候会先加载listner,然后再加载servlet。
ContextLoaderListener加载的时候会实例化加载了比如DAO、service等Bean的spring context;
DispatcherContext加载的时候会以ContextLoaderListener加载的spring context容器作为parent context容器,
这个spring context里边主要定义的bean一般是和spring mvc相关的controller、页面跳转等;
其中ContextLoaderListener的使用方法如下:
http://blog.csdn.net/zjw10wei321/article/details/40145241
其中DispatcherContext的使用方法如下:
http://blog.jobbole.com/30133/
 2018-11-04:补充,根据需要,contextLoaderListener主要负责初始化程序的dao service 等,由于需要在listener里面捕获web context就必须
 要先初始化一个context,那么只能配置两个context了,分别是父子context。
 -->

    <context-param>
        <param-name>contextConfigLocation</param-name>
        <!--<param-value>classpath*:applicationContext-*.xml,/WEB-INF/applicationContext.xml,/WEB-INF/classes/applicationContext-*.xml</param-value>-->
        <param-value>classpath:applicationContext.xml</param-value>

    </context-param>

    <listener>
        <listener-class>org.springframework.web.context.ContextLoaderListener</listener-class>
    </listener>


    <!--注意,spring项目可以用dispatcherServlet也可以用contextLoaderListener,
    两者区别在:https://blog.csdn.net/cdnight/article/details/82658355,建议不要同时使用,
    https://www.cnblogs.com/weknow619/p/6341395.html
    https://blog.csdn.net/chaijunkun/article/details/6925889
    https://blog.csdn.net/chaozhi_guo/article/details/51287745?utm_source=blogxgwz5
    否则很可能导致重复初始化实例的异常执行情况。

    参考:http://blog.csdn.net/zjw10wei321/article/details/40145241
tomcat在加载的时候会先加载listner,然后再加载servlet。
ContextLoaderListener加载的时候会实例化加载了比如DAO、service等Bean的spring context;
DispatcherContext加载的时候会以ContextLoaderListener加载的spring context容器作为parent context容器,
这个spring context里边主要定义的bean一般是和spring mvc相关的controller、页面跳转等;
其中ContextLoaderListener的使用方法如下:
http://blog.csdn.net/zjw10wei321/article/details/40145241
其中DispatcherContext的使用方法如下:
http://blog.jobbole.com/30133/
    2018-11-04:补充,根据需要,contextLoaderListener主要负责初始化程序的dao service 等,由于需要在listener里面捕获web context就必须
    要先初始化一个context,那么只能配置两个context了,分别是父子context。
    -->
    <servlet>
        <servlet-name>dispatcher</servlet-name>
        <servlet-class>org.springframework.web.servlet.DispatcherServlet</servlet-class>
        <init-param>
            <param-name>contextConfigLocation</param-name>
            <!--<param-value>-->
            <!--classpath*:config/spring/spring-mvc.xml-->
            <!--/WEB-INF/applicationContext.xml,-->
            <!--/WEB-INF/spring/spring-*.xml</param-value>-->
            <param-value>
                classpath:spring-mvc.xml</param-value>
        </init-param>
        <load-on-startup>1</load-on-startup>
        <async-supported>true</async-supported>
    </servlet>


    <servlet-mapping>
        <servlet-name>dispatcher</servlet-name>
        <url-pattern>*.do</url-pattern>
    </servlet-mapping>


</web-app>
视图文件的配置

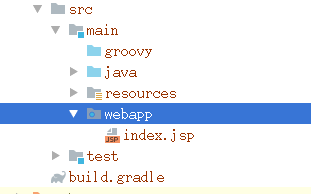
spring-mvc里面配置了视图文件在/WEB-INF/views下面,请新建文件夹,如下图:

添加一个测试控制器
控制器内容为:
以下以新建的web模块【MasterWebApp】为例说明
package net.w2p.master.controller;
import org.springframework.beans.factory.annotation.Autowired;
import org.springframework.stereotype.Controller;
import org.springframework.web.bind.annotation.RequestMapping;
import org.springframework.web.servlet.ModelAndView;
import javax.servlet.http.HttpServletRequest;
import java.io.File;
import java.util.List;
@Controller("/hello")
@RequestMapping("/hello")
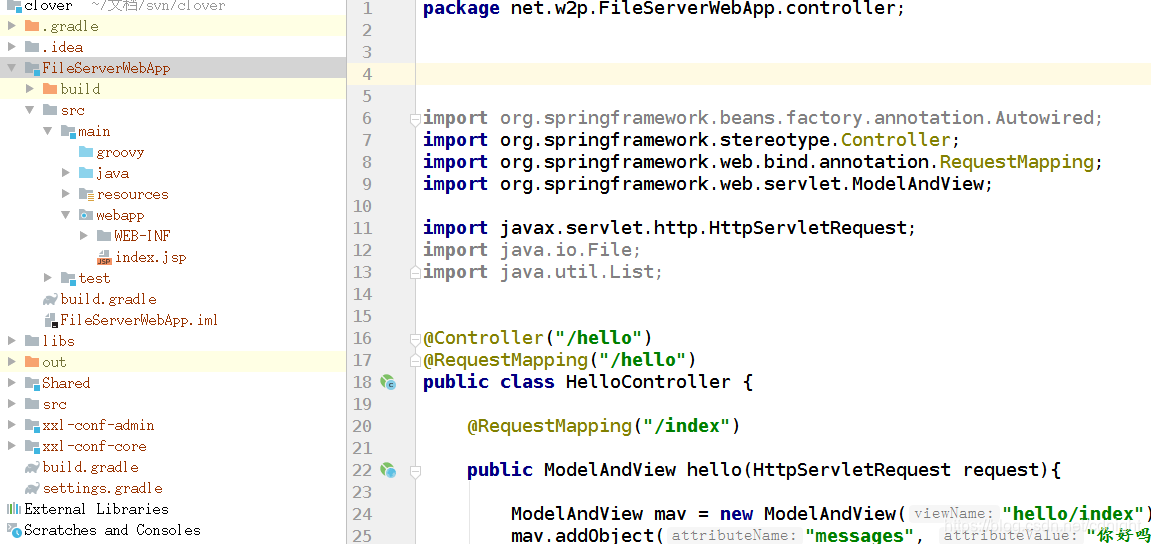
public class HelloController {
@RequestMapping("/index")
public ModelAndView hello(HttpServletRequest request){
ModelAndView mav = new ModelAndView("hello/index");
mav.addObject("messages", "你好吗");
request.setAttribute("obj", "你好吗");
try {
}
catch (Exception ed){
ed.printStackTrace();
}
System.out.println("---end--");
return mav;
}
}
如图:

添加对应的view文件,视图文件内容如下:
<%@ page contentType="text/html;charset=UTF-8" language="java" %>
<html>
<head>
    <title>测试</title>
</head>
<body>

你好吗?
</body>
</html>
如图:

idea中配置web项目部署信息以及tomcat信息
设置完以上步骤基本上一个spring项目已经整合完毕,需要编译运行了。还需要最后一步,在idea中添加当前web项目的编译部署信息。
前面文章已经具体说明了这个问题了,
一起开发一个文件服务器–1、配置springweb环境【试验稿】
下面摘录:
接下来。。。就要配置jsp web网站的运行方式了。
请点击
“run”->“Edit Configurations”->
然后点击符号“+”添加一个tomcat server-》Local的,
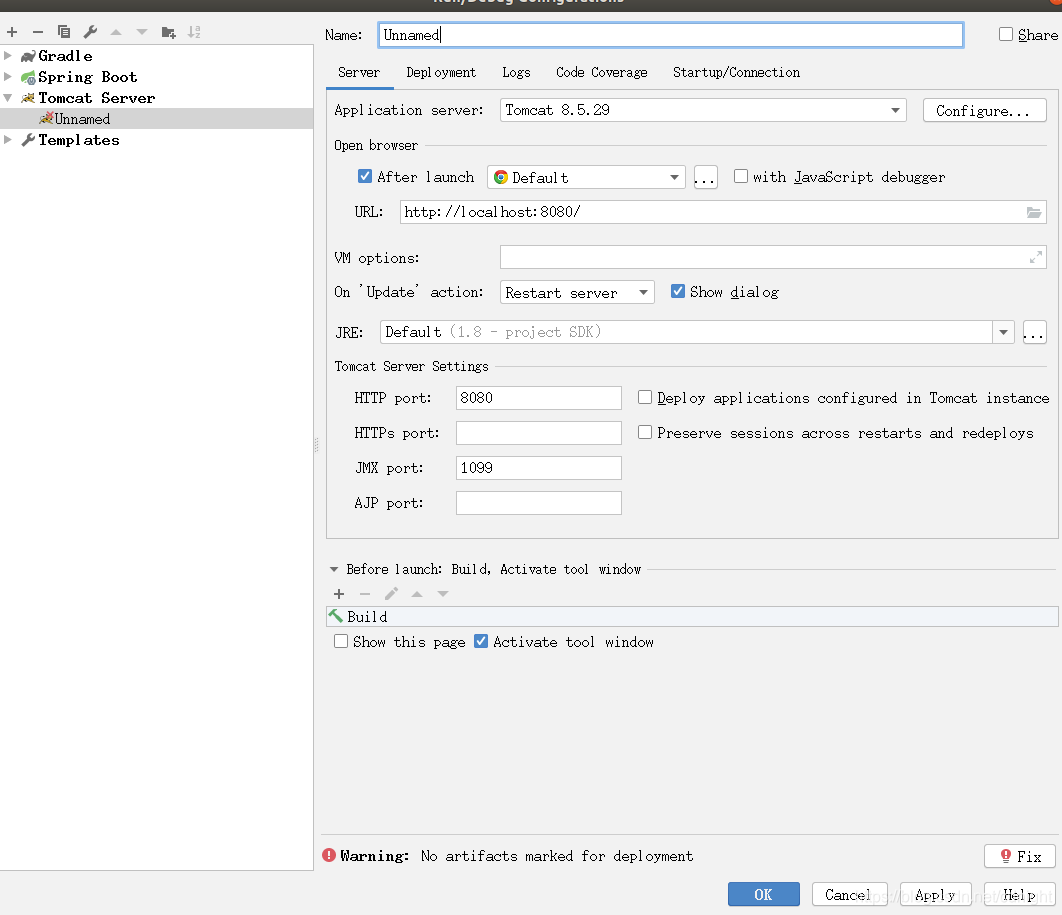
好了,配置一下名称,端口:

看到右下角的Fix警告按钮没有?这个是警告你没有选定网站发布的网站文件的,点击以后我选择的是【实际上这个在deployment标签页的那里也可以设置】:

选择以后警告消失:
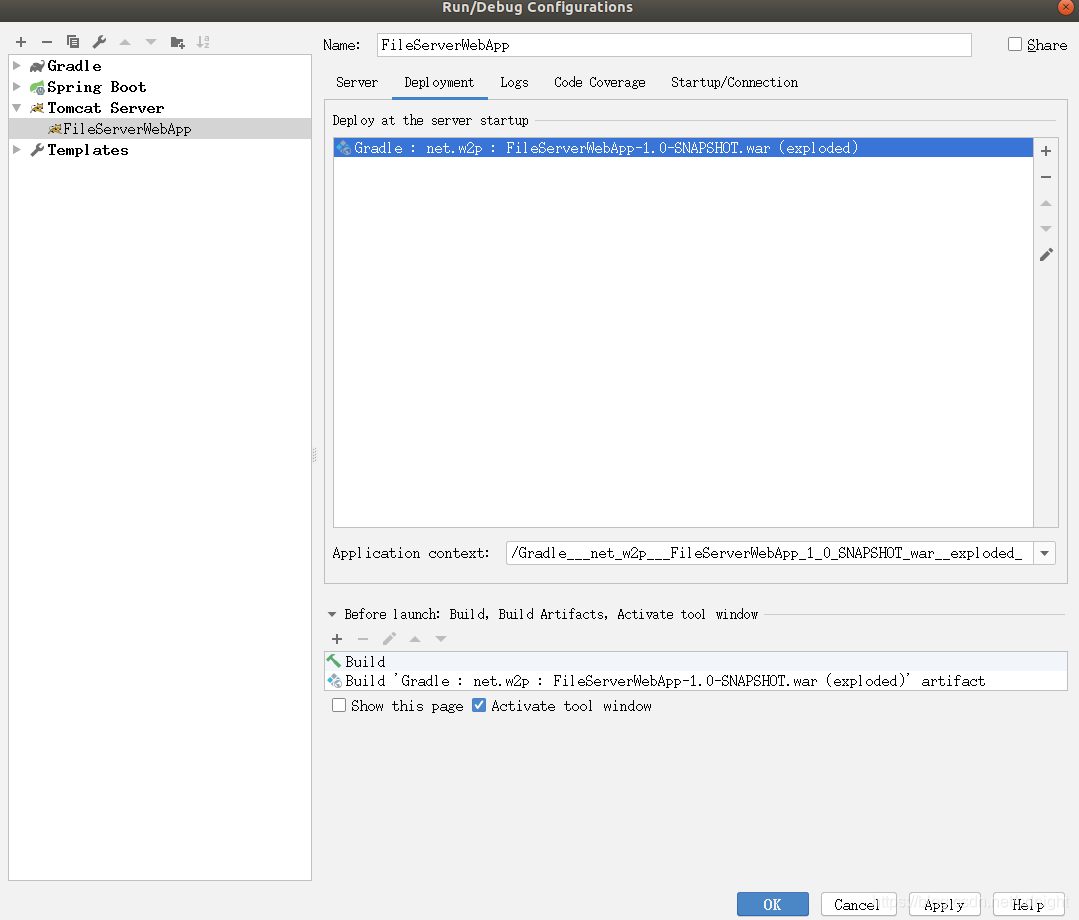
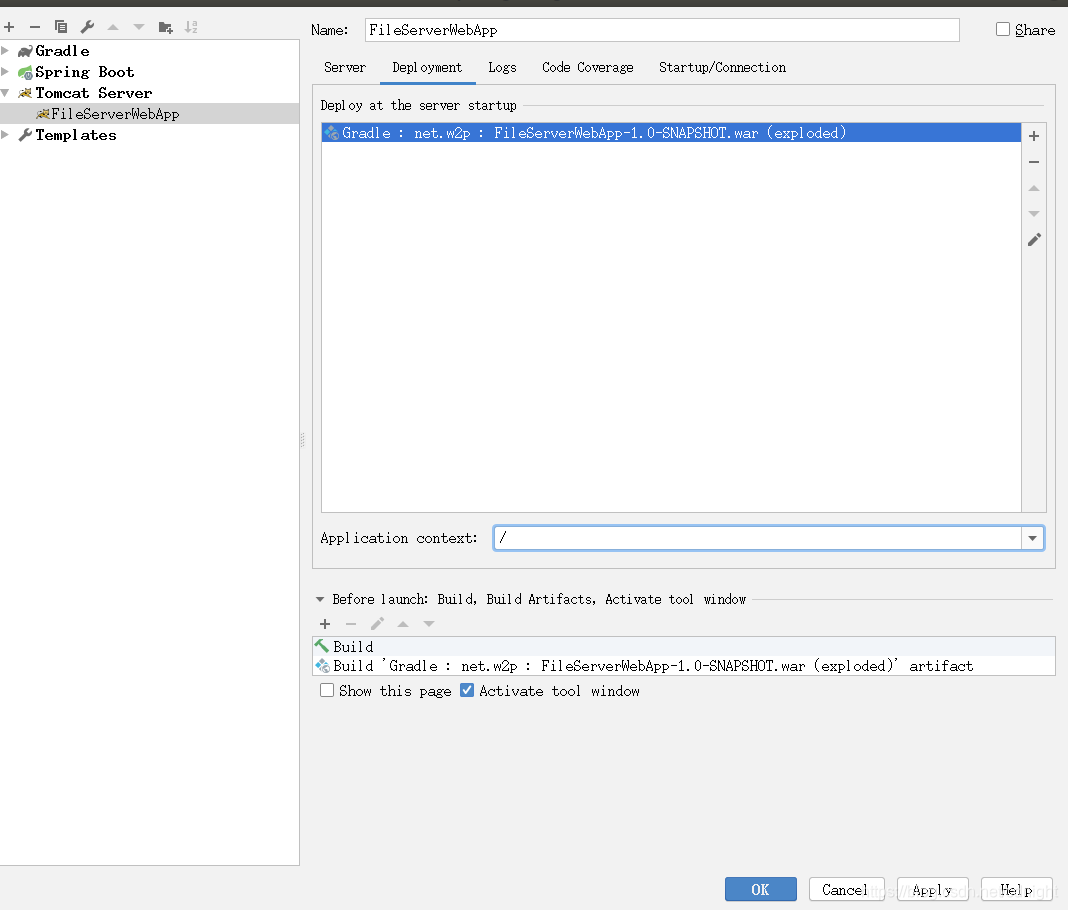
对了,别忘记检查一下application context path—实际上就是context path ,url的二级目录,譬如,这次的默认配置就有问题了:

直接将产出物的名称填上去,我们直接一个/ 斜杠即可。
好了,接下来要导入所有引用的类库:
注意到这个没有?

点击import changes
然后你会发现红色的警告线都没有了,已经可以正常识别类库了:
接下来,run->选择刚才新建的FileServerWebApp,接下来就是查看结果了:

页面显示为:

spring项目中配置测试【包括多线程测试】
前面的文章已经有提及到了,不过考虑到该文章可能是起点,那么这里就直接重复提一次。
首先,新建一个测试基础类,以后的测试都要继承自这个基础类进行测试,譬如,就叫BaseTest

内容如下:
package main;
import org.junit.After;
import org.junit.Before;
import org.junit.runner.RunWith;
import org.springframework.test.context.ContextConfiguration;
import org.springframework.test.context.junit4.SpringJUnit4ClassRunner;
import org.springframework.test.context.web.WebAppConfiguration;
import java.util.Date;
import java.util.concurrent.ExecutorService;
import java.util.concurrent.Executors;
import java.util.concurrent.LinkedBlockingQueue;
import java.util.concurrent.atomic.AtomicInteger;
@RunWith(SpringJUnit4ClassRunner.class)
@WebAppConfiguration
//@ContextConfiguration({"classpath:spring-mvc.xml","classpath:spring-mybatis.xml"})
@ContextConfiguration(locations={
"classpath*:spring-mvc.xml",
"classpath*:applicationContext.xml"
}
)
public class BaseTest {
Date beginDate;
Long begin=null;
Long end=null;
Date endDate=null;
@Before
public void init() {
//--初始化spring上下文
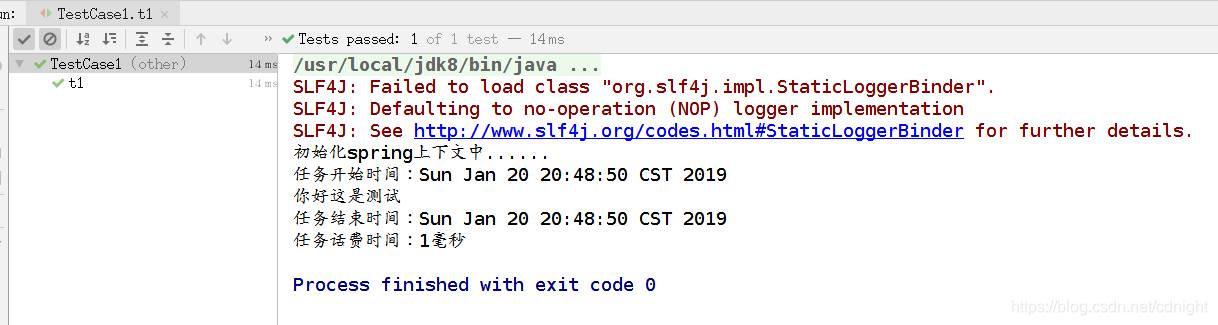
System.out.println("初始化spring上下文中......");
//在运行测试之前的业务代码
beginDate = new Date();
begin = beginDate.getTime();
System.out.println("任务开始时间:" + beginDate);
}
@After
public void after() {
//在测试完成之后的业务代码
endDate = new Date();
end = endDate.getTime();
System.out.println("任务结束时间:" + endDate + "");
System.out.println("任务话费时间:" + (end - begin) + "毫秒");
}
/***用于测试最大并发***/
public void runMultiThreadTest(int totalThreadCount, int threadPoolSize, Runnable runnable){
{
final int threadSize= totalThreadCount;
ExecutorService executor= Executors.newFixedThreadPool(threadPoolSize);
final AtomicInteger lockCount=new AtomicInteger(threadSize);
final AtomicInteger successCount=new AtomicInteger(0);
try {
for (int i = 0; i < threadSize; i++) {
final int theThreadNumber = i;
executor.submit(new Runnable() {
@Override
public void run() {
try {
runnable.run();
successCount.incrementAndGet();
}
catch (Exception ed){
ed.printStackTrace();
}
finally {
lockCount.decrementAndGet();
}
}
});
}
while(true){
synchronized (this){
if(lockCount.intValue()>0){
;
}
else{
break;
}
}
}
System.out.println("注意当前线程池最大线程数量为"+threadPoolSize+"个");
System.out.println("共运行线程"+threadSize+"个,成功运行线程:"+successCount.get()+"个");
}
catch (Exception ed){
ed.printStackTrace();
}
}
}
/***用于测试任务阻塞的任务队列执行下的性能***/
public void runMultiThreadByBlockQueue(int threadCount,TaskProducer producer,TaskConsumer consumer){
final LinkedBlockingQueue<TaskOutLine> queue=new LinkedBlockingQueue<>(threadCount);
final int threadSize=threadCount;
ExecutorService executor= Executors.newFixedThreadPool(threadSize);
final AtomicInteger lockCount=new AtomicInteger(threadSize);
final AtomicInteger successCount=new AtomicInteger(0);
try {
/***线程池同时产生任务队列***/
for (int i = 0; i < threadSize; i++) {
final int theThreadNumber = i;
TaskOutLine tmpOutLine=new TaskOutLine();
tmpOutLine.taskIndex=theThreadNumber;
executor.submit(new Runnable() {
@Override
public void run() {
try {
tmpOutLine.taskData=producer.produce();
queue.put(tmpOutLine);
}
catch (Exception ed){
ed.printStackTrace();
}
finally {
}
}
});
}
/***另起一个线程用于消费队列**/
new Thread(new Runnable() {
@Override
public void run() {
while (lockCount.get()>0){
try{
TaskOutLine currentObj=queue.take();
consumer.consume(currentObj);
successCount.incrementAndGet();
}
catch (Exception ed){
}
finally {
lockCount.decrementAndGet();
}
}
}
}).start();
while(true){
synchronized (this){
if(lockCount.intValue()>0){
;
}
else{
break;
}
}
}
System.out.println("共运行线程"+threadSize+"个,成功运行线程:"+successCount.get()+"个");
}
catch (Exception ed){
ed.printStackTrace();
}
}
public interface TaskProducer{
public Object produce();
}
public interface TaskConsumer{
public void consume(TaskOutLine taskOutLine);
}
public class TaskOutLine{
public int taskIndex=0;
public Object taskData=new Object();
public int getTaskIndex() {
return taskIndex;
}
public void setTaskIndex(int taskIndex) {
this.taskIndex = taskIndex;
}
public Object getTaskData() {
return taskData;
}
public void setTaskData(Object taskData) {
this.taskData = taskData;
}
}
}
好了,如何测试呢?
看例子:

下面根据这些来做一个入门测试:
文件结构如下:

测试代码如下:
package other;

import main.BaseTest;
import org.junit.Test;

public class TestCase1 extends BaseTest {
    @Test
    public void t1(){
        System.out.println("你好这是测试");
    }
}
测试结果:
xxl-conf配置中心整合
好了,说了那么多不通点,现在来实际操作一下,如何对一个外部插件、外部服务整合整合的?
这里强调一下,详情看看compileConfig的内容,里面做了两个事情:1、将xxl-conf.properties替换掉参数然后放到resource/conf目录下面,2、将log4j2.xml替换掉参数放到resource目录下面【log4j2.xml是最近才配置的,可能以前的版本有出入】,下面给出两个配置的模板以及代码:
代码分别是:
log4j2.xml

<?xml version="1.0" encoding="UTF-8"?>
<!--注意,针对多模块系统,日志输出目录添加了项目名称的一层,需要用compileConfig进行变量替换复制。-->
<!--日志级别以及优先级排序: OFF > FATAL > ERROR > WARN > INFO > DEBUG > TRACE > ALL -->
<!--Configuration后面的status,这个用于设置log4j2自身内部的信息输出,可以不设置,当设置成trace时,你会看到log4j2内部各种详细输出-->
<!--monitorInterval:Log4j能够自动检测修改配置 文件和重新配置本身,设置间隔秒数-->
<configuration status="WARN" monitorInterval="30">
    <!--先定义所有的appender-->
    <appenders>
        <!--这个输出控制台的配置-->
        <console name="Console" target="SYSTEM_OUT">
            <!--输出日志的格式-->
            <PatternLayout pattern="[%d{HH:mm:ss:SSS}] [%p] - %l - %m%n"/>
        </console>
        <!--文件会打印出所有信息,这个log每次运行程序会自动清空,由append属性决定,这个也挺有用的,适合临时测试用-->
        <File name="log" fileName="log/test.log" append="false">
            <PatternLayout pattern="%d{HH:mm:ss.SSS} %-5level %class{36} %L %M - %msg%xEx%n"/>
        </File>
        <!-- 这个会打印出所有的info及以下级别的信息,每次大小超过size,则这size大小的日志会自动存入按年份-月份建立的文件夹下面并进行压缩,作为存档-->
        <RollingFile name="RollingFileInfo" fileName="${sys:user.home}/logs/@moduleName@/info.log"
                     filePattern="${sys:user.home}/logs/@moduleName@/$${date:yyyy-MM}/info-%d{yyyy-MM-dd}-%i.log">
            <!--控制台只输出level及以上级别的信息(onMatch),其他的直接拒绝(onMismatch)-->
            <ThresholdFilter level="info" onMatch="ACCEPT" onMismatch="DENY"/>
            <PatternLayout pattern="[%d{HH:mm:ss:SSS}] [%p] - %l - %m%n"/>
            <Policies>
                <TimeBasedTriggeringPolicy/>
                <SizeBasedTriggeringPolicy size="100 MB"/>
            </Policies>
        </RollingFile>
        <RollingFile name="RollingFileWarn" fileName="${sys:user.home}/logs/@moduleName@/warn.log"
                     filePattern="${sys:user.home}/logs/@moduleName@/$${date:yyyy-MM}/warn-%d{yyyy-MM-dd}-%i.log">
            <ThresholdFilter level="warn" onMatch="ACCEPT" onMismatch="DENY"/>
            <PatternLayout pattern="[%d{HH:mm:ss:SSS}] [%p] - %l - %m%n"/>
            <Policies>
                <TimeBasedTriggeringPolicy/>
                <SizeBasedTriggeringPolicy size="100 MB"/>
            </Policies>
            <!-- DefaultRolloverStrategy属性如不设置,则默认为最多同一文件夹下7个文件,这里设置了20 -->
            <DefaultRolloverStrategy max="20"/>
        </RollingFile>
        <RollingFile name="RollingFileError" fileName="${sys:user.home}/logs/@moduleName@/error.log"
                     filePattern="${sys:user.home}/logs/@moduleName@/$${date:yyyy-MM}/error-%d{yyyy-MM-dd}-%i.log">
            <ThresholdFilter level="error" onMatch="ACCEPT" onMismatch="DENY"/>
            <PatternLayout pattern="[%d{HH:mm:ss:SSS}] [%p] - %l - %m%n"/>
            <Policies>
                <TimeBasedTriggeringPolicy/>
                <SizeBasedTriggeringPolicy size="100 MB"/>
            </Policies>
        </RollingFile>
    </appenders>
    <!--然后定义logger,只有定义了logger并引入的appender,appender才会生效-->
    <loggers>
        <!--过滤掉spring和mybatis的一些无用的DEBUG信息-->
        <logger name="org.springframework" level="INFO"></logger>
        <logger name="org.mybatis" level="INFO"></logger>
        <root level="all">
            <appender-ref ref="Console"/>
            <appender-ref ref="RollingFileInfo"/>
            <appender-ref ref="RollingFileWarn"/>
            <appender-ref ref="RollingFileError"/>
        </root>
    </loggers>
</configuration>
xxl-conf.properties
# xxl-conf
xxl.conf.admin.address=@xxl_conf_admin_address@
xxl.conf.env=@env@
xxl.conf.access.token=@xxl_conf_access_token@
xxl.conf.mirrorfile=@xxl_conf_mirrorfile@
编译配置文件
首先,请执行:
gradle -q compileConfig -Denv=test
先执行命令生成xxl-conf的配置properties文件:

生成的配置文件内容如下:

然后,在FileServerWebApp项目下面的BeanConfiguration添加xxl-conf的配置以及初始化:

代码如下:
package net.w2p.local.plugins.BeanConfiguration;
import com.xxl.conf.core.spring.XxlConfFactory;
import org.springframework.beans.factory.annotation.Autowired;
import org.springframework.beans.factory.annotation.Qualifier;
import org.springframework.context.annotation.Bean;
import org.springframework.context.annotation.Configuration;

import java.io.InputStream;
import java.io.InputStreamReader;
import java.util.Properties;

/***配置中心配置***/
@Configuration
public class ConfCenter {

    /***xxl-conf配置工厂***/
    @Bean(name="xxlConfFactory")
    public XxlConfFactory xxlConfFactory(){
        /****
         * 读取本地配置文件
         * ***/
        Properties config=new Properties();
        InputStream in = Thread.currentThread().getContextClassLoader().getResourceAsStream("conf/xxl-conf.properties");
        try {
            InputStreamReader is = new InputStreamReader(in, "utf-8");
            config.load(is);
            is.close();
            in.close();
        }
        catch (Exception ed){
            ed.printStackTrace();
        }
        String adminAddress=config.getProperty("xxl.conf.admin.address");
		String env=config.getProperty("xxl.conf.env");
		String accessToken=config.getProperty("xxl.conf.access.token");
		String mirrorfile=config.getProperty("xxl.conf.mirrorfile");
		XxlConfFactory xxlConf = new XxlConfFactory();
        xxlConf.setAdminAddress(adminAddress);
        xxlConf.setEnv(env);
        xxlConf.setAccessToken(accessToken);
        xxlConf.setMirrorfile(mirrorfile);

        return xxlConf;
    }

}
其实,是不是跟之前的applicationContext-XxlConf.xml的文件内容一样的?
一模一样的目的。
然后下一步。。。
额,没有下一步了,对xxl-conf的配置已经完成了。
下面进行测试。
配置中心整合情况测试
代码如下:
    @Test
    public void printConf(){
        String str=	 XxlConfClient.get("default.key01", null);
        System.out.println("从配置中心获取default.key01的值是:"+str);
    }
测试能不能从配置中心读取数据

测试通过。
结语
好了,配置中心就这样解决了。
下面到整合redis了。