面向的问题
- 一直以来,写一个小型的 C/C++ 代码工程是非常令人头疼的一件事,比如有一个只有几个源文件的代码工程需要编辑和编译:
- 打开 IDE 进行编辑,会有种杀鸡焉用牛刀的感觉,本可以在 IDE 打开的过程中就完成修改和编译工作
- 使用代码编辑器配合命令行进行编译,如果代码有配合 Makefile,那么编译不成问题,但是调试又是一个麻烦,命令行下的调试工具没有那么直观,学习起来也很耗费时间
- 所以能不能做个折衷,直接在轻量级的代码编辑器完成编辑、编译、调试的工作呢?直到最近 vscode-cpptools 做了大量更新,这个想法才得以更好地实现
准备工作
工具准备
- 安装 VS Code: 由于我们这里记录的是工具配置,所以暂不介绍安装流程,但相信点进这篇博客的读者具备安装工具的能力,或者已经安装好了 VS Code
- 安装 vscode-cpptools: 在 VS Code 的插件安装栏中搜索
C/C++即可找到微软官方出品的这个工具,根据指引安装并重载窗口即可 - 编译工具安装: 一般来讲在 VS Code 中进行开发并不涉及编译工具版本,但是由于其对 Clang 的支持比较好,我推荐有能力的读者安装 Clang ,当然其他的任何编译工具都是可以的,包括 GCC,MSVC等
- 但是这里不得不提的一点是,在 Windows 下安装 Clang 是一件不太愉快的事情,如果您在安装时遇到困难,大可放弃安装 Clang ,转而安装 GCC
- 本文讲解的内容是在 Windows 下实现的,在其他系统当中仅需对工具目录等进行简单的修改即可复现这个过程
方案选择
- 根据应用环境不同,本文提出两种解决 C/C++ 工作环境配置的方案:
- 第一种是完全依赖 VS Code 的解决方案,即只使用其内置工具实现工作环境配置。这种方案比较简单,但是对于代码的迁移和扩展造成了一定的困扰。
- 第二种是 VS Code 配合 Makefile 的解决方案,即使用 VS Code 的代码编辑功能,配合 Makefile 的编译支持来配置工作环境。相对第一种解决方案,这种方案更适合代码的迁移
- 例如代码从 Windows 平台的 VS Code 中迁移到服务器的 Linux 命令行下时,可以在 Windows 中使用 VS Code 来编辑和编译,将代码迁移后在 Linux 下使用 Makefile来编译
方案一:VS Code 原生工具编译
1. 新建测试工程
首先新建一个文件夹 VSC-CPP 并编写几个源文件,作为测试样例
这个工程包含五个文件,包括两对 .cpp + .h 的函数声明与实现,以及一个调用这两个函数的 main.cpp
目录结构
- add.h     // add() 函数声明
- add.cpp   // add() 函数实现
- sub.h     // sub() 函数声明
- sub.cpp   // sub() 函数实现
- main.cpp  // 调用 add() 与 sub()
- 1
- 2
- 3
- 4
- 5
- add.h:
#ifndef _ADD_H_
#define _ADD_H_

int add(int a, int b);

#endif // ! _ADD_H_
- 1
- 2
- 3
- 4
- 5
- 6
- add.cpp:
#include "add.h"

int add(int a, int b) { return a + b; }
- 1
- 2
- 3
- sub.h:
#ifndef _SUB_H_
#define _SUB_H_

int sub(int a, int b);

#endif // ! _SUB_H_
- 1
- 2
- 3
- 4
- 5
- 6
- sub.cpp:
#include "sub.h"

int sub(int a, int b) { return a - b; }
- 1
- 2
- 3
- main.cpp:
#include "add.h"
#include "sub.h"
#include <iostream>

int main() {
    std::cout << add(1, 2) << std::endl;
    std::cout << sub(2, 1) << std::endl;
    return 0;
}
- 1
- 2
- 3
- 4
- 5
- 6
- 7
- 8
- 9
2. 配置环境
首先假定我们使用的编译工具如下:
1. 编译工具:g++
2. 调试工具:gdb
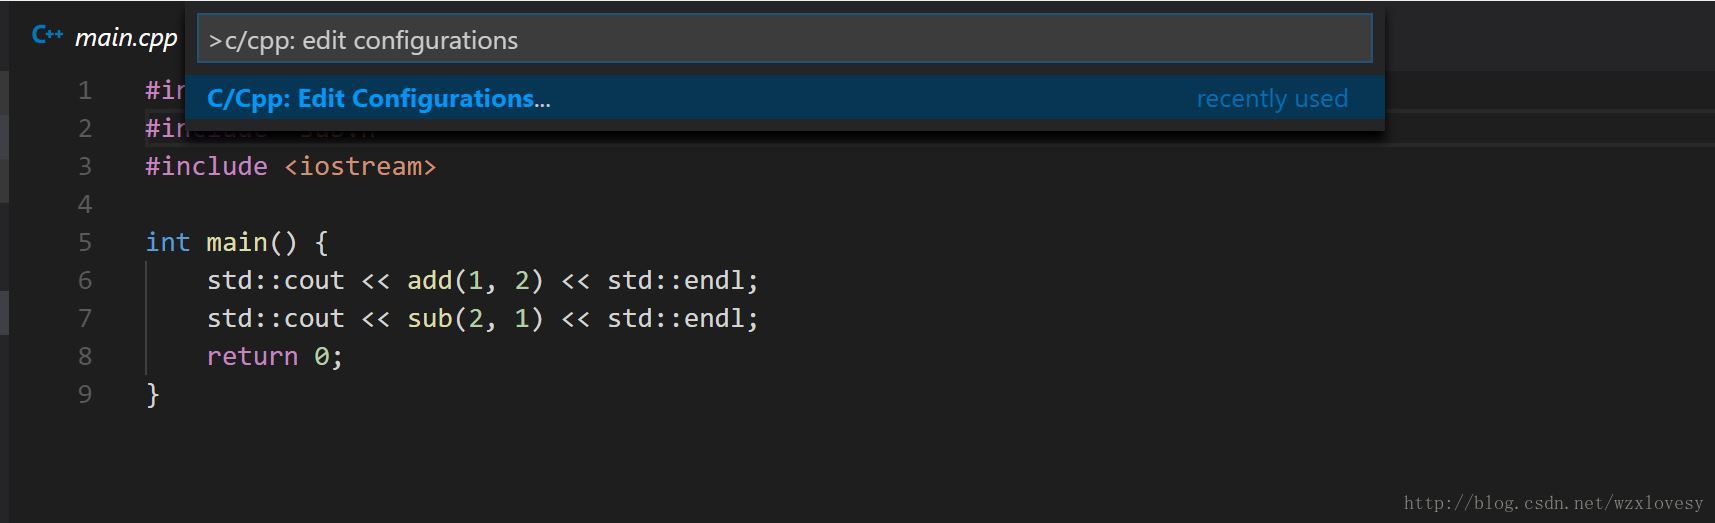
- 在 VS Code 中打开工具窗口 (默认Ctrl+Alt+P) ,输入
C/CPP: Edit Configurations来生成配置文件
- 然后在自动打开的
c_cpp_properties.json中配置 Include路径等内容 (一般而言自动生成的就是可用的,但是 Windows 下可能需要额外配置)
- 上一步结束后,一些 C/C++ 的代码提示等功能应该就可以正常工作了,接下来我们让 VS Code 能处理编译工作
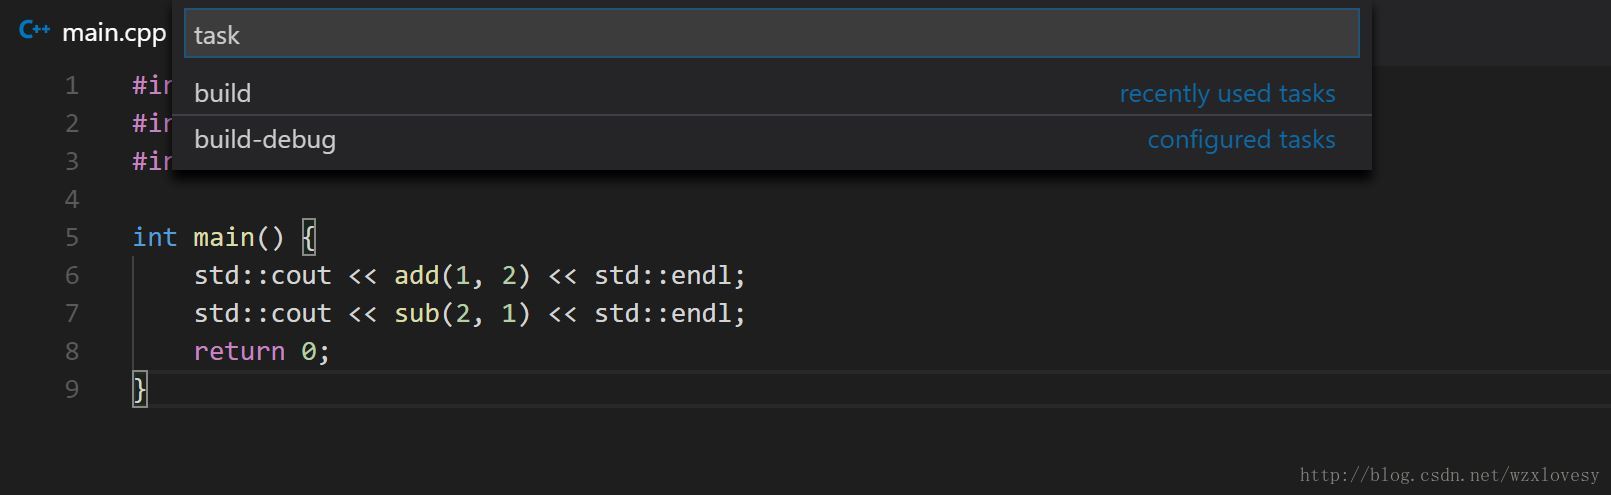
- 打开工具窗口 (默认Ctrl+Alt+P) →” role=”presentation”>→→ 在新打开的
tasks.json中配置如下 注意:复制这段代码的时候请删除其中的注释,否则可能会报错
- task.json:

{
    "version": "2.0.0",
    "tasks": [
        {
            // 默认第一条为编译命令
            "taskName": "build",
            // 使用 g++ 编译
            "command": "g++",
            // 参数包含所有使用到的源文件
            "args": [
                "main.cpp",
                "add.cpp",
                "sub.cpp",
                "-o",
                "main.exe"
            ],
            // 默认在 shell 中执行编译命令
            "type": "shell"
        },
        {
            // 编译 debug 用的目标文件
            "taskName": "build-debug",
            "command": "g++",
            // -g 参数用于编译可 debug 的目标文件
            "args": [
                "-g",
                "main.cpp",
                "add.cpp",
                "sub.cpp",
                "-o",
                "debug.exe"
            ],
            "type": "shell"
        }
    ]
}
- 1
- 2
- 3
- 4
- 5
- 6
- 7
- 8
- 9
- 10
- 11
- 12
- 13
- 14
- 15
- 16
- 17
- 18
- 19
- 20
- 21
- 22
- 23
- 24
- 25
- 26
- 27
- 28
- 29
- 30
- 31
- 32
- 33
- 34
- 35
- 36
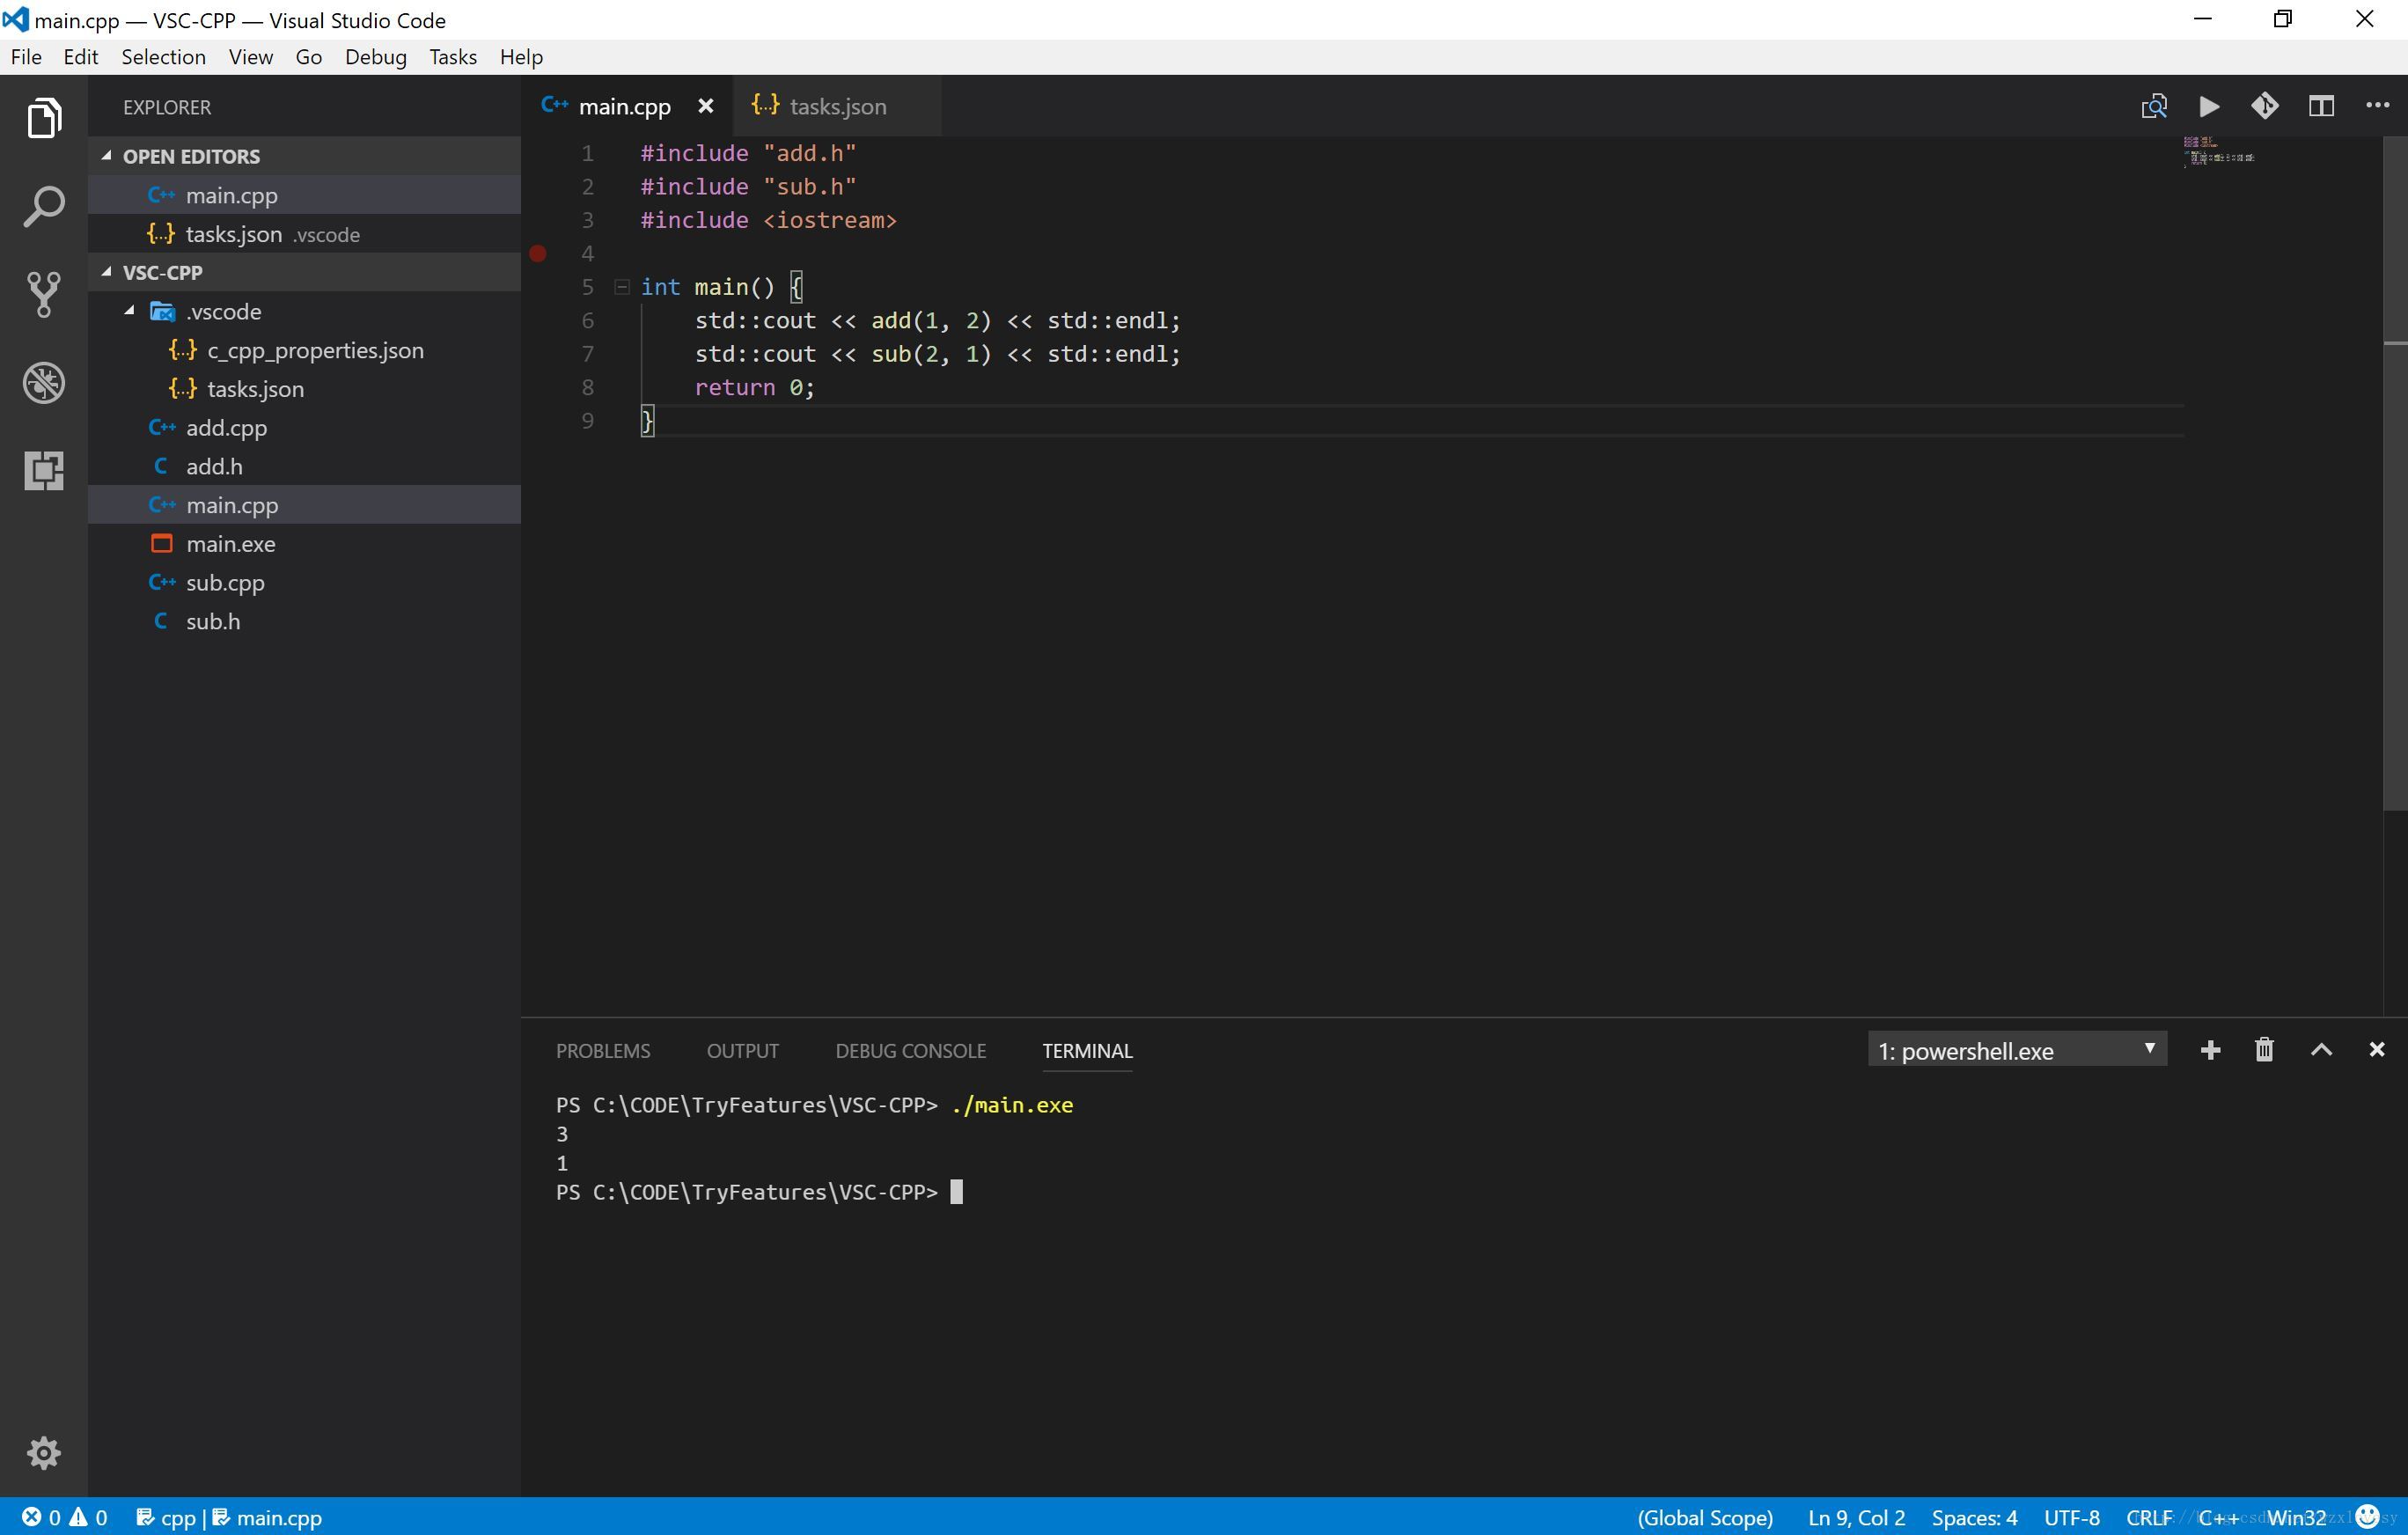
至此代码应该可以正常编译了:打开工具窗口 (默认Ctrl+Alt+P) →” role=”presentation”>→→ 此时应该已经可以看到两个不同的任务,分别为
build和build-debug,与上一步定义的相同
选择
build并执行输出得到的目标文件即可看到结果,说明编译执行是正确无误的
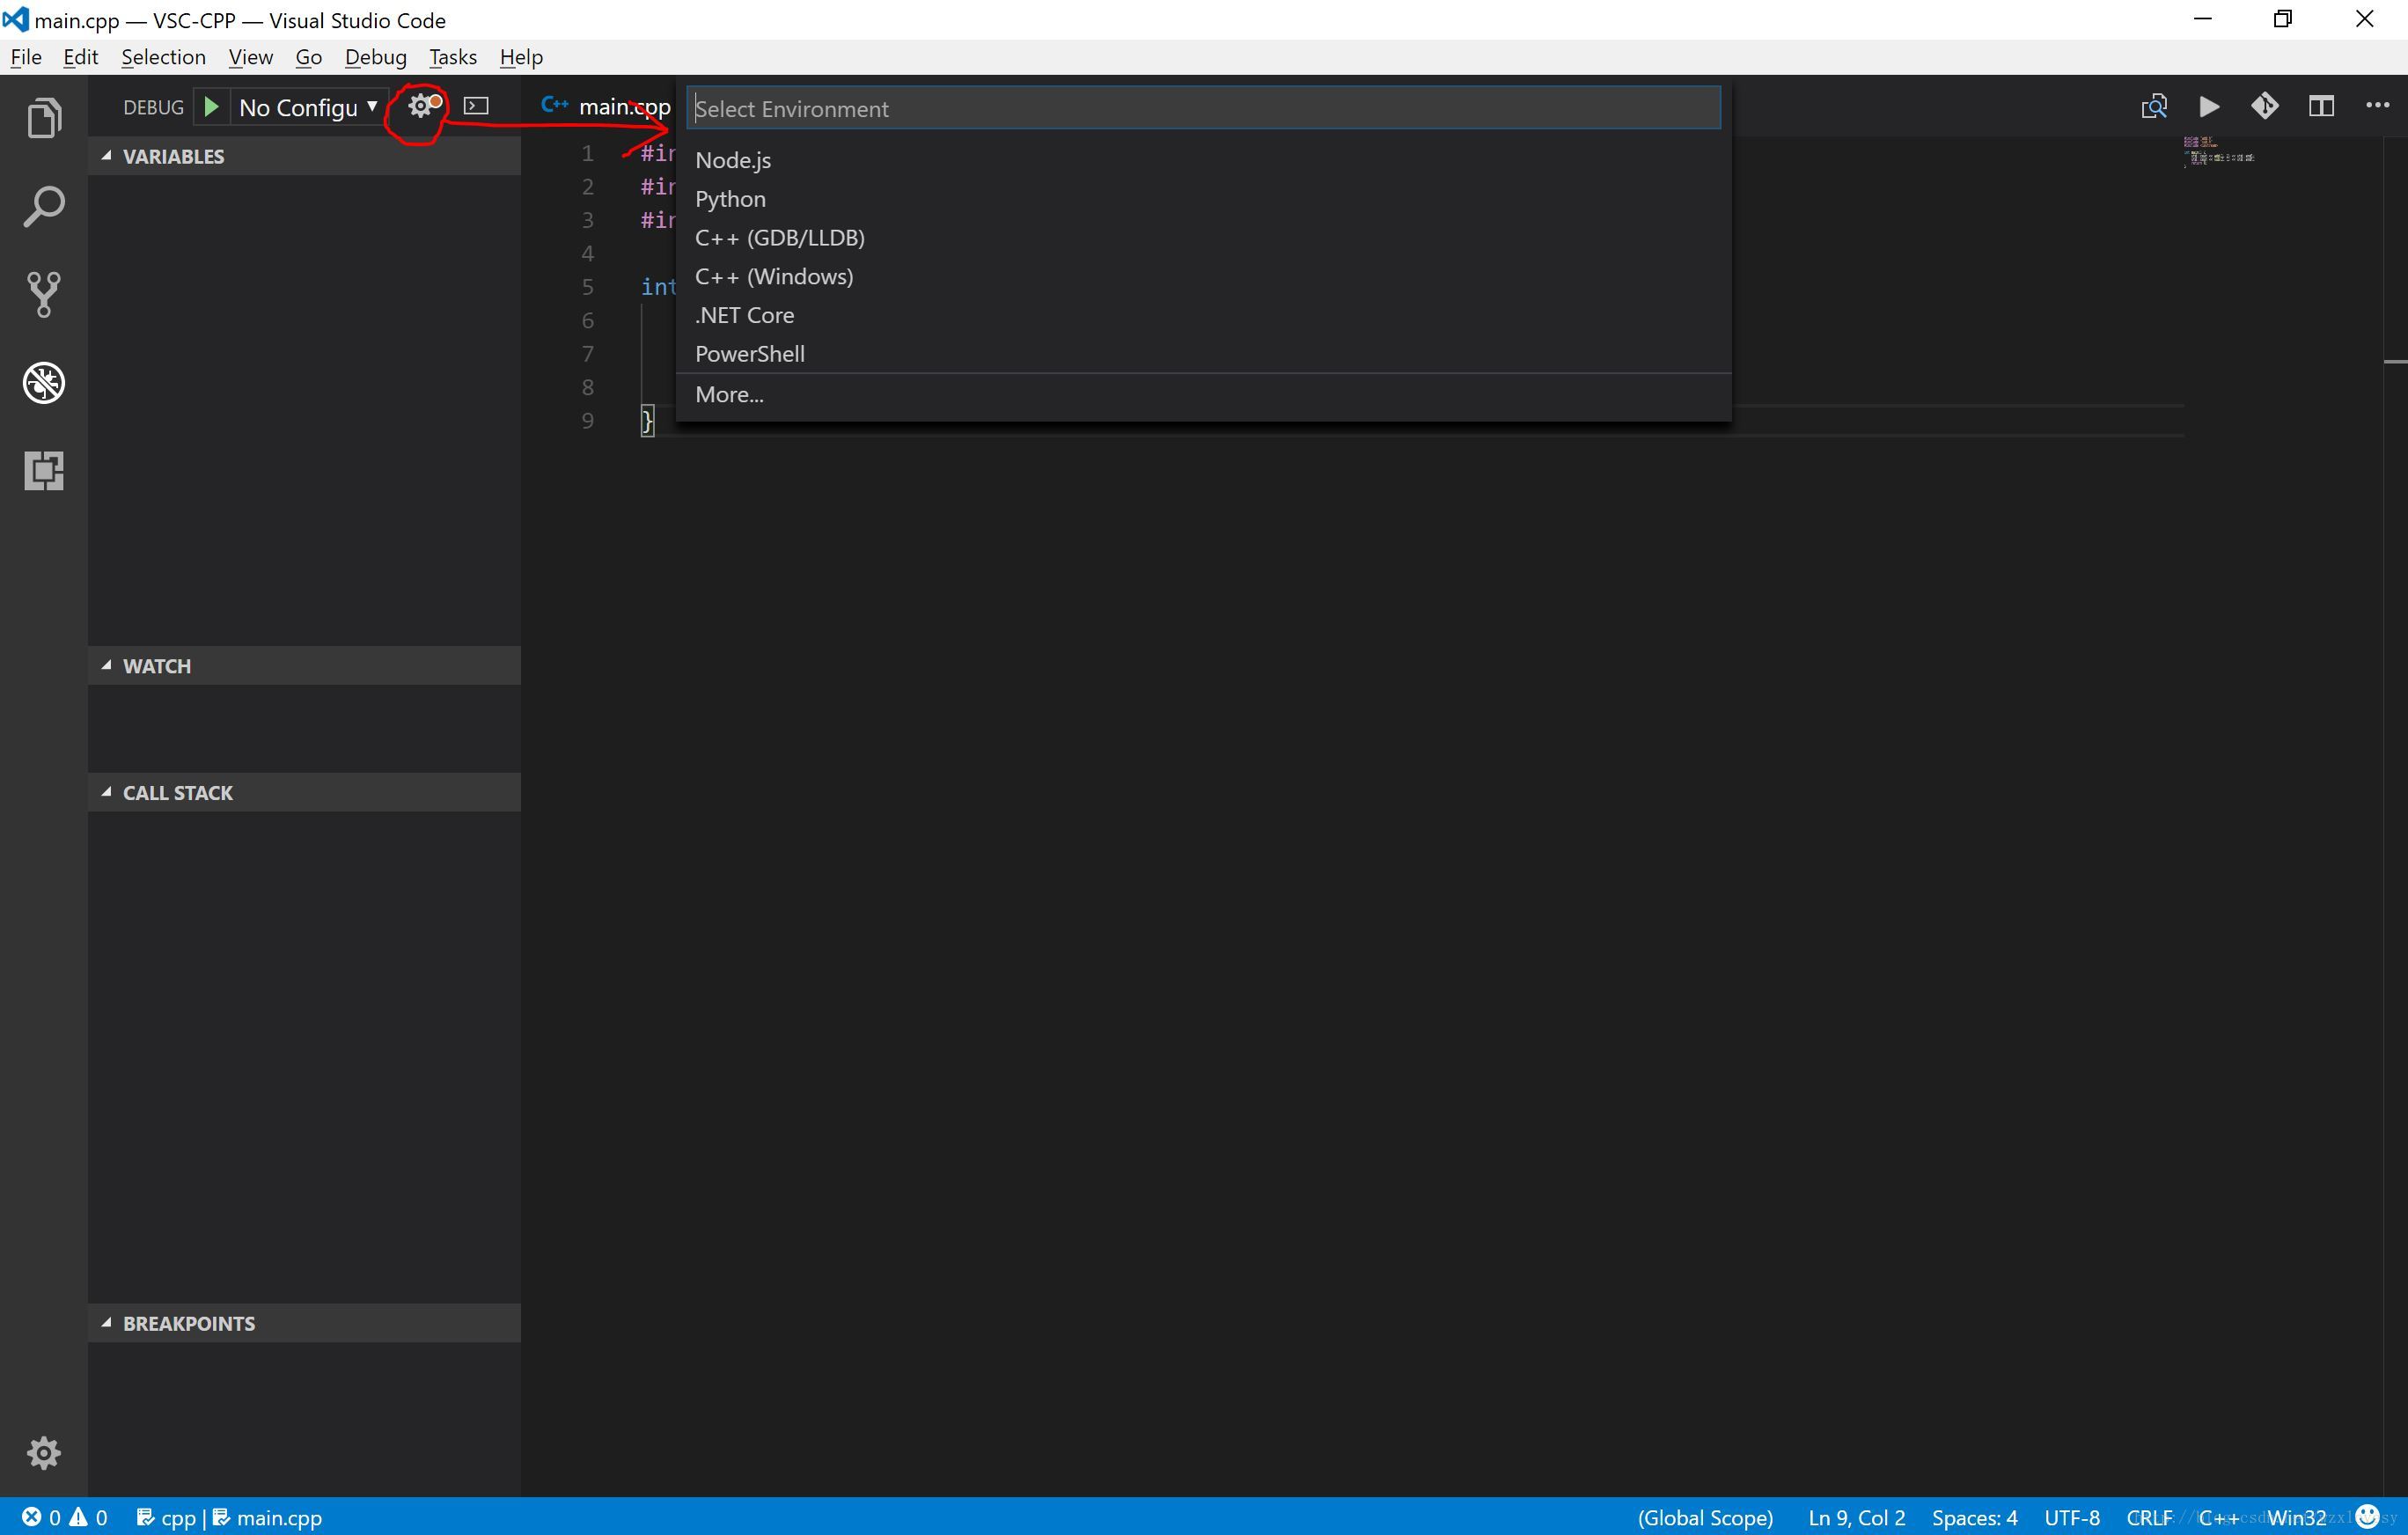
接下来尝试对代码进行调试,进入调试窗口 →” role=”presentation”>→→ 点击调试配置按钮 (如图中红圈所示)
选择
C++(GDB/LLDB)(如果使用 MSVC 编译,可以选择C++(Windows)) →” role=”presentation”>→→ 此时会生成调试配置文件launcher.json
使用配置如下,根据您的具体系统环境进行修改
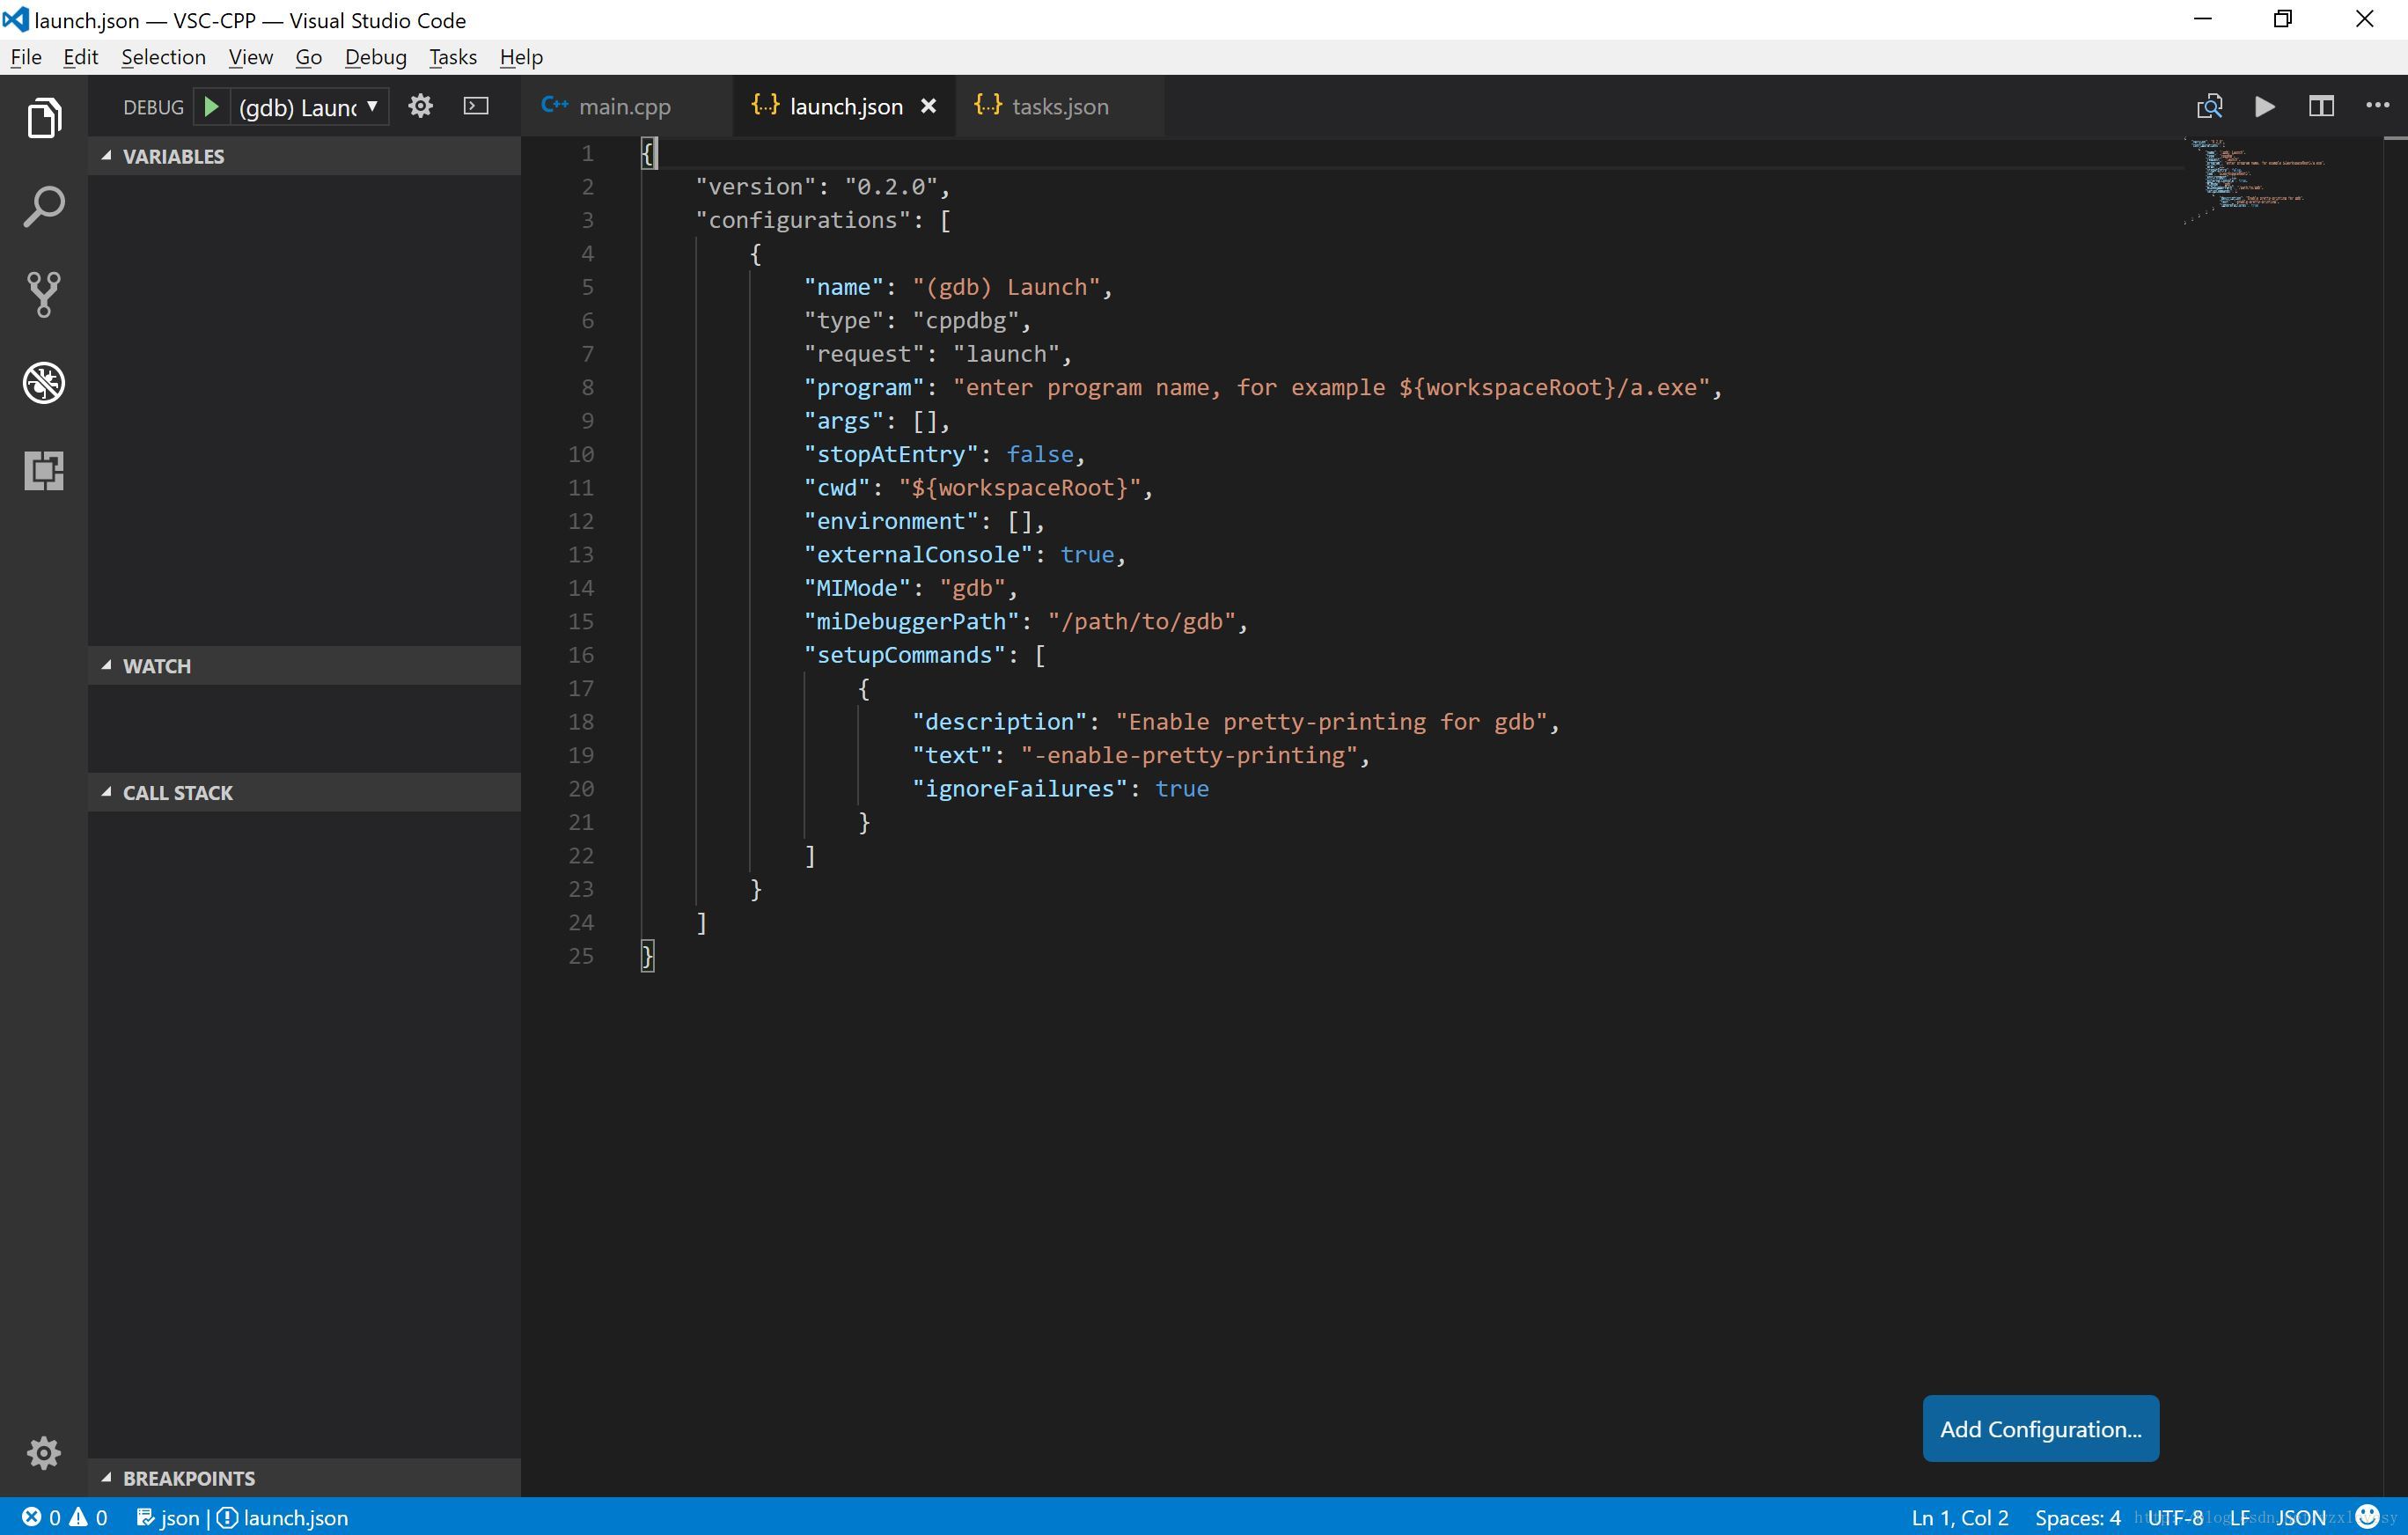
{
    "version": "0.2.0",
    "configurations": [
        {
            "name": "(gdb) Launch",
            "type": "cppdbg",
            "request": "launch",
            // g++ -g 生成的调试用目标文件名
            "program": "${workspaceRoot}/debug.exe",
            "args": [],
            "stopAtEntry": false,
            "cwd": "${workspaceRoot}",
            "environment": [],
            "externalConsole": true,
            "MIMode": "gdb",
            // 输入 gdb 的路径 (有些情况下需要绝对路径)
            "miDebuggerPath": "gdb.exe",
            "setupCommands": [
                {
                    "description": "Enable pretty-printing for gdb",
                    "text": "-enable-pretty-printing",
                    "ignoreFailures": true }
            ],
            // task.json 中指定的调试目标文件编译命令
            // 这样可以在调试前免去手动执行 build-debug 的一步
            "preLaunchTask": "build-debug"
        }
    ]
}
- 1
- 2
- 3
- 4
- 5
- 6
- 7
- 8
- 9
- 10
- 11
- 12
- 13
- 14
- 15
- 16
- 17
- 18
- 19
- 20
- 21
- 22
- 23
- 24
- 25
- 26
- 27
- 28
- 29
- 30
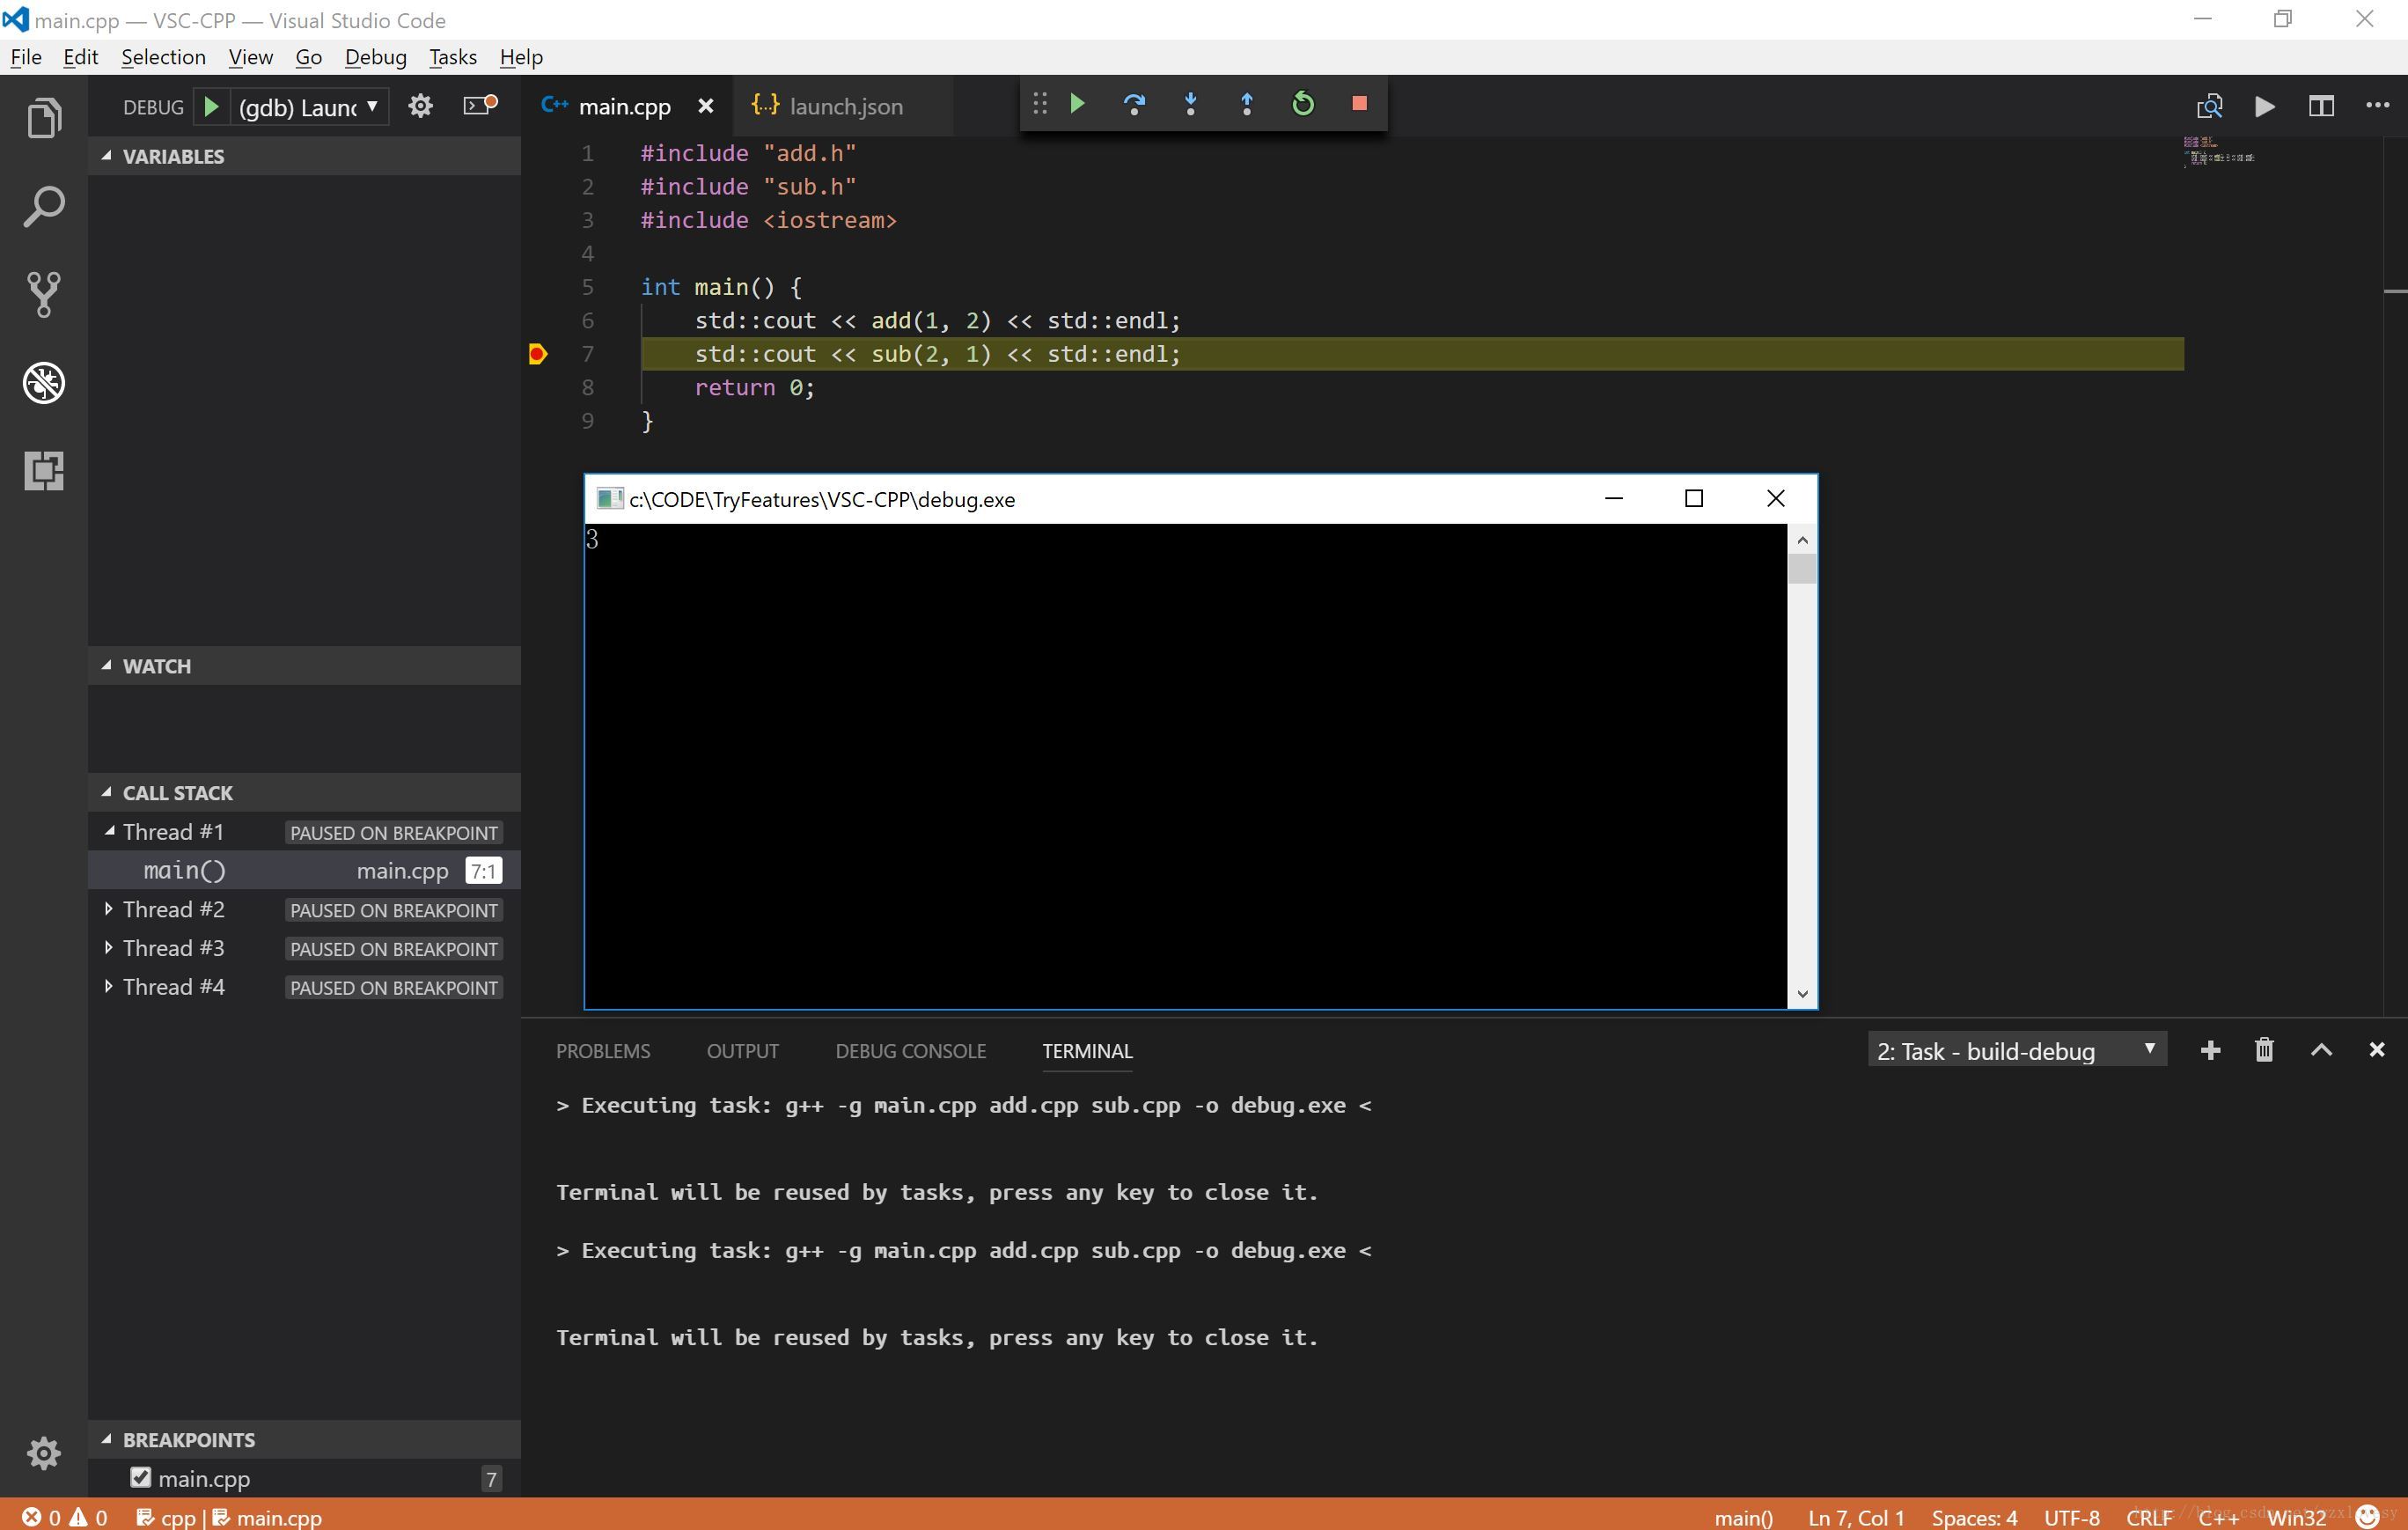
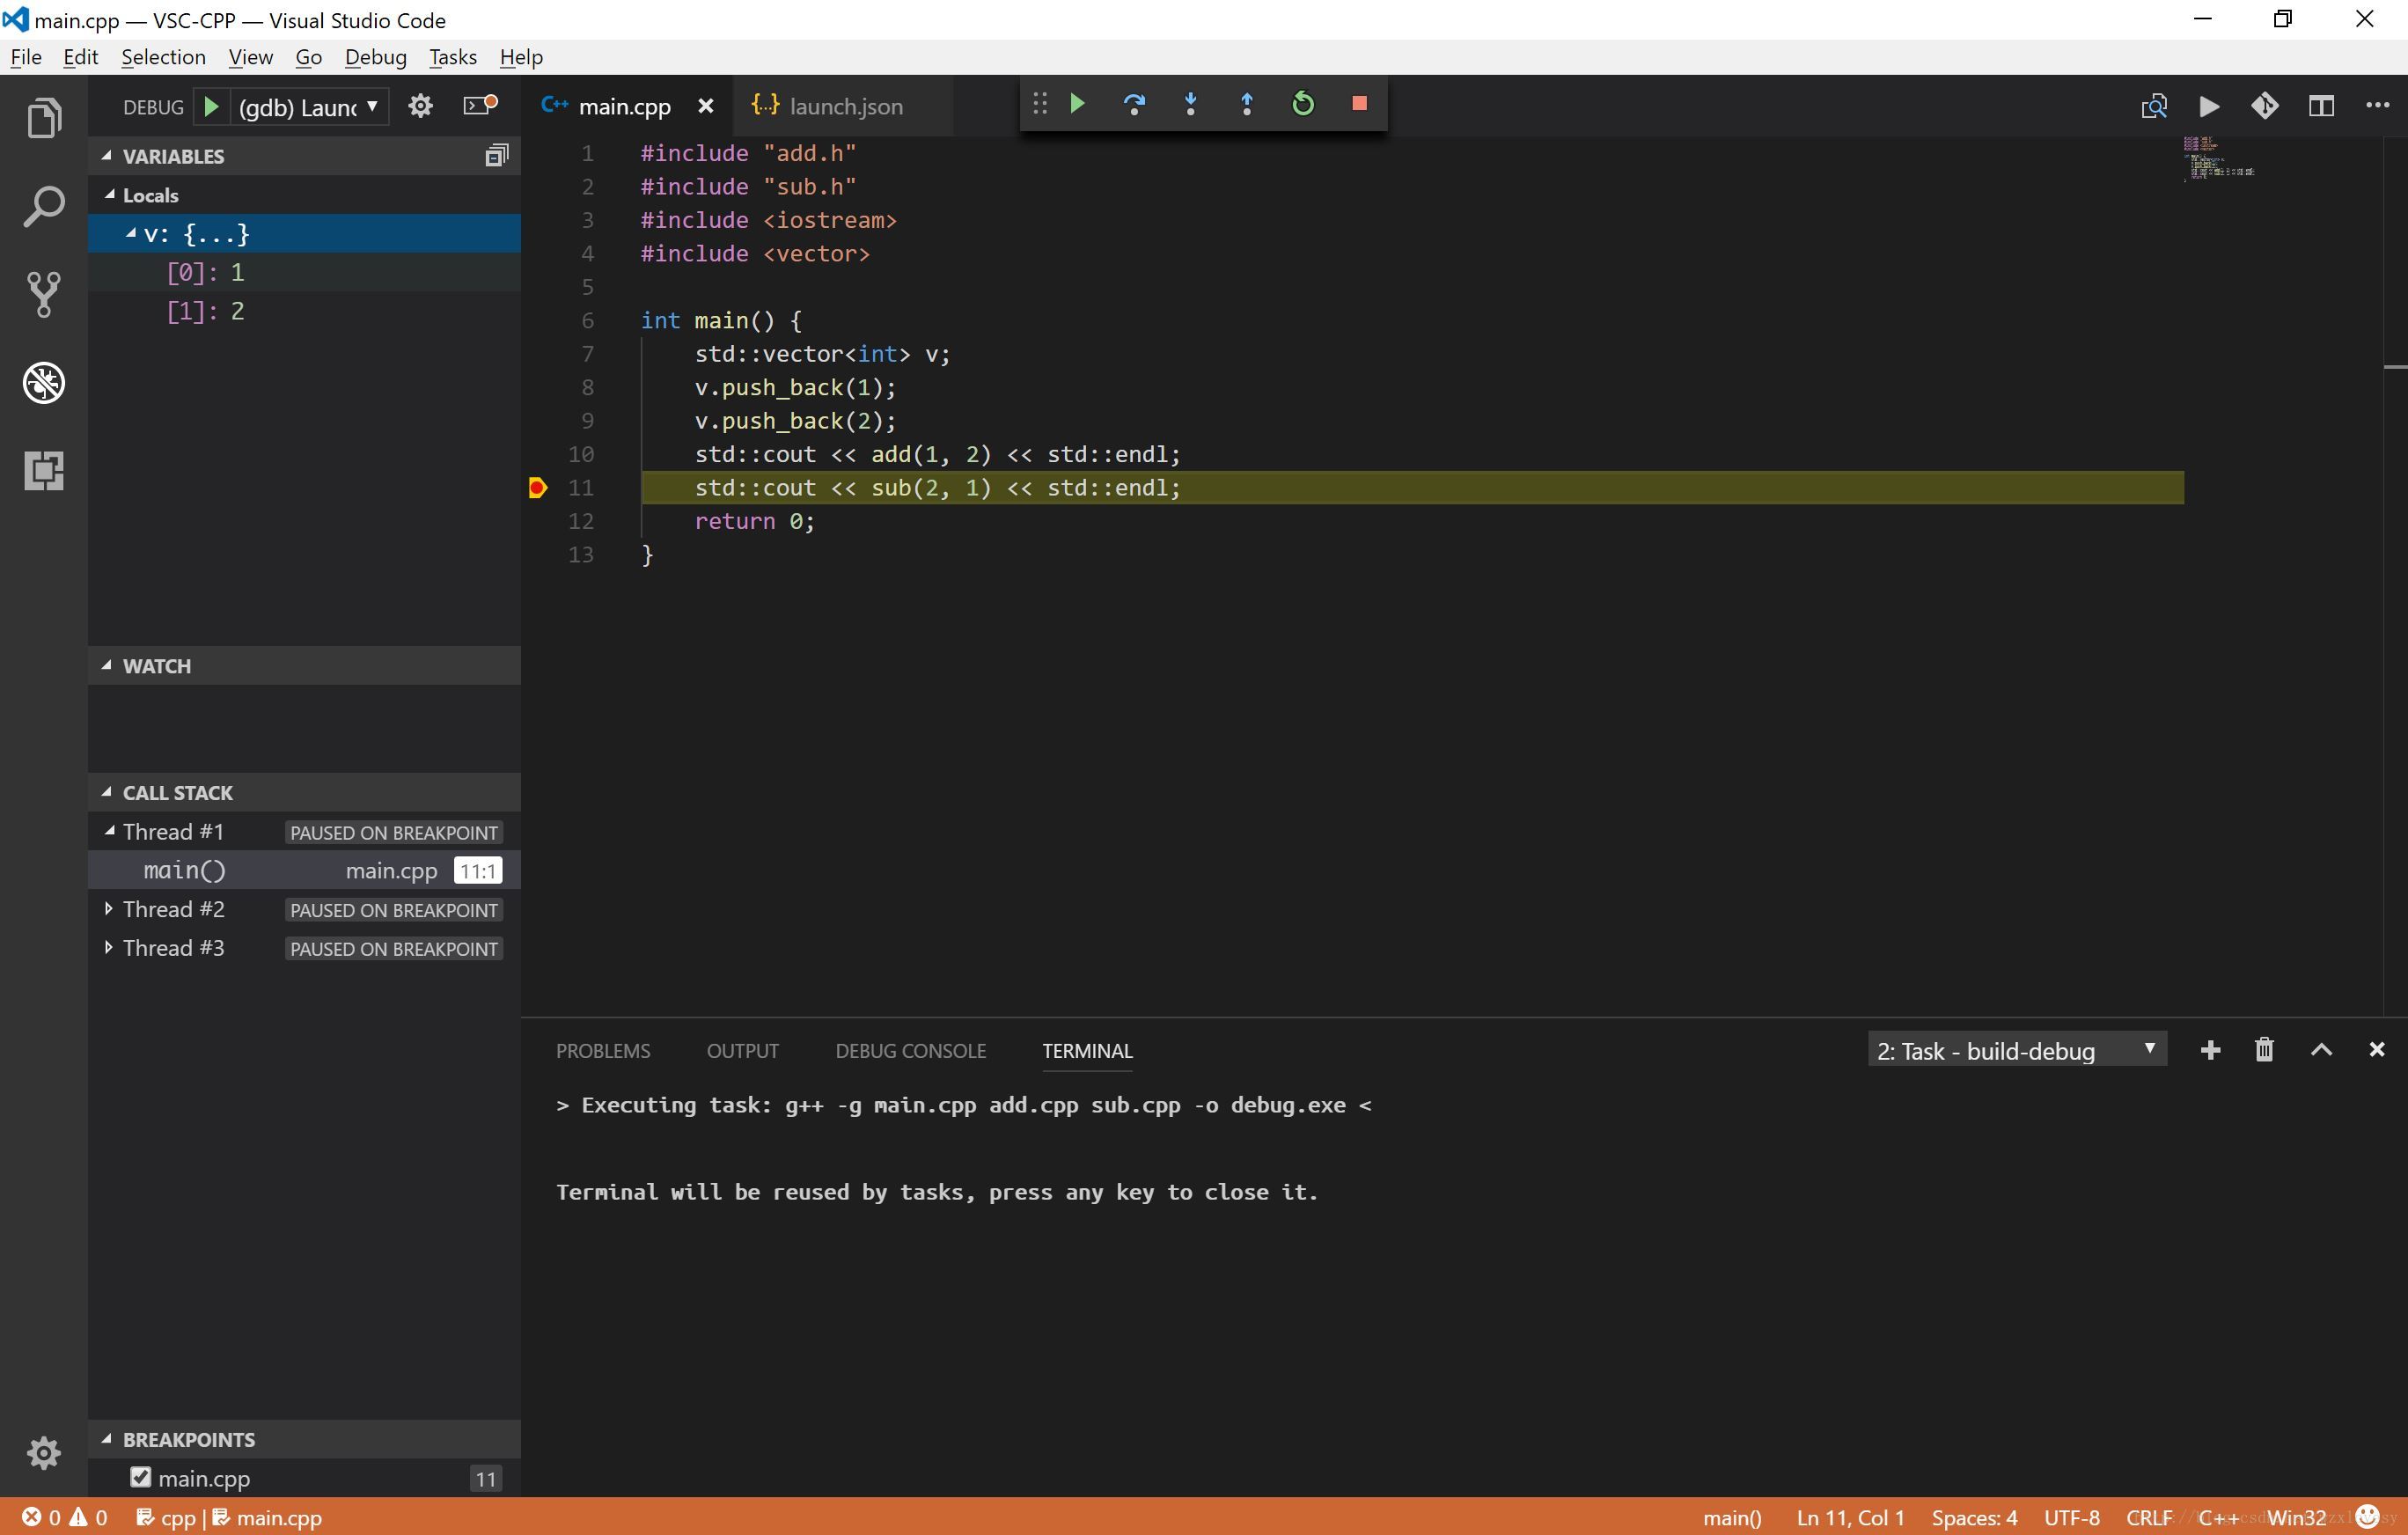
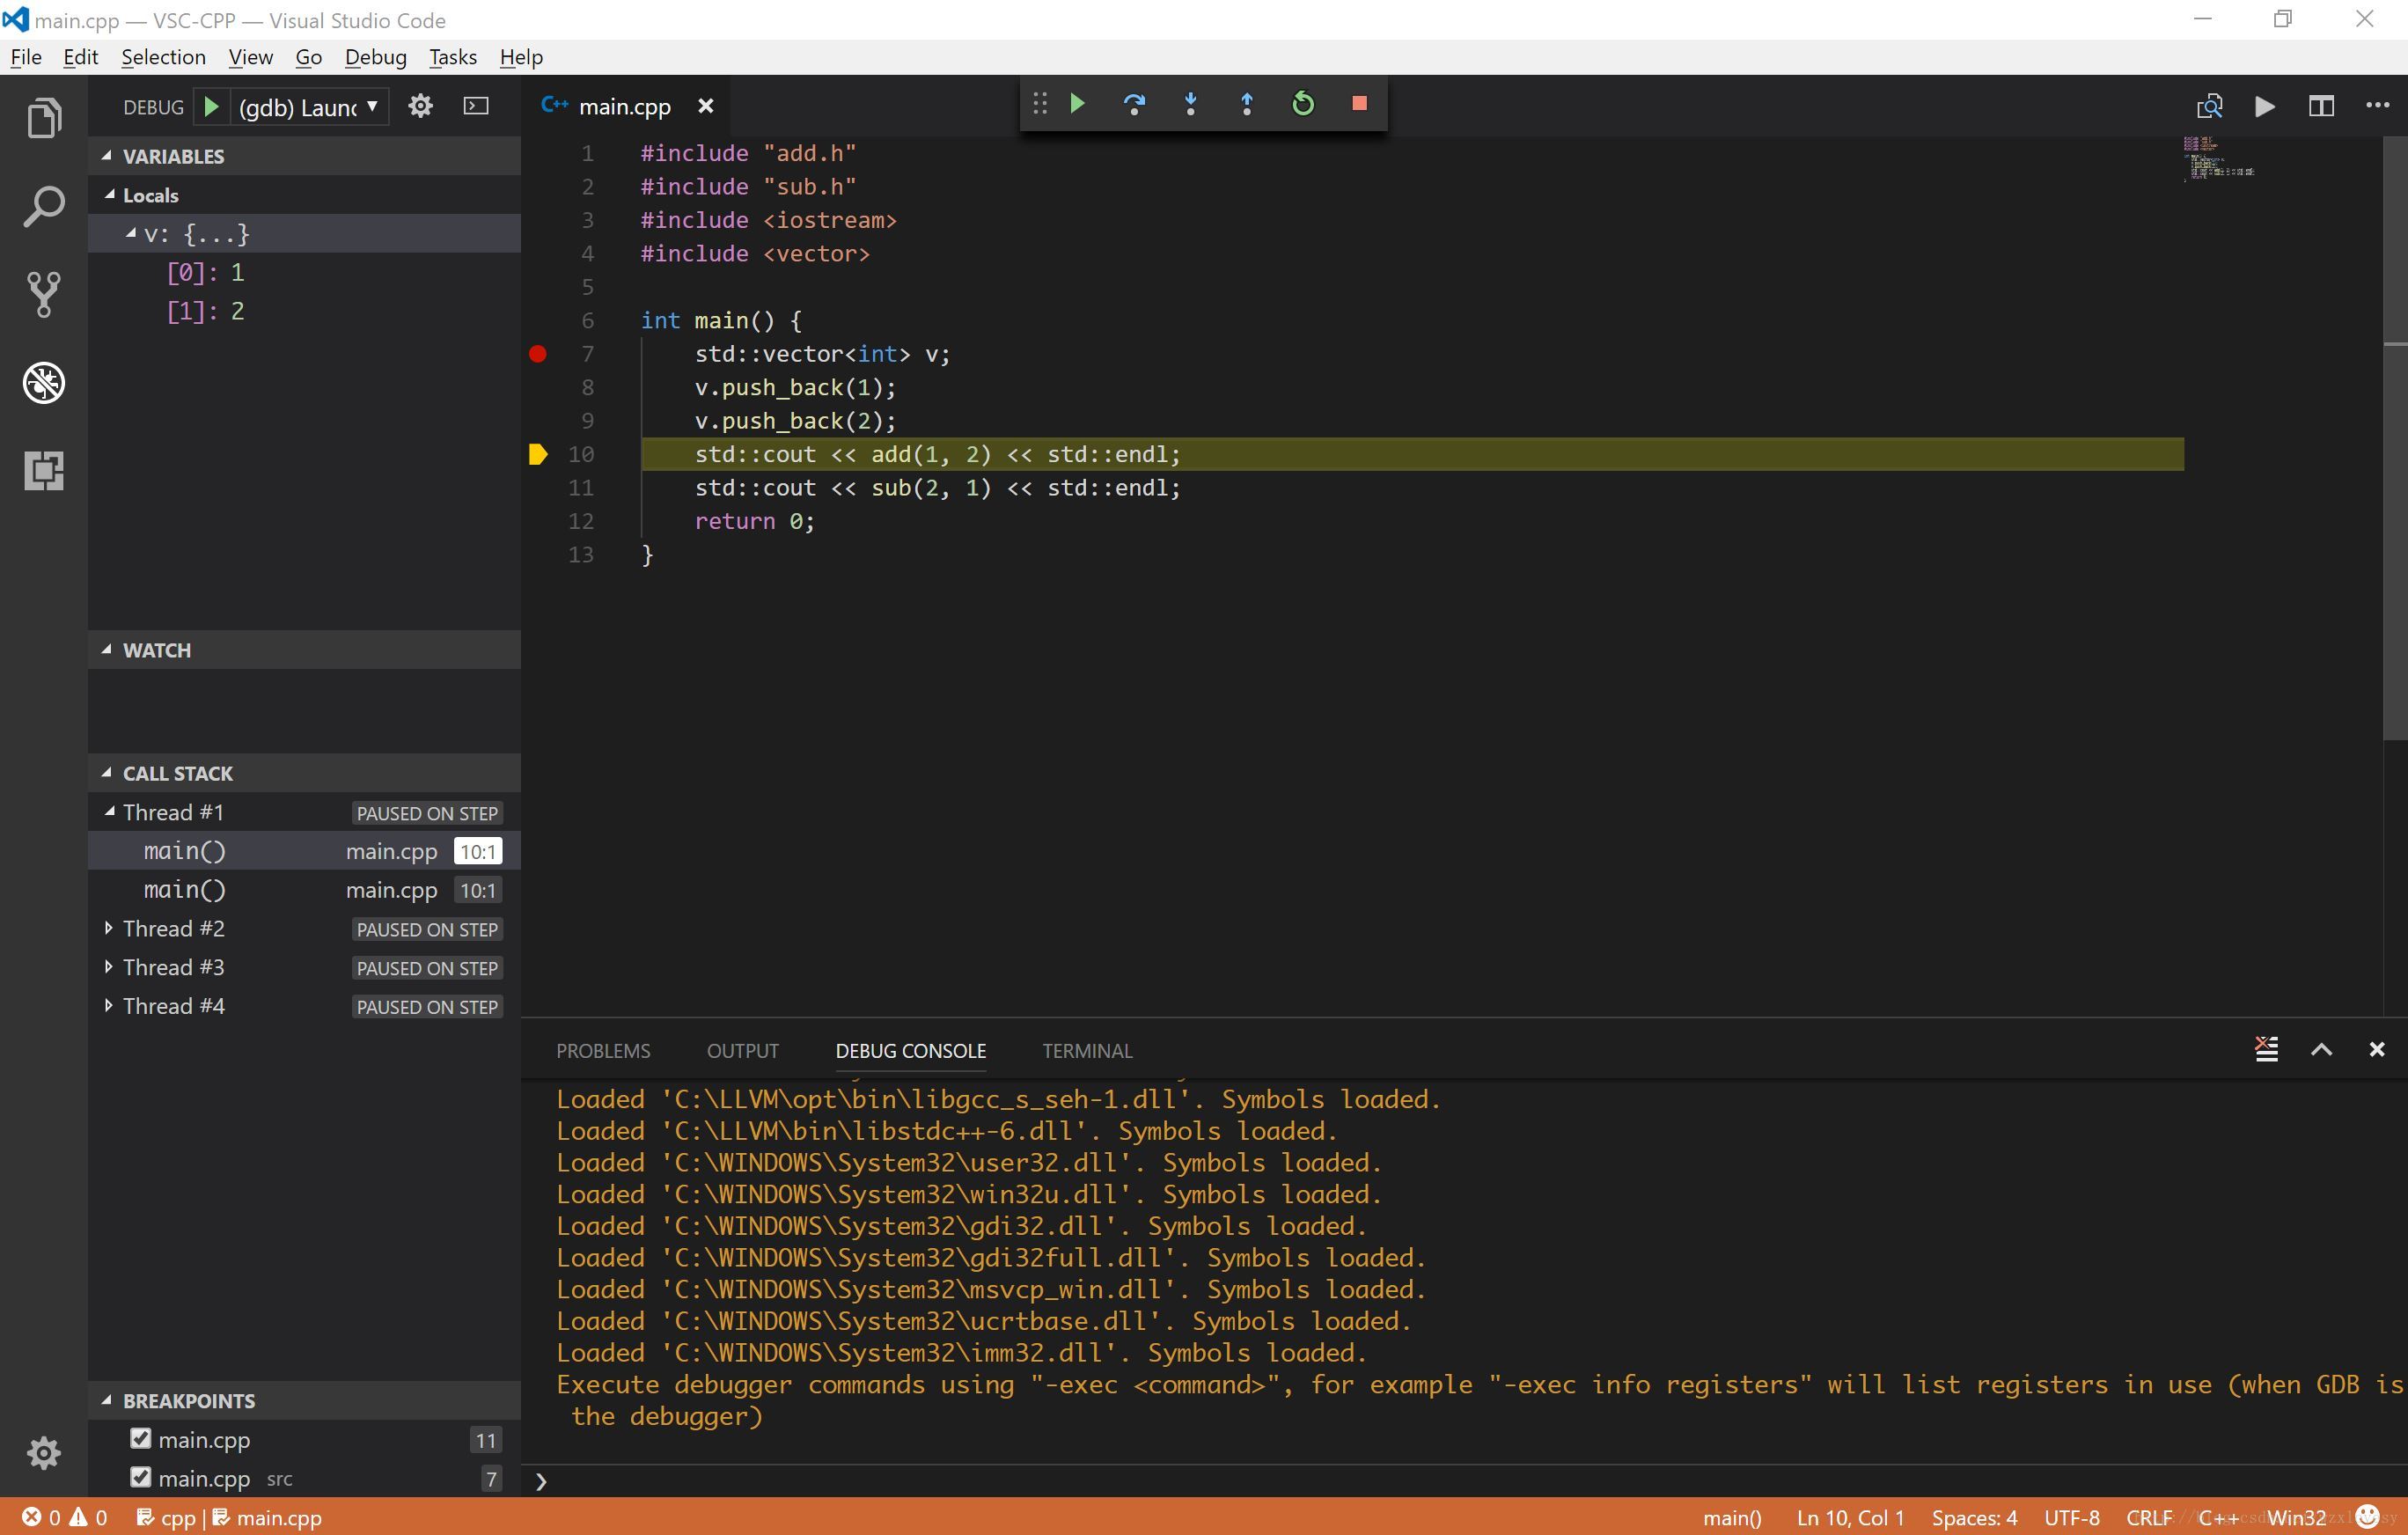
在源文件中添加一个断点,点击调试界面中的开始调试按钮来调试
至此编译和调试工作都可以正常进行了,如果 GDB 版本足够高,在调试 STL 程序时也会有很好的效果
第一种方案的配置到这里基本结束了,大家可以继续探索这种方案,不过这种方案比较受制于 VS Code ,可移植性不高。接下来我们提出另一种方式来提高 VS Code 的 C/C++ 工程的灵活性。
方案二:VS Code 配合 Makefile 来提高 C/C++ 工程的可移植性
准备工作
- 在方案一的基础上仍需准备如下内容:
- 准备一套 Makefile 模板,比如说 https://github.com/TheNetAdmin/Makefile-Templates ,或者也可以自行写一套模板,一个好的 Makefile 模板可以省去很多麻烦
- 安装编译工具与 make 工具:尤其是在 Windows 下,使用 make 是一个比较麻烦的事情,推荐大家使用 msys 提供的一套工具,这里有一个打包供下载 https://pan.baidu.com/s/1kV5hx3p
方案说明
- 这个方案的思路是:使用 Makefile 来构建工程, VS Code 通过 Tasks 调用 make 工具来编译,再通过调用 gdb 来调试
- 其优点在于不是过分依赖 VS Code 自身的配置,一个合适的 Makefile 可以在各个平台上执行编译,但是在开发过程中又可以用到 VS Code 自身的插件带来的便利,减少命令输入,减少命令行 gdb 调试带来的烦恼
步骤说明
- 首先构建一个 Makefile ,如果没有合适的可以到这里找到一些现成模板
# originating https://github.com/TheNetAdmin/Makefile-Templates
# tool marcros
CC := g++
CCFLAG := -std=c++14
DBGFLAG := -g
CCOBJFLAG := $(CCFLAG) -c

# path marcros
BIN_PATH := bin
OBJ_PATH := obj
SRC_PATH := src
DBG_PATH := debug

# compile marcros
TARGET_NAME := main
ifeq ($(OS),Windows_NT)
    TARGET_NAME := $(</span>addsuffix .exe,<span class="hljs-variable">$(TARGET_NAME))
endif
TARGET := $(</span><span class="hljs-constant">BIN_PATH</span>)/<span class="hljs-variable">$(TARGET_NAME)
TARGET_DEBUG := $(</span><span class="hljs-constant">DBG_PATH</span>)/<span class="hljs-variable">$(TARGET_NAME)
MAIN_SRC := src/main.cpp

# src files & obj files
SRC := $(</span>foreach x, <span class="hljs-variable">$(SRC_PATH), $(</span>wildcard <span class="hljs-variable">$(addprefix $(x)/*,.c*)))
OBJ := $(</span>addprefix <span class="hljs-variable">$(OBJ_PATH)/, $(</span>addsuffix .o, <span class="hljs-variable">$(notdir $(</span>basename <span class="hljs-variable">$(SRC)))))
OBJ_DEBUG := $(</span>addprefix <span class="hljs-variable">$(DBG_PATH)/, $(</span>addsuffix .o, <span class="hljs-variable">$(notdir $(</span>basename <span class="hljs-variable">$(SRC)))))

# clean files list
DISTCLEAN_LIST := $(OBJ) \
                  $(OBJ_DEBUG)
CLEAN_LIST := $(TARGET) \
              $(TARGET_DEBUG) \
              $(DISTCLEAN_LIST)

# default rule
default: all

# non-phony targets
$(</span><span class="hljs-constant">TARGET</span>)<span class="hljs-symbol">:</span> <span class="hljs-variable">$(OBJ)
    $(</span><span class="hljs-constant">CC</span>) <span class="hljs-variable">$(CCFLAG) -o $@</span> <span class="hljs-variable">$?

$(</span><span class="hljs-constant">OBJ_PATH</span>)/%.<span class="hljs-symbol">o:</span> <span class="hljs-variable">$(SRC_PATH)/%.c*
    $(</span><span class="hljs-constant">CC</span>) <span class="hljs-variable">$(CCOBJFLAG) -o $@</span> <span class="hljs-variable">$<

$(</span><span class="hljs-constant">DBG_PATH</span>)/%.<span class="hljs-symbol">o:</span> <span class="hljs-variable">$(SRC_PATH)/%.c*
    $(</span><span class="hljs-constant">CC</span>) <span class="hljs-variable">$(CCOBJFLAG) $(</span><span class="hljs-constant">DBGFLAG</span>) -o <span class="hljs-variable">$@ $<

$(</span><span class="hljs-constant">TARGET_DEBUG</span>)<span class="hljs-symbol">:</span> <span class="hljs-variable">$(OBJ_DEBUG)
    $(</span><span class="hljs-constant">CC</span>) <span class="hljs-variable">$(CCFLAG) $(</span><span class="hljs-constant">DBGFLAG</span>) <span class="hljs-variable">$? -o $@

# phony rules
.PHONY: all
all: $(TARGET)

.PHONY: debug
debug: $(TARGET_DEBUG)

.PHONY: clean
clean:
    @echo CLEAN $(CLEAN_LIST)
    @rm -f $(CLEAN_LIST)

.PHONY: distclean
distclean:
    @echo CLEAN $(CLEAN_LIST)
    @rm -f $(DISTCLEAN_LIST)
- 1
- 2
- 3
- 4
- 5
- 6
- 7
- 8
- 9
- 10
- 11
- 12
- 13
- 14
- 15
- 16
- 17
- 18
- 19
- 20
- 21
- 22
- 23
- 24
- 25
- 26
- 27
- 28
- 29
- 30
- 31
- 32
- 33
- 34
- 35
- 36
- 37
- 38
- 39
- 40
- 41
- 42
- 43
- 44
- 45
- 46
- 47
- 48
- 49
- 50
- 51
- 52
- 53
- 54
- 55
- 56
- 57
- 58
- 59
- 60
- 61
- 62
- 63
- 64
- 65
- 66
- 根据这个 Makefile,构建一个目录结构如下的工程目录
- Project
    - Makefile
    - src: 所有源文件 (不得放在子目录)
        - add.cpp
        - add.h
        - sub.cpp
        - sub.h
        - main.cpp
    - obj
        - 空
    - debug
        - 空
    - bin
        - 空
- 1
- 2
- 3
- 4
- 5
- 6
- 7
- 8
- 9
- 10
- 11
- 12
- 13
- 14
- 然后对于 VS Code 的 tasks.json 和 launch.json 做一些修改如下
- tasks.json
{
    "version": "2.0.0",
    "tasks": [
        {
            "taskName": "build",
            "command": "make",
            "args": ["default"],
            "type": "shell"
        },
        {
            "taskName": "build-debug",
            "command": "make",
            "args": ["debug"],
            "type": "shell"
        },
        {
            "taskName": "clean",
            "command": "make",
            "args": ["clean"],
            "type": "shell"
        }
    ]
}
- 1
- 2
- 3
- 4
- 5
- 6
- 7
- 8
- 9
- 10
- 11
- 12
- 13
- 14
- 15
- 16
- 17
- 18
- 19
- 20
- 21
- 22
- 23
- launch.json:
{
    "version": "0.2.0",
    "configurations": [
        {
            "name": "(gdb) Launch",
            "type": "cppdbg",
            "request": "launch",
            // 修改为新的测试目标文件路径
            "program": "${workspaceRoot}/debug/main.exe",
            "args": [],
            "stopAtEntry": false,
            "cwd": "${workspaceRoot}",
            "environment": [],
            "externalConsole": true,
            "MIMode": "gdb",
            "miDebuggerPath": "gdb.exe",
            "setupCommands": [
                {
                    "description": "Enable pretty-printing for gdb",
                    "text": "-enable-pretty-printing",
                    "ignoreFailures": true }
            ],
            "preLaunchTask": "build-debug"
        }
    ]
}
- 1
- 2
- 3
- 4
- 5
- 6
- 7
- 8
- 9
- 10
- 11
- 12
- 13
- 14
- 15
- 16
- 17
- 18
- 19
- 20
- 21
- 22
- 23
- 24
- 25
- 26
- 27
- 之后就如方案一中的步骤使用编译和调试工具即可
- 这样的话将这个工程迁移到其他平台也不用担心没有 VS Code 而无法使用
- 同时,如果工程发生重构,那么只需要更改 Makefile 与工程结构即可,不需要在 VS Code 中修改过多
总结
总体而言,经过微软官方团队一段时间的努力, VS Code 上的 C/C++ 开发体验有了很大提升,在面对一个比较小型的工程时,我们可以免去开启 IDE 的时间以及处理 IDE 目录结构的时间,从而快速打开工程,快速开发并验证思路
但是 VS Code 毕竟只是一个代码编辑器,无论我们赋予它多少功能,其对大型工程的处理能力终究是不如 IDE 的。比如 Refactor ,包管理,动态类型纠错,语法纠错等功能一直是 IDE 的强项,所以在面对比较复杂的工程时,不用多想,还是乖乖使用 IDE 吧
<div class="article-bar-bottom">
<div class="article-copyright">
版权声明:本文为博主原创文章,未经博主允许不得转载。 https://blog.csdn.net/wzxlovesy/article/details/76708151 </div>
<div class="tags-box artic-tag-box">
<span class="label">文章标签:</span>
<a class="tag-link" href="http://so.csdn.net/so/search/s.do?q=编辑器&t=blog" target="_blank">编辑器 </a><a class="tag-link" href="http://so.csdn.net/so/search/s.do?q=vscode&t=blog" target="_blank">vscode </a><a class="tag-link" href="http://so.csdn.net/so/search/s.do?q=c++&t=blog" target="_blank">c++ </a><a class="tag-link" href="http://so.csdn.net/so/search/s.do?q=c&t=blog" target="_blank">c </a>
</div>
<div class="tags-box">
<span class="label">个人分类:</span>
<a class="tag-link" href="https://blog.csdn.net/wzxlovesy/article/category/7079877" target="_blank">Tools </a>
</div>
</div>
<!-- !empty($pre_next_article[0]) -->
</div>