分享一下我老师大神的人工智能教程!零基础,通俗易懂!http://blog.csdn.net/jiangjunshow
也欢迎大家转载本篇文章。分享知识,造福人民,实现我们中华民族伟大复兴!
作者:朱金灿
来源:http://blog.csdn.net/clever101
最近使用GDI,发现它的多边形填充函数Polygon (hdc, apt, iCount) ;会把多边形边界绘制出来。具体如下面代码:
- case WM_PAINT:
- {
- hdc = BeginPaint (hwnd, &ps) ;
- LOGBRUSH log_brush;
- log_brush.lbColor = RGB(255,0,0);
- log_brush.lbStyle = BS_SOLID;
- HBRUSH hNewBrush = ::CreateBrushIndirect(&log_brush);
- HBRUSH hOldBrush = SelectBrush(hdc,hNewBrush);
- POINT pt[4];
- pt[0].x = 10;
- pt[0].y = 10 ;
- pt[1].x = 10 ;
- pt[1].y = 100 ;
- pt[2].x = 100 ;
- pt[2].y = 100 ;
- pt[3].x = 100 ;
- pt[3].y = 10 ;
- Polygon(hdc,pt,4);
- log_brush.lbColor = RGB(0,255,0);
- HBRUSH hNewBrush2 = ::CreateBrushIndirect(&log_brush);
- SelectBrush(hdc,hNewBrush2);
- pt[0].x += 90;
- pt[0].y = 10 ;
- pt[1].x += 90 ;
- pt[1].y = 100 ;
- pt[2].x += 90 ;
- pt[2].y = 100 ;
- pt[3].x += 90 ;
- pt[3].y = 10 ;
- Polygon(hdc,pt,4);
效果图如下:
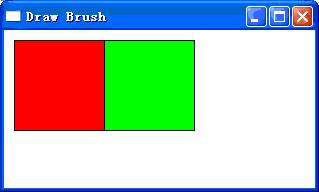
可以看出多边形的边界使用黑线绘制了出来,显然这是使用默认画笔绘制的。但是有些时候并不需要绘制边界。那么这时我们就要创建一个和画刷一样颜色的新画笔选进DC来代替系统默认画笔。将上面的代码修改如下:
- case WM_PAINT:
- {
- hdc = BeginPaint (hwnd, &ps) ;
- LOGBRUSH log_brush;
- log_brush.lbColor = RGB(255,0,0);
- log_brush.lbStyle = BS_SOLID;
- HBRUSH hNewBrush = ::CreateBrushIndirect(&log_brush);
- HBRUSH hOldBrush = SelectBrush(hdc,hNewBrush);
- LOGPEN log_pen;
- log_pen.lopnColor = RGB(255,0,0);
- log_pen.lopnStyle = PS_SOLID;
- log_pen.lopnWidth.x = 1;
- HPEN hNewPen = ::CreatePenIndirect(&log_pen);
- HPEN hOldPen = SelectPen(hdc,hNewPen);
- POINT pt[4];
- pt[0].x = 10;
- pt[0].y = 10 ;
- pt[1].x = 10 ;
- pt[1].y = 100 ;
- pt[2].x = 100 ;
- pt[2].y = 100 ;
- pt[3].x = 100 ;
- pt[3].y = 10 ;
- Polygon(hdc,pt,4);
- log_brush.lbColor = RGB(0,255,0);
- HBRUSH hNewBrush2 = ::CreateBrushIndirect(&log_brush);
- SelectBrush(hdc,hNewBrush2);
- log_pen.lopnColor = RGB(0,255,0);
- HPEN hNewPen2 = ::CreatePenIndirect(&log_pen);
- SelectPen(hdc,hNewPen2);
- pt[0].x += 90;
- pt[0].y = 10 ;
- pt[1].x += 90 ;
- pt[1].y = 100 ;
- pt[2].x += 90 ;
- pt[2].y = 100 ;
- pt[3].x += 90 ;
- pt[3].y = 10 ;
- Polygon(hdc,pt,4);
- SelectBrush(hdc,hOldBrush);
- SelectPen(hdc,hNewPen);
- EndPaint (hwnd, &ps) ;
- return 0 ;
- }
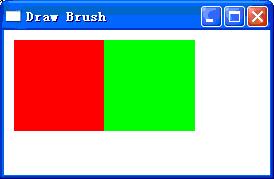
效果图如下:
给我老师的人工智能教程打call!http://blog.csdn.net/jiangjunshow
