1.MySQL版本:
 5.x:
	5.0-5.1:早期产品的延续,升级维护
	5.4 - 5.x :  MySQL整合了三方公司的新存储引擎 (推荐5.5)
安装:rpm -ivh rpm软件名
如果安装时 与某个软件  xxx冲突,则需要将冲突的软件卸载掉:
		yun -y remove xxx
	安装时 有日志提示我们可以修改密码:/usr/bin/mysqladmin -u root password 'new-password'

	注意:
		如果提示“GPG keys...”安装失败,解决方案:
			rpm -ivh rpm软件名  --force --nodoeps
验证:
mysqladmin --version
	启动mysql应用: service mysql start
	关闭: service mysql stop
	重启: service mysql restart

	在计算机reboot后 登陆MySQL :  mysql
	可能会报错:   "/var/lib/mysql/mysql.sock不存在"
	--原因:是Mysql服务没有启动
	解决 :  启动服务: 1.每次使用前 手动启动服务   /etc/init.d/mysql start
		  	 2.开机自启   chkconfig mysql on     ,  chkconfig mysql off
		检查开机是否自动启动: ntsysv

	给mysql 的超级管理员root 增加密码:/usr/bin/mysqladmin -u root password root

	登陆:
	mysql -u root -p
数据库存放目录:
ps -ef|grep mysql  可以看到:
		数据库目录:     datadir=/var/lib/mysql
		pid文件目录: --pid-file=/var/lib/mysql/bigdata01.pid

		MySQL核心目录:
			/var/lib/mysql :mysql 安装目录
			/usr/share/mysql:  配置文件
			/usr/bin:命令目录(mysqladmin、mysqldump等)
			/etc/init.d/mysql启停脚本
MySQL配置文件
 my-huge.cnf	高端服务器  1-2G内存
			 my-large.cnf   中等规模
			 my-medium.cnf  一般
			 my-small.cnf   较小
			但是,以上配置文件mysql默认不能识别,默认只能识别 /etc/my.cnf
			采用 my-huge.cnf :
			cp /usr/share/mysql/my-huge.cnf /etc/my.cnf
			注意:mysql5.5默认配置文件/etc/my.cnf;Mysql5.6 默认配置文件/etc/mysql-default.cnf

	默认端口3306
	mysql字符编码:
		sql  :  show variables like '%char%' ;
		可以发现部分编码是 latin,需要统一设置为utf-8
		设置编码:
		vi /etc/my.cnf:
		[mysql]
		default-character-set=utf8
		[client]
		default-character-set=utf8

		[mysqld]
		character_set_server=utf8
		character_set_client=utf8
		collation_server=utf8_general_ci
重启Mysql:
service mysql restart
编码:
sql  :  show variables like '%char%' ;
注意事项:修改编码 只对“之后”创建的数据库生效,因此 我们建议 在mysql安装完毕后,第一时间 统一编码。
mysql清屏
ctrl+L , system clear
2.原理
MYSQL逻辑分层 :连接层 服务层 引擎层 存储层

InnoDB(默认) :事务优先 (适合高并发操作;行锁)
MyISAM :性能优先 (表锁)
查询数据库引擎:
支持哪些引擎? show engines ;
查看当前使用的引擎   show variables like '%storage_engine%' ;

指定数据库对象的引擎:
	create table tb(
		id int(4) auto_increment ,
		name varchar(5),
		dept varchar(5) ,
		primary key(id)
	)ENGINE=MyISAM AUTO_INCREMENT=1
	 DEFAULT CHARSET=utf8   ;
3.SQL优化
原因:性能低、执行时间太长、等待时间太长、SQL语句欠佳(连接查询)、索引失效、服务器参数设置不合理(缓冲、线程数)
a.SQL :
编写过程:
select dinstinct …from …join …on …where …group by …having …order by …limit …
解析过程:
from … on… join …where …group by …having …select dinstinct …order by limit …
b.SQL优化, 主要就是 在优化索引
索引: 相当于书的目录
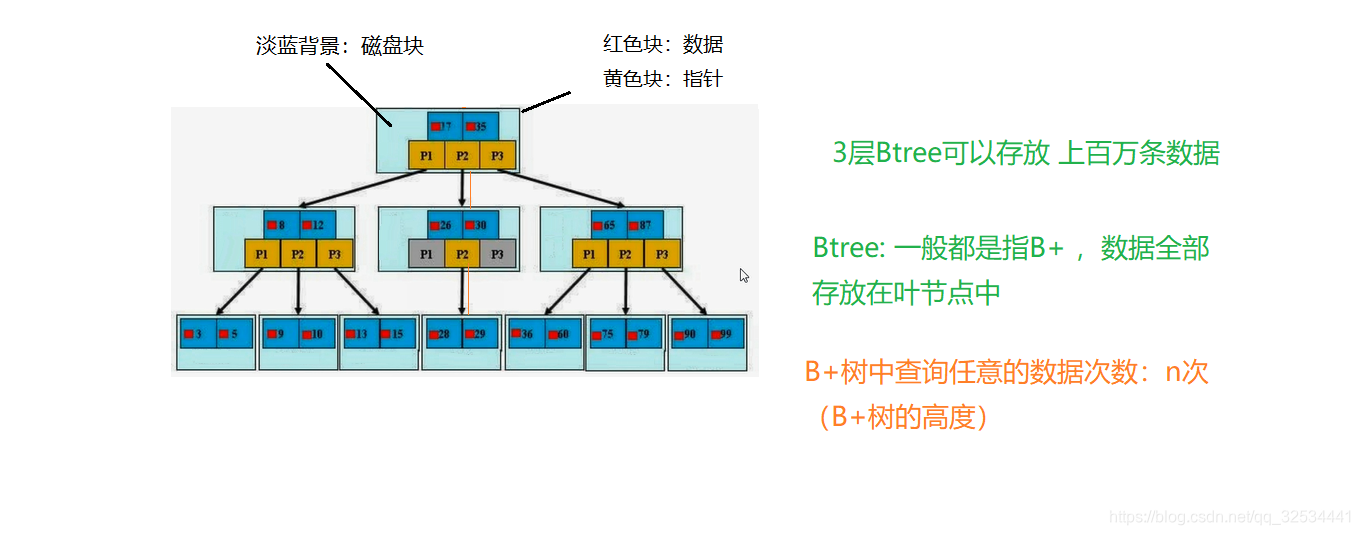
索引: index是帮助MYSQL高效获取数据的数据结构。索引是数据结构(树:B树(默认)、Hash树…)
索引的弊端:
1.索引本身很大, 可以存放在内存/硬盘(通常为 硬盘)
2.索引不是所有情况均适用: a.少量数据 b.频繁更新的字段 c.很少使用的字段
3.索引会降低增删改的效率(增删改 查)
索引的优势:
1提高查询效率(降低IO使用率)
2.降低CPU使用率 (…order by age desc,因为 B树索引 本身就是一个 好排序的结构,因此在排序时 可以直接使用)
参照:https://www.cnblogs.com/annsshadow/p/5037667.html(步步深入:MySQL架构总览->查询执行流程->SQL解析顺序)
4.索引
4.1分类:
主键索引: 不能重复。id 不能是null
唯一索引: 不能重复。id 可以是null
单值索引: 单列, age ;一个表可以多个单值索引,name。
复合索引: 多个列构成的索引 (相当于 二级目录 : z: zhao) (name,age) (a,b,c,d,…,n)
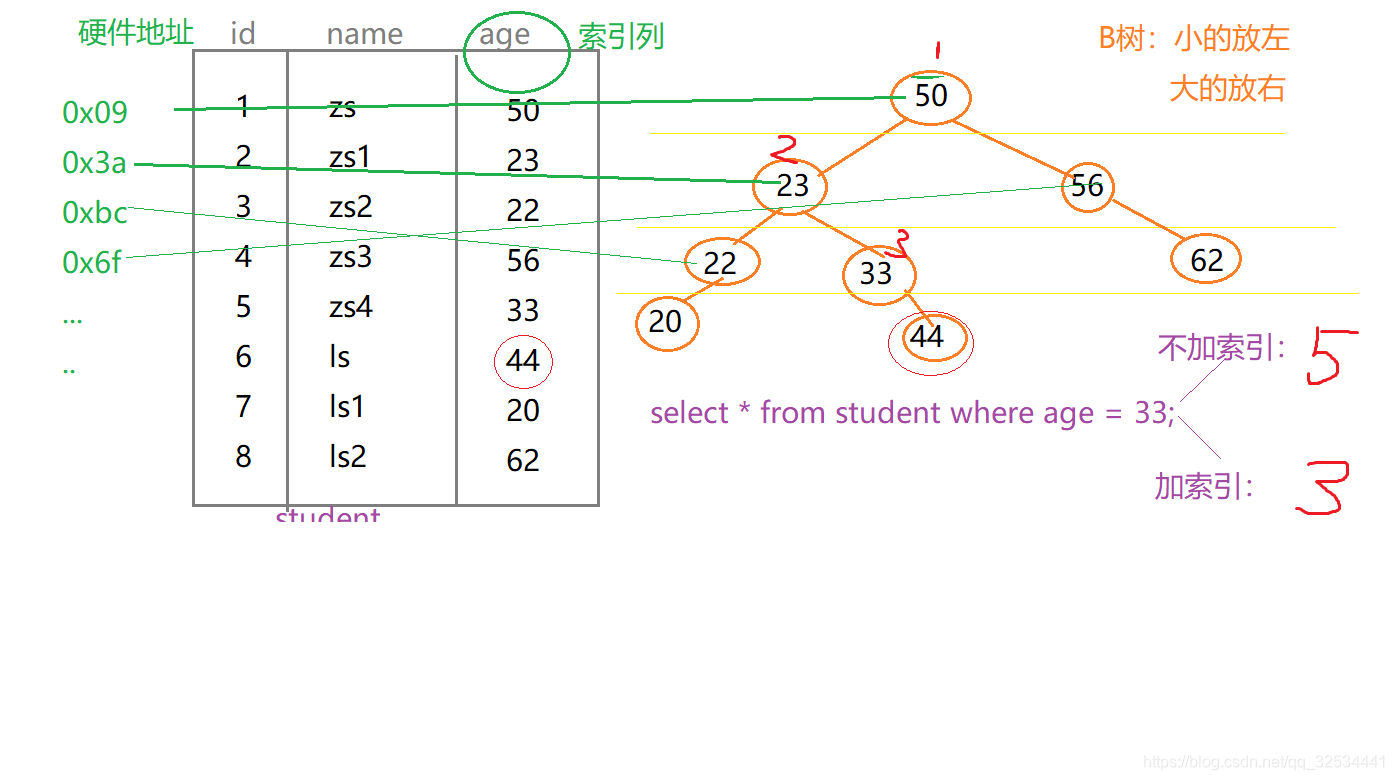
BTree检索原理:
4.2创建索引:
方式一:create 索引类型 索引名 on 表(字段)
单值:
create index   dept_index on  tb(dept);
唯一:
create unique index  name_index on tb(name) ;
复合索引
create index dept_name_index on tb(dept,name);
方式二:alter table 表名 索引类型 索引名(字段)
单值:
alter table tb add index dept_index(dept) ;
唯一:
alter table tb add unique index name_index(name);
复合索引
alter table tb add index dept_name_index(dept,name);
注意: 如果一个字段是primary key,则改字段默认就是 主键索引
删除索引:
drop index 索引名 on 表名 ;
drop index name_index on tb ;
查询索引:
show index from 表名 ;
show index from 表名 \G
5.SQL性能问题
a.分析SQL的执行计划 : explain ,可以模拟SQL优化器执行SQL语句,从而让开发人员 知道自己编写的SQL状况
b.MySQL查询优化其会干扰我们的优化
优化方法,官网:https://dev.mysql.com/doc/refman/5.5/en/optimization.html
5.1查询执行计划:
explain +SQL语句
explain  select  * from tb ;
id : 编号
select_type :查询类型
table :表
type :类型
possible_keys :预测用到的索引
key :实际使用的索引
key_len :实际使用索引的长度
ref :表之间的引用
rows :通过索引查询到的数据量
Extra :额外的信息
测试:
1.准备数据:
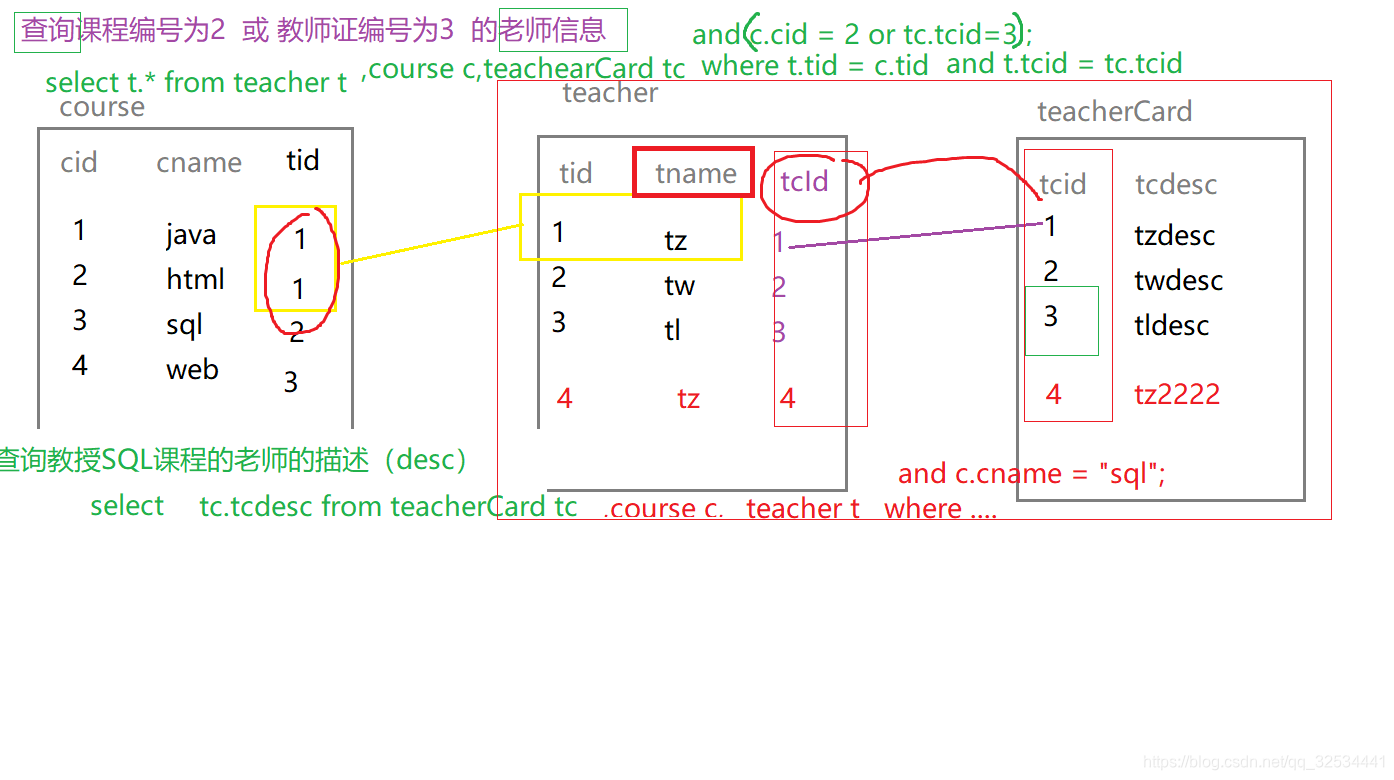
create table course
(
cid int(3),
cname varchar(20),
tid int(3)
);
create table teacher
(
tid int(3),
tname varchar(20),
tcid int(3)
);
create table teacherCard
(
tcid int(3),
tcdesc varchar(200)
);


insert into course values(1,'java',1);
insert into course values(2,'html',1);
insert into course values(3,'sql',2);
insert into course values(4,'web',3);

insert into teacher values(1,'tz',1);
insert into teacher values(2,'tw',2);
insert into teacher values(3,'tl',3);

insert into teacherCard values(1,'tzdesc') ;
insert into teacherCard values(2,'twdesc') ;
insert into teacherCard values(3,'tldesc') ;
查询课程编号为2 或 教师证编号为3 的老师信息
explain +sql:
(1)id:
id值相同,从上往下 顺序执行。 t3-tc3-c4
tc3--c4-t6
表的执行顺序 因数量的个数改变而改变的原因: 笛卡儿积
	a 	 b  	 c
	4	3	 2   =  			2*3=6 * 4   =24
							3*4=12* 2   =24
数据小的表 优先查询;
id值不同:id值越大越优先查询 (本质:在嵌套子查询时,先查内层 再查外层)
查询教授SQL课程的老师的描述(desc)
explain select tc.tcdesc from teacherCard tc,course c,teacher t where c.tid = t.tid
and t.tcid = tc.tcid and c.cname = 'sql' ;
将以上 多表查询 转为子查询形式:
explain select tc.tcdesc from teacherCard tc where tc.tcid =
(select t.tcid from teacher t where  t.tid =
	(select c.tid from course c where c.cname = 'sql')
);
子查询+多表:
explain select t.tname ,tc.tcdesc from teacher t,teacherCard tc where t.tcid= tc.tcid
and t.tid = (select c.tid from course c where cname = 'sql') ;
id值有相同,又有不同: id值越大越优先;id值相同,从上往下 顺序执行
(2)select_type:查询类型
PRIMARY:包含子查询SQL中的 主查询 (最外层)
SUBQUERY:包含子查询SQL中的 子查询 (非最外层)
simple:简单查询(不包含子查询、union)
derived:衍生查询(使用到了临时表)
a.在from子查询中只有一张表
explain select  cr.cname 	from ( select * from course where tid in (1,2) ) cr ;

b.在from子查询中, 如果有table1 union table2 ,则table1 就是derived,table2就是union
explain select  cr.cname 	from ( select * from course where tid = 1
union select * from course where tid = 2 ) cr ;
union: 上例
union result : 告知开发人员,那些表之间存在union查询
(3)type:索引类型、类型
越来越差:
system > const > eq_ref > ref > fulltext > ref_or_null > index_merge > unique_subquery > index_subquery > range > index > ALL
system>const>eq_ref>ref>range>index>all ,要对type进行优化的前提:有索引
其中:system,const只是理想情况;实际能达到 ref>range
1.system(忽略):
只有一条数据的系统表 ;或 衍生表只有一条数据的主查询
create table test01
(
	tid int(3),
	tname varchar(20)
);

insert into test01 values(1,'a') ;
commit;
增加索引
alter table test01 add constraint tid_pk primary key(tid) ;
explain select * from (select * from test01 )t where tid =1 ;
2.const:
仅仅能查到一条数据的SQL ,用于Primary key 或unique索引 (类型 与索引类型有关)
explain select tid from test01 where tid =1 ;
alter table test01 drop primary key ;
create index test01_index on test01(tid) ;
3.eq_ref:
唯一性索引:对于每个索引键的查询,返回匹配唯一行数据(有且只有1个,不能多 、不能0)
select ... from ..where name = ... .常见于唯一索引 和主键索引。

 alter table teacherCard add constraint pk_tcid primary key(tcid);
alter table teacher add constraint uk_tcid unique index(tcid) ;


explain select t.tcid from teacher t,teacherCard tc where t.tcid = tc.tcid ;

以上SQL,用到的索引是 t.tcid,即teacher表中的tcid字段;
如果teacher表的数据个数 和 连接查询的数据个数一致(都是3条数据),则有可能满足eq_ref级别;否则无法满足。
4.ref:
非唯一性索引,对于每个索引键的查询,返回匹配的所有行(0,多)
准备数据:
 insert into teacher values(4,'tz',4) ;
 insert into teacherCard values(4,'tz222');

测试:
alter table teacher add index index_name (tname) ;
explain select * from teacher 	where tname = 'tz';
5.range:
检索指定范围的行 ,where后面是一个范围查询(between ,> < >=, 特殊:in有时候会失效 ,从而转为 无索引all)
alter table teacher add index tid_index (tid) ;
explain select t.* from teacher t where t.tid in (1,2) ;
explain select t.* from teacher t where t.tid <3 ;
6.index:
查询全部索引中数据
explain select tid from teacher ; --tid 是索引, 只需要扫描索引表,不需要所有表中的所有数据
7.all:
查询全部表中的数据
explain select cid from course ; --cid不是索引,需要全表所有,即需要所有表中的所有数据
system/const: 结果只有一条数据
eq_ref:结果多条;但是每条数据是唯一的 ;
ref:结果多条;但是每条数据是是0或多条 ;
(4)possible_keys :可能用到的索引,是一种预测,不准。
alter table  course add index cname_index (cname);

explain select t.tname ,tc.tcdesc from teacher t,teacherCard tc
where t.tcid= tc.tcid
and t.tid = (select c.tid from course c where cname = 'sql') ;
如果 possible_key/key是NULL,则说明没用索引
explain select tc.tcdesc from teacherCard tc,course c,teacher t where c.tid = t.tid
and t.tcid = tc.tcid and c.cname = 'sql' ;
(5) key :实际使用到的索引
(6)key_len :索引的长度 ;
作用:用于判断复合索引是否被完全使用 (a,b,c)。
create table test_kl
(
	name char(20) not null default ''
);
alter table test_kl add index index_name(name) ;
explain select * from test_kl where name ='' ;   -- key_len :60
在utf8:1个字符站3个字节
alter table test_kl add column name1 char(20) ;  --name1可以为null

alter table test_kl add index index_name1(name1) ;
explain select * from test_kl where name1 ='' ;
–如果索引字段可以为Null,则会使用1个字节用于标识。
drop index index_name on test_kl ;
drop index index_name1 on test_kl ;

增加一个复合索引
alter table test_kl add index name_name1_index (name,name1) ;

explain select * from test_kl where name1 = '' ; --121
explain select * from test_kl where name = '' ; --60


varchar(20)
alter table test_kl add column name2 varchar(20) ; --可以为Null
alter table test_kl add index name2_index (name2) ;

explain select * from test_kl where name2 = '' ;  --63
20*3=60 +  1(null)  +2(用2个字节 标识可变长度)  =63
utf8:1个字符3个字节
gbk:1个字符2个字节
latin:1个字符1个字节
(7) ref : 注意与type中的ref值区分。
作用: 指明当前表所 参照的 字段。
select ....where a.c = b.x ;(其中b.x可以是常量,const)

alter table course  add index tid_index (tid) ;

explain select * from course c,teacher t where c.tid = t.tid  and t.tname ='tw' ;
(8)rows: 被索引优化查询的 数据个数 (实际通过索引而查询到的 数据个数)
explain select * from course c,teacher t  where c.tid = t.tid
and t.tname = 'tz' ;
(9)Extra:
(i).using filesort : 性能消耗大;需要“额外”的一次排序(查询) 。常见于 order by 语句中。
排序:先查询
10个人 根据年龄排序。


create table test02
(
	a1 char(3),
	a2 char(3),
	a3 char(3),
	index idx_a1(a1),
	index idx_a2(a2),
	index idx_a3(a3)
);

explain select * from test02 where a1 ='' order by a1 ;

a1:姓名  a2:年龄


explain select * from test02 where a1 ='' order by a2 ; --using filesort
小结: 对于单索引, 如果排序和查找是同一个字段,则不会出现using filesort;如果排序和查找不是同一个字段,则会出现using filesort;
避免: where哪些字段,就order by那些字段2
复合索引:不能跨列(最佳左前缀)
drop index idx_a1 on test02;
drop index idx_a2 on test02;
drop index idx_a3 on test02;

alter table test02 add index idx_a1_a2_a3 (a1,a2,a3) ;
explain select *from test02 where a1='' order by a3 ;  --using filesort
explain select *from test02 where a2='' order by a3 ; --using filesort
explain select *from test02 where a1='' order by a2 ;
explain select *from test02 where a2='' order by a1 ; --using filesort
小结: 避免: where和order by 按照复合索引的顺序使用,不要跨列或无序使用。
(ii). using temporary: 性能损耗大 ,用到了临时表。一般出现在group by 语句中。
explain select a1 from test02 where a1 in ('1','2','3') group by a1 ;
	explain select a1 from test02 where a1 in ('1','2','3') group by a2 ; --using temporary
避免: 查询那些列,就根据那些列 group by .
(iii). using index : 性能提升; 索引覆盖(覆盖索引)。原因:不读取原文件,只从索引文件中获取数据 (不需要回表查询)
只要使用到的列 全部都在索引中,就是索引覆盖using index
例如:test02表中有一个复合索引(a1,a2,a3)
explain select a1,a2 from test02 where a1=’’ or a2= ‘’ ; --using index
drop index idx_a1_a2_a3 on test02;

alter table test02 add index idx_a1_a2(a1,a2) ;
explain select a1,a3 from test02 where a1='' or a3= '' ;
如果用到了索引覆盖(using index时),会对 possible_keys和key造成影响:
a.如果没有where,则索引只出现在key中;
b.如果有where,则索引 出现在key和possible_keys中。
explain select a1,a2 from test02 where a1='' or a2= '' ;
explain select a1,a2 from test02  ;
(iii).using where (需要回表查询)
假设age是索引列
但查询语句select age,name from …where age =…,此语句中必须回原表查Name,因此会显示using where.
explain select a1,a3 from test02 where a3 = '' ; --a3需要回原表查询
(iv). impossible where : where子句永远为false
explain select * from test02 where a1='x' and a1='y' ;
6.优化案例
单表优化、两表优化、三表优化
(1)单表优化
create table book
(
	bid int(4) primary key,
	name varchar(20) not null,
	authorid int(4) not null,
	publicid int(4) not null,
	typeid int(4) not null
);

insert into book values(1,'tjava',1,1,2) ;
insert into book values(2,'tc',2,1,2) ;
insert into book values(3,'wx',3,2,1) ;
insert into book values(4,'math',4,2,3) ;
commit;

	查询authorid=1且 typeid为2或3的	bid
	explain select bid from book where typeid in(2,3) and authorid=1  order by typeid desc ;

	(a,b,c)
	(a,b)
优化: 加索引
alter table book add index idx_bta (bid,typeid,authorid);
索引一旦进行 升级优化,需要将之前废弃的索引删掉,防止干扰。
drop index idx_bta on book;
根据SQL实际解析的顺序,调整索引的顺序:
alter table book add index idx_tab (typeid,authorid,bid);
--虽然可以回表查询bid,但是将bid放到索引中 可以提升使用using index ;
再次优化(之前是index级别): 思路。因为范围查询in有时会实现,因此交换 索引的顺序,将typeid in(2,3) 放到最后。
drop index idx_tab on book;
alter table book add index idx_atb (authorid,typeid,bid);
explain select bid from book where  authorid=1 and  typeid in(2,3) order by typeid desc ;
–小结: a.最佳做前缀,保持索引的定义和使用的顺序一致性 b.索引需要逐步优化 c.将含In的范围查询 放到where条件的最后,防止失效。
本例中同时出现了Using where(需要回原表); Using index(不需要回原表):原因,where authorid=1 and typeid in(2,3)中authorid在索引(authorid,typeid,bid)中,因此不需要回原表(直接在索引表中能查到);而typeid虽然也在索引(authorid,typeid,bid)中,但是含in的范围查询已经使该typeid索引失效,因此相当于没有typeid这个索引,所以需要回原表(using where);
例如以下没有了In,则不会出现using where
explain select bid from book where authorid=1 and typeid =3 order by typeid desc ;
还可以通过key_len证明In可以使索引失效。
(2)两表优化
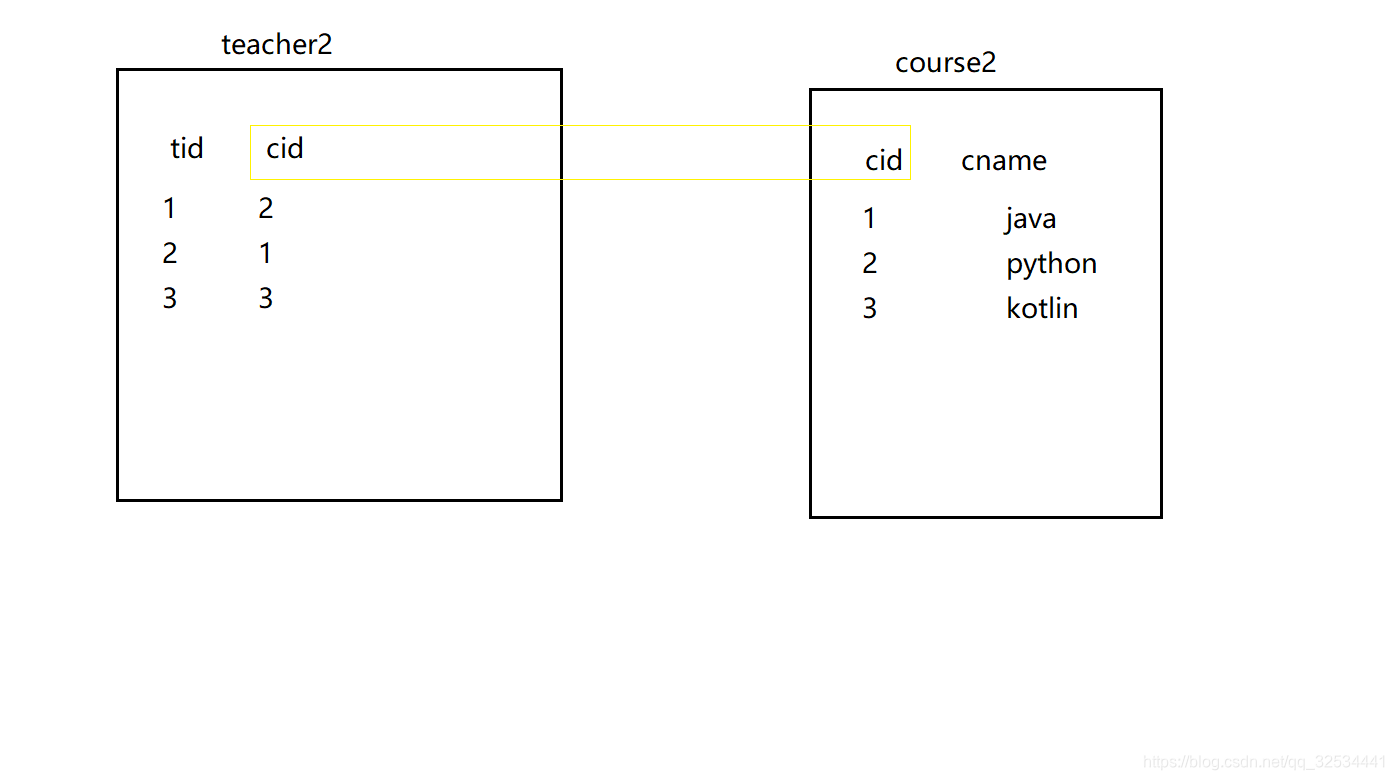
create table teacher2
(
	tid int(4) primary key,
	cid int(4) not null
);

insert into teacher2 values(1,2);
insert into teacher2 values(2,1);
insert into teacher2 values(3,3);

create table course2
(
	cid int(4) ,
	cname varchar(20)
);

insert into course2 values(1,'java');
insert into course2 values(2,'python');
insert into course2 values(3,'kotlin');
commit;
左连接:
explain select *from teacher2 t left outer join course2 c
on t.cid=c.cid where c.cname='java';
索引往哪张表加? -小表驱动大表
-索引建立经常使用的字段上 (本题 t.cid=c.cid可知,t.cid字段使用频繁,因此给该字段加索引) [一般情况对于左外连接,给左表加索引;右外连接,给右表加索引]
小表:10
大表:300
where 小表.x 10 = 大表.y 300; --循环了几次?10
大表.y 300=小表.x 10	--循环了300次


小表:10
大表:300

select ...where 小表.x10=大表.x300 ;
for(int i=0;i<小表.length10;i++)
{
	for(int j=0;j<大表.length300;j++)
	{
		...
	}
}


select ...where 大表.x300=小表.x10 ;
for(int i=0;i<大表.length300;i++)
{
	for(int j=0;j<小表.length10;j++)
	{
		...
	}
}
–以上2个FOR循环,最终都会循环3000次;但是 对于双层循环来说:一般建议 将数据小的循环 放外层;数据大的循环放内存。
总结:–当编写 …on t.cid=c.cid 时,将数据量小的表 放左边(假设此时t表数据量小)
alter table teacher2 add index index_teacher2_cid(cid) ;
alter table course2 add index index_course2_cname(cname);


Using join buffer:extra中的一个选项,作用:Mysql引擎使用了 连接缓存。
(3)三张表优化A B C
a.小表驱动大表
b.索引建立在经常查询的字段上
示例:
create table test03
(
  a1 int(4) not null,
  a2 int(4) not null,
  a3 int(4) not null,
  a4 int(4) not null
);
alter table test03 add index idx_a1_a2_a3_4(a1,a2,a3,a4) ;


explain select a1,a2,a3,a4 from test03 where a1=1 and a2=2 and a3=3 and a4 =4 ;
--推荐写法,因为 索引的使用顺序(where后面的顺序) 和 复合索引的顺序一致

explain select a1,a2,a3,a4 from test03 where a4=1 and a3=2 and a2=3 and a1 =4 ;
--虽然编写的顺序 和索引顺序不一致,但是 sql在真正执行前 经过了SQL优化器的调整,结果与上条SQL是一致的。
--以上 2个SQL,使用了 全部的复合索引

explain select a1,a2,a3,a4 from test03 where a1=1 and a2=2 and a4=4 order by a3;
--以上SQL用到了a1 a2两个索引,该两个字段 不需要回表查询using index ;而a4因为跨列使用,造成了该索引失效,
需要回表查询 因此是using where;以上可以通过 key_len进行验证

explain select a1,a2,a3,a4 from test03 where a1=1 and a4=4 order by a3;
--以上SQL出现了 using filesort(文件内排序,“多了一次额外的查找/排序”) :不要跨列使用( where和order by 拼起来,
不要跨列使用)


explain select a1,a2,a3,a4 from test03 where a1=1 and a4=4 order by a2 , a3;
--不会using filesort
–总结:
i.如果 (a,b,c,d)复合索引 和使用的顺序全部一致(且不跨列使用),则复合索引全部使用。如果部分一致(且不跨列使用),则使用部分索引。
select a,c where a = and b= and d=
ii.where和order by 拼起来,不要跨列使用
using temporary:需要额外再多使用一张表. 一般出现在group by语句中;已经有表了,但不适用,必须再来一张表。
解析过程:
from … on… join …where …group by …having …select dinstinct …order by limit …
a.
explain select * from test03 where a2=2 and a4=4 group by a2,a4 ;–没有using temporary
b.
explain select * from test03 where a2=2 and a4=4 group by a3 ;
7.避免索引失效的一些原则
(1)复合索引
a.复合索引,不要跨列或无序使用(最佳左前缀) (a,b,c)
b.复合索引,尽量使用全索引匹配(a,b,c)
(2)不要在索引上进行任何操作(计算、函数、类型转换),否则索引失效
select …where A.x = … ; --假设A.x是索引
不要:select …where A.x*3 = …
explain select * from book where authorid = 1 and typeid = 2 ;--用到了at2个索引
explain select * from book where authorid = 1 and typeid*2 = 2 ;--用到了a1个索引
explain select * from book where authorid*2 = 1 and typeid*2 = 2 ;----用到了0个索引
explain select * from book where authorid*2 = 1 and typeid = 2 ;----用到了0个索引,原因:
对于复合索引,如果左边失效,右侧全部失效。(a,b,c),例如如果 b失效,则b c同时失效。

drop index idx_atb on book ;
alter table book add index idx_authroid (authorid) ;
alter table book add index idx_typeid (typeid) ;
explain select * from book where authorid*2 = 1 and typeid = 2 ;
(3)复合索引不能使用不等于(!= <>)或is null (is not null),否则自身以及右侧所有全部失效。
复合索引中如果有>,则自身和右侧索引全部失效。
explain select * from book where authorid = 1 and typeid =2 ;
– SQL优化,是一种概率层面的优化。至于是否实际使用了我们的优化,需要通过explain进行推测。
explain select * from book where authorid != 1 and typeid =2 ;
explain select * from book where authorid != 1 and typeid !=2 ;
体验概率情况(< > =): 原因是服务层中有SQL优化器,可能会影响我们的优化。
drop index idx_typeid on book;
drop index idx_authroid on book;
alter table book add index idx_book_at (authorid,typeid);
explain select * from book where authorid = 1 and typeid =2 ;--复合索引at全部使用
explain select * from book where authorid > 1 and typeid =2 ; --复合索引中如果有>,则自身和右侧索引全部失效。
explain select * from book where authorid = 1 and typeid >2 ;--复合索引at全部使用

----明显的概率问题---
explain select * from book where authorid < 1 and typeid =2 ;--复合索引at只用到了1个索引
explain select * from book where authorid < 4 and typeid =2 ;--复合索引全部失效
–我们学习索引优化 ,是一个大部分情况适用的结论,但由于SQL优化器等原因 该结论不是100%正确。
–一般而言, 范围查询(> < in),之后的索引失效。
(4)补救。尽量使用索引覆盖(using index)
(a,b,c)
select a,b,c from xx..where a= .. and b =.. ;
(5) like尽量以“常量”开头,不要以’%'开头,否则索引失效
select * from xx where name like '%x%' ; --name索引失效

explain select * from teacher  where tname like '%x%'; --tname索引失效

explain select * from teacher  where tname like 'x%';

explain select tname from teacher  where tname like '%x%'; --如果必须使用like '%x%'进行模糊查询,可以使用索引覆盖 挽救一部分。
(6)尽量不要使用类型转换(显示、隐式),否则索引失效
explain select * from teacher where tname = 'abc' ;
explain select * from teacher where tname = 123 ;//程序底层将 123 -> '123',即进行了类型转换,因此索引失效
(7)尽量不要使用or,否则索引失效
explain select * from teacher where tname ='' or tcid >1 ; --将or左侧的tname 失效。
8.一些其他的优化方法
(1)exist和in
select …from table where exist (子查询) ;
select …from table where 字段 in (子查询) ;
如果主查询的数据集大,则使用In   ,效率高。
如果子查询的数据集大,则使用exist,效率高。
exist语法: 将主查询的结果,放到子查需结果中进行条件校验(看子查询是否有数据,如果有数据 则校验成功) ,
如果 复合校验,则保留数据;
select tname from teacher where exists (select * from teacher) ;
--等价于select tname from teacher


select tname from teacher where exists (select * from teacher where tid =9999) ;
in语法:
select ..from table where tid in (1,3,5) ;
(2)order by 优化
using filesort 有两种算法:双路排序、单路排序 (根据IO的次数)
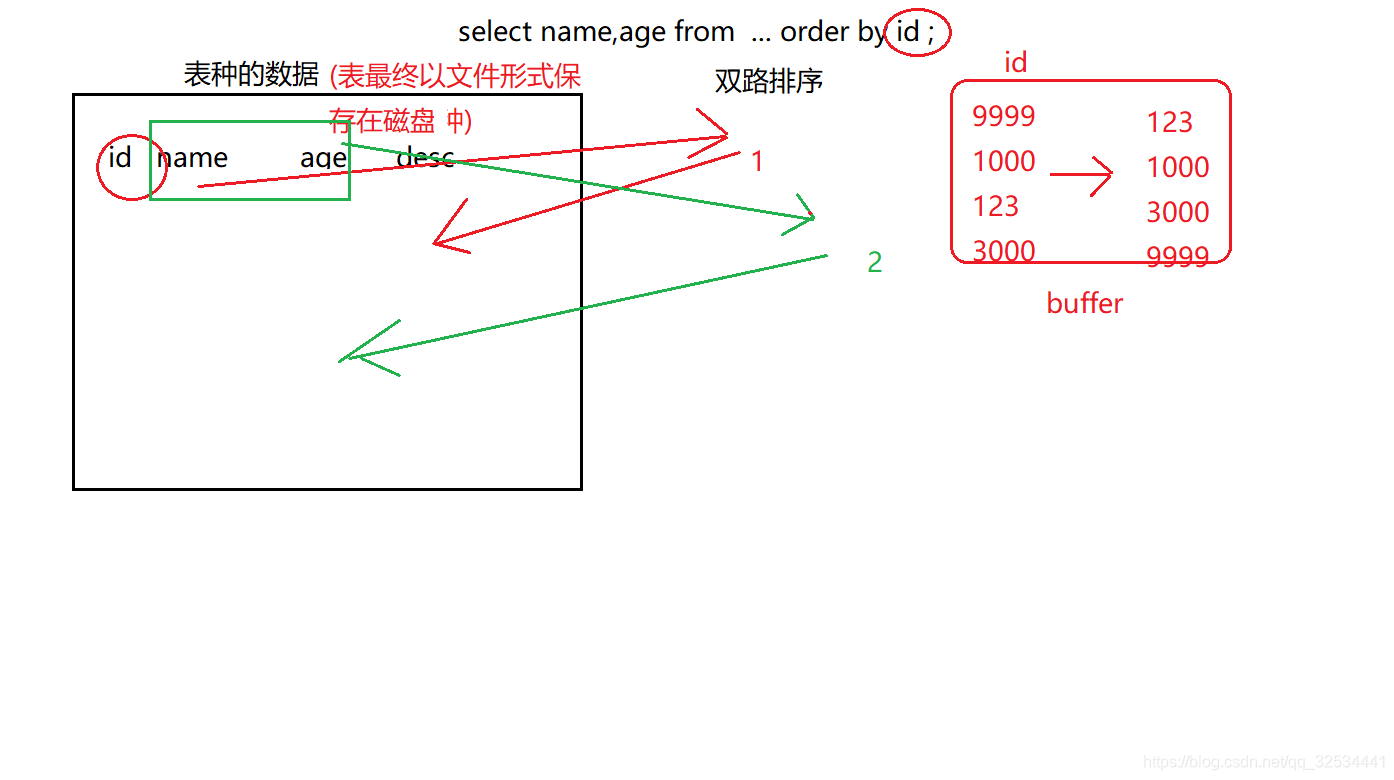
MySQL4.1之前 默认使用 双路排序;
双路:扫描2次磁盘
1:从磁盘读取排序字段 ,对排序字段进行排序(在buffer中进行的排序)
2:扫描其他字段
–IO较消耗性能
MySQL4.1之后 默认使用 单路排序 :
只读取一次(全部字段),在buffer中进行排序。但种单路排序 会有一定的隐患 (不一定真的是“单路|1次IO”,有可能多次IO)。
原因:如果数据量特别大,则无法 将所有字段的数据 一次性读取完毕,因此 会进行“分片读取、多次读取”。
单路排序在使用时,如果数据大,可以考虑调大buffer的容量大小: set max_length_for_sort_data = 1024 单位byte
注意: 单路排序 比双路排序 会占用更多的buffer。
如果max_length_for_sort_data值太低,则mysql会自动从 单路->双路
(太低:需要排序的列的总大小超过了max_length_for_sort_data定义的字节数)
提高order by查询的策略:
a.选择使用单路、双路 ;调整buffer的容量大小;
b.避免select * …
c.复合索引 不要跨列使用 ,避免using filesort
d.保证全部的排序字段 排序的一致性(都是升序 或 降序)
9.SQL排查
慢查询日志: MySQL提供的一种日志记录,用于记录MySQL种响应时间超过阀值的SQL语句 (long_query_time,默认10秒)
慢查询日志默认是关闭的;
建议:开发调优是 打开,而 最终部署时关闭。
检查是否开启了 慢查询日志 :
show variables like '%slow_query_log%' ;
临时开启:
set global slow_query_log = 1 ;  --在内存种开启
exit
service mysql restart
永久开启:
/etc/my.cnf 中追加配置:
vi /etc/my.cnf
[mysqld]
slow_query_log=1
slow_query_log_file=/var/lib/mysql/localhost-slow.log
慢查询阀值:
show variables like '%long_query_time%' ;
临时设置阀值:
set global long_query_time = 5 ; --设置完毕后,重新登陆后起效 (不需要重启服务)
永久设置阀值:
/etc/my.cnf 中追加配置:
vi /etc/my.cnf
[mysqld]
long_query_time=3
select sleep(4);
select sleep(5);
select sleep(3);
select sleep(3);
–查询超过阀值的SQL:
show global status like '%slow_queries%' ;
(1)慢查询的sql被记录在了日志中,因此可以通过日志 查看具体的慢SQL。
cat /var/lib/mysql/localhost-slow.log
(2)通过mysqldumpslow工具查看慢SQL,可以通过一些过滤条件 快速查找出需要定位的慢SQL
mysqldumpslow --help
	s:排序方式
	r:逆序
	l:锁定时间
	g:正则匹配模式


	--获取返回记录最多的3个SQL
		mysqldumpslow -s r -t 3  /var/lib/mysql/localhost-slow.log

	--获取访问次数最多的3个SQL
		mysqldumpslow -s c -t 3 /var/lib/mysql/localhost-slow.log

	--按照时间排序,前10条包含left join查询语句的SQL
		mysqldumpslow -s t -t 10 -g "left join" /var/lib/mysql/localhost-slow.log

	语法:
		mysqldumpslow 各种参数  慢查询日志的文件
10.分析海量数据
a.模拟海量数据
存储过程(无return)/存储函数(有return)
create database testdata ;
	use testdata
create table dept
(
dno int(5) primary key default 0,
dname varchar(20) not null default '',
loc varchar(30) default ''
)engine=innodb default charset=utf8;

create table emp
(
eid int(5) primary key,
ename varchar(20) not null default '',
job varchar(20) not null default '',
deptno int(5) not null default 0
)engine=innodb default charset=utf8;
通过存储函数 插入海量数据:
创建存储函数:
randstring(6)  ->aXiayx  用于模拟员工名称

delimiter $
create function randstring(n int)   returns varchar(255)
begin
	declare  all_str varchar(100) default 'abcdefghijklmnopqrstuvwxyzABCDEFGHIJKLMNOPQRSTUVWXYZ' ;
	declare return_str varchar(255) default '' ;
	declare i int default 0 ;
	while i<n
	do
		set return_str = concat(  return_str,      substring(all_str,   FLOOR(1+rand()*52)   ,1)       );
		set i=i+1 ;
	end while ;
	return return_str;

end $
–如果报错:You have an error in your SQL syntax,说明SQL语句语法有错,需要修改SQL语句;
如果报错This function has none of DETERMINISTIC, NO SQL, or READS SQL DATA in its declaration and binary logging is enabled (you might want to use the less safe log_bin_trust_function_creators variable)
是因为 存储过程/存储函数在创建时 与之前的 开启慢查询日志冲突了
解决冲突:
临时解决( 开启log_bin_trust_function_creators )
	show variables like '%log_bin_trust_function_creators%';
	set global log_bin_trust_function_creators = 1;
永久解决:
	/etc/my.cnf
	[mysqld]
	log_bin_trust_function_creators = 1
–产生随机整数
create function ran_num() returns int(5)
	begin
		declare i int default 0;
		set i =floor( rand()*100 ) ;
		return i ;
end $
–通过存储过程插入海量数据:emp表中 , 10000, 100000
create procedure insert_emp( in eid_start int(10),in data_times int(10))
	begin
		declare i int default 0;
		set autocommit = 0 ;

		repeat

		insert into emp values(eid_start + i, randstring(5) ,'other' ,ran_num()) ;
		set i=i+1 ;
		until i=data_times
	end repeat ;
	commit ;
end $
–通过存储过程插入海量数据:dept表中
create procedure insert_dept(in dno_start int(10) ,in data_times int(10))
		begin
			declare i int default 0;
			set autocommit = 0 ;
			repeat

			insert into dept values(dno_start+i ,randstring(6),randstring(8)) ;
			set i=i+1 ;
			until i=data_times
		end repeat ;
	commit ;


	end$
–插入数据
delimiter ;
call insert_emp(1000,800000) ;
call insert_dept(10,30) ;
b.分析海量数据:
(1)profiles
show profiles ; --默认关闭
show variables like '%profiling%';
set profiling = on ;
show profiles  :会记录所有profiling打开之后的  全部SQL查询语句所花费的时间。缺点:不够精确,只能看到 总共消费的时间,不能看到各个硬件消费的时间(cpu  io )
(2)–精确分析:sql诊断
 show profile all for query 上一步查询的的Query_Id
 show profile cpu,block io for query 上一步查询的的Query_Id
(3)全局查询日志 :
记录开启之后的 全部SQL语句。 (这次全局的记录操作 仅仅在调优、开发过程中打开即可,在最终的部署实施时 一定关闭)
show variables like '%general_log%';
–执行的所有SQL记录在表中
set global general_log = 1 ;--开启全局日志
set global log_output='table' ; --设置 将全部的SQL 记录在表中
–执行的所有SQL记录在文件中
set global log_output='file' ;
set global general_log = on ;
set global general_log_file='/tmp/general.log' ;
开启后,会记录所有SQL : 会被记录 mysql.general_log表中。
select * from mysql.general_log ;
11.锁机制 :解决因资源共享 而造成的并发问题。
示例:买最后一件衣服X
A:  X	买 :  X加锁 ->试衣服...下单..付款..打包 ->X解锁
B:	X       买:发现X已被加锁,等待X解锁,   X已售空
分类:
操作类型:
a.读锁(共享锁): 对同一个数据(衣服),多个读操作可以同时进行,互不干扰。
b.写锁(互斥锁): 如果当前写操作没有完毕(买衣服的一系列操作),则无法进行其他的读操作、写操作
操作范围:
a.表锁 :一次性对一张表整体加锁。如MyISAM存储引擎使用表锁,开销小、加锁快;无死锁;但锁的范围大,容易发生锁冲突、并发度低。
b.行锁 :一次性对一条数据加锁。如InnoDB存储引擎使用行锁,开销大,加锁慢;容易出现死锁;锁的范围较小,不易发生锁冲突,并发度高(很小概率 发生高并发问题:脏读、幻读、不可重复度、丢失更新等问题)。
c.页锁
示例:
(1)表锁 : --自增操作 MYSQL/SQLSERVER 支持;oracle需要借助于序列来实现自增
create table tablelock
(
id int primary key auto_increment ,
name varchar(20)
)engine myisam;


insert into tablelock(name) values('a1');
insert into tablelock(name) values('a2');
insert into tablelock(name) values('a3');
insert into tablelock(name) values('a4');
insert into tablelock(name) values('a5');
commit;
增加锁:
locak table 表1 read/write ,表2 read/write ,...
查看加锁的表:
show open tables ;
会话:session :每一个访问数据的dos命令行、数据库客户端工具 都是一个会话
===加读锁:
	会话0:
		lock table  tablelock read ;
		select * from tablelock; --读(查),可以
		delete from tablelock where id =1 ; --写(增删改),不可以

		select * from emp ; --读,不可以
		delete from emp where eid = 1; --写,不可以
结论1:
–如果某一个会话 对A表加了read锁,则 该会话 可以对A表进行读操作、不能进行写操作;
且 该会话不能对其他表进行读、写操作。
–即如果给A表加了读锁,则当前会话只能对A表进行读操作。
	会话1(其他会话):
		select * from tablelock;   --读(查),可以
		delete from tablelock where id =1 ; --写,会“等待”会话0将锁释放


	会话1(其他会话):
		select * from emp ;  --读(查),可以
		delete from emp where eno = 1; --写,可以
		结论2:
		--总结:
			会话0给A表加了锁;其他会话的操作:a.可以对其他表(A表以外的表)进行读、写操作
							b.对A表:读-可以;  写-需要等待释放锁。
	释放锁: unlock tables ;


===加写锁:
	会话0:
		lock table tablelock write ;

		当前会话(会话0) 可以对加了写锁的表  进行任何操作(增删改查);但是不能 操作(增删改查)其他表
	其他会话:
		对会话0中加写锁的表 可以进行增删改查的前提是:等待会话0释放写锁
MySQL表级锁的锁模式:
MyISAM在执行查询语句(SELECT)前,会自动给涉及的所有表加读锁,
在执行更新操作(DML)前,会自动给涉及的表加写锁。
所以对MyISAM表进行操作,会有以下情况:
a、对MyISAM表的读操作(加读锁),不会阻塞其他进程(会话)对同一表的读请求,
但会阻塞对同一表的写请求。只有当读锁释放后,才会执行其它进程的写操作。
b、对MyISAM表的写操作(加写锁),会阻塞其他进程(会话)对同一表的读和写操作,
只有当写锁释放后,才会执行其它进程的读写操作。
分析表锁定:
查看哪些表加了锁:
show open tables ; 1代表被加了锁
分析表锁定的严重程度:
show status like 'table%' ;
Table_locks_immediate :即可能获取到的锁数
Table_locks_waited:需要等待的表锁数(如果该值越大,说明存在越大的锁竞争)
一般建议:
Table_locks_immediate/Table_locks_waited > 5000, 建议采用InnoDB引擎,否则MyISAM引擎
(2)行锁(InnoDB)
create table linelock(
id int(5) primary key auto_increment,
name varchar(20)
)engine=innodb ;
insert into linelock(name) values(‘1’) ;
insert into linelock(name) values(‘2’) ;
insert into linelock(name) values(‘3’) ;
insert into linelock(name) values(‘4’) ;
insert into linelock(name) values(‘5’) ;
–mysql默认自动commit; oracle默认不会自动commit ;
为了研究行锁,暂时将自动commit关闭; set autocommit =0 ; 以后需要通过commit
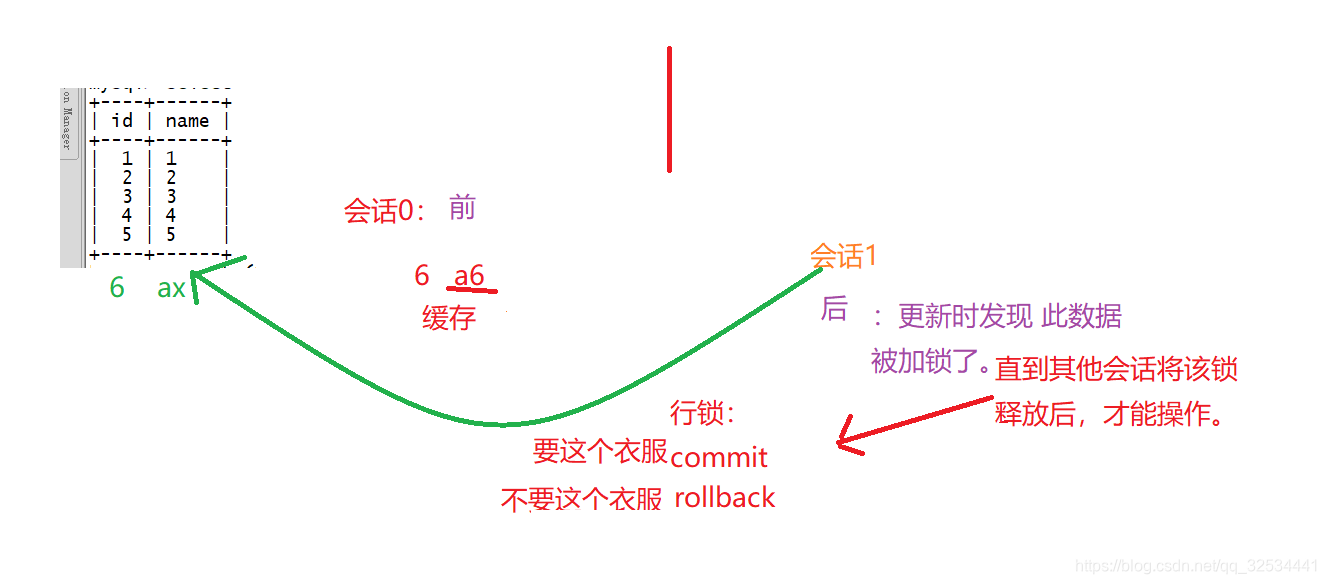
会话0: 写操作
	insert into linelock values(	'a6') ;

会话1: 写操作 同样的数据
	update linelock set name='ax' where id = 6;
对行锁情况:
1.如果会话x对某条数据a进行 DML操作(研究时:关闭了自动commit的情况下),则其他会话必须等待会话x结束事务(commit/rollback)后 才能对数据a进行操作。
2.表锁 是通过unlock tables,也可以通过事务解锁 ; 行锁 是通过事务解锁。
行锁,操作不同数据:

会话0: 写操作

	insert into linelock values(8,'a8') ;
会话1: 写操作, 不同的数据
	update linelock set name='ax' where id = 5;
	行锁,一次锁一行数据;因此 如果操作的是不同数据,则不干扰。
行锁的注意事项:
a.如果没有索引,则行锁会转为表锁
show index from linelock ;
alter table linelock add index idx_linelock_name(name);


会话0: 写操作
	update linelock set name = 'ai' where name = '3' ;

会话1: 写操作, 不同的数据
	update linelock set name = 'aiX' where name = '4' ;


会话0: 写操作
	update linelock set name = 'ai' where name = 3 ;

会话1: 写操作, 不同的数据
	update linelock set name = 'aiX' where name = 4 ;

--可以发现,数据被阻塞了(加锁)
-- 原因:如果索引类 发生了类型转换,则索引失效。 因此 此次操作,会从行锁 转为表锁。
b.行锁的一种特殊情况:
间隙锁:值在范围内,但却不存在
–此时linelock表中 没有id=7的数据
update linelock set name ='x' where id >1 and id<9 ;
--即在此where范围中,没有id=7的数据,则id=7的数据成为间隙。
间隙:Mysql会自动给 间隙 加索 ->间隙锁。即 本题 会自动给id=7的数据加 间隙锁(行锁)。
行锁:如果有where,则实际加索的范围 就是where后面的范围(不是实际的值)
开启和关闭
1.查看是否开启间隙锁:
mysql> show variables like 'innodb_locks_unsafe_for_binlog';
+--------------------------------+-------+
| Variable_name                  | Value |
+--------------------------------+-------+
| innodb_locks_unsafe_for_binlog | OFF   |
+--------------------------------+-------+
innodb_locks_unsafe_for_binlog:默认值为0,即启用gap lock。
2.关闭间隙锁(gap lock)方法:
在my.cnf里面的[mysqld]添加
[mysqld]
innodb_locks_unsafe_for_binlog = 1
3.重启MySQL后生效.
如果仅仅是查询数据,能否加锁? 可以   for update
研究学习时,将自动提交关闭:
	set autocommit =0 ;
	start transaction ;
	begin ;
 select * from linelock where id =2 for update ;

通过for update对query语句进行加锁。
行锁总结:
InnoDB默认采用行锁;
缺点: 比表锁性能损耗大。
优点:并发能力强,效率高。
因此建议,高并发用InnoDB,否则用MyISAM。
行锁分析:
show status like '%innodb_row_lock%' ;
Innodb_row_lock_current_waits :当前正在等待锁的数量
Innodb_row_lock_time:等待总时长。从系统启到现在 一共等待的时间
Innodb_row_lock_time_avg  :平均等待时长。从系统启到现在平均等待的时间
Innodb_row_lock_time_max  :最大等待时长。从系统启到现在最大一次等待的时间
Innodb_row_lock_waits :	等待次数。从系统启到现在一共等待的次数
12.主从复制 (集群在数据库的一种实现)
windows:mysql 主
linux:mysql从
安装windows版mysql:
如果之前计算机中安装过Mysql,要重新再安装  则需要:先卸载 再安装
		先卸载:
			通过电脑自带卸载工具卸载Mysql (电脑管家也可以)
			删除一个mysql缓存文件C:\ProgramData\MySQL
			删除注册表regedit中所有mysql相关配置
			--重启计算机

	安装MYSQL:
		安装时,如果出现未响应:  则重新打开D:\MySQL\MySQL Server 5.5\bin\MySQLInstanceConfig.exe

	图形化客户端: SQLyog, Navicat


	如果要远程连接数据库,则需要授权远程访问。
	授权远程访问 :(A->B,则再B计算机的Mysql中执行以下命令)
	GRANT ALL PRIVILEGES ON *.* TO 'root'@'%' IDENTIFIED BY 'root' WITH GRANT OPTION;
	FLUSH PRIVILEGES;

	如果仍然报错:可能是防火墙没关闭 :  在B关闭防火墙  service iptables stop
实现主从同步(主从复制):
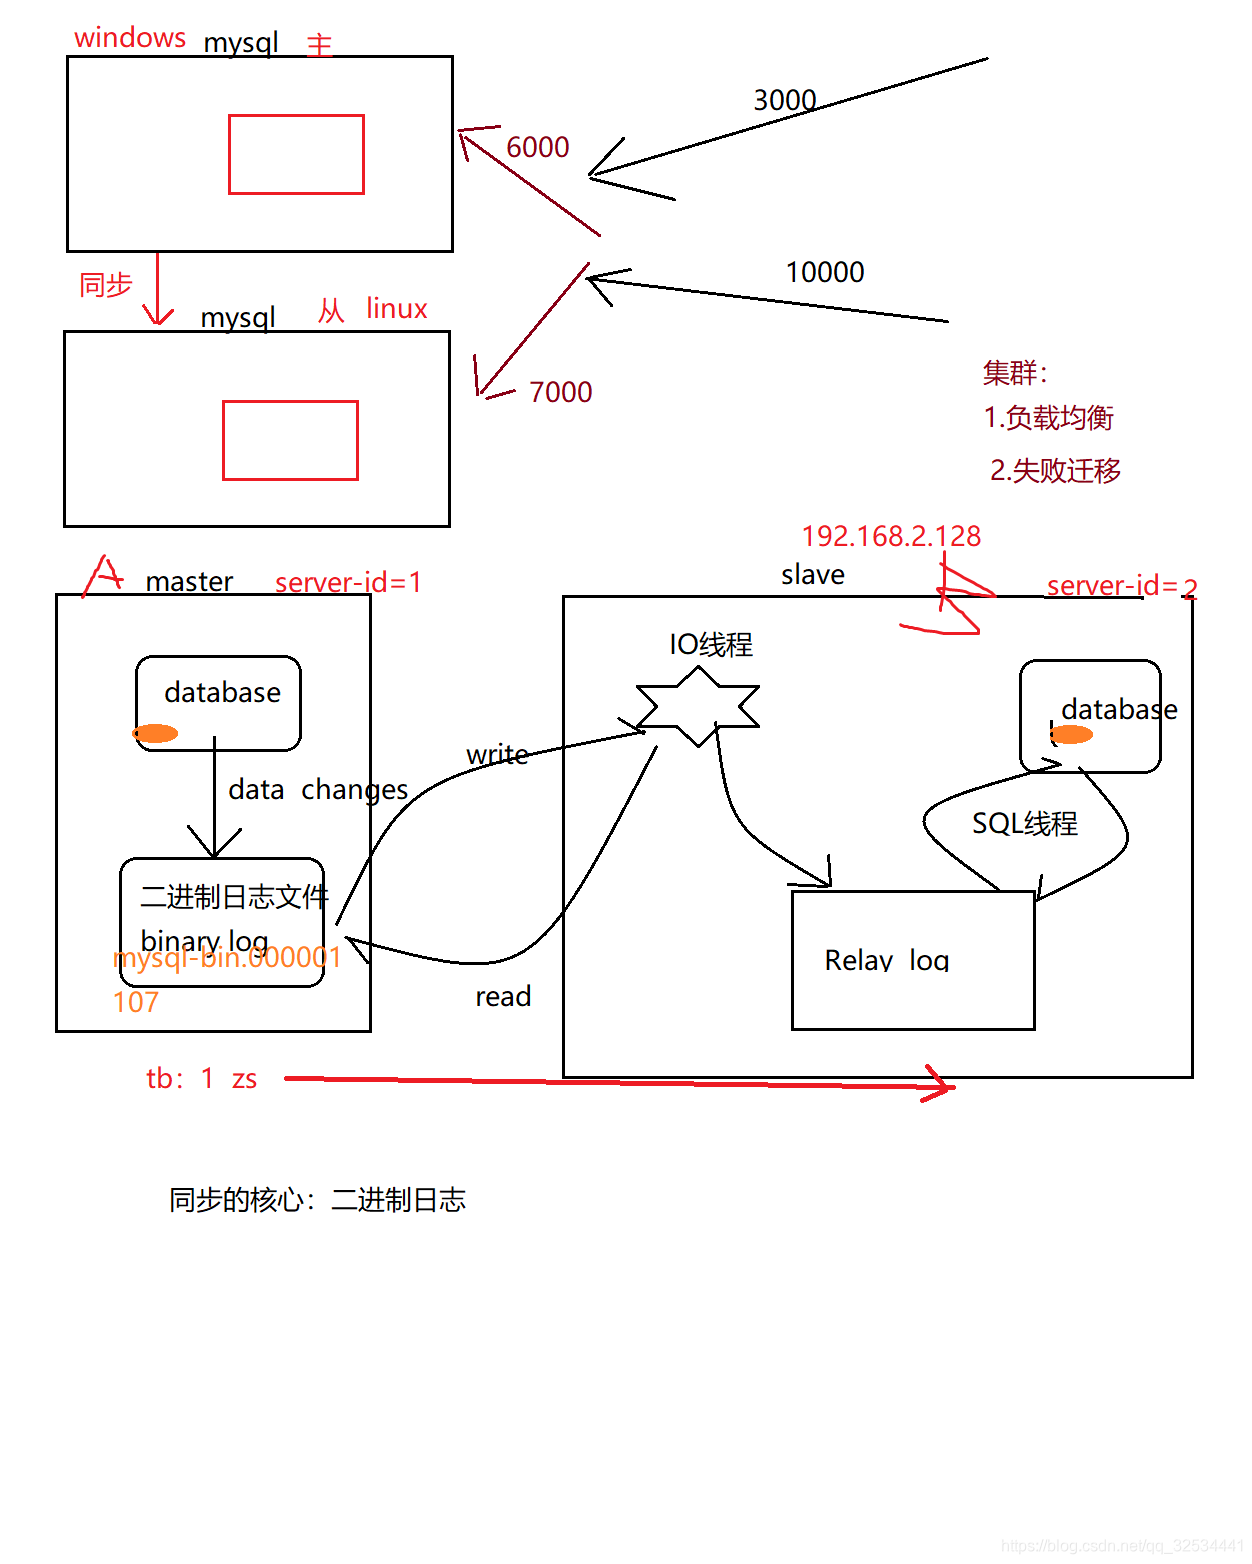
1.master将改变的数 记录在本地的 二进制日志中(binary log) ;该过程 称之为:二进制日志件事
2.slave将master的binary log拷贝到自己的 relay log(中继日志文件)中
3.中继日志事件,将数据读取到自己的数据库之中
MYSQL主从复制 是异步的,串行化的, 有延迟
配置:
windows(mysql: my.ini)
linux(mysql: my.cnf)
准备工作:
配置前,为了无误,先将权限(远程访问)、防火墙等处理:
关闭windows/linux防火墙: windows:右键“网络” ,
linux: service iptables stop
Mysql允许远程连接(windowos/linux):
GRANT ALL PRIVILEGES ON . TO ‘root’@’%’ IDENTIFIED BY ‘root’ WITH GRANT OPTION;
FLUSH PRIVILEGES;
1.主机(以下代码和操作 全部在主机windows中操作):
my.ini
[mysqld]
#id
server-id=1
#二进制日志文件(注意是/  不是\)
log-bin="D:/MySQL/MySQL Server 5.5/data/mysql-bin"
#错误记录文件
log-error="D:/MySQL/MySQL Server 5.5/data/mysql-error"
#主从同步时 忽略的数据库
binlog-ignore-db=mysql
#(可选)指定主从同步时,同步哪些数据库
binlog-do-db=test
windows中的数据库 授权哪台计算机中的数据库 是自己的从数据库:
 GRANT REPLICATION slave,reload,super ON *.* TO 'root'@'192.168.2.%' IDENTIFIED BY 'root';
 flush privileges ;
查看主数据库的状态(每次在左主从同步前,需要观察 主机状态的最新值)
show master status; (mysql-bin.000001、 107)
2.从机(以下代码和操作 全部在从机linux中操作):
my.cnf
[mysqld]
server-id=2
log-bin=mysql-bin
replicate-do-db=test
linux中的数据 授权哪台计算机中的数控 是自己的主计算机
CHANGE MASTER TO
MASTER_HOST = '192.168.2.2',
MASTER_USER = 'root',
MASTER_PASSWORD = 'root',
MASTER_PORT = 3306,
master_log_file='mysql-bin.000001',
master_log_pos=107;

如果报错:This operation cannot be performed with a running slave; run STOP SLAVE first
解决:STOP SLAVE ;再次执行上条授权语句
3.开启主从同步:
从机linux:
start slave ;
检验 show slave status \G
主要观察: Slave_IO_Running和 Slave_SQL_Running,确保二者都是yes;
如果不都是yes,则看下方的 Last_IO_Error。
本次 通过 Last_IO_Error发现错误的原因是 主从使用了相同的server-id, 检查:在主从中分别查看serverid: show variables like ‘server_id’ ;
可以发现,在Linux中的my.cnf中设置了server-id=2,但实际执行时 确实server-id=1,原因:可能是 linux版Mysql的一个bug,也可能是 windows和Linux版本不一致造成的兼容性问题。
解决改bug: set global server_id =2 ;
stop slave ;
 set global server_id =2 ;
start slave ;
 show slave status \G
4.演示:
主windows =>从
windows:
将表,插入数据
观察从数据库中该表的数据