Sentinel是什么?Redis高可用是什么?参考博文:Redis - 主从复制那些事与高可用sentinel 和深入学习Redis高可用之Sentinel相关概念。
本篇博文分享的是一主二从三哨兵模式。至于为什么用三个哨兵,同第一段。本文是模拟环境,都是一个服务器上面。
【1】POM文件和配置
① pom文件
<parent>
<groupId>org.springframework.boot</groupId>
	<artifactId>spring-boot-starter-parent</artifactId>
	<version>2.1.1.RELEASE</version>
	<relativePath/> <!-- lookup parent from repository -->
</parent>
<groupId>com.boot.redis</groupId>
<artifactId>boot-redis</artifactId>
<version>0.0.1-SNAPSHOT</version>
<name>boot-redis</name>
<description>Demo project for Spring Boot</description>

<properties>
	<java.version>1.8</java.version>
</properties>

<dependencies>
	<dependency>
		<groupId>org.springframework.boot</groupId>
		<artifactId>spring-boot-starter-data-redis</artifactId>
		<exclusions>
			<exclusion>
				<groupId>redis.clients</groupId>
				<artifactId>jedis</artifactId>
			</exclusion>
			<exclusion>
				<groupId>io.lettuce</groupId>
				<artifactId>lettuce-core</artifactId>
			</exclusion>
		</exclusions>
	</dependency>
	<dependency>
		<groupId>org.springframework.boot</groupId>
		<artifactId>spring-boot-starter-web</artifactId>
	</dependency>
	<dependency>
		<groupId>redis.clients</groupId>
		<artifactId>jedis</artifactId>
	</dependency>

	<dependency>
		<groupId>org.springframework.boot</groupId>
		<artifactId>spring-boot-starter-test</artifactId>
		<scope>test</scope>
	</dependency>
	<dependency>
		<groupId>org.apache.commons</groupId>
		<artifactId>commons-pool2</artifactId>
		<version>2.5.0</version>
		<!--<version>2.4.2</version>-->
	</dependency>
</dependencies>
② yml简单配置
spring:
  redis:
    host: 192.168.2.110 #哨兵模式下不用配置
    port: 6379 # 哨兵模式下不用配置
    password: admin
    jedis:
      pool:
        #最大连接数
        max-active: 1024
        #最大阻塞等待时间(负数表示没限制)
        max-wait: 20000
        #最大空闲
        max-idle: 200
        #最小空闲
        min-idle: 10
    sentinel:
      master: mymaster
      nodes: 192.168.2.110:26379,192.168.2.110:26380,192.168.2.110:26381
server:
  port: 8088
至于客户端使用jedis或者lettuce等相关详细配置,这里回头更新。本文重点不在这里。
③ redis服务配置
6379.conf(默认为master):
port 6379
masterauth admin
requirepass admin
protected-mode yes
# 服务器ip地址
bind 192.168.2.110
6380配置(slave):
port 6380
masterauth admin
requirepass admin
protected-mode yes
# 服务器ip地址
bind 192.168.2.110
slaveof 192.168.2.110 6379
6381同6380,只是端口不一致。若找不到在redis.conf中对应位置,博文末尾GitHub中已经提交相关配置。
④ 哨兵配置
sentinel.conf(默认端口26379):
port 26379
sentinel monitor mymaster 192.168.2.110 6379 2
sentinel auth-pass mymaster admin
sentinel down-after-milliseconds mymaster 15000
sentinel parallel-syncs mymaster 1
sentinel failover-timeout mymaster 80000
bind 192.168.2.110
protected-mode yes
其他两个哨兵配置文件类似,只是需要修改一下端口分别为26380和26381。
⑤ RedisConfig类
@Configuration
@EnableAutoConfiguration
public class RedisConfig {
    private static Logger logger = LoggerFactory.getLogger(RedisConfig.class);

    @Value("#{'${spring.redis.sentinel.nodes}'.split(',')}")
    private List<String> nodes;

    @Bean
    @ConfigurationProperties(prefix="spring.redis")
    public JedisPoolConfig getRedisConfig(){
        JedisPoolConfig config = new JedisPoolConfig();
        return config;
    }
    @Bean
    public RedisSentinelConfiguration sentinelConfiguration(){
        RedisSentinelConfiguration redisSentinelConfiguration = new RedisSentinelConfiguration();
        //配置matser的名称
        redisSentinelConfiguration.master("mymaster");
        //配置redis的哨兵sentinel
        Set<RedisNode> redisNodeSet = new HashSet<>();
        nodes.forEach(x->{
            redisNodeSet.add(new RedisNode(x.split(":")[0],Integer.parseInt(x.split(":")[1])));
        });
        logger.info("redisNodeSet -->"+redisNodeSet);
        redisSentinelConfiguration.setSentinels(redisNodeSet);
        return redisSentinelConfiguration;
    }

    @Bean
    public JedisConnectionFactory jedisConnectionFactory(JedisPoolConfig jedisPoolConfig,RedisSentinelConfiguration sentinelConfig) {
        JedisConnectionFactory jedisConnectionFactory = new JedisConnectionFactory(sentinelConfig,jedisPoolConfig);
        return jedisConnectionFactory;
    }

}
然后在服务器依次启动redis服务6379、6380、6381和哨兵服务26379/26380以及26381。
此时可以通过命令窗口查看主从以及哨兵状况,可以使用命令进行主从切换,查看哨兵选举。
另外将项目打包放到服务器运行,查看当master挂掉时,SpringBoot所获取到的信息与转变。
【2】几点说明
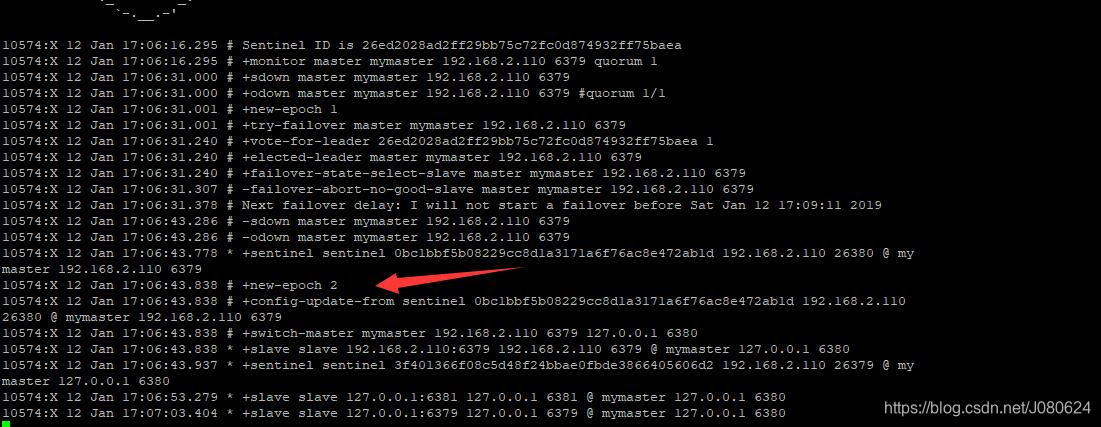
① 哨兵之间通信
哨兵启动后,相互之间是保持通信的:

如下所示,一个哨兵挂掉重启后将会从其他哨兵获取最新信息:
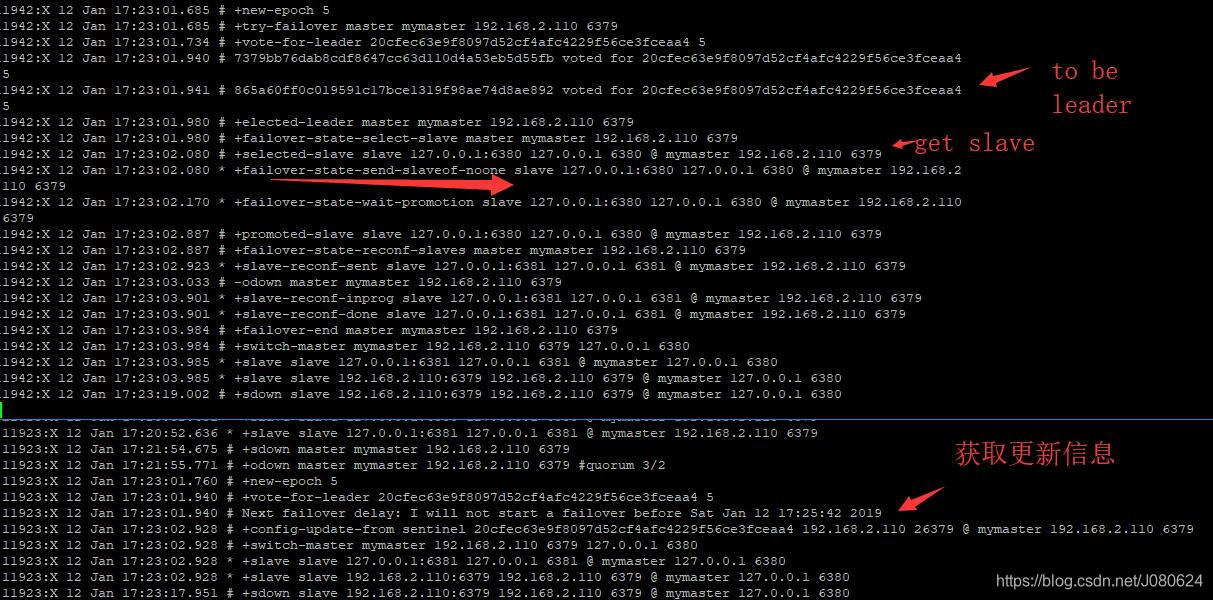
② 当master挂掉之后,三个哨兵需要选举出来一个leader进行主从转移
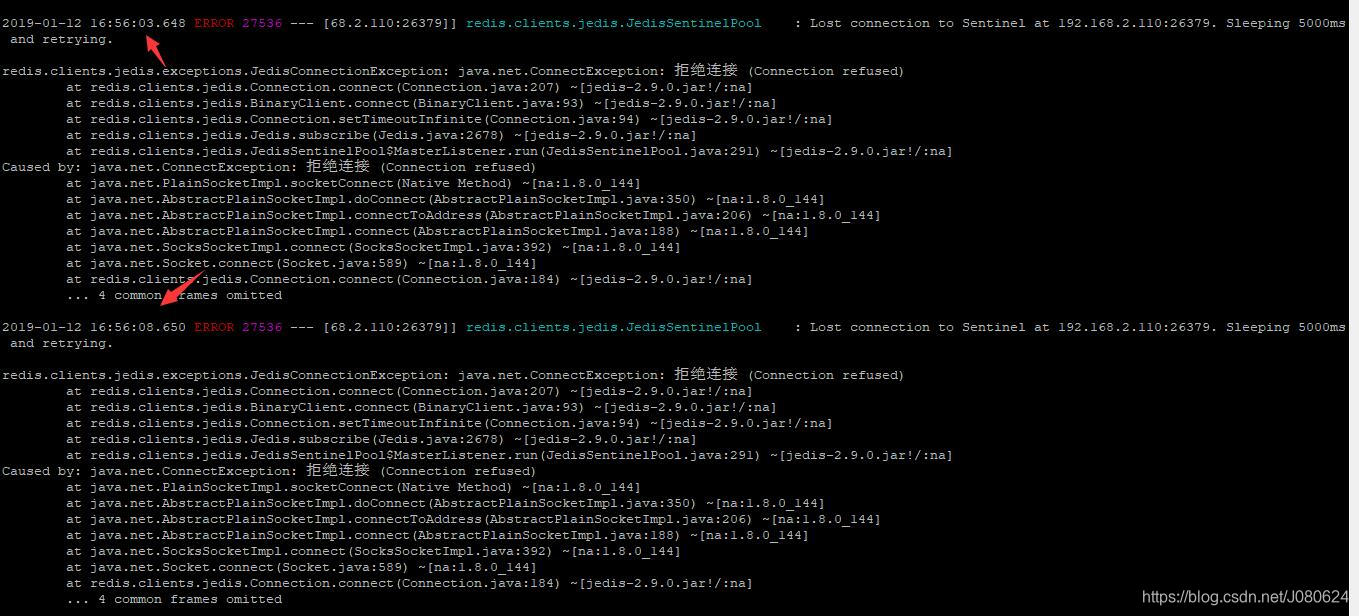
③ 如果哨兵挂掉,则MasterListener将会隔5秒重试
④ 如果master挂掉,MasterListener将会通过Sentinel获取最新的master信息并重置JedisSentinelPool

所以不用担心master挂掉,SpringBoot会怎么办。有MasterListener在,一切OK。
⑤ 哨兵配置动态修改
哨兵启动后,配置文件是会被动态改变的,如下所示:
port 26379
sentinel myid 8ac857af0b63edc73e07cce9c11462eef047704d
sentinel monitor mymaster 127.0.0.1 6380 2
sentinel down-after-milliseconds mymaster 15000
sentinel failover-timeout mymaster 80000
sentinel auth-pass mymaster admin
bind 192.168.2.110
protected-mode yes
# Generated by CONFIG REWRITE
dir "/root"
sentinel config-epoch mymaster 1
sentinel leader-epoch mymaster 1
sentinel known-slave mymaster 192.168.2.110 6379
sentinel known-slave mymaster 127.0.0.1 6381
sentinel known-sentinel mymaster 192.168.2.110 26381 b3d9ee9efae47556349a733ed668385d8083b5cc
sentinel known-sentinel mymaster 192.168.2.110 26380 e7a100d97d70834ea3b117cf23a4b08f7a46b425
sentinel current-epoch 1
【3】几个类
这里面有几个类十分重要 ,建议查看源码跟踪一番。
① JedisConnectionFactory
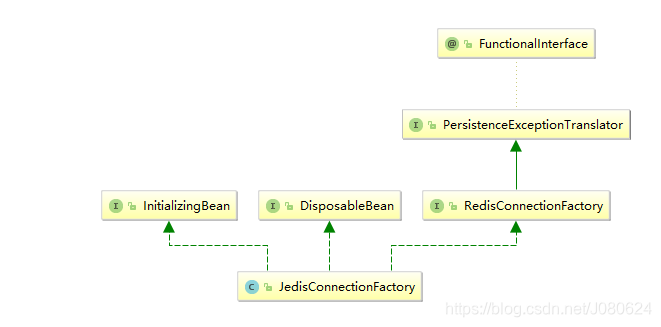
时序图如下:

重点在步骤12中,MasterListener继承了Thread,它是个单独的线程,通过Jedis监听Redis的哨兵,如果收到master改变的消息,那么会修改JedisFactory。
如下图所示是MasterListener收到master节点变化的消息:
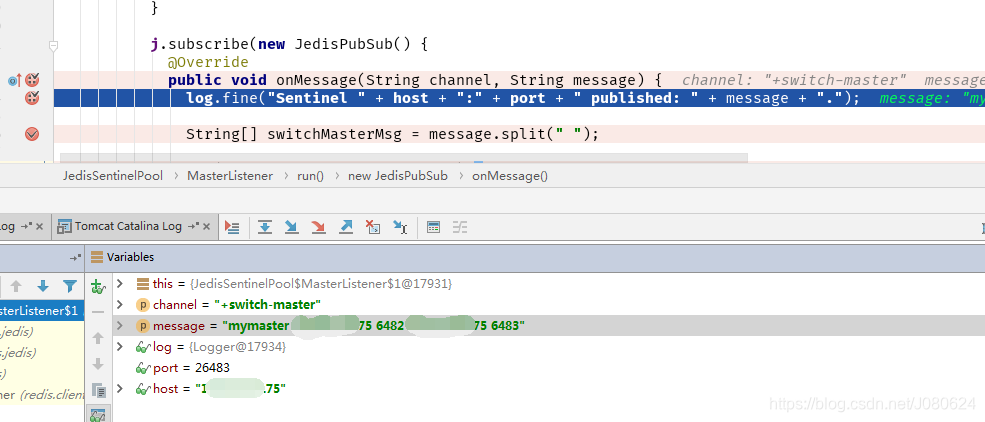
想要debug跟踪源码的同学可以在下图处打上断点:

② JedisSentinelPool
其构造方法如下:
  public JedisSentinelPool(String masterName, Set<String> sentinels,
      final GenericObjectPoolConfig poolConfig, final int connectionTimeout, final int soTimeout,
      final String password, final int database, final String clientName) {
    this.poolConfig = poolConfig;
    this.connectionTimeout = connectionTimeout;
    this.soTimeout = soTimeout;
    this.password = password;
    this.database = database;
    this.clientName = clientName;

    HostAndPort master = initSentinels(sentinels, masterName);
    initPool(master);
  }
其中initSentinels(sentinels, masterName)就是根据哨兵和master名字来获取master的信息–host和port。然后根据获取的maser来初始化pool(所以yml中不用配置spring.redis.host和spring.redis.port)。
从应用启动也可以看到这一点:

获取HostAndPort master方法如下所示:
private HostAndPort initSentinels(Set<String> sentinels, final String masterName) {

    HostAndPort master = null;
    boolean sentinelAvailable = false;

    log.info("Trying to find master from available Sentinels...");
//遍历sentinels,获取master,然后基于该master创建pool
    for (String sentinel : sentinels) {
      final HostAndPort hap = HostAndPort.parseString(sentinel);

      log.fine("Connecting to Sentinel " + hap);

      Jedis jedis = null;
      try {
        jedis = new Jedis(hap.getHost(), hap.getPort());
//根据哨兵的host port 以及masterName获取masterAddr
        List<String> masterAddr = jedis.sentinelGetMasterAddrByName(masterName);

        // connected to sentinel...
        sentinelAvailable = true;

        if (masterAddr == null || masterAddr.size() != 2) {
          log.warning("Can not get master addr, master name: " + masterName + ". Sentinel: " + hap
              + ".");
          continue;
        }
//转换格式
        master = toHostAndPort(masterAddr);
        log.fine("Found Redis master at " + master);
        break;
      } catch (JedisException e) {
        // resolves #1036, it should handle JedisException there's another chance
        // of raising JedisDataException
        log.warning("Cannot get master address from sentinel running @ " + hap + ". Reason: " + e
            + ". Trying next one.");
      } finally {
        if (jedis != null) {
          jedis.close();
        }
      }
    }

    if (master == null) {
      if (sentinelAvailable) {
        // can connect to sentinel, but master name seems to not
        // monitored
        throw new JedisException("Can connect to sentinel, but " + masterName
            + " seems to be not monitored...");
      } else {
        throw new JedisConnectionException("All sentinels down, cannot determine where is "
            + masterName + " master is running...");
      }
    }

    log.info("Redis master running at " + master + ", starting Sentinel listeners...");
//如下,启动每个哨兵的监听
    for (String sentinel : sentinels) {
      final HostAndPort hap = HostAndPort.parseString(sentinel);
      MasterListener masterListener = new MasterListener(masterName, hap.getHost(), hap.getPort());
      // whether MasterListener threads are alive or not, process can be stopped
      masterListener.setDaemon(true);
      masterListeners.add(masterListener);
      masterListener.start();
    }

    return master;
  }
初始化pool的方法如下所示:
private void initPool(HostAndPort master) {
    if (!master.equals(currentHostMaster)) {
      currentHostMaster = master;
      //判断JedisFactory是否为null,为null则使用master创建
      if (factory == null) {
        factory = new JedisFactory(master.getHost(), master.getPort(), connectionTimeout,
            soTimeout, password, database, clientName, false, null, null, null);
        initPool(poolConfig, factory);
      } else {
        factory.setHostAndPort(currentHostMaster);
        // although we clear the pool, we still have to check the
        // returned object
        // in getResource, this call only clears idle instances, not
        // borrowed instances
        internalPool.clear();
      }

      log.info("Created JedisPool to master at " + master);
    }
  }
③ MasterListener
MasterListener 是一个继承自Thread 的线程类,用来监听哨兵的master改变信息。 收到master改变的消息后,调用initPool方法修改JedisFactory,进而会影响connection的获取。
protected class MasterListener extends Thread {

    protected String masterName;
    protected String host;
    protected int port;
    protected long subscribeRetryWaitTimeMillis = 5000;
    protected volatile Jedis j;
    protected AtomicBoolean running = new AtomicBoolean(false);

    protected MasterListener() {
    }

    public MasterListener(String masterName, String host, int port) {
      super(String.format("MasterListener-%s-[%s:%d]", masterName, host, port));
      this.masterName = masterName;
      this.host = host;
      this.port = port;
    }

    public MasterListener(String masterName, String host, int port,
        long subscribeRetryWaitTimeMillis) {
      this(masterName, host, port);
      this.subscribeRetryWaitTimeMillis = subscribeRetryWaitTimeMillis;
    }

//主要功能如下
    @Override
    public void run() {

      running.set(true);

      while (running.get()) {
//拿到一个Jedis
        j = new Jedis(host, port);

        try {
          // double check that it is not being shutdown
          if (!running.get()) {
            break;
          }
//发布订阅模式
          j.subscribe(new JedisPubSub() {
            @Override
            public void onMessage(String channel, String message) {
              log.fine("Sentinel " + host + ":" + port + " published: " + message + ".");

              String[] switchMasterMsg = message.split(" ");

              if (switchMasterMsg.length > 3) {

                if (masterName.equals(switchMasterMsg[0])) {
                //这里,重置initPool
                  initPool(toHostAndPort(Arrays.asList(switchMasterMsg[3], switchMasterMsg[4])));
                } else {
                  log.fine("Ignoring message on +switch-master for master name "
                      + switchMasterMsg[0] + ", our master name is " + masterName);
                }

              } else {
                log.severe("Invalid message received on Sentinel " + host + ":" + port
                    + " on channel +switch-master: " + message);
              }
            }
          }, "+switch-master");

        } catch (JedisConnectionException e) {

          if (running.get()) {
            log.log(Level.SEVERE, "Lost connection to Sentinel at " + host + ":" + port
                + ". Sleeping 5000ms and retrying.", e);
            try {
              Thread.sleep(subscribeRetryWaitTimeMillis);
            } catch (InterruptedException e1) {
              log.log(Level.SEVERE, "Sleep interrupted: ", e1);
            }
          } else {
            log.fine("Unsubscribing from Sentinel at " + host + ":" + port);
          }
        } finally {
          j.close();
        }
      }
    }

    public void shutdown() {
      try {
        log.fine("Shutting down listener on " + host + ":" + port);
        running.set(false);
        // This isn't good, the Jedis object is not thread safe
        if (j != null) {
          j.disconnect();
        }
      } catch (Exception e) {
        log.log(Level.SEVERE, "Caught exception while shutting down: ", e);
      }
    }
  }
参考博文:
Redis - 主从复制那些事与高可用sentinel
深入学习Redis高可用之Sentinel相关概念
SpringBoot2.0整合Redis
Redis - 发布订阅机制详解
GitHub地址:https://github.com/JanusJ/SpringBoot