多线程编程
线程的概念
多线程简介
进程和线程的概念
在计算机中一个任务就是一个进程(例如:浏览器、视频播放器、音频播放器、Word),在某些进程内部还需要同时执行多个子任务(例如在Word进程中可能会执行打字、拼写检查、打印等子任务 ==>线程)
进程和线程的区别
1)一个进程可以包含一个或多个线程(至少一个线程)
2)线程是操作系统调度的最小任务单位
3)如何调度线程完全由操作系统决定
实现多任务的方法:
1)多进程模式(每个进程只有一个线程)
2)多线程模式(一个进程多个线程)
3)多进程+多线程模式(复杂度高)
多进程 VS 多线程
1)创建进程比创建线程开销大
2)进程间通信比线程间通信慢
3)多进程稳定性比线程高
Java语言内置多线程支持
1)一个Java程序实际上是一个JVM进程
2)JVM用一个主线程来执行main()方法
3)在main()方法中又可以启动多个线程
多线程编程的特点
1)多线程需要读写共享数据
2)多线程经常需要同步
3)多线程编程的复杂度高,调试更困难
Java多线程编程的特点
1)多线程模型是Java程序最基本的并发模型
2)网络、数据库、Web都依赖多线程模型
3)必须掌握Java多线程编程才能继续深入学习
创建新线程
继承Thread
1)继承Thread
2)覆写run()方法
3)创建MyThread实例
4)调用start()启动线程
public class MyThread extends Thread{
	public void run(){
		System.out.println()
	}
}
public class Main{
	public static void main(String[] args){
		Thread t = new MyThread();
		t.start();
	}
}
实现Runnable接口

如果一个类已经从某个类派生,无法从Thread继承,我们就可以实现Runnable接口来创建线程
1)实现Runnable接口
2)覆写run()方法
3)在main()方法中创建Runnable实例
4)创建Thread实例并传入Runnable
5)调用start()启动线程
public class MyThread implements Runnable{
	public void run(){
		System.out.println();
	}
}
public class Main{
	public static void main(String[] args){
		Runnable r = new MyThread();
		Thread t = new Thread(r);
		t.start();
	}
}
直接调用run()方法是无效的,必须调用start()方法才能启动新线程
// 查看Thread源码
public class Thread implements Runnable{
	public synchronized void start(){
		start0();
	}
	private native void start0();//JVM 内部的C语言实现的
	...
}
Thread.sleep()可以把当前线程暂停一段时间
线程的优先级:
1)可以对线程设定优先级——Thread.setPriority(int n)  // 1~10 默认值5
2)优先级高的线程被操作系统调度的优先级高
3)不能通过设置优先级来确保功能的执行顺序
线程状态
一个线程对象只能调用一次start(),线程的执行代码是run()方法,线程调度由操作系统决定,程序本身无法决定
Java线程对象Thread的状态包括:
1)New(新创建)
2)Runnable(运行中)
3)Blocked(被阻塞)
4)Waiting(等待)
5)Timed Waiting(计时等待)
6)Terminated(已终止)
线程终止的原因
1)run()方法执行到return语句返回(线程正常终止)
2)因为未捕获的异常导致线程终止(线程意外终止)
3)对某个线程的Thread实例调用stop()方法强制终止(不推荐)
通过对另一个线程对象调用join()方法可以等待其执行结束
public class MyThread extends Thread{
	public void run(){
		System.out.println("Hello");
	}
}
public class Main{
	public static void main(String[] args){
		Thread t = new MyThread();
		System.out.println("Start");
		t.start();
		t.join(); // 等待线程t执行结束
		System.out.println("End");
	}
}
// 输出结果:Start    Hello		End
可以指定等待时间,超过时间线程仍然没有结束就不再等待
对已经运行结束的线程调用join()方法会立即返回
join练习
创建3个线程,每个线程先打印
Hello, xxx!
然后等待1秒,再打印
Goodbye, xxx!
输出例如:
START
Hello, Bob!
Hello, Alice!
Hello, Tom!
(等待约1秒)
Goodbye, Bob!
Goodbye, Alice!
Goodbye, Tom!
END
public class HelloThread extends Thread{
	String name;
	public HelloThread(String name){
		this.name = name;
	}
	@Override
	public void run(){
		System.out.println("Hello, " + name + "!");
		try {
			Thread.sleep(1000);
		} catch (Exception e) {
			e.printStackTrace();
		}
		System.out.println("Goodbye, " + name + "!");
	}
}
public class Main {
	public static void main(String[] args) throws InterruptedException {
		List<Thread> thList = new ArrayList<>();
		for(String name : Arrays.asList("Bob", "Alice", "Tom")){
			thList.add(new HelloThread(name));
		}
		System.out.println("START");
		for(Thread t : thList){
			t.start();
		}
		for(Thread t : thList){
			t.join();
		}
		System.out.println("END");
	}
}
中断线程
如果线程需要执行一个长时间任务,就可能需要中断线程。中断线程就是其他线程给该线程发一个信号,该线程收到信号后结束执行run()方法。
中断线程需要通过检测isInterrupted()标志获取当前线程是否已中断,而其他线程通过调用interrupt()方法可以中断一个线程。
class HelloThread extends Thread{
	public void run(){
		while(!isInterrupted()){
			// doSomething...
		}
	}
}
public class Main{
	public static void main(String[] args){
		Thread t = HelloThread();
		t.start();
		Thread.sleep(1000);
		t.interrupt(); // 中断t线程
	}
}
如果线程处于等待状态,该线程会捕获InterruptedException;捕获InterruptedException说明有其他线程对其调用了interrupt()方法,通常情况下该线程应该立即结束运行。
还可以通过设置running标志位,例如
class HelloThread extends Thread{
	public volatile boolean running = true;
	public void run(){
		while(running){
			// doSomething...
		}
	}
}
public class Main{
	public static void main(String[] args){
		Thread t = new HelloThread();
		t.start();
		Thread.sleep(1000);
		t.running = false;
	}
}
// 当run()方法中的while循环检测到running值为false时,就会终止调循环,从而结束run()方法。
volatile
线程间共享变量需要使用volatile关键字标记,确保线程能读取到更新后的变量值

在Java内存模型中,变量存储在主内存中。但是当线程访问该变量时,会先复制一个变量副本,并且保存在自己的工作内存中。如果线程修改变量的值,虚拟机会在某一时刻把该值修改到主内存,但是这个时间是不确定的。这样就会导致,一个线程修改了变量的值,而另一个线程读取到的值还是之前的值。
volatile关键字的目的是告诉虚拟机
1)每次访问变量时,总是获取主内存的最新值
2)每次修改变量后,立刻回写到主内存
因此volatile关键字解决了共享变量在线程间的可见性问题,当一个线程修改了某个变量的值,其他线程能够立刻获取到修改后的值
守护线程
Java程序入口就是由JVM启动main线程,main线程又可以启动其他线程,当所有线程都运行结束时,JVM退出,进程结束。
但是有一种线程目的就是无限循环,例如:定时任务
Q:如果某个线程不结束,JVM进程就无法结束,那么由谁来结束该线程?
A:守护线程
守护线程(Daemon)
守护线程是为其他线程服务的线程,所有非守护线程都执行完毕后,虚拟机退出
守护线程特点
不能持有资源(如打开文件等)
创建守护线程:setDaemon(true)
class TimerThread extends Thread {
	@Override
	public void run() {
		while (true) {
			System.out.println(LocalTime.now().format(DateTimeFormatter.ofPattern("HH:mm:ss")));
			try {
				Thread.sleep(1000);
			} catch (InterruptedException e) {
				break;
			}
		}
	}
}
public class Main {
	public static void main(String[] args) throws InterruptedException {
		System.out.println("Main start");
		TimerThread t = new TimerThread();
		t.setDaemon(true); // 将线程t设置为守护线程
		t.start();
		Thread.sleep(5000);
		System.out.println("Main end");
	}
}
//Main start
//22:38:02
//22:38:03
//22:38:04
//22:38:05
//22:38:06
//Main end
// t设置为守护线程后,主线程结束,t线程也会随之结束
线程同步
线程同步
多线程同时修改变量,会造成逻辑错误,例如
// 我们启动两个线程分别对同一个变量count加减10000次,希望输出结果是0
class AddThread extends Thread{
	public void run(){
		for(int i=0; i<Main.LOOP; i++){
			Main.count += 1;
		}
	}
}
class DecThread extends Thread{
	public void run(){
		for(int i=0; i<Main.LOOP; i++){
			Main.count -= 1;
		}
	}
}
public class Main {
	final static int LOOP = 10000;
	public static int count = 0;
	public static void main(String[] args) throws InterruptedException {
		Thread t1 = new AddThread();
		Thread t2 = new DecThread();
		t1.start();
		t2.start();
		t1.join();
		t2.join();
		System.out.println(count);
	}
}
// 实际输出结果是不确定的
对共享变量进行写入时,必须保证是原子操作(是指不能被中断的一个或一系列操作)
对于n = n + 1,它的字节码指令是
iload
iadd
istore
是三条指令,并不是原子操作的
要实现原子操作,就需要对 iload 之前进行加锁和 istore 之后进行解锁
Java通过synchronized对一个对象进行加锁
synchronized(lock){
	n = n + 1;
}
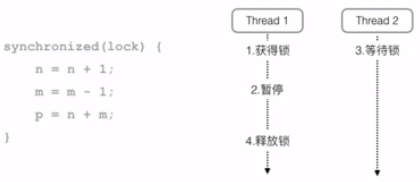
synchronized保证了代码块在任意时刻最多只有一个线程能执行,synchronized的问题是性能下降,加锁和解锁都会损耗性能
如何使用synchronized:
1)找出修改共享变量的线程代码块
2)选择一个实例作为锁
3)使用synchronized(lockObject){ ... }
同步的本质就是给指定对象加锁,注意加锁对象必须是同一个实例
public class Main {
	final static int LOOP = 10000;
	public static int count = 0;
	public static final Object LOCK = new Object();

	public static void main(String[] args) throws InterruptedException {
		Thread t1 = new AddThread();
		Thread t2 = new DecThread();
		t1.start();
		t2.start();
		t1.join();
		t2.join();
		System.out.println(count);
	}
}
class AddThread extends Thread{
	public void run(){
		for(int i=0; i<Main.LOOP; i++){
			synchronized(Main.LOCK){
				Main.count += 1;
			}
		}
	}
}
class DecThread extends Thread{
	public void run(){
		for(int i=0; i<Main.LOOP; i++){
			synchronized(Main.LOCK){
				Main.count -= 1;
			}
		}
	}
}
// 这样我们得到的结果是0
对JVM定义的单个原子操作不需要同步,局部变量也不需要同步(各个线程的局部变量是完全独立的)
1)基本类型(long和double除外)赋值:int n = 100;
2)引用类型赋值:List<String> list = anotherList;
synchronized方法
用synchronized修饰方法可以把整个方法变为同步代码块
数据封装:把同步逻辑封装到持有数据的实例中
class Counter {
	int count = 0;
	public void add(int n){
		synchronized (this) {
			count += n;
		}
	}
	public void dec(int n){
		synchronized (this) {
			count -= n;
		}
	}
	public int get(){
		return count;
	}
}
等价于
class Counter {
	int count = 0;
	public synchronized void add(int n){
		count += n;
	}
	public synchronized void dec(int n){
		count -= n;
	}
	public int get(){
		return count;
	}
}
但是当synchronized 方法内部有一些语句并是在是 synchronized (this) 代码块中,那么这两种写法就不等价了。
静态方法锁住的是Class实例
public class A{
	static count;
	static synchronized void add(int n){
		count += n;
	}
}
// 等价于
public class A{
	static count;
	static void add(int n){
		synchronized(A.class){
			count += n;
		}
	}
}
通过合理的设计和数据封装可以让一个类变为“线程安全”,一个类没有特殊说明,默认不是线程安全的(thread-safe),线程安全的类:
1)不变类:String,Integer,LocalDate
2)没有成员变量的类:Math
3)正确使用synchronized的类:StringBuffer
非线程安全的类:
1)不能在多线程中共享实例并修改:ArrayList
2)可以在多线程中以只读方式共享
多线程能否访问某个非线程安全的实例,需要具体问题具体分析
死锁
Java的线程索是可重入的锁,例如
// 同一个对象同一个线程可以多次获取同一个锁
public void add(int m){
	synchronized(lock){
		this.value += m;
		synchronized(lock){
			this.another += m;
		}
	}
}
Java的线程还可以获取多个不同对象的锁
public void add(int m){
	synchronized(lockA){// 获取lockA的锁
		this.value += m;
		synchronized(lockB){// 获取lockB的锁
			this.another += m;
		}// 释放lockB的锁
	}// 释放lockA的锁
}
死锁产生的条件:
多线程各持有不同的锁,并互相试图获取对方已持有的锁,双方无限等待下去,就导致死锁,例如:
public class Main {
	private Object lock1 = new Object();
	private Object lock2 = new Object();
	public String deadlock(){
		new Thread(() -> {
		    synchronized (lock1){
		        try{
		        	System.out.println("Thread1 running");
		            Thread.sleep(1000);
		        }catch (Exception e){}
		        synchronized (lock2){
		            System.out.println("Thread1 over");
		        }
		    }
		}).start();
		new Thread(() -> {
		    synchronized (lock2){
		        try{
		        	System.out.println("Thread2 running");
		            Thread.sleep(1000);
		        }catch (Exception e){}
		        synchronized (lock1){
		            System.out.println("Thread2 over");
		        }
		    }
		}).start();
		return "deadlock";
	}
	public static void main(String[] args) {
		new Main().deadlock();
	}
}
死锁发生后,没有任何机制能解除死锁,只能强制结束JVM进程
如果避免死锁:
多线程获取锁的顺序要一致
wait和notify
wait和notify用于多线程协调运行:当条件不满足时,线程进入等待状态
public synchronized String getTask(){
	while(queue.isEmpty()){
		this.wait();
	}
	return queue.remove();
}
wait
wait()方法不是一个普通的方法,它是在JVM虚拟机层面实现的 native 方法,只有在synchronized内部可以调用wait()使线程进入等待状态,必须在已获得的锁对象上调用wait()方法
notify
用于唤醒等待状态的线程

在synchronized内部可以调用notify()、notifyAll()唤醒其他等待线程
必须在已获得的锁对象上调用notify()、notifyAll()方法
class TaskQueue {
	final Queue<String> queue = new LinkedList<>();
	public synchronized String getTask() throws InterruptedException {
		while(this.queue.isEmpty()){
			this.wait();
		}
		return queue.remove();
	}
	public synchronized void addTask(String name){
		this.queue.add(name);
		this.notifyAll();
		// notifyAll:唤醒所有等待的线程,notify只是唤醒某一个线程
	}
}
class WorkerThread extends Thread{
	TaskQueue taskQueue;
	public WorkerThread(TaskQueue taskQueue){
		this.taskQueue = taskQueue;
	}
	public void run(){
		while(!isInterrupted()){
			String name;
			try {
				name = taskQueue.getTask();
			} catch (InterruptedException e) {
				break;
			}
			String result = "Hello, " + name + "!";
			System.out.println(result);
		}
	}
}
public class Main {
	public static void main(String[] args) throws Exception{
		TaskQueue taskQueue = new TaskQueue();
		WorkerThread worker = new WorkerThread(taskQueue);
		worker.start();
		// add task;
		taskQueue.addTask("Bob");
		Thread.sleep(1000);
		taskQueue.addTask("Alice");
		Thread.sleep(1000);
		taskQueue.addTask("Tom");
		Thread.sleep(1000);
		worker.interrupt();
		worker.join();
		System.out.println("END");
	}
}
// Hello, Bob!
// Hello, Alice!
// Hello, Tom!
// END
// 该程序可以用于后台顺序下载功能
高级Concurrent包
ReentrantLock
线程同步:多线程读写竞争资源需要同步,Java语言提供了synchronized / wait / notify,但是编写多线程同步还是比较困难。因此,Java(JDK>=1.5)提供更高级的java.util.concurrent包,具有更加高级的同步功能,简化多线程程序的编写。
ReentrantLock可以替代synchronized,ReentrantLock获取锁更安全
class Counter{
	final Lock lock = new ReentrantLock();
	public void run(){
		lock.lock();
		try{
			n = n + 1;
		}finally{
			lock.unlock();
		}
	}
}
ReentrantLock也是可重入锁,一个线程可多次获取同一个锁;lock()方法可获取锁;必须使用try…finally保证正确获取和释放锁;tryLock()方法可以尝试获取锁并可指定超时时间。
class Counter{
	final Lock lock = new ReentrantLock();
	public void run(){
		if(lcok.tryLock(1, TimeUnit.SECONDS)){
			try{
				n = n + 1;
			}finally{
				lock.unlock();
			}
		}
	}
}
ReadWriteLock
使用ReadWriteLock可以提高读取效率
1)ReadWriteLock只允许一个线程写入
2)ReadWriteLock允许多个线程同时读取
3)ReadWriteLock适合读多写少的场景
ReadWriteLock适用条件:同一个实例,有大量线程读取,仅有少数线程修改
class Counter{
	final ReadWriteLock lock = new ReentrantReadWriteLock();
	final Lock rLock = lock.readLock();
	final Lock wLock = lock.writeLock();
	public void inc(){ // 只允许一个线程写入
		wLock.lock();
		try{
			value += 1;
		}finally{
			wLock.unlcok();
		}
	}
	public int get(){ // 多个线程同时读取
		rLock.lock();
		try{
			return value;
		}finally{
			rLock.unlcok();
		}
	}
}
Condition
Condition可以替代wait / notify
Condition对象必须从ReentrantLock对象获取
class TaskQueue{
	final Queue<String> queue = new LinkedList<>();
	final Lock lock = new ReentrantLock();
	final Condition notEmpty = lock.newCondition();
	public String getTask(){
		lock.lock();
		try{
			while(this.queue.isEmpty()){
				notEmpty.await(); // 等价于在synchronized中使用wait()方法
			}
		}finally{
			lock.unlock();
		}
	}
	public void addTask(String name){
		lock.lock();
		try{
			this.queue.add(name);
			notEmpty.signalAll(); // 等价于在synchronized中使用notifyAll()方法
		}finally{
			lock.unlock();
		}
	}
}
ReentrantLock +Condition可以替代synchronized+wait / notify
Condition.await / signal / signalAll 原理和 wait / notify / notifyAll一致
await()会释放当前锁,进入等待状态
signal()会唤醒某个等待线程
signalAll()会唤醒所有等待线程
唤醒线程从await()返回后需要重新获得锁
Concurrent集合
使用java.util.concurrent提供的Blocking集合可以简化多线程编程:
| Interface | Non-thread safe | Thread safe |
|---|---|---|
| List | ArrayList | CopyOnWriteArrayList |
| Map | HashMap | ConcurrentHashMap |
| Set | HashSet、TreeSet | CopyOnWriteArraySet |
| Queue | ArrayQueue、LinkedList | ArrayBlockingQueue、LinkedBlockingQueue |
| Deque | ArrayDeque、LinkedList | LinkedBlockingDeque |
多线程同时访问Blocking集合是安全的
尽量使用JDK提供的concurrent集合,避免自己编写同步代码
class WorkerThread extends Thread {
	BlockingQueue<String> taskQueue;
	public WorkerThread(BlockingQueue<String> taskQueue){
		this.taskQueue = taskQueue;
	}
	public void run(){
		while(!isInterrupted()){
			String name;
			try {
				name = taskQueue.take();
			} catch (InterruptedException e) {
				break;
			}
			String result = "Hello, " + name + "!";
			System.out.println(result);
		}
	}
}
public class Main {
	public static void main(String[] args) throws Exception {
		BlockingQueue<String> taskQueue = new ArrayBlockingQueue<>(100);
		WorkerThread worker = new WorkerThread(taskQueue);
		worker.start();
		taskQueue.put("Bob");
		Thread.sleep(1000);
		taskQueue.put("Alice");
		Thread.sleep(1000);
		taskQueue.put("Tom");
		Thread.sleep(1000);
		worker.interrupt();
		worker.join();
		System.out.println("END");
	}
}
java.util.Collections工具类还提供了旧的线程安全集合转换器:
Map unsafeMap = new HashMap();
Map threadSafeMap = Collections.synchronizedMap(unsafeMap);
// 实际是做了一层包装,性能没有Concurrent提供的集合性能好,不推荐使用
Atomic
使用 java.util.atomic 提供的原子操作可以简化多线程编程:
AtomicInteger / AtomicLong / AtomicIntegerArray等
// 例如:AtomicInteger
int addAndGet(int delta)
int incrementAndGet()
int get()
int compareAndSet(int expect, int update)
原子操作实现了无锁(lock-free)的线程安全(thread-safe)访问
适用于计算器,累加器等
class IdGenerator{
	AtomicLong var = new AtomicLong(0);
	// 多线程安全的ID序列生成器
	public long getNextId(){
		return var.incrementAndGet();
	}
}
class Counter{
	private AtomicInteger value = new AtomicInteger(0);
	public int add(int m){
		return this.value.addAndGet(m);
	}
	public int dec(int m){
		return this.value.addAndGet(-m);
	}
	public int get(){
		return this.value.get();
	}
}
ExecutorService
Java语言内置多语言支持,创建线程需要操作系统资源(线程资源,栈空间…),频繁创建和销毁线程需要消耗大量时间。
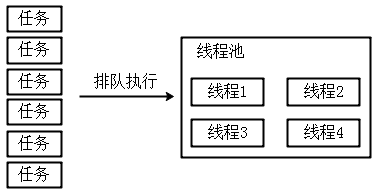
线程池:
1)线程池维护若干个线程,处于等待状态
2)如果有新任务,就分配一个空闲线程执行
3)如果所有线程都处于忙碌状态,新任务放入队列等待
JDK提供了ExecutorService实现了线程池功能
ExecutorService executor = Executors.newFixedThreadPool(4); // 固定大小的线程池
executor.submit(task1);
executor.submit(task2);
executor.submit(task3);
...
线程池内部维护一组线程,可以高效执行大量小任务
Exectors提供了静态方法创建不同类型的ExecutorService
常用的ExecutorService:
1)FixedThreadPool:线程数固定
2)CachedThreadPool:线程数根据任务动态调整
3)SingleThreadExecutor:仅单线程执行
class PrintTask implements Runnable {
	String name;
	public PrintTask(String name) {
		this.name = name;
	}
	public void run() {
		for (int i = 0; i < 3; i++) {
			System.out.println("Hello, " + name + "!");
			try {
				Thread.sleep(1000);
			} catch (InterruptedException e) {
			}
		}
	}
}
public class ThreadPool {
	public static void main(String[] args) throws Exception {
		ExecutorService executor = Executors.newFixedThreadPool(3);
		executor.submit(new PrintTask("Bob"));
		executor.submit(new PrintTask("Alice"));
		executor.submit(new PrintTask("Tom"));
		executor.submit(new PrintTask("Robot"));
		Thread.sleep(10000);
		executor.shutdown();
	}
}
//Hello, Alice!
//Hello, Tom!
//Hello, Bob!
//Hello, Tom!
//Hello, Bob!
//Hello, Alice!
//Hello, Bob!
//Hello, Tom!
//Hello, Alice!
//Hello, Robot!
//Hello, Robot!
//Hello, Robot!

// 如果改为SingleThreadExecutor
ExecutorService executor = Executors.newSingleThreadExecutor();
// 那么每个线程就会以串行运行
//Hello, Bob!
//Hello, Bob!
//Hello, Bob!
//Hello, Alice!
//Hello, Alice!
//Hello, Alice!
//Hello, Tom!
//Hello, Tom!
//Hello, Tom!
//Hello, Robot!
//Hello, Robot!
//Hello, Robot!

// 如果改为CachedThreadPool
ExecutorService executor = Executors.newCachedThreadPool();
// 那么线程数根据任务动态调整
//Hello, Alice!
//Hello, Robot!
//Hello, Bob!
//Hello, Tom!
//Hello, Tom!
//Hello, Robot!
//Hello, Alice!
//Hello, Bob!
//Hello, Alice!
//Hello, Tom!
//Hello, Bob!
//Hello, Robot!
必须调用shutdown()关闭ExecutorService
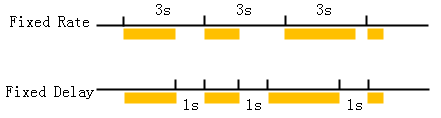
ScheduledThreadPool可以让一个任务定期地反复执行,可以定期调度多个任务(可取代Timer:一个Timer只对应一个Thread)
ScheduledThreadPool执行模式:
1)Fixed Rate
2)Fixed Delay
class HelloTask implements Runnable{
	String name;
	public HelloTask(String name){
		this.name = name;
	}
	public void run(){
		System.out.println("Hello, " + name + "! It is " + LocalTime.now());
		try {
			Thread.sleep(1000);
		} catch (InterruptedException e) {
		}
		System.out.println("Goodbye, " + name + "! It is " + LocalTime.now());
	}
}
public class Schedule {
	public static void main(String[] args) {
		ScheduledExecutorService executor = Executors.newScheduledThreadPool(3);
		// 2:表示2秒后执行;5:表示每隔5秒执行
		executor.scheduleAtFixedRate(new HelloTask("Bob"), 2, 5, TimeUnit.SECONDS);
		executor.scheduleWithFixedDelay(new HelloTask("Alice"), 2, 5, TimeUnit.SECONDS);
	}
}
// Bob任务执行频率比较高,每隔5秒钟执行;Alice任务执行频率较低,间隔5秒执行

问题:FixedRate模式下,如果任务执行时间过长,后续任务会不会并发执行?
如果任务抛出了异常,后续任务是否继续执行?
Future
Callable<T>接口:
相比于Runnable接口,他多了一个返回值
class Task implements Callable<String>{
	public String call() throws Exception{
		return longTimeCalculation();
	}
}
// 如何获取异步执行的结果?
Callable<String> task = new Task();
ExecutorService executor = Executors.newFixedThreadPool(4);
Future<String> future = executor.submit(task);
String result = future.get(); // 可能阻塞
Future表示一个未来可能会返回的结果
get():返回一个异步执行的结果
get(long timeout, TimeUnit unit):返回一个异步执行的结果,并指定一个最长的等待时间
cancel(boolean mayInterruptIfRunning):中断一个异步任务的执行
isDone():判断当前的异步任务是否已经完成
提交Callable任务,可以获得一个Future对象
可以用Future在将来某个时刻获取结果
class DownloadTask implements Callable<String> {
	String url;
	public DownloadTask(String url) {
		this.url = url;
	}
	public String call() throws Exception {
		System.out.println("Start download " + url + "...");
		URLConnection conn = new URL(this.url).openConnection();
		conn.connect();
		try (BufferedReader reader = new BufferedReader(new InputStreamReader(
				conn.getInputStream(), "UTF-8"))) {
			String s = null;
			StringBuffer sb = new StringBuffer();
			while ((s = reader.readLine()) != null) {
				sb.append(s).append("\n");
			}
			return sb.toString();
		}
	}
}
public class Main {
	public static void main(String[] args) throws Exception {
		ExecutorService executor = Executors.newFixedThreadPool(3);
		DownloadTask task = new DownloadTask("https://www.zte.com.cn");
		Future<String> future = executor.submit(task);
		String html = future.get();
		System.out.println(html);
		executor.shutdown();
	}
}

使用Future获得异步执行结果的方法:
1)阻塞方法:get()
2)轮询:isDone()
这两中方法都不是太好,我们希望的是在异步任务执行完了之后自动返回结果 ==> CompletableFuture
CompletableFuture
CompletableFuture的优点
1)异步任务结束时,会自动回调某个对象的方法
2)异步任务出错时,会自动回调某个对象的方法
3)主线程设置好回调后,不再关心异步任务的执行
CompletableFuture<String> cf = getCompletableFutureFromSomewhere();
cf.thenAccept(new Consumer<String>(){
	public void accept(String result){
		System.out.println("正常运行获得异步结果:" + result);
	}
});
cf.exceptionally(new Function<Throwable, String>(){
	public String apply(Throwable t){
		System.out.println("运行发生异常:" + t.getMessage());
		return null;
	}
});
CompletableFuture基本用法:
CompletableFuture<String> cf = CompletableFuture.supplyAsync(异步执行实例);
cf.thenAccept(获取结果后的操作);
cf.exceptionally(发生异常后的操作);
class DownloadUtil {
	public static String download(String url) throws IOException{
		HttpURLConnection conn = (HttpURLConnection) new URL(url).openConnection();
		conn.setDoOutput(false);
		conn.setAllowUserInteraction(false);
		conn.setConnectTimeout(3000);
		conn.setReadTimeout(3000);
		conn.connect();
		ByteArrayOutputStream output = new ByteArrayOutputStream(10240);
		try(InputStream input = conn.getInputStream()){
			int n;
			byte[] buffer = new byte[2048];
			while((n = input.read(buffer)) != -1){
				output.write(buffer, 0, n);
			}
		}
		conn.disconnect();
		return new String(output.toByteArray(), "UTF-8");
	}
}
class StockSupplier implements Supplier<Float>{
	@Override
	public Float get(){
		String url = "http://hq.sinajs.cn/list=sh000001";
		System.out.println("GET: " + url);
		try {
			String result = DownloadUtil.download(url);
			String[] ss = result.split(",");
			return Float.parseFloat(ss[3]);
		} catch (Exception e) {
			throw new RuntimeException(e);
		}
	}
}
public class CompletableFutureSample{
	public static void main(String[] args) throws Exception{
		CompletableFuture<Float> getStockFuture = CompletableFuture.supplyAsync(new StockSupplier());
		getStockFuture.thenAccept(new Consumer<Float>() {
			@Override
			public void accept(Float price){
				System.out.println("Current price: " + price);
			}
		});
		getStockFuture.exceptionally(new Function<Throwable, Float>() {
			@Override
			public Float apply(Throwable t){
				System.out.println("Error: " + t.getMessage());
				return Float.NaN;
			}
		});
		getStockFuture.join();
	}
}
多个CompletableFuture可以串行执行:
CompletableFuture<String> cf1 = CompletableFuture.supplyAsync(异步执行实例1);
CompletableFuture<LocalDate> cf2 = cf1.thenApplyAsync(异步执行实例2);
CompletableFuture<Float> cf3 = cf2.thenApplyAsync(异步执行实例3);
cf3.thenAccept(实例3获得结果后的操作);
class StockLookupSupplier implements Supplier<String>{
	String name;
	public StockLookupSupplier(String name){
		this.name = name;
	}
	public String get(){
		System.out.println("lookup: " + name);
		try{
			String url = "http://suggest3.sinajs.cn/suggest/type=11,12&key=" + URLEncoder.encode(name, "UTF-8");
			String result = DownloadUtil.download(url);
			String[] ss = result.split(",");
			return ss[3];
		}catch(Exception e){
			throw new RuntimeException(e);
		}
	}
}
public class CompletableFutureSequenceSample {
	public static void main(String[] args) throws Exception{
		String name = "上证指数";
		// 通过证券名称获取证券代码
		CompletableFuture<String> getStockCodeFuture = CompletableFuture.supplyAsync(new StockLookupSupplier(name));
		// 当获得证券代码后再获得证券价格
		CompletableFuture<Price> getStockPriceFuture = getStockCodeFuture.thenApplyAsync(new Function<String, Price>() {
			public Price apply(String code){
				System.out.println("got code: " + code);
				try{
					String url = "http://hq.sinajs.cn/list=" + code;
					String result = DownloadUtil.download(url);
					String[] ss = result.split(",");
					return new Price(code, Float.parseFloat(ss[3]));
				}catch(Exception e){
					throw new RuntimeException(e);
				}
			}
		});
		getStockPriceFuture.thenAccept(new Consumer<Price>() {
			public void accept(Price p){
				System.out.println(p.code + ":" + p.price);
			}
		});
		getStockPriceFuture.join();
	}
}
多个CompletableFuture还可以并行执行
class StockPrice{
	final float price;
	final String from;
	public StockPrice(float price, String from) {
		this.price = price;
		this.from = from;
	}
	public String toString(){
		return "Price: " + price + " from " + from;
	}
}
class StockFromSina implements Supplier<StockPrice>{
	@Override
	public StockPrice get(){
		String url = "http://hq.sinajs.cn/list=sh000001";
		System.out.println("GET: " + url);
		try{
			String result = DownloadUtil.download(url);
			String[] ss = result.split(",");
			return new StockPrice(Float.parseFloat(ss[3]), "sina");
		}catch(Exception e){
			throw new RuntimeException(e);
		}
	}
}
class StockFromNetease implements Supplier<StockPrice>{
	@Override
	public StockPrice get(){
		String url = "http://api.money.126.net/data/feed/0000001,money.api";
		System.out.println("GET: " + url);
		try{
			String result = DownloadUtil.download(url);
			int priceIndex = result.indexOf("\"price\"");
			int start = result.indexOf(":", priceIndex);
			int end = result.indexOf(",", priceIndex);
			return new StockPrice(Float.parseFloat(result.substring(start+1, end)), "netease");
		}catch(Exception e){
			throw new RuntimeException(e);
		}
	}
}
public class CompletableFutureAnyOfSample {
	public static void main(String[] args) throws Exception{
		CompletableFuture<StockPrice> getStockFromSina = CompletableFuture.supplyAsync(new StockFromSina());
		CompletableFuture<StockPrice> getStockFromNetease = CompletableFuture.supplyAsync(new StockFromNetease());
		// 并行的从新浪和网易获取证券的价格
		CompletableFuture<Object> getStock = CompletableFuture.anyOf(getStockFromSina, getStockFromNetease);
		// 当两个结果都返回的时候才执行,这时CompletableFuture的泛型参数是Void
		// CompletableFuture<Void> getStock = CompletableFuture.allOf(getStockFromSina, getStockFromNetease);
		getStock.thenAccept(new Consumer<Object>() {
			public void accept(Object result){
				System.out.println("Result: " + result);
			}
		});
		getStock.join();
	}
}
// 输出结果有时候是新浪先返回,有时候是网易先返回
CompletableFuture对象可以指定异步处理流程:
1)thenAccept()处理正常结果
2)execptionally()处理异常结果
3)thenApplyAsync()用于串行化另一个CompletableFuture
4)anyOf / allOf 用于并行化两个CompletableFuture
CompletableFuture的命名规则
1)xxx():继续在已有的线程中执行
2)xxxAsync():用Executor的新线程执行
Fork/Join
Fork/Join线程池可以执行一种特殊的任务,Fork/Join是一种基于“分治”的算法:分解任务 +合并结果(JDK>=1.7)
ForkJoinPool线程池可以把一个大任务分拆成小任务并行执行
任务类必须继承自RecursiveTask(有返回值)/ RecursiveAction(没有返回值)
class SumTask extends RecursiveTask<Long>{
	protected Long compute(){
		SumTask subtask1 = new SumTask(...);
		SumTask subtask2 = new SumTask(...);
		// invokeAll会并行运行两个小任务
		invokeAll(subtask1, subtask2);
		Long result1 = subtask1.join();
		Long result2 = subtask2.join();
		return resule1 + result2;
	}
}

大任务分为小任务,小任务还可以继续细分。。。

使用Fork/Join模式可以进行并行计算提高效率
class SumTask extends RecursiveTask<Long> {
	static final int THRESHOLD = 500;
	long[] array;
	int start;
	int end;
	SumTask(long[] array, int start, int end) {
		this.array = array;
		this.start = start;
		this.end = end;
	}
	@Override
	protected Long compute() {
		if (end - start <= THRESHOLD) {
			// 如果任务足够小,直接计算
			long sum = 0;
			for (int i = start; i < end; i++) {
				sum += this.array[i];
				try {
					Thread.sleep(2);
				} catch (InterruptedException e) {
				}
			}
			return sum;
		}
		// 任务太大,一分为二
		int middle = (end + start) / 2;
		System.out.println(String.format("split %d~%d ==> %d~%d, %d~%d", start,
				end, start, middle, middle, end));
		SumTask subtask1 = new SumTask(this.array, start, middle);
		SumTask subTask2 = new SumTask(this.array, middle, end);
		invokeAll(subtask1, subTask2);
		Long subresult1 = subtask1.join();
		Long subresult2 = subTask2.join();
		Long result = subresult1 + subresult2;
		System.out.println("result = " + subresult1 + "+" + subresult2
				+ " ==> " + result);
		return result;
	}
}
public class ForkJoinTaskSample {
	static Random random = new Random(0);
	static long random() {
		return random.nextInt(1000);
	}
	public static void main(String[] args) throws Exception {
		// 创建1000个随机数组成的数组
		long[] array = new long[1000];
		long expectedSum = 0;
		for (int i = 0; i < array.length; i++) {
			array[i] = random();
			expectedSum += array[i];
		}
		System.out.println("Expected sum: " + expectedSum);
		// fork/join
		ForkJoinTask<Long> task = new SumTask(array, 0, array.length);
		long startTime = System.currentTimeMillis();
		Long result = ForkJoinPool.commonPool().invoke(task);
		long endTime = System.currentTimeMillis();
		System.out.println("Fork/join sum: " + result + " in "
				+ (endTime - startTime));
	}
}
//Expected sum: 492164
//split 0~1000 ==> 0~500, 500~1000
//result = 251591+240573 ==> 492164
//Fork/join sum: 492164 in 1389

// 当把任务拆解到更细时,例如:
static final int THRESHOLD = 250;
// 得到的结果为:
//Expected sum: 492164
//split 0~1000 ==> 0~500, 500~1000
//split 0~500 ==> 0~250, 250~500
//split 500~1000 ==> 500~750, 750~1000
//result = 120306+120267 ==> 240573
//result = 127611+123980 ==> 251591
//result = 251591+240573 ==> 492164
//Fork/join sum: 492164 in 627
Fork/join模式的应用:
java.util.Arrays.parallelSort(array); // 并行排序
线程工具类
多线程是Java实现多任务的基础,我们通过 Thread 启动新线程,我们通过 ExecutorService、ScheduledThreadPool、Fork/Join这样的多线程框架完成多任务
ThreadLocal
Thread 对象代表一个线程,我们通过调用Thread.currentThread()获取当前线程
Q:我们如何在一个线程内传递状态?
JDK提供了ThreadLocal,在一个线程中传递同一个对象
static ThreadLocal<String> threadLocalUser = new ThreadLocal<>();
threadLocalUser.set("Bob");
...
String current = threadLocalUser.get();
...
threadLocalUser.remove();
class User {
	String name;
	int level;
	public User(String name, int level) {
		this.name = name;
		this.level = level;
	}
}
class UserContext implements AutoCloseable {
	/**
	 * 全局唯一静态变量
	 */
	static final ThreadLocal<User> context = new ThreadLocal<>();
	/**
	 * 获取当前线程的ThreadLocal USer
	 *
	 * @return
	 */
	public static User getCurrentUser() {
		return context.get();
	}
	/**
	 * 初始化ThreadLocal的User
	 *
	 * @param user
	 */
	public UserContext(User user) {
		context.set(user);
	}
	/**
	 * 移除ThreadLocal关联的User
	 */
	public void close() {
		context.remove();
	}
}
class ProcessThread extends Thread {
	User user;
	public ProcessThread(User user) {
		this.user = user;
	}
	public void run() {
		try (UserContext ctx = new UserContext(user)) {
			// step1:
			new Greeting().hello();
			// step2:
			Level.checkLevel();
			// step3:
			// TODO:
		}
	}
}
class Greeting {
	void hello() {
		User user = UserContext.getCurrentUser();
		System.out.println("Hello, " + user.name + "!");
	}
}
class Level {
	static void checkLevel() {
		User user = UserContext.getCurrentUser();
		if (user.level > 100) {
			System.out.println(user.name + " is a VIP user.");
		}else{
			System.out.println(user.name + " is a registered user.");
		}
	}
}
public class Main {
	public static void main(String[] args) throws Exception{
		Thread t1 = new ProcessThread(new User("Bob", 120));
		Thread t2 = new ProcessThread(new User("Alice", 98));
		t1.start();
		t2.start();
		t1.join();
		t2.join();
		System.out.println("Main end");
	}
}
可以把ThreadLocal看成是全局Map<Thread, Object>:每个线程获取ThreadLocal变量时,使用Thread自身作为key:
Object threadLocalValue = threadLocalmap.get(Thread.currentThread());
ThreadLocal表示线程的“局部变量”,它确保每个线程的ThreadLocal变量都是各自独立的
ThreadLocal适合在一个线程的处理流程中保持上下文(避免了同一参数在所有方法中传递)
使用ThreadLocal要用try … finally 结构