网络结构
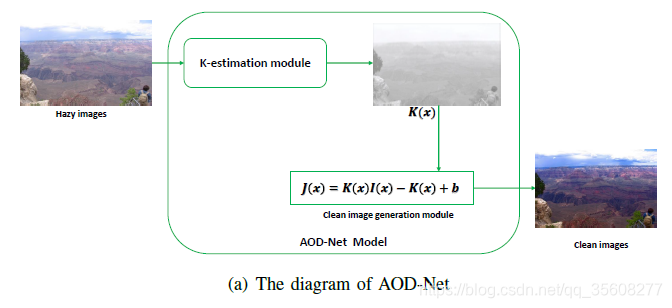
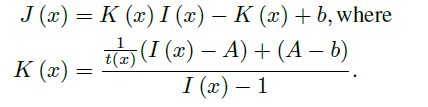
K(x)随I(x)变化,算法为了学习到自适应的K(x)
所以算法核心就是K(x)

五层网络极为简单:
code
import torch
import torch.nn as nn
import math

class dehaze_net(nn.Module):

	def __init__(self):
		super(dehaze_net, self).__init__()

		self.relu = nn.ReLU(inplace=True)
	############   每个卷积层只用三个核     ##############
		self.e_conv1 = nn.Conv2d(3,3,1,1,0,bias=True)
		self.e_conv2 = nn.Conv2d(3,3,3,1,1,bias=True)
		self.e_conv3 = nn.Conv2d(6,3,5,1,2,bias=True) ## 连接1、2层3+3=6,输出3
		self.e_conv4 = nn.Conv2d(6,3,7,1,3,bias=True) ##连接2,3层3+3=6,输出3
		self.e_conv5 = nn.Conv2d(12,3,3,1,1,bias=True) #连接1,2,3,4层3+3+3+3=12,输出3

	def forward(self, x):
		source = []
		source.append(x)
#########    K-estimation     ###########
		x1 = self.relu(self.e_conv1(x))
		x2 = self.relu(self.e_conv2(x1))

		concat1 = torch.cat((x1,x2), 1)
		x3 = self.relu(self.e_conv3(concat1))

		concat2 = torch.cat((x2, x3), 1)
		x4 = self.relu(self.e_conv4(concat2))

		concat3 = torch.cat((x1,x2,x3,x4),1)
		x5 = self.relu(self.e_conv5(concat3))
####### 带入公式  ############
		clean_image = self.relu((x5 * x) - x5 + 1)

		return clean_image
训练细节
数据集
NYU2 27256
MSE损失
梯度约束在[-0.1,0.1]
lr:0.001
batch:8(480*640)
momentum:0.9
decay rate:0.0001
结果比较
SSIM
PSNR
MSE
视觉效果:过度增强、色彩饱和与否、不真实的色调或真实,纹理锐利或模糊、某些区域变暗,对无雾图像影响、应对光晕(偏向宽动态)