由上图菜鸟教程定义可知:checked伪类仅仅适用于单选按钮或则复选框,所以如果在其他类型的元素定义checked伪类,checked会失效。具体用法参考下列代码:
<!DOCTYPE html>
<html>
<head>
    <meta charset="UTF-8">
	<meta name="viewport" content="width=device-width,inital-scale=1.0,minimun-scale=1.0,maximun-scale=1.0" />
    <title>伪类选择器:checked</title>
    <style type="text/css">

        span{color: red;}

	    label{border: 2px solid black;}

		.input1:checked+.checkbox1{border: 2px dashed blue;background-color: brown;}
		.checkbox1{border: 2px dashed red;background-color: bisque;}
    </style>
</head>
<body>
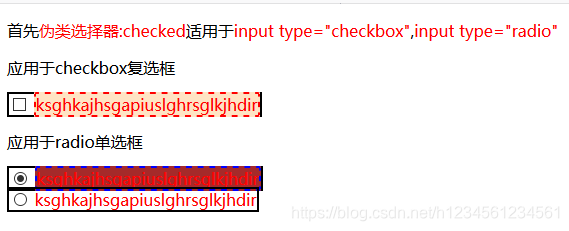
<p>首先<span>伪类选择器:checked</span>适用于<span>input type="checkbox"</span>,<span>input type="radio"</span></p>
<p>应用于checkbox复选框</p>
 <label>
	 <input class="input1" type="checkbox" checked="checked"/>
	 <span class="checkbox1">ksghkajhsgapiuslghrsglkjhdir</span>
 </label><br />

 <p>应用于radio单选框</p>
  <label>
 	 <input class="input1" type="radio" name="radio" />
 	 <span class="checkbox1">ksghkajhsgapiuslghrsglkjhdir</span>
  </label><br />

  <label>
  	<input class="" type="radio" name="radio" checked="checked"/>
  	<span class="">ksghkajhsgapiuslghrsglkjhdir</span>
  </label>

</body>
</html>
关于其用法,注意小点:
1,在为类选择器选择的时候,使用原始的input:checked+class/label(每当选中时,改变其后class/label中的内容样式)
2,经验之谈:在使用radio or checkbox 时,父类最好使用<label>标签,这样可以使点击<span>内容时格改变checkbox or radio 的状态,增强用户交互感。
关于radio使用:
1,每个<input type="radio"/>如果没有写name="?"则会默认的给每个input设定不同的name事件名,这样就表面的打破了其单选的意义,所以,在用时,一定要给其事件命名,且名称相同。
2,单选~顾名思义就是必须要有一个选中,一旦你已选就必须存在一个已被选中,所以再次点击已选中按钮,按钮不会取消选中,除非点击另一按钮将其替换
运行截图:
