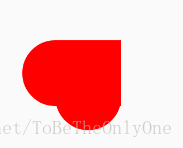
昨天看到一个有意思的动画,就想用Android 中的属性动画(ObjectAnimator)给实现出来,顺便复习一下属性动画的使用,完成效果如下:
看完了效果,现在该开始动手干活了~
首先先分析一下这个动画用Android 中的属性动画该怎么实现:
看上去这个动画很简单,可以用一个方形和两个圆形组成,两个在不同位置上的圆分别改变其X 和 Y 方向上位置就可以了。
先创建正方形和圆形的图像文件,我是用xml文件创建的,源码如下:
rectangle.xml
<?xml version="1.0" encoding="utf-8"?>
<selector xmlns:android="http://schemas.android.com/apk/res/android">

    <item>
        <shape android:shape="rectangle"
            <solid android:color="#ff0000"/>
            <size android:height="100dp"
                  android:width="100dp"/>
        </shape>
    </item>
</selector>
round.xml
<?xml version="1.0" encoding="utf-8"?>
<selector xmlns:android="http://schemas.android.com/apk/res/android">

    <item >
        <shape android:shape="oval">
            <solid android:color="#ff0000"/>
            <size android:width="100dp"
                  android:height="100dp"/>
        </shape>
    </item>
</selector>
背景文件创建好之后,然后把它们的初始位置摆放好,布局文件如下:
activity_love_icon.xml
<?xml version="1.0" encoding="utf-8"?>
<android.support.constraint.ConstraintLayout
    xmlns:android="http://schemas.android.com/apk/res/android"
    xmlns:app="http://schemas.android.com/apk/res-auto"
    xmlns:tools="http://schemas.android.com/tools"
    android:layout_width="match_parent"
    android:layout_height="match_parent"
    tools:context=".LoveIconActivity">

    <ImageView
        android:id="@+id/roundImage2"
        android:layout_width="wrap_content"
        android:layout_height="wrap_content"
        android:layout_marginBottom="50dp"
        android:layout_marginEnd="8dp"
        android:layout_marginStart="8dp"
        app:layout_constraintBottom_toBottomOf="@+id/rectangleImage"
        app:layout_constraintEnd_toEndOf="parent"
        app:layout_constraintStart_toStartOf="parent"
        app:srcCompat="@drawable/round"/>

    <ImageView
        android:id="@+id/roundImage1"
        android:layout_width="wrap_content"
        android:layout_height="wrap_content"
        android:layout_marginBottom="8dp"
        android:layout_marginEnd="50dp"
        android:layout_marginTop="8dp"
        app:layout_constraintBottom_toBottomOf="parent"
        app:layout_constraintEnd_toEndOf="@+id/rectangleImage"
        app:layout_constraintTop_toTopOf="parent"
        app:srcCompat="@drawable/round"/>

    <ImageView
        android:id="@+id/rectangleImage"
        android:layout_width="100dp"
        android:layout_height="100dp"
        android:layout_marginBottom="8dp"
        android:layout_marginEnd="8dp"
        android:layout_marginStart="8dp"
        android:layout_marginTop="8dp"
        app:layout_constraintBottom_toBottomOf="parent"
        app:layout_constraintEnd_toEndOf="parent"
        app:layout_constraintStart_toStartOf="parent"
        app:layout_constraintTop_toTopOf="parent"
        app:srcCompat="@drawable/rectangle"/>
</android.support.constraint.ConstraintLayout>
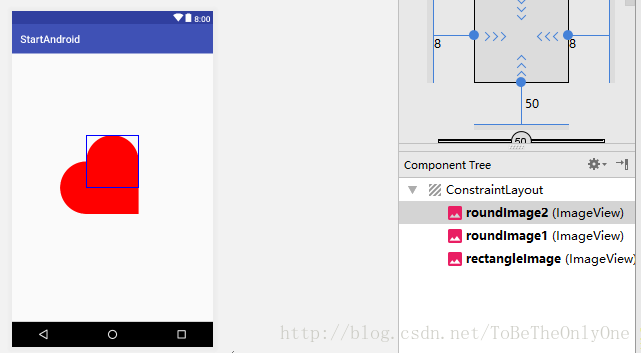
这个布局文件我是用 ConstraintLayout 为根布局创建的,在设计界面的显示如下:
对 ConstraintLayout 有疑问的朋友可以参考我的博客:
Android开发中ConstraintLayout的使用从入门到精通(一)
当然,布局文件也可以选择其他布局为根布局,这个不重要,看个人的爱好了。
然后分析用属性动画怎么去实现我们想要的效果:
- 首先让
roundImage1,即水平方向上的圆以动画的方式从初始位置向右移动一个正方形边长的距离。 - 等上一个动画完成之后,让
roundImage2,即竖直方向上的圆以动画的方式从初始位置向下移动一个正方形边长的距离。 - 等上一个动画完成之后,让
roundImage1以动画的方式回到初始位置。 - 等上一个动画完成之后,让
roundImage2以动画的方式回到初始位置。 - 以上述形式进行循环就实现我们想要的效果了。
LoveIconActivity.java
package .startandroid;

import android.animation.Animator;
import android.animation.ObjectAnimator;
import android.content.Context;
import android.support.v7.app.AppCompatActivity;
import android.os.Bundle;
import android.widget.ImageView;

public class LoveIconActivity extends AppCompatActivity {

    private ImageView rectangle,round1,round2;
    private ObjectAnimator round1Animator1,round1Animator2,round2Animator1,round2Animator2;
    private Context mContext;
    private final int animDuration = 500; //动画持续的时间

    @Override
    protected void onCreate(Bundle savedInstanceState) {
        super.onCreate(savedInstanceState);
        setContentView(R.layout.activity_love_icon);
        mContext = this;


        rectangle = findViewById(R.id.rectangleImage);
        //水平方向上的圆
        round1 = findViewById(R.id.roundImage1);
        //竖直方向上的圆
        round2 = findViewById(R.id.roundImage2);

        //动画初始化
        //round1从左到右动画
        round1Animator1 = ObjectAnimator.ofFloat(round1,"translationX",0f,DensityUtil.dip2px(mContext,100f))
                .setDuration(animDuration);
        round1Animator2 = ObjectAnimator.ofFloat(round1,"translationX",DensityUtil.dip2px(mContext,100f),0f)
                .setDuration(animDuration);
        round2Animator1 = ObjectAnimator.ofFloat(round2,"translationY",0f,DensityUtil.dip2px(mContext,100f))
                .setDuration(animDuration);
        round2Animator2 = ObjectAnimator.ofFloat(round2,"translationY",DensityUtil.dip2px(mContext,100f),0f)
                .setDuration(animDuration);
//添加动画监听事件
        round1Animator1.addListener(new Animator.AnimatorListener() {
            @Override
            public void onAnimationStart(Animator animator) {

            }

            @Override
            public void onAnimationEnd(Animator animator) {
                round2Animator1.start();
            }

            @Override
            public void onAnimationCancel(Animator animator) {

            }

            @Override
            public void onAnimationRepeat(Animator animator) {

            }
        });

        round1Animator2.addListener(new Animator.AnimatorListener() {
            @Override
            public void onAnimationStart(Animator animator) {

            }

            @Override
            public void onAnimationEnd(Animator animator) {
                round2Animator2.start();
            }

            @Override
            public void onAnimationCancel(Animator animator) {

            }

            @Override
            public void onAnimationRepeat(Animator animator) {

            }
        });

        round2Animator1.addListener(new Animator.AnimatorListener() {
            @Override
            public void onAnimationStart(Animator animator) {

            }

            @Override
            public void onAnimationEnd(Animator animator) {
                round1Animator2.start();
            }

            @Override
            public void onAnimationCancel(Animator animator) {

            }

            @Override
            public void onAnimationRepeat(Animator animator) {

            }
        });

        round2Animator2.addListener(new Animator.AnimatorListener() {
            @Override
            public void onAnimationStart(Animator animator) {

            }

            @Override
            public void onAnimationEnd(Animator animator) {
                round1Animator1.start();
            }

            @Override
            public void onAnimationCancel(Animator animator) {

            }

            @Override
            public void onAnimationRepeat(Animator animator) {

            }
        });
    }

    @Override
    protected void onStart() {
        super.onStart();

        round1Animator1.start();
    }
}
其中 DensityUtil 是自己定义的一个类,作用是实现 px 和 dp 之间的相互转化,源码如下:
DensityUtil.class
package .startandroid;

import android.content.Context;

public class DensityUtil {

    /**
     * 根据手机的分辨率从 dp 的单位 转成为 px(像素)
     */
    public static int dip2px(Context context, float dpValue) {
        final float scale = context.getResources().getDisplayMetrics().density;
        return (int) (dpValue * scale + 0.5f);
    }

    /**
     * 根据手机的分辨率从 px(像素) 的单位 转成为 dp
     */
    public static int px2dip(Context context, float pxValue) {
        final float scale = context.getResources().getDisplayMetrics().density;
        return (int) (pxValue / scale + 0.5f);
    }
}
以上就是用属性动画实现我们想要的动画的全过程,希望可以帮到你~
