1. 建造者模式概述
建造者模式(Builder Pattern):将一个复杂对象的构建与它的表示分离,使得同样的构建过程可以创建不同的表示。建造者模式是一种对象创建型模式。
建造者模式一步一步创建一个复杂的对象,它允许用户只通过指定复杂对象的类型和内容就可以构建它们,用户不需要知道内部的具体构建细节。建造者模式结构如图所示:
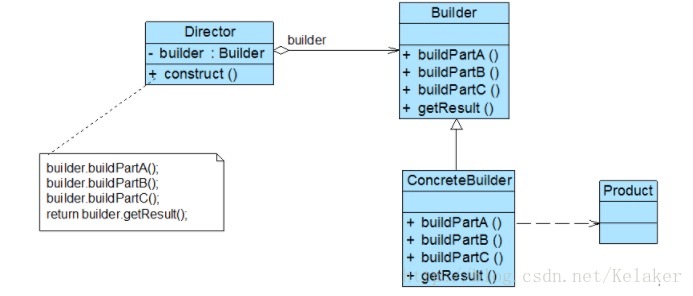
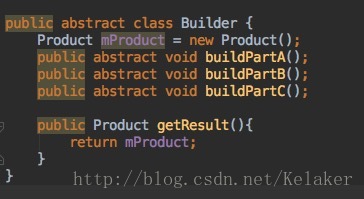
- Builder(抽象建造者):它为创建一个产品Product对象的各个部件指定抽象接口,在该接口中一般声明两类方法,一类方法是buildPartX(),它们用于创建复杂对象的各个部件;另一类方法是getResult(),它们用于返回复杂对象。Builder既可以是抽象类,也可以是接口。
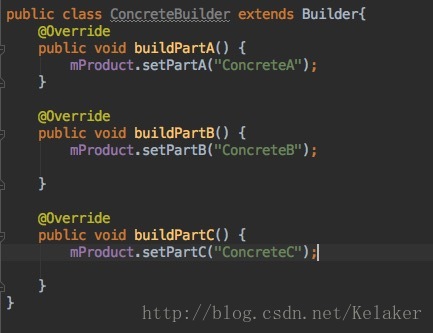
- ConcreteBuilder(具体建造者):它实现了Builder接口,实现各个部件的具体构造和装配方法,定义并明确它所创建的复杂对象,也可以提供一个方法返回创建好的复杂产品对象。
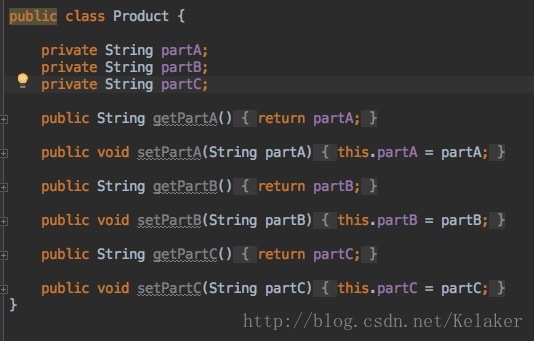
- Product(产品角色):它是被构建的复杂对象,包含多个组成部件,具体建造者创建该产品的内部表示并定义它的装配过程。
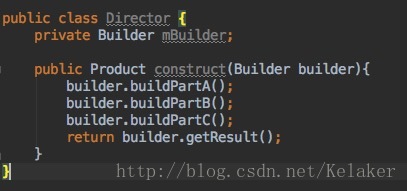
- Director(指挥者):指挥者又称为导演类,它负责安排复杂对象的建造次序,指挥者与抽象建造者之间存在关联关系,可以在其construct()建造方法中调用建造者对象的部件构造与装配方法,完成复杂对象的建造
产品角色是我们最终要创建的对象,一个产品里面有很多组成部分,典型代码如下:
抽象建造者定义了产品的各个组建的创建方法,典型代码如下:
具体建造者继承于抽象建造者并实现了具体的各个组建的创建方式,典型代码如下:
指挥者隔离了客户和产品的创建过程,实际控制了产品的创建流程,典型代码如下:
对于客户端而言,只需关心具体的建造者即可,一般情况下,客户端类代码片段如下所示:

2. 建造者模式在Andorid的AlertDialog中的应用
平常我们基本是这样使用AlertDialog的,代码如下:
    AlertDialog.Builder builder = new AlertDialog.Builder(this);
    builder.setTitle("标题");
    builder.setMessage("确定提交吗?");
    builder.setNegativeButton("取消", new DialogInterface.OnClickListener() {
        @Override
        public void onClick(DialogInterface dialog, int which) {

        }
    });
    builder.setPositiveButton("确定", new DialogInterface.OnClickListener() {
        @Override
        public void onClick(DialogInterface dialog, int which) {

        }
    });
    builder.show();
为什么我们不能直接new一个AlertDialog呢,查看源代码发现:
    protected AlertDialog(@NonNull Context context) {
        this(context, 0);
    }

    protected AlertDialog(@NonNull Context context, @StyleRes int themeResId) {
        super(context, resolveDialogTheme(context, themeResId));
        mAlert = new AlertController(getContext(), this, getWindow());
    }

    protected AlertDialog(@NonNull Context context, boolean cancelable,
            @Nullable OnCancelListener cancelListener) {
        this(context, 0);
        setCancelable(cancelable);
        setOnCancelListener(cancelListener);
    }
AlertDialog的构造方法全是protected的,只能通过AlertDilog.Builder.create()构建,查看AlertDilog.Builder源代码主要如下:
    private final AlertController.AlertParams P;
    private final int mTheme;
    public Builder(@NonNull Context context, @StyleRes int themeResId) {
            P = new AlertController.AlertParams(new ContextThemeWrapper(
                    context, resolveDialogTheme(context, themeResId)));
            mTheme = themeResId;
    }
    public Builder setTitle(@Nullable CharSequence title) {
            P.mTitle = title;
            return this;
    }
    public Builder setCustomTitle(@Nullable View customTitleView) {
            P.mCustomTitleView = customTitleView;
            return this;
    }
    public Builder setMessage(@Nullable CharSequence message) {
        P.mMessage = message;
        return this;
    }
    ......
    public AlertDialog create() {
           // We can't use Dialog's 3-arg constructor with the createThemeContextWrapper param,
           // so we always have to re-set the theme
           final AlertDialog dialog = new AlertDialog(P.mContext, mTheme);
           P.apply(dialog.mAlert);
           dialog.setCancelable(P.mCancelable);
           if (P.mCancelable) {
               dialog.setCanceledOnTouchOutside(true);
           }
           dialog.setOnCancelListener(P.mOnCancelListener);
           dialog.setOnDismissListener(P.mOnDismissListener);
           if (P.mOnKeyListener != null) {
               dialog.setOnKeyListener(P.mOnKeyListener);
           }
           return dialog;
    }
    public AlertDialog show() {
         final AlertDialog dialog = create();
         dialog.show();
         return dialog;
    }
可以看出Builder相当于建造者角色,AlertController.AlertParams相当于产品角色,Builder提供的一系列set方法都是为了改变AlertController.AlertParams的属性,在create()方法里,第25行 p.apply(dialog.mAlert), 查看apply方法源代码如下:
    public void apply(AlertController dialog) {
          if (mCustomTitleView != null) {
              dialog.setCustomTitle(mCustomTitleView);
          } else {
              if (mTitle != null) {
                  dialog.setTitle(mTitle);
              }
              if (mIcon != null) {
                  dialog.setIcon(mIcon);
              }
              if (mIconId != 0) {
                  dialog.setIcon(mIconId);
              }
              if (mIconAttrId != 0) {
                  dialog.setIcon(dialog.getIconAttributeResId(mIconAttrId));
              }
          }
          if (mMessage != null) {
              dialog.setMessage(mMessage);
          }
          if (mPositiveButtonText != null) {
              dialog.setButton(DialogInterface.BUTTON_POSITIVE, mPositiveButtonText,
                      mPositiveButtonListener, null);
          }
          if (mNegativeButtonText != null) {
              dialog.setButton(DialogInterface.BUTTON_NEGATIVE, mNegativeButtonText,
                      mNegativeButtonListener, null);
          }
          if (mNeutralButtonText != null) {
              dialog.setButton(DialogInterface.BUTTON_NEUTRAL, mNeutralButtonText,
                      mNeutralButtonListener, null);
          }
          // For a list, the client can either supply an array of items or an
          // adapter or a cursor
          if ((mItems != null) || (mCursor != null) || (mAdapter != null)) {
              createListView(dialog);
          }
          if (mView != null) {
              if (mViewSpacingSpecified) {
                  dialog.setView(mView, mViewSpacingLeft, mViewSpacingTop, mViewSpacingRight,
                          mViewSpacingBottom);
              } else {
                  dialog.setView(mView);
              }
          } else if (mViewLayoutResId != 0) {
              dialog.setView(mViewLayoutResId);
          }

          /*
          dialog.setCancelable(mCancelable);
          dialog.setOnCancelListener(mOnCancelListener);
          if (mOnKeyListener != null) {
              dialog.setOnKeyListener(mOnKeyListener);
          }
          */
      }
apply方法主要将AlertParams的属性通过AlertController重新设置一遍,AlertDialog的属性实际上还是通过AlertController控制,查看AlertDialog的set方法代码,主要如下:
    final AlertController mAlert;
    @Override
    public void setTitle(CharSequence title) {
        super.setTitle(title);
        mAlert.setTitle(title);
    }
    public void setCustomTitle(View customTitleView) {
        mAlert.setCustomTitle(customTitleView);
    }
    public void setMessage(CharSequence message) {
        mAlert.setMessage(message);
    }
可以看出,AlertDialog的属性都是通过AlertController控制,客户不知道具体的创建细节,都是通过AlertController构建,AlertDialog充当指挥者的角色。