这一节我们一起用springboot开发一个应用程序,应用程序里的核心概念是玩家获取英雄列表上的英雄信息。
1、定义实体模型:
代码如下:
package com.dota.herolist.entity;
import javax.persistence.Entity;
import javax.persistence.GeneratedValue;
import javax.persistence.GenerationType;
import javax.persistence.Id;
@Entity
public class Hero {
private Long id;
private String name;
private String type;
private Integer bloodValue;
private Integer attack;
/*AUTO主键由程序控制, 是默认选项 ,不设置就是这个
-IDENTITY 主键由数据库生成, 采用数据库自增长, Oracle不支持这种方式
-SEQUENCE 通过数据库的序列产生主键, MYSQL 不支持
-Table 提供特定的数据库产生主键, 该方式更有利于数据库的移植*/
@Id
@GeneratedValue(strategy=GenerationType.AUTO)
public Long getId() {
return id;
}
public void setId(Long id) {
this.id = id;
}
public String getName() {
return name;
}
public void setName(String name) {
this.name = name;
}
public String getType() {
return type;
}
public void setType(String type) {
this.type = type;
}
public Integer getBloodValue() {
return bloodValue;
}
public void setBloodValue(Integer bloodValue) {
this.bloodValue = bloodValue;
}
public Integer getAttack() {
return attack;
}
public void setAttack(Integer attack) {
this.attack = attack;
}
}
Hero类就是简单的java对象,@Entity注解表示它是一个JPA实体,Id属性为主键,
2、定义持久层,代码如下:
package com.dota.herolist.repository;
import java.util.List;
import org.springframework.data.jpa.repository.JpaRepository;
import com.dota.herolist.entity.Hero;
public interface HeroListRepository extends JpaRepository<Hero,Long>{
List<Hero> findByName(String name);
}
3、创建web界面:
package com.dota.herolist.controller;
import java.util.List;
import org.springframework.beans.factory.annotation.Autowired;
import org.springframework.stereotype.Controller;
import org.springframework.ui.Model;
import org.springframework.web.bind.annotation.PathVariable;
import org.springframework.web.bind.annotation.RequestMapping;
import org.springframework.web.bind.annotation.RequestMethod;
import com.dota.herolist.entity.Hero;
import com.dota.herolist.repository.HeroListRepository;
@Controller
@RequestMapping("/heroList")
public class HeroListController {
private HeroListRepository heroListRepository;
@Autowired
public HeroListController(HeroListRepository heroListRepository){
this.heroListRepository=heroListRepository;
}
@RequestMapping(value="/{name}",method=RequestMethod.GET)
public String heroList(@PathVariable("name") String name,Model model){
List<Hero> heroList=heroListRepository.findByName(name);
if(heroList!=null){
model.addAttribute("heros",heroList);
}
return "heroList";
}
@RequestMapping(value="/{name}",method=RequestMethod.POST)
public String addToHeroList(@PathVariable("name") String name,Hero hero){
heroListRepository.save(hero);
return "redirect:/heroList/{name}";
}
}
写完controller后在src/main/resources/templates里创建一个名为heroList.html的文件:
<html>
<head>
<title>Hero List</title>
<link rel="stylesheet" th:href="@{/style.css}"></link>
</head>
<body>
<h2>Dota Hero List</h2>
<div th:unless="${#lists.isEmpty(heros)}">
<dl th:each="hero : ${heros}">
<dt class="heroHeadLine">
<span th:text="${hero.name}"></span>
<span th:text="${hero.type}"></span>
</dt>
<dd class="heroDescription">
<span th:if="${hero.description}" th:text="${hero.description}">
Description
</span>
<span th:if="${hero.description eq null}">
No description !
</span>
</dd>
</dl>
</div>
<div th:if="${#lists.isEmpty(heros)}">
<p>No Hero!</p>
</div>
<hr/>
<h3>Add a hero</h3>
<form method="POST">
<label for="name">Name:</label>
<input type="text" name="name" size="50"/><br/>
<label for="type">Type:</label>
<input type="text" name="type" size="50"/><br/>
<label for="bloodValue">BloodValue:</label>
<input type="text" name="bloodValue" size="50"/><br/>
<label for="attack">Attack:</label>
<input type="text" name="attack" size="50"/><br/>
<label for="description">Description:</label>
<textarea type="text" name="description" cols="80" rows="5"/></textarea><br/>
<input type="submit"></input>
</form>
</body>
</html>
再在src/main/resources/static下创建一个css文件:
body{background-color:#cccccc;
font-family:arial,helvetica,sans-serif;
}
.heroHeadLine{font-size:12pt;font-weight:bold;
}
.heroDescription{font-size:10pt;}
label{font-weight:bold;}
然后运行程序,启动成功后,访问路径http://localhost:9090/heroList/zhangfei ,会显示如下界面:

然后可通过表单添加一些信息,如下图:

提交表单,然后访问: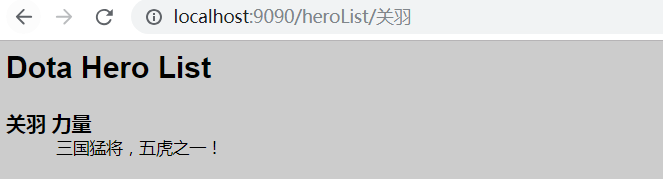
很神奇!我们这节就到这里,下节再分析!