一、客户端系统环境
[root@ecs-326c-0002 ~]# cat /etc/redhat-release
CentOS release 6.5 (Final)
[root@ecs-326c-0002 ~]# ifconfig
eth0      Link encap:Ethernet  HWaddr FA:16:3E:63:E2:8F
          inet addr:192.168.1.126  Bcast:192.168.1.255  Mask:255.255.255.0
          inet6 addr: fe80::f816:3eff:fe63:e28f/64 Scope:Link
          UP BROADCAST RUNNING MULTICAST  MTU:1500  Metric:1
          RX packets:10774 errors:0 dropped:0 overruns:0 frame:0
          TX packets:3907 errors:0 dropped:0 overruns:0 carrier:0
          collisions:0 txqueuelen:1000
          RX bytes:778520 (760.2 KiB)  TX bytes:374096 (365.3 KiB)
          Interrupt:45

lo        Link encap:Local Loopback
          inet addr:127.0.0.1  Mask:255.0.0.0
          inet6 addr: ::1/128 Scope:Host
          UP LOOPBACK RUNNING  MTU:16436  Metric:1
          RX packets:28469 errors:0 dropped:0 overruns:0 frame:0
          TX packets:28469 errors:0 dropped:0 overruns:0 carrier:0
          collisions:0 txqueuelen:0
          RX bytes:1772474 (1.6 MiB)  TX bytes:1772474 (1.6 MiB)
1、NRPE简介
nagios监控远程主机的方法有多种,其方式包括SNMP、NRPE、SSH和NCSA等。这里介绍其通过NRPE监控远程Linux主机的方式。NRPE(nagios remote plugin executor)是用于在远端服务器上运行检测命令的守护进程,它用于让nagios监控端基于安装的方式触发远程主机上的检测命令,并将检测结果输出至监控端。而其执行的开销远低于基于SSH的检测方式,而且检测过程不需要远程主机上的系统账号等信息,其安全性也高于SSH的检测方式。
2、安装配置被监控端
1)因为是编译安装软件,所以先确保开放包组已经安装好,使用yum grouplist查看,
如果没有就使用命令安装:yum -y groupinstall "Development Tools" "Development Libraries"
二、被监控端安装nagios-plugins插件和nrpe
1、添加nagios用户
[root@ecs-326c-0002 ~]# useradd -s /sbin/nologin nagios
2、安装nagios-plugins插件,因为nrpe依赖此插件
[root@ecs-326c-0002 ~]# yum -y install gcc gcc-c++ make openssl openssl-devel[root@ecs-326c-0002 ~]# wget https://nagios-plugins.org/download/nagios-plugins-2.1.4.tar.gz[root@ecs-326c-0002 ~]# tar zxf nagios-plugins-2.1.4.tar.gz
[root@ecs-326c-0002 ~]# cd nagios-plugins-2.1.4
[root@ecs-326c-0002 nagios-plugins-2.1.4]# ./configure --with-nagios-user=nagios --with-nagios-group=nagios这里如果要监控mysql需要添加--with-mysql
[root@ecs-326c-0002 nagios-plugins-2.1.4]# make all[root@ecs-326c-0002 nagios-plugins-2.1.4]# make install3、安装NRPE
[root@ecs-326c-0002 ~]# wget https://jaist.dl.sourceforge.net/project/nagios/nrpe-3.x/nrpe-3.2.1.tar.gz[root@ecs-326c-0002 ~]# tar -zxvf nrpe-3.2.1.tar.gz[root@ecs-326c-0002 ~]# cd nrpe-3.2.1
[root@ecs-326c-0002 nrpe-3.2.1]# ./configure --with-nrpe-user=nagios \
> --with-nrpe-group=nagios \
> --with-nagios-user=nagios \
> --with-nagios-group=nagios \
> --enable-command-args \
> --enable-ssl[root@ecs-326c-0002 nrpe-3.2.1]# make all[root@ecs-326c-0002 nrpe-3.2.1]# make install-plugin[root@ecs-326c-0002 nrpe-3.2.1]# make install-daemon[root@ecs-326c-0002 nrpe-3.2.1]# make install-config(注意:最后这里如果使用了3.X.X的版本的话,用这命令# make install-config,如果是2.X.X的版本使用#make install-daemon-config)
4、配置NRPE
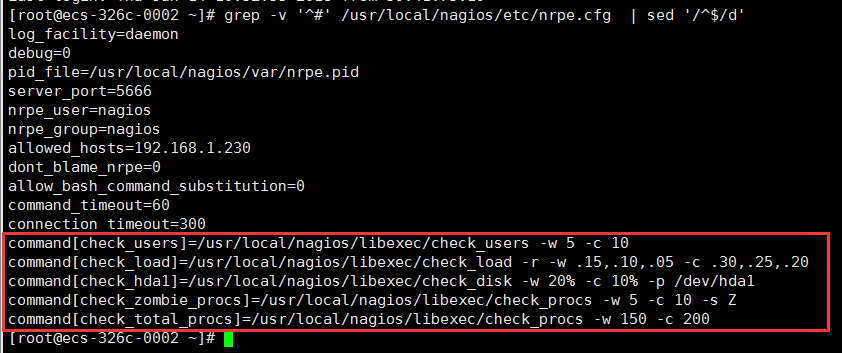
#vim /usr/local/nagios/etc/nrpe.cfg
log_facility=daemon
pid_file=/var/run/nrpe.pid_file
server_address=本地IP
server_port=5666
nrpe_user=nagios
nrpe_group=nagios
allowed_hosts=服务器IP
command_timeout=60
connection_timeout=300
debug=0
上述配置指令可以做到见名知义,因此,配置过程中根据实际需要进行修改即可。其中,需要特定说明的是allowed_hosts指令用于定义本机所允许的监控端的IP地址。
5、启动NRPE
1)# /usr/local/nagios/bin/nrpe -c /usr/local/nagios/etc/nrpe.cfg -daemon
2)为了便于NRPE服务的启动,可以将如下内容定义为/etc/init.d/nrped脚本:
[root@ecs-326c-0002 ~]#vim /etc/init.d/nrped#!/bin/bash
# chkconfig:2345 88 12
# description:NRPE DAEMON
NRPE=/usr/local/nagios/bin/nrpe
NRPECONF=/usr/local/nagios/etc/nrpe.cfg
case "$1" in
start)
echo -n "Starting NRPE daemon.."
$NRPE -c $NRPECONF -d
echo "done."
;;
stop)
echo -n "Stopping NRPE daemon.."
pkill -u nagios nrpe
echo "done."
;;
restart)
$0 stop
sleep 2
$0 start
;;
*)
echo "Usage:$0 start|stop|restart"
;;
esac
exit 0
[root@ecs-326c-0002 ~]# chmod +x /etc/init.d/nrped[root@ecs-326c-0002 ~]# chkconfig --add nrped
[root@ecs-326c-0002 ~]# chkconfig --list nrped
nrped 0:off 1:off 2:on 3:on 4:on 5:on 6:off[root@ecs-326c-0002 ~]# netstat -ntlp
Active Internet connections (only servers)
Proto Recv-Q Send-Q Local Address Foreign Address State PID/Program name
tcp 0 0 0.0.0.0:22 0.0.0.0:* LISTEN 2298/sshd
tcp 0 0 127.0.0.1:631 0.0.0.0:* LISTEN 1992/cupsd
tcp 0 0 127.0.0.1:25 0.0.0.0:* LISTEN 2402/master
tcp 0 0 127.0.0.1:6010 0.0.0.0:* LISTEN 42522/sshd
tcp 0 0 127.0.0.1:32001 0.0.0.0:* LISTEN 1690/java
tcp 0 0 :::22 :::* LISTEN 2298/sshd
tcp 0 0 ::1:631 :::* LISTEN 1992/cupsd
tcp 0 0 ::1:25 :::* LISTEN 2402/master
tcp 0 0 ::1:6010 :::* LISTEN 42522/sshd
[root@ecs-326c-0002 ~]# service nrped start
Starting NRPE daemon..done.
[root@ecs-326c-0002 ~]# netstat -ntlp
Active Internet connections (only servers)
Proto Recv-Q Send-Q Local Address Foreign Address State PID/Program name
tcp 0 0 0.0.0.0:22 0.0.0.0:* LISTEN 2298/sshd
tcp 0 0 127.0.0.1:631 0.0.0.0:* LISTEN 1992/cupsd
tcp 0 0 127.0.0.1:25 0.0.0.0:* LISTEN 2402/master
tcp 0 0 127.0.0.1:6010 0.0.0.0:* LISTEN 42522/sshd
tcp 0 0 127.0.0.1:32001 0.0.0.0:* LISTEN 1690/java
tcp 0 0 0.0.0.0:5666 0.0.0.0:* LISTEN 66099/nrpe
tcp 0 0 :::22 :::* LISTEN 2298/sshd
tcp 0 0 ::1:631 :::* LISTEN 1992/cupsd
tcp 0 0 ::1:25 :::* LISTEN 2402/master
tcp 0 0 ::1:6010 :::* LISTEN 42522/sshd
tcp 0 0 :::5666 :::* LISTEN 66099/nrpe 或者,也可以在/etc/xinetd.d目录中创建nrpe文件,使其成为一个基于非独立守护进程的服务,文件内容如下:
service nrpe
(
flags = REUSE
socket_type = stream
wait = no
user = nagios
group = nagios
server = /opt/naigos/bin/nrpe
server_args = -c /etc/nagios/nrpe.cfg -in
log_on_failure += USERID
disable = no
此种情况下启动NRPE进行需要通过重启xinetd来实现。
三、服务器端安装NRPE
1、安装nrpe
[root@ecs-6221 ~]# wget https://jaist.dl.sourceforge.net/project/nagios/nrpe-3.x/nrpe-3.2.1.tar.gz[root@ecs-6221 ~]# tar -zxvf nrpe-3.2.1.tar.gz [root@ecs-6221 ~]# cd nrpe-3.2.1
[root@ecs-6221 nrpe-3.2.1]# ./configure --with-nrpe-user=nagios \
> --with-nrpe-group=nagios \
> --with-nagios-user=nagios \
> --with-nagios-group=nagios \
> --enable-command-args \
> --enable-ssl[root@ecs-6221 nrpe-3.2.1]# make all[root@ecs-6221 nrpe-3.2.1]# make install-plugin会在nagios安装目录的libexec下生成check_nrpe的插件
[root@ecs-6221 nrpe-3.2.1]# cd /usr/local/nagios/libexec/
You have new mail in /var/spool/mail/root
[root@ecs-6221 libexec]# ll -d check_nrpe
-rwxrwxr-x 1 nagios nagios 132384 Jun 14 11:20 check_nrpe
2、检测客户端连接状态,出现版本号即为正常
[root@ecs-6221 libexec]# ./check_nrpe -H 192.168.1.126
NRPE v3.2.1
通过NRPE监控远程Linux主机要使用chech_nrpe插件进行,其语法格式如下:
check_nrpe -H <host> [-n] [-u] [-p <port>] [-t <timeout>] [-c <command>] [-a <arglist...>]
3、定义命令
[root@ecs-6221 ~]# cd /usr/local/nagios/etc/objects/
[root@ecs-6221 objects]# ll
total 52
-rw-rw-r-- 1 nagios nagios  7688 Jun 13 23:38 commands.cfg
-rw-rw-r-- 1 nagios nagios  2138 Jun 13 23:38 contacts.cfg
-rw-r--r-- 1 root   root    3991 Jun 14 10:55 linhost.cfg
-rw-rw-r-- 1 nagios nagios  5379 Jun 13 23:38 localhost.cfg
-rw-rw-r-- 1 nagios nagios  3070 Jun 13 23:38 printer.cfg
-rw-rw-r-- 1 nagios nagios  3252 Jun 13 23:38 switch.cfg
-rw-rw-r-- 1 nagios nagios 10595 Jun 13 23:38 templates.cfg
-rw-rw-r-- 1 nagios nagios  3180 Jun 13 23:38 timeperiods.cfg
-rw-rw-r-- 1 nagios nagios  3991 Jun 13 23:38 windows.cfg
[root@ecs-6221 objects]# vim commands.cfg
先查看是否已经存在,没有就在末尾行添加
define command{
        command_name    check_nrpe
        command_line    $USER1$/check_nrpe -H $HOSTADDRESS$ -c "$ARG1$"
        }
4、定义服务
[root@ecs-6221 objects]# cp windows.cfg linhost.cfg
[root@ecs-6221 objects]# vim linhost.cfg
[root@ecs-6221 objects]# grep -v '^#' linhost.cfg | sed '/^$/d'
define host{
	use		linux-server	; Inherit default values from a template
	host_name	linhost		; The name we're giving to this host
	alias		192.168.1.126	; A longer name associated with the host
	address		192.168.1.126	; IP address of the host
	}
define service{
	use			generic-service
	host_name		linhost
	service_description	CHECK USER
	check_command		check_nrpe!check_users
	}
define service{
	use			generic-service
	host_name		linhost
	service_description	load
	check_command		check_nrpe!check_load
	}
define service{
	use			generic-service
	host_name		linhost
	service_description	SDA1
	check_command		check_nrpe!check_hda1
	}
define service{
	use			generic-service
	host_name		linhost
	service_description	Zombie
	check_command		check_nrpe!check_zombie_procs
	}
define service{
	use			generic-service
	host_name		linhost
	service_description	Total procs
	check_command		check_nrpe!check_total_procs
	}
nagios服务端定义服务的命令完全是根据被监控端nrpe中内置的监控命令,如下在客户端的查看显示
5、启动所定义的命令和服务,增加linhost
[root@ecs-6221 ~]# vim /usr/local/nagios/etc/nagios.cfg 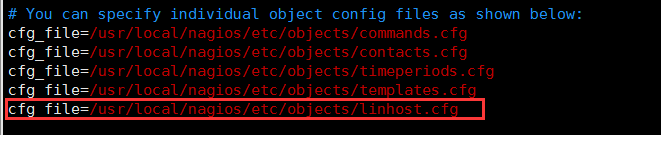
6、配置文件的语法检查
[root@ecs-6221 ~]# service nagios configtest

Nagios Core 4.3.1
Copyright (c) 2009-present Nagios Core Development Team and Community Contributors
Copyright (c) 1999-2009 Ethan Galstad
Last Modified: 02-23-2017
License: GPL

Website: https://www.nagios.org
Reading configuration data...
   Read main config file okay...
   Read object config files okay...

Running pre-flight check on configuration data...

Checking objects...
	Checked 13 services.
	Checked 2 hosts.
	Checked 1 host groups.
	Checked 0 service groups.
	Checked 1 contacts.
	Checked 1 contact groups.
	Checked 25 commands.
	Checked 5 time periods.
	Checked 0 host escalations.
	Checked 0 service escalations.
Checking for circular paths...
	Checked 2 hosts
	Checked 0 service dependencies
	Checked 0 host dependencies
	Checked 5 timeperiods
Checking global event handlers...
Checking obsessive compulsive processor commands...
Checking misc settings...

Total Warnings: 0
Total Errors:   0

Things look okay - No serious problems were detected during the pre-flight check
Object precache file created:
/usr/local/nagios/var/objects.precache
7、重启nagios服务
[root@ecs-6221 ~]# service nagios restart
Running configuration check...
Stopping nagios:. done.
Starting nagios: done.
8、打开nagios web监控界面
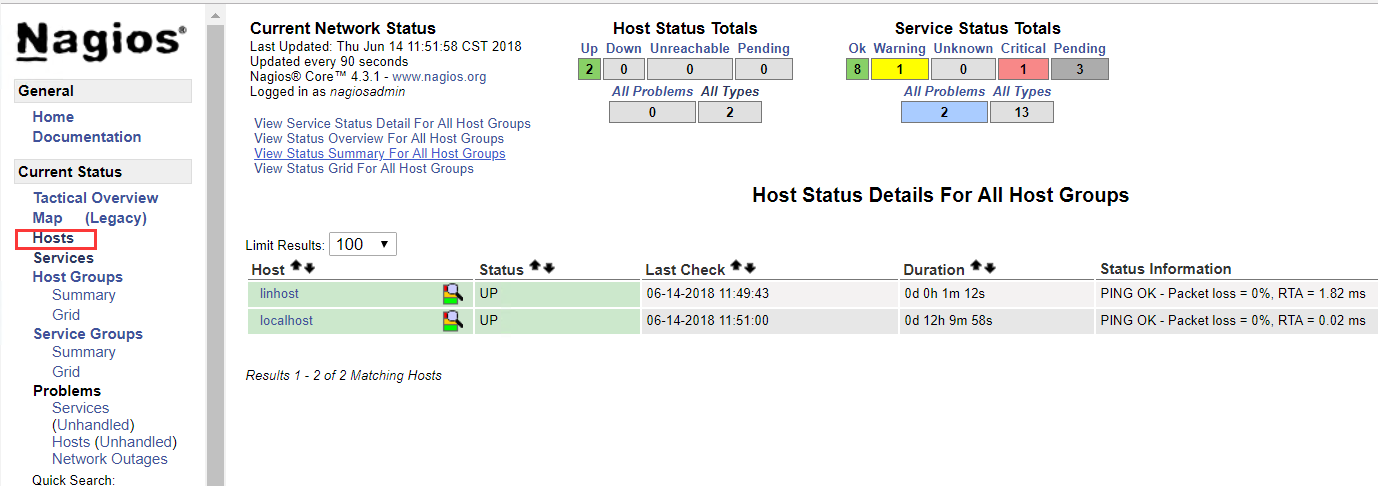
1)点击hosts,查看主机状态
2)然后点击service,查看到硬盘监控异常,提示没有这个文件或目录
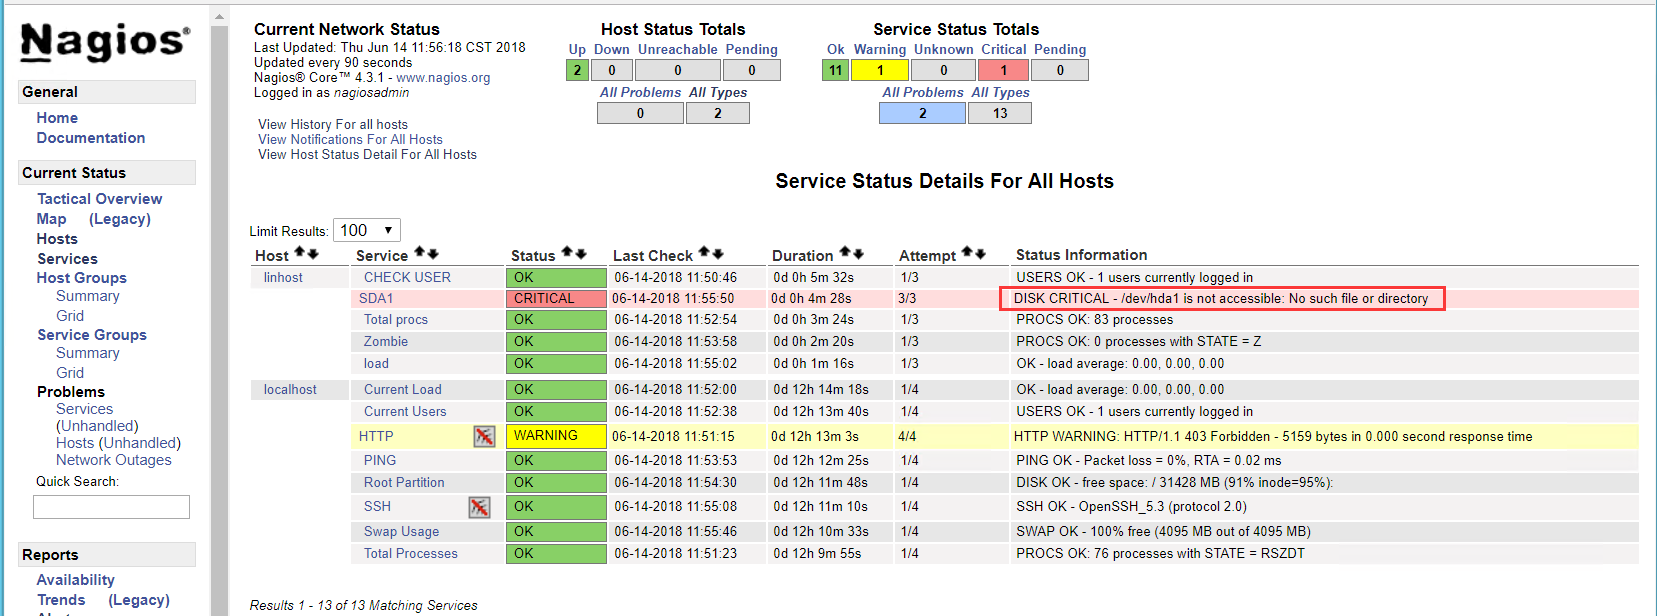
解决:回到被监控主机上查看,硬盘类型

修改被监控主机的nrpe配置文件并重启nrpe服务
[root@ecs-326c-0002 ~]# vim /usr/local/nagios/etc/nrpe.cfg 
[root@ecs-326c-0002 ~]# service nrped restart
Stopping NRPE daemon..done.
Starting NRPE daemon..done.
再修改服务器端linhost.cfg配置文件并重启nagios和httpd服务
[root@ecs-6221 ~]# vim /usr/local/nagios/etc/objects/linhost.cfg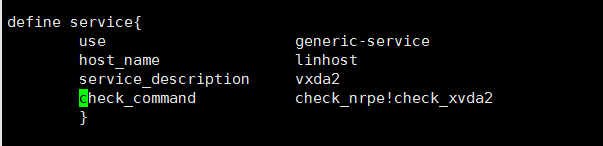
[root@ecs-6221 ~]# service nagios restart
Running configuration check...
Stopping nagios:. done.
Starting nagios: done.
[root@ecs-6221 ~]# service httpd restart
Stopping httpd:                                            [  OK  ]
Starting httpd: httpd: Could not reliably determine the server's fully qualified domain name, using 183.136.168.82 for ServerName
                                                           [  OK  ]
最后查看服务都正常

添加linux 监控ping
[root@ecs-6221 objects]# pwd
/usr/local/nagios/etc/objects
[root@ecs-6221 objects]# vim linhost.cfg
define service{
use generic-service ; Name of service template to use
host_name linhost
service_description PING
check_command check_ping!100.0,20%!500.0,60%
}