detectron是facebook的开源项目,其实现主要基于caffe2。里面有诸如FPN,Mask-RCNN等优秀目标检测算法的实现。
利用Detectron训练自己的数据集,首先我们要搭建好相应环境。
caffe2的安装请参考caffe2官网安装教程。
https://caffe2.ai/docs/getting-started.html?platform=ubuntu&configuration=prebuilt
detectron安装请参考detectron官方安装教程。
https://github.com/facebookresearch/Detectron/blob/master/INSTALL.md
数据准备
由于我们的数据集是voc格式的,即我们的annotation是xml格式的,而detectron要求的是json格式的annotation,因此首先进行数据转换。
首先将训练集的xml格式的annotation放置到新文件夹train_annotations, 将测试集的xml格式的annotations放置到新文件夹test_annotations。(可能我们的测试集是从训练集中分离出来的验证集,它们的xml格式的annotation放置在一起,手动分离是不太可能的,对此,我们可以用程序实现)
# if you want to use it to copy some file from one directory to the other directory,
# you can you this file
# first, you should have a list file that list test/train sets. eg:trainval.txt
# write by GX.
import os
import shutil

# the path is you original file directory
# the newpath is the new directory
class CopyXml():
    def __init__(self):
        # 你的xml格式的annotation的路径
        self.path = '/home/zhgx/WorkSpace/KITTI/VOC2007/Annotations'
        # 你训练集/测试集xml格式annotation存放的路径
        self.newpath = '/home/zhgx/WorkSpace/KITTI/VOC2007/train_annotations'

    def startcopy(self):
        filelist = os.listdir(self.path)  # file list in this directory
        # print(len(filelist))
        test_list = loadFileList()
        # print(len(test_list))
        for f in filelist:
            filedir = os.path.join(self.path, f)
            (shotname, extension) = os.path.splitext(f)
            if str(shotname) in test_list:
                #print('success')
                shutil.copyfile(str(filedir),os.path.join(self.newpath,f))


# load the list of train/test file list
def loadFileList():
    filelist = []
    f = open("/home/zhgx/WorkSpace/KITTI/VOC2007/ImageSets/Main/trainval.txt", "r")
    lines = f.readlines()
    for line in lines:
        # 去掉文件中每行的结尾字符
        line = line.strip('\r\n')  # to remove the '\n' for test.txt, '\r\n' for tainval.txt
        line = str(line)
        filelist.append(line)
    f.close()
    # print(filelist)
    return filelist

if __name__ == '__main__':
    demo = CopyXml()
    demo.startcopy()
    # filelist = os.listdir('/home/zhgx/WorkSpace/KITTI/VOC2007/train_annotations')
    # print(len(filelist))
然后便可以利用xml格式的annotation生成json格式的annotation。这个可以参考
https://blog.csdn.net/Mr_health/article/details/81348130
生成之后我们需要将数据以正确的方式摆放。
最终形成的目录结构为:
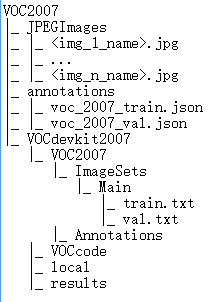
其中VOCdevkit2007文件夹,里面还有一个VOC2007文件,注意其中的ImageSets/Main目录中存放的是自己数据的train.txt和val.txt,Annotations存放自己的数据的xml文件(也就是train_Annotations和val_Annotations的集合,因为模型评估中仍采用voc数据集的方式,所以只需要val数据的xml支持)
然后修改VOCcode中的VOCinit
将其中的VOC2007 classes改为你自己的classes名称,对于我是
VOCopts.classes={...
    'pedestrian'
    'cyclist'
    'car'};
数据准备好之后我们需要创建软链接到Detectron要求的位置
$DETECTRON指我的Detectron的位置
ln -s /home/WorkSpace/VOC2007 $DETECTRON/detectron/datasets/data
训练模型
在detectron根目录下创建文件夹experiments,在experiments下新建文件夹cfgs和result用于存放配置文件和结果。
这里我训练的FPN+ResNet50
下载预训练模型
detectron官方有在imageNet上预训练的模型文件,建议先下载好。
在detectron根目录下新建文件夹pre_train_model
下载地址:https://github.com/facebookresearch/Detectron/blob/master/MODEL_ZOO.md
下载R-50.pkl到pre_train_model文件夹下。
修改配置文件
将configs/getting_started/tutorial_1gpu_e2e_faster_rcnn_R-50-FPN.yaml(你可以根据自己的GPU数目选择配置文件)拷贝到experiments/cfgs文件夹中,主要修改项如下:
NUM_CLASSES: 你自己的类别数+1
TRAIN:
|_ WEIGHTS:you/path/to/R-50.pkl
|_ DATASETS:(‘voc_2007_train’,)
TEST:
|_ DATASETS:(‘voc_2007_val’,)
OUTPUT_DIR: you/path/to/save/result
开始训练
python tools/train_net.py \
    --cfg experiments/cfgs/tutorial_1gpu_e2e_faster_rcnn_R-50-FPN.yaml \