接上一篇,在hibernate添加成功之后,我们找到hibernate.cfg.xml文件,可以看到,系统自己创建的文件有一段是标红的,这是因为我们还没有导入mysql的jar包。我们可以直接从网上找一个mysql的jar包,添加到项目中。
如图,这是我从网上下载下来的jar包,将其复制粘贴到项目的lib目录下。

然后选中jar包,右键,Add as Library...

确定。然后再回到hibernate配置文件中,原本标红的路径已经不再报错了。

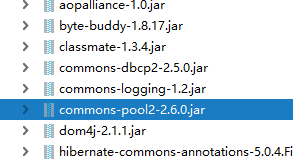
然后,我们用相同的方式,从网上找到commons-dbcp2,和commons-pool2两个jar包,将其添加到项目中去。
添加完成之后,找到src文件夹下面的spring-config.xml文件,添加部分配置,完整代码如下:
<?xml version="1.0" encoding="UTF-8"?>
<beans xmlns="http://www.springframework.org/schema/beans"
       xmlns:xsi="http://www.w3.org/2001/XMLSchema-instance"
       xsi:schemaLocation="http://www.springframework.org/schema/beans http://www.springframework.org/schema/beans/spring-beans.xsd">


    <bean id="OutputHelper" class="com.yiibai.output.OutputHelper">
        <property name="outputGenerator" ref="CsvOutputGenerator"></property>
    </bean>
    <bean id="CsvOutputGenerator" class="com.yiibai.output.impl.CsvOutputGenerator"></bean>


    <bean id="dataSource" class="org.apache.commons.dbcp2.BasicDataSource" destroy-method="close">
        <property name="driverClassName" value="com.mysql.jdbc.Driver"></property>
        <property name="url" value="jdbc:mysql://localhost:3306/test"></property>
        <property name="username" value="root"></property>
        <property name="password" value="123456"></property>
    </bean>
    <bean id="sessionFactory" class="org.springframework.orm.hibernate4.LocalSessionFactoryBean">
        <property name="dataSource" ref="dataSource"></property>
        <property name="hibernateProperties">
            <props>
                <prop key="hibernate.dialect">org.hibernate.dialect.MySQLDialect</prop>
                <prop key="hibernate.show_sql">true</prop>
                <prop key="hibernate.connection.url">jdbc:mysql://localhost:3306/test</prop>
                <prop key="hibernate.connection.driver_class">com.mysql.jdbc.Driver</prop>
            </props>
        </property>
    </bean>
</beans>
这里需要注意的就是mysql的路径和账号密码。请根据自己的实际情况进行设置。
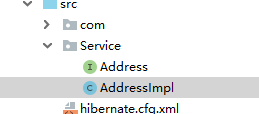
设置完成之后,回到项目目录,在src文件夹下新建Service包,在包中新建Address接口和AddressImpl实现类,如图:
Address 的代码:
package Service;

import com.dojo.UserEntity;

public interface Address {
    public void add(UserEntity ue);
}
AddressImpl的代码:
package Service;

import com.dojo.UserEntity;
import org.hibernate.Session;
import org.hibernate.SessionFactory;
import org.hibernate.Transaction;
import org.springframework.beans.factory.annotation.Autowired;
import org.springframework.beans.factory.annotation.Qualifier;

public class AddressImpl implements Address{

    @Qualifier("sessionFactory")
    @Autowired
    private SessionFactory sessionFactory;

    @Override
    public void add(UserEntity ue){
        Session session = sessionFactory.openSession();
        Transaction tx = session.beginTransaction();
        session.save(ue);
        tx.commit();
    }

    public void setSessionFactory(SessionFactory sessionFactory){
        this.sessionFactory = sessionFactory;
    }
}
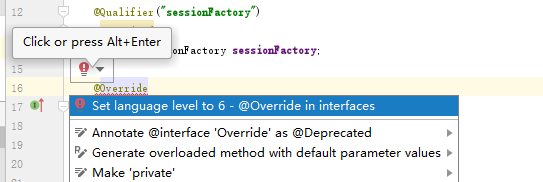
添加完成之后@Override有可能会报错,直接点一下红灯泡,改一下语言等级就可以了。
完成之后,再回到之前的spring-config.xml,对其进行完善。完善后的全部代码如下:
<?xml version="1.0" encoding="UTF-8"?>
<beans xmlns="http://www.springframework.org/schema/beans"
       xmlns:xsi="http://www.w3.org/2001/XMLSchema-instance"
       xsi:schemaLocation="http://www.springframework.org/schema/beans http://www.springframework.org/schema/beans/spring-beans.xsd">


    <bean id="OutputHelper" class="com.yiibai.output.OutputHelper">
        <property name="outputGenerator" ref="CsvOutputGenerator"></property>
    </bean>
    <bean id="CsvOutputGenerator" class="com.yiibai.output.impl.CsvOutputGenerator"></bean>


    <bean id="dataSource" class="org.apache.commons.dbcp2.BasicDataSource" destroy-method="close">
        <property name="driverClassName" value="com.mysql.jdbc.Driver"></property>
        <property name="url" value="jdbc:mysql://localhost:3306/test"></property>
        <property name="username" value="root"></property>
        <property name="password" value="123456"></property>
    </bean>
    <bean id="sessionFactory" class="org.springframework.orm.hibernate4.LocalSessionFactoryBean">
        <property name="dataSource" ref="dataSource"></property>
        <property name="hibernateProperties">
            <props>
                <prop key="hibernate.dialect">org.hibernate.dialect.MySQLDialect</prop>
                <prop key="hibernate.show_sql">true</prop>
                <prop key="hibernate.connection.url">jdbc:mysql://localhost:3306/test</prop>
                <prop key="hibernate.connection.driver_class">com.mysql.jdbc.Driver</prop>
            </props>
        </property>
        <property name="mappingLocations">
            <list>
                <value>classpath:com/dojo/UserEntity.hbm.xml</value>
                <value>classpath:com/dojo/UserEntity.hbm.xml</value>
            </list>
        </property>
        <property name="annotatedClasses">
            <list>
                <value>com.dojo.UserEntity</value>
            </list>
        </property>
    </bean>
    <bean id="address" class="Service.AddressImpl">
        <property name="sessionFactory" ref="sessionFactory"></property>
    </bean>
</beans>
然后我们找到CsvOutputGenerator.java文件,对其进行修改:
package com.yiibai.output.impl;

import Service.Address;
import Service.AddressImpl;
import com.dojo.UserEntity;
import com.yiibai.output.IOutputGenerator;
import org.springframework.context.ApplicationContext;
import org.springframework.context.support.ClassPathXmlApplicationContext;

public class CsvOutputGenerator implements IOutputGenerator {

    public String generateOutput(){
        ApplicationContext ac=new ClassPathXmlApplicationContext(new String[]{"spring-config.xml"});
        Address address = (AddressImpl)ac.getBean("address");
        UserEntity userEntity = new UserEntity();
        userEntity.setUid(3);
        userEntity.setUname("cat");
        address.add(userEntity);
        return "SUCCESS";
    }
}
修改完成之后运行tomcat:
点击主页上的login,报错:
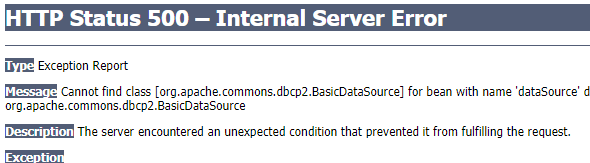
这个错误跟上次的一样,也是由于包的原因造成的。我们回到项目,File——Project Structure如图:

put into output root ,然后OK就可以了。
再次运行tomcat,点击主页上的login,出现错误:

这个错误是由数据库时差引起的,我们回到spring-config.xml,修改一下数据库连接url,将
jdbc:mysql://localhost:3306/test改为:
jdbc:mysql://localhost:3306/test?serverTimezone=GMT%2B8也就是在后面加上 ?serverTimezone=GMT%2B8 这么一段代码。
这段代码的意思是更改数据库时间显示为北京时间。如果你本人在东京时区,那么将这一段代码后面的8改为7就可以了。
运行tomcat:
点击login:

成功。我们再去到数据库中查看一下:

数据添加成功!