本教程是Kevin大神的最后一个教程,内容很充实
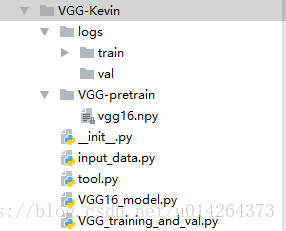
浏览文件大纲:
这些都是本教程的内容,很充实,代码写完后你将会学到的知识有:对训练数据的处理,怎么分批次训练;卷积过程步骤流程券走通,还可以泛用到其他卷积网络;VGG模型的实操;迁移VGG原模型的参数进行训练;tensorboard的打开实时查看训练情况等等。
1.第一个文件,卷积工具包,文件命名为:tool.py,内容截图如下;
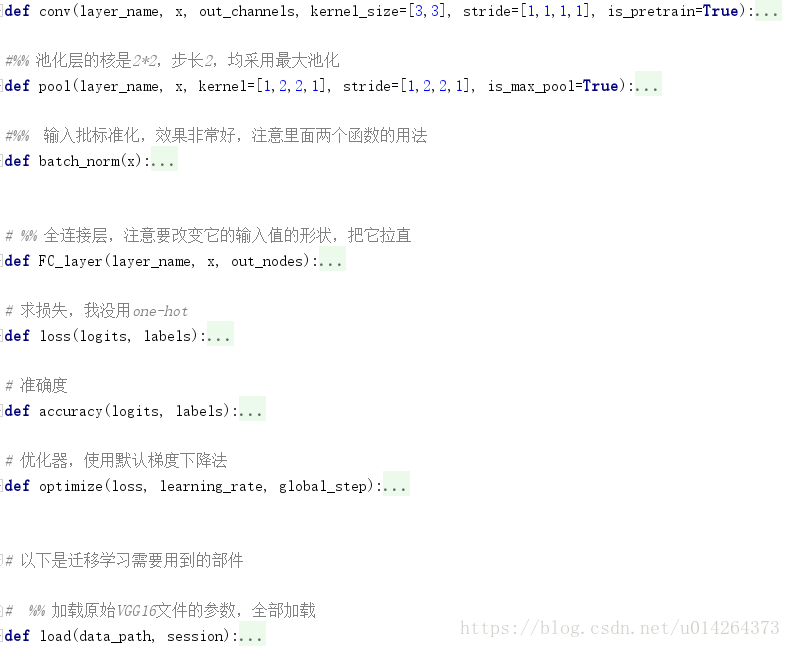


是不是包含及基本卷积需要用到的很多方法;以后也是可以调用的
这部分的代码如下:
# 这是一个卷积模型包,包含所有成分,调用这个可以方便的写出模型,VGG16就是调用这个来写的
import tensorflow as tf
import numpy as np


#%%
def conv(layer_name, x, out_channels, kernel_size=[3,3], stride=[1,1,1,1], is_pretrain=True):
    '''Convolution op wrapper, use RELU activation after convolution
    Args:
        layer_name: e.g. conv1, pool1...
        x: input tensor, [batch_size, height, width, channels]
        out_channels: number of output channels (or comvolutional kernels)
        kernel_size: the size of convolutional kernel, VGG paper used: [3,3]
        stride: A list of ints. 1-D of length 4. VGG paper used: [1, 1, 1, 1]
        is_pretrain: if load pretrained parameters, freeze all conv layers.
        Depending on different situations, you can just set part of conv layers to be freezed.
        the parameters of freezed layers will not change when training.
    Returns:
        4D tensor
    '''

    in_channels = x.get_shape()[-1]
    with tf.variable_scope(layer_name):
        w = tf.get_variable(name='weights',
                            trainable=is_pretrain,   # 为false时为固定住某层,让他不训练
                            shape=[kernel_size[0], kernel_size[1], in_channels, out_channels],
                            initializer=tf.contrib.layers.xavier_initializer())
        # default is uniform distribution initialization
        # 这里的初始化形式同以往不一样
        b = tf.get_variable(name='biases',
                            trainable=is_pretrain,
                            shape=[out_channels],
                            initializer=tf.constant_initializer(0.0))
        x = tf.nn.conv2d(x, w, stride, padding='SAME', name='conv')
        x = tf.nn.bias_add(x, b, name='bias_add')
        x = tf.nn.relu(x, name='relu')
        return x

#%% 池化层的核是2*2,步长2,均采用最大池化
def pool(layer_name, x, kernel=[1,2,2,1], stride=[1,2,2,1], is_max_pool=True):
    '''Pooling op
    Args:
        x: input tensor
        kernel: pooling kernel, VGG paper used [1,2,2,1], the size of kernel is 2X2
        stride: stride size, VGG paper used [1,2,2,1]
        padding:
        is_max_pool: boolen
                    if True: use max pooling
                    else: use avg pooling
    '''
    if is_max_pool:
        x = tf.nn.max_pool(x, kernel, strides=stride, padding='SAME', name=layer_name)
    else:
        x = tf.nn.avg_pool(x, kernel, strides=stride, padding='SAME', name=layer_name)
    return x

#%%  输入批标准化,效果非常好,注意里面两个函数的用法
def batch_norm(x):
    '''Batch normlization(I didn't include the offset and scale)
    '''
    epsilon = 1e-3
    batch_mean, batch_var = tf.nn.moments(x, [0])   # 均值和方差
    x = tf.nn.batch_normalization(x,
                                  mean=batch_mean,
                                  variance=batch_var,
                                  offset=None,
                                  scale=None,
                                  variance_epsilon=epsilon)
    return x


# %% 全连接层,注意要改变它的输入值的形状,把它拉直
def FC_layer(layer_name, x, out_nodes):
    '''Wrapper for fully connected layers with RELU activation as default
    Args:
        layer_name: e.g. 'FC1', 'FC2'
        x: input feature map
        out_nodes: number of neurons for current FC layer
    '''
    shape = x.get_shape()
    # 这里有两种拉直方式,第一种对4维的进行拉直,也就是卷积完之后使用,另一种是全连接之后的全连接使用
    if len(shape) == 4:
        size = shape[1].value * shape[2].value * shape[3].value
    else:
        size = shape[-1].value

    with tf.variable_scope(layer_name):
        w = tf.get_variable('weights',
                            shape=[size, out_nodes],
                            initializer=tf.contrib.layers.xavier_initializer())
        b = tf.get_variable('biases',
                            shape=[out_nodes],
                            initializer=tf.constant_initializer(0.0))
        flat_x = tf.reshape(x, [-1, size])  # flatten into 1D 把输入数据拉直

        x = tf.nn.bias_add(tf.matmul(flat_x, w), b)
        x = tf.nn.relu(x)
        return x

# 求损失,我没用one-hot
def loss(logits, labels):
    '''Compute loss
    Args:
        logits: logits tensor, [batch_size, n_classes]
        labels: one-hot labels
    '''
    with tf.name_scope('loss') as scope:
        cross_entropy = tf.nn.softmax_cross_entropy_with_logits(logits=logits, labels=labels,name='cross-entropy')
        loss = tf.reduce_mean(cross_entropy, name='loss')
        tf.summary.scalar(scope+'/loss', loss)
        return loss

# 准确度
def accuracy(logits, labels):
  """Evaluate the quality of the logits at predicting the label.
  Args:
    logits: Logits tensor, float - [batch_size, NUM_CLASSES].
    labels: Labels tensor,
  """
  with tf.name_scope('accuracy') as scope:
      correct = tf.equal(tf.arg_max(logits, 1), tf.arg_max(labels, 1))
      correct = tf.cast(correct, tf.float32)
      accuracy = tf.reduce_mean(correct)*100.0
      tf.summary.scalar(scope+'/accuracy', accuracy)
  return accuracy

# 优化器,使用默认梯度下降法
def optimize(loss, learning_rate, global_step):
    '''optimization, use Gradient Descent as default
    '''
    with tf.name_scope('optimizer'):
        optimizer = tf.train.GradientDescentOptimizer(learning_rate=learning_rate)
        #optimizer = tf.train.AdamOptimizer(learning_rate=learning_rate)
        train_op = optimizer.minimize(loss, global_step=global_step)
        return train_op


# 以下是迁移学习需要用到的部件

#  %% 加载原始VGG16文件的参数,全部加载
def load(data_path, session):
    data_dict = np.load(data_path, encoding='latin1').item()

    keys = sorted(data_dict.keys())
    for key in keys:
        with tf.variable_scope(key, reuse=True):
            for subkey, data in zip(('weights', 'biases'), data_dict[key]):
                session.run(tf.get_variable(subkey).assign(data))


# %%   测试加载进来的参数
def test_load():
    data_path = './/VGG-pretrain//vgg16.npy'  # 文件保存路径
    # 注意这个文件要到网上自行下载
    data_dict = np.load(data_path, encoding='latin1').item()
    keys = sorted(data_dict.keys())
    for key in keys:
        weights = data_dict[key][0]
        biases = data_dict[key][1]
        print('\n')
        print(key)
        print('weights shape: ', weights.shape)
        print('biases shape: ', biases.shape)


# %%   跳级加载,就是不是每个层都要加载它的参数
def load_with_skip(data_path, session, skip_layer):
    data_dict = np.load(data_path, encoding='latin1').item()
    for key in data_dict:
        if key not in skip_layer:
            with tf.variable_scope(key, reuse=True):
                for subkey, data in zip(('weights', 'biases'), data_dict[key]):
                    session.run(tf.get_variable(subkey).assign(data))

# 打印可训练的参数,可以运行来看看。
def print_all_variables(train_only=True):
    """Print all trainable and non-trainable variables
    without tl.layers.initialize_global_variables(sess)

    Parameters
    ----------
    train_only : boolean
        If True, only print the trainable variables, otherwise, print all variables.
    """
    # tvar = tf.trainable_variables() if train_only else tf.all_variables()
    if train_only:
        t_vars = tf.trainable_variables()
        print("  [*] printing trainable variables")
    else:
        try: # TF1.0
            t_vars = tf.global_variables()
        except: # TF0.12
            t_vars = tf.all_variables()
        print("  [*] printing global variables")
    for idx, v in enumerate(t_vars):
        print("  var {:3}: {:15}   {}".format(idx, str(v.get_shape()), v.name))
2.第二个部件就是VGG模型,用上面这个tool.py来创建,非常简单,具体模型可以参考对应论文,以及网上的解说。
以下给了两种方案,主要区别是就是tensorboard Graph的区别,建议使用第二种。
# vgg16 模型
import tensorflow as tf
import tool


# %% 这是原始VGG16的模型,有两种方法,第二种用了命名范围,就可以把整个模型显示在tensorboard上面。自选一种
# def VGG16(x, n_classes, is_pretrain=True):
#     x = tool.conv('conv1_1', x, 64, kernel_size=[3, 3], stride=[1, 1, 1, 1], is_pretrain=is_pretrain)
#     x = tool.conv('conv1_2', x, 64, kernel_size=[3, 3], stride=[1, 1, 1, 1], is_pretrain=is_pretrain)
#     x = tool.pool('pool1', x, kernel=[1, 2, 2, 1], stride=[1, 2, 2, 1], is_max_pool=True)
#
#     x = tool.conv('conv2_1', x, 128, kernel_size=[3, 3], stride=[1, 1, 1, 1], is_pretrain=is_pretrain)
#     x = tool.conv('conv2_2', x, 128, kernel_size=[3, 3], stride=[1, 1, 1, 1], is_pretrain=is_pretrain)
#     x = tool.pool('pool2', x, kernel=[1, 2, 2, 1], stride=[1, 2, 2, 1], is_max_pool=True)
#
#     x = tool.conv('conv3_1', x, 256, kernel_size=[3, 3], stride=[1, 1, 1, 1], is_pretrain=is_pretrain)
#     x = tool.conv('conv3_2', x, 256, kernel_size=[3, 3], stride=[1, 1, 1, 1], is_pretrain=is_pretrain)
#     x = tool.conv('conv3_3', x, 256, kernel_size=[3, 3], stride=[1, 1, 1, 1], is_pretrain=is_pretrain)
#     x = tool.pool('pool3', x, kernel=[1, 2, 2, 1], stride=[1, 2, 2, 1], is_max_pool=True)
#
#     x = tool.conv('conv4_1', x, 512, kernel_size=[3, 3], stride=[1, 1, 1, 1], is_pretrain=is_pretrain)
#     x = tool.conv('conv4_2', x, 512, kernel_size=[3, 3], stride=[1, 1, 1, 1], is_pretrain=is_pretrain)
#     x = tool.conv('conv4_3', x, 512, kernel_size=[3, 3], stride=[1, 1, 1, 1], is_pretrain=is_pretrain)
#     x = tool.pool('pool3', x, kernel=[1, 2, 2, 1], stride=[1, 2, 2, 1], is_max_pool=True)
#
#     x = tool.conv('conv5_1', x, 512, kernel_size=[3, 3], stride=[1, 1, 1, 1], is_pretrain=is_pretrain)
#     x = tool.conv('conv5_2', x, 512, kernel_size=[3, 3], stride=[1, 1, 1, 1], is_pretrain=is_pretrain)
#     x = tool.conv('conv5_3', x, 512, kernel_size=[3, 3], stride=[1, 1, 1, 1], is_pretrain=is_pretrain)
#     x = tool.pool('pool3', x, kernel=[1, 2, 2, 1], stride=[1, 2, 2, 1], is_max_pool=True)
#
#     x = tool.FC_layer('fc6', x, out_nodes=4096)
#     # 全连接后有两种做法,一是BN算法,如下:另是dropout算法,有时间可以做下对比
#     # x = tools.batch_norm(x)
#     x = tool.FC_layer('fc7', x, out_nodes=4096)
#     # x = tools.batch_norm(x)
#     x = tool.FC_layer('fc8', x, out_nodes=n_classes)
#
#     return x


def VGG16N(x, n_classes, is_pretrain=True):
    with tf.name_scope('VGG16'):
        x = tool.conv('conv1_1', x, 64, kernel_size=[3, 3], stride=[1, 1, 1, 1], is_pretrain=is_pretrain)
        x = tool.conv('conv1_2', x, 64, kernel_size=[3, 3], stride=[1, 1, 1, 1], is_pretrain=is_pretrain)
        with tf.name_scope('pool1'):
            x = tool.pool('pool1', x, kernel=[1, 2, 2, 1], stride=[1, 2, 2, 1], is_max_pool=True)

        x = tool.conv('conv2_1', x, 128, kernel_size=[3, 3], stride=[1, 1, 1, 1], is_pretrain=is_pretrain)
        x = tool.conv('conv2_2', x, 128, kernel_size=[3, 3], stride=[1, 1, 1, 1], is_pretrain=is_pretrain)
        with tf.name_scope('pool2'):
            x = tool.pool('pool2', x, kernel=[1, 2, 2, 1], stride=[1, 2, 2, 1], is_max_pool=True)

        x = tool.conv('conv3_1', x, 256, kernel_size=[3, 3], stride=[1, 1, 1, 1], is_pretrain=is_pretrain)
        x = tool.conv('conv3_2', x, 256, kernel_size=[3, 3], stride=[1, 1, 1, 1], is_pretrain=is_pretrain)
        x = tool.conv('conv3_3', x, 256, kernel_size=[3, 3], stride=[1, 1, 1, 1], is_pretrain=is_pretrain)
        with tf.name_scope('pool3'):
            x = tool.pool('pool3', x, kernel=[1, 2, 2, 1], stride=[1, 2, 2, 1], is_max_pool=True)

        x = tool.conv('conv4_1', x, 512, kernel_size=[3, 3], stride=[1, 1, 1, 1], is_pretrain=is_pretrain)
        x = tool.conv('conv4_2', x, 512, kernel_size=[3, 3], stride=[1, 1, 1, 1], is_pretrain=is_pretrain)
        x = tool.conv('conv4_3', x, 512, kernel_size=[3, 3], stride=[1, 1, 1, 1], is_pretrain=is_pretrain)
        with tf.name_scope('pool4'):
            x = tool.pool('pool4', x, kernel=[1, 2, 2, 1], stride=[1, 2, 2, 1], is_max_pool=True)

        x = tool.conv('conv5_1', x, 512, kernel_size=[3, 3], stride=[1, 1, 1, 1], is_pretrain=is_pretrain)
        x = tool.conv('conv5_2', x, 512, kernel_size=[3, 3], stride=[1, 1, 1, 1], is_pretrain=is_pretrain)
        x = tool.conv('conv5_3', x, 512, kernel_size=[3, 3], stride=[1, 1, 1, 1], is_pretrain=is_pretrain)
        with tf.name_scope('pool5'):
            x = tool.pool('pool5', x, kernel=[1, 2, 2, 1], stride=[1, 2, 2, 1], is_max_pool=True)

        x = tool.FC_layer('fc6', x, out_nodes=4096)
        # with tf.name_scope('batch_norm1'):
        # x = tools.batch_norm(x)
        x = tool.FC_layer('fc7', x, out_nodes=4096)
        # with tf.name_scope('batch_norm2'):
        # x = tools.batch_norm(x)
        x = tool.FC_layer('fc8', x, out_nodes=n_classes)

        return x
3.第三个文件就是VGG的训练文件,这里有很多需要注意的地方。所以采用代码分段的方式叙述。
导入需要的库:
import os
import os.path

import numpy as np
import tensorflow as tf
import input_data   # 之前训练CIFAR10的input_data
import VGG16_model  # 你的VGG模型
import tool          # 卷积网络工具包,自己写的
这里的input_data在我的教程CIFAR10里面有,这里也给大家提供,注意着部分训练要用到CIFAR10的数据,建议先完成CIFAR10的训练再来做这个比较好。
input_data.py:
#########################################################
#输入数据
#CIFAR10共有60000张图片,其中50000张彩色图像用于训练,大小为32*32;10000张用于测试。在官网下载二进制数据,
# 这个类型的数据是分批次的,不会一起加入内存。地址http://www.cs.toronto.edu/~kriz/cifar.html,版本为Binary version
#数据的存放格式如https://zhuanlan.zhihu.com/p/26141396描述
# 一张图像占了3073位,第一位是标签,其余的32*32*3=3072位是图像像素,注意代码会根据这个来提取标签和图像size
#对数据的处理主要步骤如下:
#1.读取的数据
#2.加入队列用tf.train.string_input_producer()
#3.用tf.FixedLengthRecordReader读取队列的内容,这个读取数据需要数据是等尺寸的,刚好适用这个CIFAR的读取
#4.解码,因为原始image是二进制形式的,解码成unit8
#5.重构图像的size,为img_depth, img_height, img_width
##########################################################################

import tensorflow as tf
import numpy as np
import os


# %% Reading data

def read_cifar10(data_dir, is_train, batch_size, shuffle):
    """Read CIFAR10

    Args:
        data_dir: the directory of CIFAR10
        is_train: boolen
        batch_size:
        shuffle:
    Returns:
        label: 1D tensor, tf.int32
        image: 4D tensor, [batch_size, height, width, 3], tf.float32

    """
    img_width = 32
    img_height = 32
    img_depth = 3
    label_bytes = 1
    image_bytes = img_width * img_height * img_depth

    with tf.name_scope('input'):

        if is_train:
            filenames = [os.path.join(data_dir, 'data_batch_%d.bin' % ii)
                         for ii in np.arange(1, 6)]
        else:
            filenames = [os.path.join(data_dir, 'test_batch.bin')]

        filename_queue = tf.train.string_input_producer(filenames)

        reader = tf.FixedLengthRecordReader(label_bytes + image_bytes)

        key, value = reader.read(filename_queue)

        record_bytes = tf.decode_raw(value, tf.uint8)

        label = tf.slice(record_bytes, [0], [label_bytes])
        label = tf.cast(label, tf.int32)

        image_raw = tf.slice(record_bytes, [label_bytes], [image_bytes])
        image_raw = tf.reshape(image_raw, [img_depth, img_height, img_width])
        image = tf.transpose(image_raw, (1, 2, 0))  # convert from D/  /W to H/W/D
        image = tf.cast(image, tf.float32)

        #        # data argumentation

        #        image = tf.random_crop(image, [24, 24, 3])# randomly crop the image size to 24 x 24
        #        image = tf.image.random_flip_left_right(image)
        #        image = tf.image.random_brightness(image, max_delta=63)
        #        image = tf.image.random_contrast(image,lower=0.2,upper=1.8)


        image = tf.image.per_image_standardization(image)  # substract off the mean and divide by the variance

        if shuffle:
            images, label_batch = tf.train.shuffle_batch(
                [image, label],
                batch_size=batch_size,
                num_threads=64,
                capacity=20000,
                min_after_dequeue=3000)
        else:
            images, label_batch = tf.train.batch(
                [image, label],
                batch_size=batch_size,
                num_threads=64,
                capacity=2000)
        ## ONE-HOT
        n_classes = 10
        label_batch = tf.one_hot(label_batch, depth=n_classes)
        label_batch = tf.cast(label_batch, dtype=tf.int32)
        label_batch = tf.reshape(label_batch, [batch_size, n_classes])

        return images, label_batch

# %%y
超参数的设置
# 超参数的设置,用这个网络训练CIFAR10
IMG_W = 32
IMG_H = 32
N_CLASSES = 10
BATCH_SIZE = 32
learning_rate = 0.01
MAX_STEP = 15000   # it took me about one hour to complete the training.
IS_PRETRAIN = True
原作者这部分是训练加验证,但是我的验证出了问题,就只有训练部分。这部分需要用到vgg16.npy这个文件,去网上搜来下载,下载有问题的可以私信我给你。这个文件里就是训练的网络和参数,用在这里预训练。
# %%   Training 注意修改路径以及涉及到的函数名字
def train():
    pre_trained_weights = 'D:/Python/neural network/VGG-Kevin/VGG-pretrain/vgg16.npy'       # 下载的vgg16.npy地址
    data_dir = 'D:/Python/neural network/CIFAR10-Guoqingxu/data/'   # 把这个数据加载进来
    train_log_dir = './/logs//train//'     # 新增训练完成后的日志地址
    with tf.name_scope('input'):
        tra_image_batch, tra_label_batch = input_data.read_cifar10(data_dir=data_dir,
                                                                   is_train=True,
                                                                   batch_size=BATCH_SIZE,
                                                                   shuffle=True)

    logits = VGG16_model.VGG16N(tra_image_batch, N_CLASSES, IS_PRETRAIN)
    loss = tool.loss(logits,tra_label_batch)
    accuracy = tool.accuracy(logits, tra_label_batch)

    my_global_step = tf.Variable(0, name='global_step', trainable=False)
    train_op = tool.optimize(loss, learning_rate, my_global_step)

    saver = tf.train.Saver(tf.global_variables())
    summary_op = tf.summary.merge_all()

    init = tf.global_variables_initializer()
    sess = tf.Session()
    sess.run(init)

    # load the parameter file, assign the parameters, skip the specific layers
    # 只加载原始文件的卷积层部分的参数,全连接层随机初始化
    tool.load_with_skip(pre_trained_weights, sess, ['fc6', 'fc7', 'fc8'])

    coord = tf.train.Coordinator()
    threads = tf.train.start_queue_runners(sess=sess, coord=coord)
    tra_summary_writer = tf.summary.FileWriter(train_log_dir, sess.graph)
    # 打印模型的变量(参数)信息
    tool.print_all_variables(train_only=True)
    try:
        for step in np.arange(MAX_STEP):
            if coord.should_stop():
                break

            tra_images, tra_labels = sess.run([tra_image_batch, tra_label_batch])
            _, tra_loss, tra_acc = sess.run([train_op, loss, accuracy])
            if step % 50 == 0 or (step + 1) == MAX_STEP:
                print('Step: %d, loss: %.4f, accuracy: %.4f%%' % (step, tra_loss, tra_acc))
                summary_str = sess.run(summary_op)
                tra_summary_writer.add_summary(summary_str, step)

            if step % 2000 == 0 or (step + 1) == MAX_STEP:
                checkpoint_path = os.path.join(train_log_dir, 'model.ckpt')
                saver.save(sess, checkpoint_path, global_step=step)

    except tf.errors.OutOfRangeError:
        print('Done training -- epoch limit reached')
    finally:
        coord.request_stop()

    coord.join(threads)
    sess.close()
到这里代码部分就结束了。用别人的代码一定要注意改地址的地方,我已经备注好了。
这3个代码只需要运行最后一个就好了,在最后添加train()就可以运行。运行之后我们去tensorboard看结果,只要开始运行,就会在logs目录下出现一个events事件,就可以打开来看看运行情况,以下做演示:

1.打开终端 快捷键win +r
2.切换到你项目所在的地址:该项目为VGG-Kevin
3.键入Tensorboard --logdir==.//logs//

4.复制网址到谷歌浏览器
然后发现打开来什么都没有,tensorboard我一直为搞明白,偶尔打开有东西偶尔打开没,要尝试各种打开方法。
5,隔了一天用另一种方法打开了。

train是上一级目录。
结果展示:


只训练了8000步,收敛的不好。可以多尝试几种微调方法