网上有很多与此类型相似的文章,但是在我搭建网关集成认证功能时,要么参考的这些文章并不全,要么不是我想要的或者说是比较复杂。因此本篇将会搭建一个简易的网关服务,采用oauth2协议的passowrd模式来进行身份认证,jwt作为token令牌。最终达到需要登录获取AccessToken才能向网关申请服务资源的效果。本篇博文代码已托管至码云。
项目整体的目录结构如下

版本:Spring Cloud Edgware.SR3
Spring Boot 1.5.12.RELEASE
1.首先创建父工程
pom.xml部分如下
    <properties>
        <project.build.sourceEncoding>UTF-8</project.build.sourceEncoding>
        <project.reporting.outputEncoding>UTF-8</project.reporting.outputEncoding>
        <java.version>1.8</java.version>
        <spring.cloud.version>Edgware.SR3</spring.cloud.version>
        <spring.boot.version>1.5.12.RELEASE</spring.boot.version>
    </properties>

    <dependencies>
        <dependency>
            <groupId>org.springframework.boot</groupId>
            <artifactId>spring-boot-starter-actuator</artifactId>
        </dependency>
        <dependency>
            <groupId>org.springframework.boot</groupId>
            <artifactId>spring-boot-starter-test</artifactId>
            <scope>test</scope>
        </dependency>
        <dependency>
            <groupId>org.springframework.cloud</groupId>
            <artifactId>spring-cloud-starter-eureka</artifactId>
        </dependency>
    </dependencies>

    <dependencyManagement>
        <dependencies>
            <dependency>
                <groupId>org.springframework.cloud</groupId>
                <artifactId>spring-cloud-dependencies</artifactId>
                <version>${spring.cloud.version}</version>
                <type>pom</type>
                <scope>import</scope>
            </dependency>
        </dependencies>
    </dependencyManagement>

    <repositories>
        <repository>
            <id>spring-milestones</id>
            <name>Spring Milestones</name>
            <url>https://repo.spring.io/libs-milestone</url>
            <snapshots>
                <enabled>false</enabled>
            </snapshots>
        </repository>
    </repositories>
2.搭建Eureka服务治理
@EnableEurekaServer
@SpringBootApplication
public class EurekaServerApplication {
    public static void main(String[] args) {
        SpringApplication.run(EurekaServerApplication.class, args);
    }
}
3.搭建一个示例资源服务
提供/test端点用于测试
@RestController
@EnableEurekaClient
@SpringBootApplication
public class ResourceServiceApplication {
    public static void main(String[] args) {
        SpringApplication.run(ResourceServiceApplication.class, args);
    }

    @GetMapping("/test")
    public String testAuthentication() {
        return "authentication permit";
    }
}
4.搭建认证服务
用到如下依赖
<dependency>
    <groupId>org.springframework.cloud</groupId>
    <artifactId>spring-cloud-starter-oauth2</artifactId>
</dependency>
认证服务配置
@Configuration
@EnableAuthorizationServer
public class AuthorizationServerConfig extends AuthorizationServerConfigurerAdapter {
    @Autowired
    private AuthenticationManager authenticationManager;
    @Autowired
    private UserDetailsService userDetailsService;

    @Override
    public void configure(ClientDetailsServiceConfigurer clients) throws Exception {
        //使用内存存储
        clients.inMemory()
                //分配客户端账号
                .withClient("client")
                .secret("client-secret")
                //支持的授权类型
                .authorizedGrantTypes("refresh_token", "password")
                .scopes("server")
                //token有效时长
                .accessTokenValiditySeconds(1200)
                //refreshToken有效时长
                .refreshTokenValiditySeconds(50000);
    }

    @Bean
    public JwtAccessTokenConverter jwtAccessTokenConverter() {
        JwtAccessTokenConverter jwtAccessTokenConverter = new JwtAccessTokenConverter();
        //设置签名密钥
        jwtAccessTokenConverter.setSigningKey("demo");
        return jwtAccessTokenConverter;
    }

    //使用JWT作为token
    @Bean
    public TokenStore jwtTokenStore() {
        return new JwtTokenStore(jwtAccessTokenConverter());
    }

    @Override
    public void configure(AuthorizationServerEndpointsConfigurer endpoints) throws Exception {
        endpoints.tokenStore(jwtTokenStore())
                .accessTokenConverter(jwtAccessTokenConverter())
                .reuseRefreshTokens(true)
                //配置以生效password模式
                .authenticationManager(authenticationManager)
                .userDetailsService(userDetailsService);
    }

    @Override
    public void configure(AuthorizationServerSecurityConfigurer security) throws Exception {
        security.allowFormAuthenticationForClients()
                .tokenKeyAccess("permitAll()")
                .checkTokenAccess("isAuthenticated()");
    }
}
注意:这里需要配置authenticationManager否则无法支持password模式。当获取token时,出现如下响应。
{
        "error": "unsupported_grant_type",
        "error_description": "Unsupported grant type: password"
}
安全服务配置
@Configuration
@EnableWebSecurity
public class WebSecurityConfig extends WebSecurityConfigurerAdapter {
    @Autowired
    private UserDetailsService userDetailsService;

    @Bean
    public PasswordEncoder passwordEncoder() {
        return new BCryptPasswordEncoder();
    }

    @Override
    protected void configure(HttpSecurity http) throws Exception {
        http.formLogin()
                .and()
                .authorizeRequests()
                .anyRequest()
                .authenticated()
                .and()
                .csrf().disable();
    }

    @Override
    protected void configure(AuthenticationManagerBuilder auth) throws Exception {
        auth.userDetailsService(userDetailsService)
                .passwordEncoder(passwordEncoder());
    }
}
简单模拟用户校验服务
@Component
public class UserDetailsServiceImpl implements UserDetailsService {
    @Autowired
    private PasswordEncoder passwordEncoder;

    //username:任意 password:123456
    @Override
    public UserDetails loadUserByUsername(String username) throws UsernameNotFoundException {
        return new User(username, passwordEncoder.encode("123456"),
                        AuthorityUtils.commaSeparatedStringToAuthorityList("ROLE_USER"));
    }
}
application.yml
spring:
  application:
    name: auth-server
server:
  port: 4040
security:
  oauth2:
    resource:
      filter-order: 3
management:
  security:
    enabled: false
eureka:
  client:
    service-url:
      defaultZone: http://eureka:pwd@localhost:8761/eureka
5.搭建服务网关
资源服务配置
@Configuration
@EnableResourceServer
public class ResourceServerConfig extends ResourceServerConfigurerAdapter {
    @Override
    public void configure(HttpSecurity http) throws Exception {
        http.csrf().disable()
                .authorizeRequests()
                //去掉获取token会被拦截
                .antMatchers("/auth/**").permitAll()
                .anyRequest().authenticated();
    }
}
注意:这里需要放行/auth/**否则网关会在获取token请求时就对其身份进行校验拦截
添加网关过滤器
@Component
public class AuthFilter extends ZuulFilter {
    //拦截类型
    @Override
    public String filterType() {
        return PRE_TYPE;
    }

    //拦截顺序
    @Override
    public int filterOrder() {
        return SERVLET_DETECTION_FILTER_ORDER - 1;
    }

    //开启拦截
    @Override
    public boolean shouldFilter() {
        return true;
    }

    //拦截处理逻辑
    @Override
    public Object run() {
        //获取用户认证信息
        Authentication authentication = SecurityContextHolder.getContext().getAuthentication();
        System.out.println(authentication);
        return null;
    }
}
application.yml
spring:
  application:
    name: api-gateway
server:
  port: 8040
eureka:
  client:
    service-url:
      defaultZone: http://eureka:pwd@localhost:8761/eureka
zuul:
  ignoredServices: '*'
  routes:
    resource-service: /demo/**
    auth-server: /auth/**
  sensitive-headers:

management:
  security:
    enabled: false

security:
  oauth2:
    client:
      //在认证服务器中配置的客户端账号
      clientId: client
      clientSecret: client-secret
    resource:
      token-info-uri: http://localhost:4040/oauth/check_token
      prefer-token-info: true
      jwt:
        key-uri: http://localhost:4040/oauth/token_key
  sessions: stateless
注意:由于使用token-info-uri,因此需先启动auth-server再启动网关服务,因为网关服务在启动时会调用该端点获取数据。如先启动网关会出现如下报错日志。
I/O error on GET request for "http://localhost:4040/oauth/token_key": Connection refused: connect;
nested exception is java.net.ConnectException: Connection refused: connect
至此,一个简单的网关认证服务就搭建完成了。接下来,让我们来测试一下。
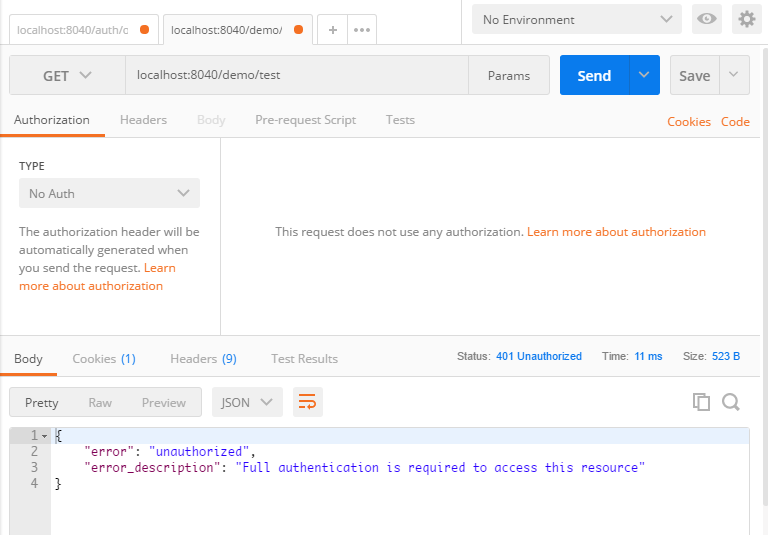
直接通过网关代理请求测试端点,返回结果如下,响应提示需要认证后才可访问资源。
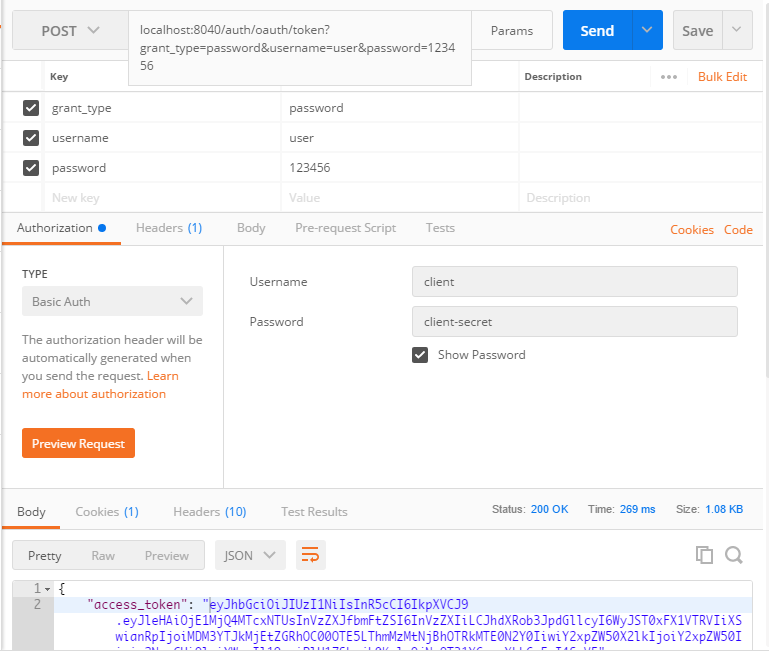
password模式获取jwt token
通过获取到的access_token请求资源服务

控制台可见如下输出,可见在过滤器获取到了用户的身份信息
org.springframework.security.oauth2.provider.OAuth2Authentication@407c5f9d: Principal: user;
Credentials: [PROTECTED]; Authenticated: true; Details: remoteAddress=0:0:0:0:0:0:0:1,
tokenType=BearertokenValue=<TOKEN>; Granted Authorities: ROLE_USER
本篇博文从PIG项目中简化剥离出来,如有需要进一步拓展的小伙伴们,推荐两个开源项目
冷冷——PIG
老A——AG-Admin(好像换人维护了)