一、什么是SpringBoot?
Spring Boot 是一个轻量级框架,可以完成基于 Spring 的应用程序的大部分配置工作。在本教程中,将学习如何使用 Spring Boot 的 starter、特性和可执行 JAR 文件结构,快速创建能直接运行的基于 Spring 的应用程序。
前提条件
• JDK 8
• Eclipse IDE
• Apache Maven
Spring Boot 的目的是提供一组工具,以便快速构建容易配置的 Spring 应用程序。
官方介绍:Spring Boot 使您能轻松地创建独立的、生产级的、基于 Spring 且能直接运行的应用程序。我们对 Spring 平台和第三方库有自己的看法,所以您从一开始只会遇到极少的麻烦。
对于SpringBoot:
首先,它很有主见
Spring Boot 拥有观点。换句话说,Spring Boot 拥有合理的默认值,所以您可以使用这些常用值快速构建应用程序。
例如,Tomcat 是一个非常流行的 Web 容器。默认情况下,Spring Boot Web 应用程序使用了一个嵌入式 Tomcat 容器。
其次,它可以自定义
如果无法改变其想法,具有主见的框架就不是很好的框架。您可以根据自己的喜好轻松地自定义 Spring Boot 应用程序,无论是在进行初始配置时还是在开发周期的后期阶段。
二、HelloWorld快速入门
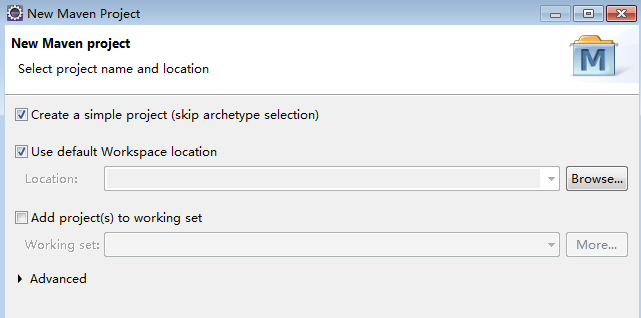
1、先看下项目概况

2、Maven项目构建
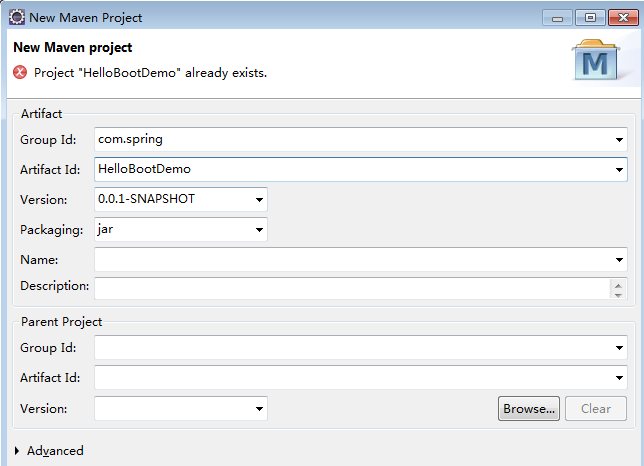
3、pom.xml文件全部设置
<project xmlns="http://maven.apache.org/POM/4.0.0"
    xmlns:xsi="http://www.w3.org/2001/XMLSchema-instance"
    xsi:schemaLocation="http://maven.apache.org/POM/4.0.0 http://maven.apache.org/xsd/maven-4.0.0.xsd">
    <modelVersion>4.0.0</modelVersion>
    <groupId>com.spring</groupId>
    <artifactId>HelloBootDemo</artifactId>
    <version>0.0.1-SNAPSHOT</version>
    <!-- Spring Boot 启动父依赖 -->
    <parent>
        <groupId>org.springframework.boot</groupId>
        <artifactId>spring-boot-starter-parent</artifactId>
        <version>1.4.0.RELEASE</version>
    </parent>
    <properties>
        <java.version>1.8</java.version>
    </properties>

    <dependencies>
        <!-- 配置热部署 -->
        <dependency>
            <groupId>org.springframework.boot</groupId>
            <artifactId>spring-boot-devtools</artifactId>
        </dependency>

        <!-- Spring Boot web依赖 -->
        <dependency>
            <groupId>org.springframework.boot</groupId>
            <artifactId>spring-boot-starter-web</artifactId>
        </dependency>

        <!-- Junit -->
        <dependency>
            <groupId>junit</groupId>
            <artifactId>junit</artifactId>
            <version>4.12</version>
        </dependency>
    </dependencies>
</project>
4、创建启动类 Application
package com.spring.demo;

import org.springframework.boot.SpringApplication;
import org.springframework.boot.autoconfigure.SpringBootApplication;

@SpringBootApplication
public class Application {
    public static void main(String[] args) {
        SpringApplication.run(Application.class, args);
    }
}
5、创建控制类 HelloWorldController
package com.spring.demo;

import org.springframework.beans.factory.annotation.Autowired;
import org.springframework.core.env.Environment;
import org.springframework.web.bind.annotation.RequestMapping;
import org.springframework.web.bind.annotation.RestController;

@RestController
public class HelloWorldController {
    @Autowired
    private Environment env;

    @RequestMapping("/info")
    public String info() {
        return "Hello   World !! " + env.getProperty("url");
    }
}
4、自定义配置文件 application.properties
server.port=8088
url=http://www.helloworld.com
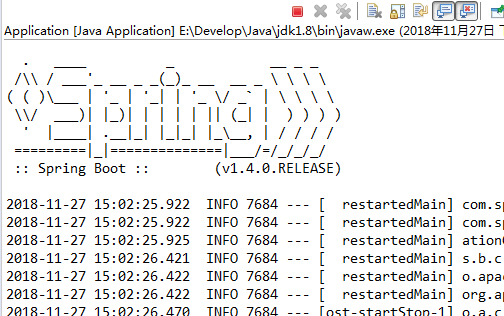
5、启动验证
直接在Application类中Run As 选择Java Application 即可启动SpringBoot
启动成功后控制台会输出:
之后在浏览器中输入http://localhost:8088/info就能看到输出

6、热部署
我们在开发中反复修改类、页面等资源,每次修改后都是需要重新启动才生效,这样每次启动都很麻烦,浪费了大量的时间,能不能在我修改代码后不重启就能生效呢?可以,在pom.xml中添加如下配置就可以实现这样的功能,我们称之为热部署。
<!-- 配置热部署 -->
<dependency>
    <groupId>org.springframework.boot</groupId>
    <artifactId>spring-boot-devtools</artifactId>
</dependency>
三、SpringBoot进阶
SpringBoot整合Dubbo
SpringBoot整合ActiveMQ