1. SpringBoot简介
Spring Boot来简化Spring应用开发,约定大于配置,去繁从简,just run就能创建一个独立的、产品级别的应用。
背景:
J2EE笨重的开发、繁多的配置、低下的开发效率、复杂的部署流程、第三方技术集成难度大。
解决:
Spring Boot ——> J2EE一站式解决方案
Spring Cloud ——> 分布式整体解决方案
优点:
- 快速创建独立的Spring应用程序以及与主流框架集成
- 直接嵌入Tomcat,Jetty或Undertow(无需部署WAR文件)
- 提供自己的’入门’POM来简化你的Maven配置(starters自动依赖与版本控制)
- 尽可能自动配置Spring,简化开发,也可修改默认值
- 提供生产就绪功能,如指标,运行状况检查和外部配置
- 绝对不会生成代码,并且不需要XML配置
- 与云计算的天然集成
学习SpringBoot之前需要熟悉Spring Framework框架,最好熟悉Spring的注解驱动开发
2. 快速入门
2.1 入门案例
1.maven配置(Spring Boot 2.0.2.RELEASE需要Java 8或9以及 Spring Framework 5.0.6.RELEASE或更高版本。为Maven 3.2+和Gradle 4提供了明确的构建支持)
<!-- Inherit defaults from Spring Boot -->
<parent>
    <groupId>org.springframework.boot</groupId>
    <artifactId>spring-boot-starter-parent</artifactId>
    <version>2.0.2.RELEASE</version>
</parent>
<!-- Add typical dependencies for a web application -->
<dependencies>
    <dependency>
        <groupId>org.springframework.boot</groupId>
        <artifactId>spring-boot-starter-web</artifactId>
    </dependency>
</dependencies>
<!-- Package as an executable jar -->
<build>
    <plugins>
        <plugin>
            <groupId>org.springframework.boot</groupId>
            <artifactId>spring-boot-maven-plugin</artifactId>
        </plugin>
    </plugins>
</build>
2.SpringBoot启动程序
/**
 * SpringBootApplication标注一个主程序类(主配置类),说明这是一个SpringBoot应用,SpringBoot运行
 * 这个类的main方法来启动SpringBoot应用
 */
@SpringBootApplication
public class HelloWorldMainApplication {
    public static void main(String[] args) {
        //spring应用启动
        SpringApplication.run(HelloWorldMainApplication.class,args);
    }
}
3.编写相关的Controller、Service等
/**
 * @Controller
 * @ResponseBody
 * spring4.2
 */
@RestController
public class HelloController {
    @RequestMapping(value = "/hello")
    public String execute() {
        return "hello world quick";
    }
}
2.2 案例解析
2.2.1 pom文件
父项目
maven配置中继承父项目spring-boot-starter-parent的依赖,而spring-boot-starter-parent继承了spring-boot-dependencies,spring-boot-dependencies它来真正管理Spring Boot应用里面的所有依赖版本,因此以后我们导入依赖默认是不需要写版本(没有在dependencies里面管理的依赖自然需要声明版本号)。
starter
spring-boot-starter-*:spring-boot场景启动器,Spring Boot将所有的功能场景都抽取出来,做成一个个的starters(启动器),只需要在项目里面引入这些starter相关场景的所有依赖都会导入进来。SpringBoot的starter见官方文档
2.2.2 主程序
应用程序通过main方法启动。这只是一个遵循Java约定的应用程序入口点的标准方法。我们的main方法通过调用委托给Spring Boot的类SpringApplication的run。 SpringApplication引导我们的应用程序,我们需要将HelloWorldMainApplication.class作为run方法的参数,以确定SpringApplication哪些是主要的Spring组件,args数组也作为命令行参数传入。
@SpringBootApplication
@SpringBootApplication:标注在某个类上,表示这是一个Spring Boot的配置类。
@Target(ElementType.TYPE)
@Retention(RetentionPolicy.RUNTIME)
@Documented
@Inherited
@SpringBootConfiguration
@EnableAutoConfiguration
@ComponentScan(excludeFilters = {
        @Filter(type = FilterType.CUSTOM, classes = TypeExcludeFilter.class),
        @Filter(type = FilterType.CUSTOM, classes = AutoConfigurationExcludeFilter.class) })
public @interface SpringBootApplication {
}@SpringBootConfiguration是@Configuration的组合注解,@Configuration标注类表示是配置类,在注解开发中已提及。
@EnableAutoConfiguration:开启自动配置功能,@EnableAutoConfiguration的组合注解时@AutoConfigurationPackage和@Import(AutoConfigurationImportSelector.class)。
1.@AutoConfigurationPackage注解的spring底层注解是@Import(AutoConfigurationPackages.Registrar.class):
static class Registrar implements ImportBeanDefinitionRegistrar, DeterminableImports {
    @Override
    public void registerBeanDefinitions(AnnotationMetadata metadata,
            BeanDefinitionRegistry registry) {
        register(registry, new PackageImport(metadata).getPackageName());
    }
}
new PackageImport(metadata).getPackageName()计算的结果是@SpringBootApplication注解的类的包名,意为将主配置类的所在包及下面所有子包里面的所有组件扫描到Spring容器中。
2.AutoConfigurationImportSelector类实现了DeferredImportSelector接口重写了selectImports方法,该方法返回的是configurations的数组
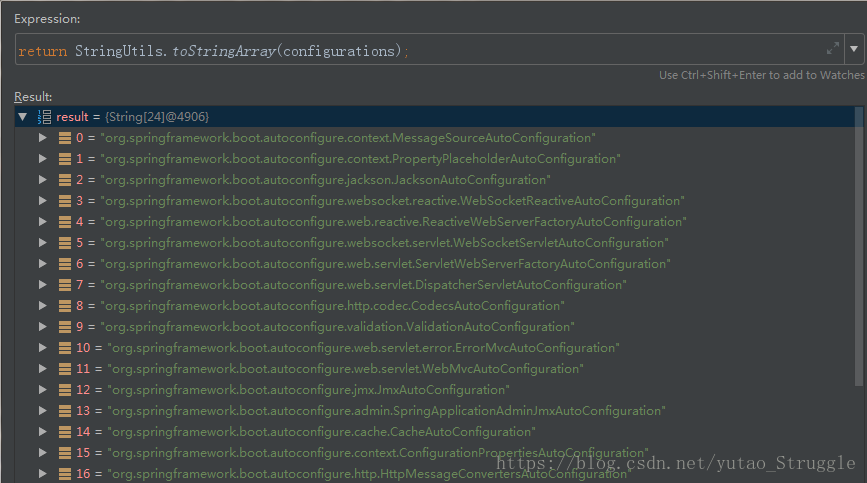
表示给容器中导入了非常多的自动配置类(*AutoConfiguration)。自动配置类是由SpringFactoriesLoader类从META-INF/spring.factories中读取。
2.3 快速创建SpringBoot项目
IDEA:使用 Spring Initializer快速创建项目
- 主程序已经生成好了,我们只需要我们自己的逻辑
- resources
- static:保存所有的静态资源 js css images
- templates:保存所有的模板页面(Spring Boot默认jar包使用嵌入式的Tomcat,默认不支持JSP页面),可以使用模板引擎(freemarker、thymeleaf)
- application.properties:Spring Boot应用的配置文件,可以修改一些默认设置
STS:使用 Spring Starter Project快速创建项目
3. 配置文件
SpringBoot使用二种全局的配置文件,配置文件名是固定的:
- application.properties
- application.yml
配置文件的作用:修改SpringBoot自动配置的默认值
<!--导入配置文件处理器,配置文件进行绑定就会有提示-->
<dependency>
    <groupId>org.springframework.boot</groupId>
    <artifactId>spring-boot-configuration-processor</artifactId>
    <optional>true</optional>
</dependency>
3.1 application.properties
person.last-name=张三
person.age=18
person.birth=2018/01/01
person.boss=false
person.maps.k1=v1
person.maps.k2=v2
person.lists=a,b,c
person.dog.name=小狗
person.dog.age=2
3.2 application.yml
*.yml是YAML语法编写的配置文件
3.2.1 YAML简介及语法
YAML(YAML Ain’t Markup Language)
YAML  A Markup Language:是一个标记语言

YAML   isn't Markup Language:不是一个标记语言;
标记语言:
以前的配置文件;大多都使用的是  *.xml文件

YAML:以数据为中心,比json、xml等更适合做配置文件
YAML语法
key: value:表示一对键值对(:后必须有空格)
YAML以空格的缩进来控制层级关系,只要左对齐的一列数据都是同一层级,同时对大小写敏感
server:
  port: 8090
  error:
    path: /error
spring:
  aop:
    auto: true
值的写法:
- 字面量:默认不需要使用单引号或双引号,双引号不会转义字符串内的特殊字符,单引号会转义特殊字符
对象、Map:
person:
  lastName: hello
  age: 18
或
person: {lastName: hello,age: 18}
数组(List、Set):
lists:
    - lisi
    - zhaoliu
或
lists: [lisi,zhaoliu]
多文档:使用[- - -]隔开
server:
    port: 8090

---
person:
    lastName: hello
3.2.2 配置文件值注入
@Value与@ConfigurationProperties比较
| 功能 | @ConfigurationProperties | @Value |
|---|---|---|
| 注入方式 | 批量注入配置文件中的属性 | 一个个指定 |
| 松散绑定(松散语法) | 支持 | 不支持 |
| SpEL | 不支持 | 支持 |
| JSR303数据校验(@Validated) | 支持 | 不支持 |
| 复杂类型封装 | 支持 | 不支持 |
应用场景:
配置文件yml还是properties它们都能获取到值
若只是在某个业务逻辑中需要获取一下配置文件中的某项值,使用@Value
若专门编写了一个javaBean来和配置文件进行映射,我们就直接使用@ConfigurationProperties
@ConfigurationProperties
该注解可以将配置文件中配置的每一个属性的值,通过set方法映射到被注释的组件中(因此不可以缺少setter方法)
/**
 * 批量注入、松散绑定、数据校验、复杂类型封装
 */
@Component
@ConfigurationProperties(prefix = "person1")    //批量注入
@Validated  //数据校验
public class Person {
    @Email
    private String lastName;
    private Integer age;
    private Boolean boss;
    private Date birth;
    private Map<String,Object> maps;
    private List<Object> lists;
    private Dog dog;//复杂类型封装

    public void setLastName(String lastName) {
        this.lastName = lastName;
    }
    ......
}
public class Dog {
    private String name;
    private Integer age;
    public void setName(String name) {
        this.name = name;
    }
    public void setAge(Integer age) {
        this.age = age;
    }
}
applicaton.yml
person1:
  lastName: 888888@qq.com
  #以下二种写法与上述等同(松散绑定):
  #last-name: 88888@qq.com
  #last_name: 88888@qq.com
  age: 18
  boss: false
  birth: 2018/04/04
  maps: {k1: v1,k2: v2}
  lists:
      - lisi
      - zhaoliu
  dog:
      name: 小狗
      age: 12
@Value
@Component
@Validated
public class Person {
    @Email//数据校验无效
    @Value("${person1.lastName}")//从环境变量、配置文件中获取值
    private String lastName;
    @Value("#{11*2}")//使用SpEL表达式
    private Integer age;
    @Value("true")//直接赋值
    private Boolean boss;
    private Date birth;
    @Value("${person1.maps}")//不支持复杂类型,报错
    private Map<String,Object> maps;
    private List<Object> lists;
    private Dog dog;
    ......
}
@PropertySource、@ImportResource、@Bean
//指明当前类为配置类,替代之前的Spring配置文件
@Configuration
//加载指定的配置文件
@PropertySource(value = {"classpath:person.properties"})
//SpringBoot项目没有Spring的配置文件,若要想自己编写Spring配置文件加载并生效,需要使用@ImportResoure注解标注在一个配置类上
@ImportResource(locations = {"classpath:application.xml"})
public class MyAppConfig {

    @Bean       //注册bean,默认是方法名作为id
    public Person person() {
         return new Person();
    }
}
SpringBoot给容器中添加组件的方式(推荐使用全注解的方式):
- 配置类@Configuration标注@ImportResoure加载Spring配置文件
- 使用@Bean给容器中添加组件
3.3 配置文件属性
3.3.1 随机数
RandomValuePropertySource:配置文件中可以使用随机数
- ${random.value}:随机数字与字母组合的字符串
- ${random.uuid}:随机uuid
- ${random.long}:随机long值
- ${random.int}:随机int值
- ${random.int(value)}:0~value之间的随机数
- ${random.int(value,max)}:value~max之间的随机数
这些随机数可以使用在配置文件或@Value注解中
person1:
  lastName: ${random.value}
  age: ${random.int(0,100)}
  #如果birthday不存在使用默认值2014/1/1
  birth: ${birthday:2014/1/1}
3.3.2 profile
Profile是Spring对不同环境提供不同配置功能的支持,可以通过激活、指定参数等方式快速切换环境,多环境有以下二种方式:
- 多个profile文件:格式是application-{profile}.properties/yml,例如application-dev.properties,SpringBoot默认加载application.propeties/yml配置文件,可以在该文件中激活不同的profile:
spring.profiles.active=dev 多个profile文档块模式application.yml:
#激活指定环境

spring:
  profiles:
    active: dev

---

#开发环境

spring:
  profiles: dev
server:
  port: 8090

---

#生产环境

spring:
  profiles: product
server:
  port: 9090

---

#默认环境

spring:
  profiles: default
server:
  port: 8080
配置环境也可以在外部文件、命令行或jvm参数中指定,如使用命令行(- -spring.profiles.active=dev)或jvm参数(-Dspring.profiles.active=dev)来激活指定的profile。
3.3.3 配置文件加载顺序
springboot 启动会扫描以下位置的application.properties或者application.yml文件作为Spring boot的默认配置文件
- file:./config/
- file:./
- classpath:/config/
- classpath:/
上述优先级由高到低,高优先级的配置会覆盖低优先级的配置,同时配置互补。项目打包好以后,我们可以使用命令行参数的形式,启动项目的时候来可以使用spring.config.location指定外部的配置文件位置:
java -jar spring-boot-0.0.1-SNAPSHOT.jar --spring.config.location=D:/application.propertiesspringboot的所有配置都可以在命令行上指定,多个配置使用空格分开,spring配置的优先级由高到低:
- 命令行参数
- 来自java:comp/env的JNDI属性
- Java系统属性(System.getProperties())
- 操作系统环境变量
- RandomValuePropertySource配置的random.*属性值
- jar包外部的application-{profile}.properties或application.yml(带spring.profile)配置文件
- jar包内部的application-{profile}.properties或application.yml(带spring.profile)配置文件
- jar包外部的application.properties或application.yml(不带spring.profile)配置文件
- jar包内部的application.properties或application.yml(不带spring.profile)配置文件
- @Configuration注解类上的@PropertySource
- 通过SpringApplication.setDefaultProperties指定的默认属性
4. 自动配置原理
- SpringBoot启动的时候加载主配置类(
@SpringBootApplication),开启了自动配置功能@EnableAutoConfiguration @EnableAutoConfiguration的组合注解@AutoConfigurationPackage将该配置类包及子包路径下的所有组件扫描进Spring容器中@EnableAutoConfiguration的组合注解@Import(AutoConfigurationImportSelector.class)注解导入AutoConfigurationImportSelector类,AutoConfigurationImportSelector类实现了DeferredImportSelector接口重写了selectImports方法,SpringFactoriesLoader.loadFactoryNames()扫描所有jar包类路径下META-INF/spring.factories把扫描到的这些文件的内容包装成List对象,selectImports将这些自动配置类注册到容器中
4.1 自动配置类案例分析
以HttpEncodingAutoConfiguration 这个自动配置类为例:
@Configuration      //标注该类为配置类
@EnableConfigurationProperties(HttpEncodingProperties.class)     //启动指定类的ConfigurationProperties功能,将配置文件中对应的值和HttpEncodingProperties绑定起来,并把HttpEncodingProperties加入到ioc容器中
@ConditionalOnWebApplication(type = ConditionalOnWebApplication.Type.SERVLET)   //只有基于Servlet的web环境配置类才会生效
@ConditionalOnClass(CharacterEncodingFilter.class)  //判断当前项目有没有CharacterEncodingFilter这个类,CharacterEncodingFilter是SpringMVC中进行乱码解决的过滤器
@ConditionalOnProperty(prefix = "spring.http.encoding", value = "enabled", matchIfMissing = true)//判断配置文件中是否存在spring.http.encoding.enabled这个配置,如果缺失则默认为true
public class HttpEncodingAutoConfiguration {

    private final HttpEncodingProperties properties;
    //将与SpringBoot配置文件映射过的HttpEncodingProperties注入
    public HttpEncodingAutoConfiguration(HttpEncodingProperties properties) {
        this.properties = properties;
    }
    //若容器中没有CharacterEncodingFilter这个组件就注入该bean
    @Bean
    @ConditionalOnMissingBean(CharacterEncodingFilter.class)
    public CharacterEncodingFilter characterEncodingFilter() {
        CharacterEncodingFilter filter = new OrderedCharacterEncodingFilter();
        filter.setEncoding(this.properties.getCharset().name());
        filter.setForceRequestEncoding(this.properties.shouldForce(HttpEncodingProperties.Type.REQUEST));
        filter.setForceResponseEncoding(this.properties.shouldForce(HttpEncodingProperties.Type.RESPONSE));
        return filter;
    }

    @Bean
    public LocaleCharsetMappingsCustomizer localeCharsetMappingsCustomizer() {
        return new LocaleCharsetMappingsCustomizer(this.properties);
    }

    private static class LocaleCharsetMappingsCustomizer implements
            WebServerFactoryCustomizer<ConfigurableServletWebServerFactory>, Ordered {

        private final HttpEncodingProperties properties;

        LocaleCharsetMappingsCustomizer(HttpEncodingProperties properties) {
            this.properties = properties;
        }

        @Override
        public void customize(ConfigurableServletWebServerFactory factory) {
            if (this.properties.getMapping() != null) {
                factory.setLocaleCharsetMappings(this.properties.getMapping());
            }
        }

        @Override
        public int getOrder() {
            return 0;
        }
    }
}HttpEncodingProperties类映射配置文件中以spring.http.encoding为前缀的配置
@ConfigurationProperties(
    prefix = "spring.http.encoding"
)
public class HttpEncodingProperties {
   public static final Charset DEFAULT_CHARSET = StandardCharsets.UTF_8;

    /**
     * Charset of HTTP requests and responses. Added to the "Content-Type" header if not
     * set explicitly.
     */
    private Charset charset = DEFAULT_CHARSET;

    /**
     * Whether to force the encoding to the configured charset on HTTP requests and
     * responses.
     */
    private Boolean force;

    /**
     * Whether to force the encoding to the configured charset on HTTP requests. Defaults
     * to true when "force" has not been specified.
     */
    private Boolean forceRequest;

    /**
     * Whether to force the encoding to the configured charset on HTTP responses.
     */
    private Boolean forceResponse;

    /**
     * Locale in which to encode mapping.
     */
    private Map<Locale, Charset> mapping;
    .......
}
application.yml
#yml中可配置的属性也都是根据这些类中的属性来指定
spring:
  http:
    encoding:
      enabled: true
      charset: utf-8
      force: true
      force-request: true
      force-response: true
mapping: UTF-8以以上案例可以推论出:每一个自动配置类都会使用@EnableConfigurationProperties(*Properties.class)将对应的*Properties类与配置文件映射后注册到Spring容器中,在通过对应的*Properties类获取相应的属性值给容器添加各种组件。
4.2 @Conditional派生注解
@Conditional*的底层实现都是Spring原生注解@Conditional,只是针对不同的情况作了封装处理
| @Conditional扩展注解 | 作用(判断是否满足当前指定条件) |
|---|---|
| @ConditionalOnJava | 系统的java版本是否符合要求 |
| @ConditionalOnBean | 容器中存在指定Bean |
| @ConditionalOnMissingBean | 容器中不存在指定Bean |
| @ConditionalOnExpression | 满足SpEL表达式指定 |
| @ConditionalOnClass | 系统中有指定的类 |
| @ConditionalOnMissingClass | 系统中没有指定的类 |
| @ConditionalOnSingleCandidate | 容器中只有一个指定的Bean,或者这个Bean是首选Bean |
| @ConditionalOnProperty | 系统中指定的属性是否有指定的值 |
| @ConditionalOnResource | 类路径下是否存在指定资源文件 |
| @ConditionalOnWebApplication | 当前是web环境 |
| @ConditionalOnNotWebApplication | 当前不是web环境 |
| @ConditionalOnJndi | JNDI存在指定项 |
自动配置类必须在标注了这些@Conditional*条件成立时才能生效。由于SpringBoot的日志默认使用了INFO级别,我们可以通过配置debug=true属性来查看哪些自动配置类生效了。