版权声明:本文为博主原创文章,如需转载,请注明出处: https://blog.csdn.net/MASILEJFOAISEGJIAE/article/details/84240984
Unity版本:Unity 2018.2.14f1
原视频链接:https://unity3d.com/cn/learn/tutorials/s/space-shooter-tutorial
教程目录(持续更新中):
Unity游戏开发官方入门教程:飞机大战(一)——创建新项目、导入资源、设置场景
Unity游戏开发官方入门教程:飞机大战(二)——创建飞船对象
Unity游戏开发官方入门教程:飞机大战(三)——设置相机和光照
Unity游戏开发官方入门教程:飞机大战(四)——使用Quad加入背景
Unity游戏开发官方入门教程:飞机大战(五)——实现飞船控制脚本
Unity游戏开发官方入门教程:飞机大战(六)——创建子弹
Unity游戏开发官方入门教程:飞机大战(七)——发射子弹
创建子弹对象
- 在Player下新建一个GameObject,命名为Bolt,并重置其的Transform
- 在Bolt下新建一个Quad,命名为VFX,重置其Transform,将Rotation-X设置为90
- 在Assets\Materials文件夹新建一个Material,命名为fx_bolt_orange

- 将位于Assets\Textures的fx_lazer_orange_dff拖拽进fx_bolt_orange的Albedo属性栏
- 将fx_bolt_orange拖拽到Hierarchy中的VFX
- 默认的shader太暗,将fx_bolt_orange的shader修改为Shader->Mobile->Particles->Additive
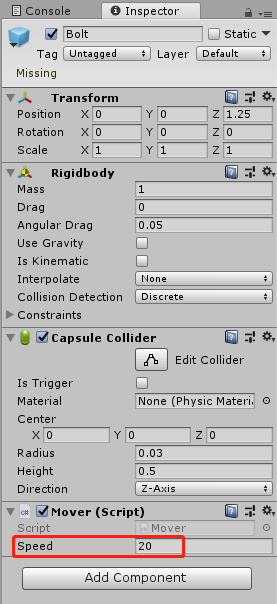
- 为Bolt增加一个Rigibody:Add Component -> Rigibody,取消勾选Use Gravity,避免子弹掉下屏幕。
- 移除VFX的Mesh Collider
- 为Bolt增加一个Capsule Collider,并勾选上Is Trigger,以便实现碰撞检测。
- 将Direction选择为Z-Axis,Radius设置为0.03,Height设置为0.5
创建子弹飞行脚本Mover
- Bolt中新建脚本Mover.cs,脚本内容如下:
using System.Collections;
using System.Collections.Generic;
using UnityEngine;

public class Mover : MonoBehaviour {
    public float speed;
    private Rigidbody rb;

	void Start () {
        rb = GetComponent<Rigidbody>();
        rb.velocity = transform.forward * speed;
	}
}
- 在Inspector中,将Bolt的Speed设置为20
- 将Bolt拖拽到Assets\Prefabs中,将其保存成prefab
- 将Bolt从Hierarchy中移除
- 运行游戏,将Assets\Prefabs中的Bolt拖拽到Hierarchy中,可见子弹一旦创建就会自动飞行:
参考资料:https://unity3d.com/cn/learn/tutorials/s/space-shooter-tutorial