版权声明:本文为博主原创文章,未经博主允许不得转载。 https://blog.csdn.net/TingHW/article/details/84526840
# OpenCV提供了两个转换函数,cv2.warpAffine和cv2.warpPerspective,通过他们你可以进行各种转换,
# cv2.warpAffine接受2x3的转换矩阵二cv2.warpPerspective接受3x3的转换矩阵做为输入。


# 缩放

import cv2
import numpy as np

img = cv2.imread('feiy.jpg')
res1 = cv2.resize(img, None, fx=2, fy=2, interpolation=cv2.INTER_LINEAR  )#fx,fy缩放比例
res3 = cv2.resize(img, None, fx=2, fy=2, interpolation=cv2.INTER_AREA      )#fx,fy缩放比例
res4 = cv2.resize(img, None, fx=2, fy=2, interpolation=cv2.INTER_CUBIC     )#fx,fy缩放比例
# 等价于
# height, width = img.shape[:2]
# res = cv2.resize(img, (2*width, 2*height), interpolation=cv2.INTER_CUBIC)
# cv2.imwrite('da.jpg',res)
cv2.imshow('res1',res1)
cv2.imshow('res3',res3)
cv2.imshow('res4',res4)
cv2.waitKey(0)
cv2.destroyAllWindows()
# 平移

import cv2
import numpy as np

img = cv2.imread('touxiang.jpg', 0)
rows, cols = img.shape

M = np.float32([[1,0,100],[0,1,50]])
# cv2.warpAffine()函数的第三个参数是输出图片的大小,应该是(width, height)的形式,记住width=列数,height=行数
dst = cv2.warpAffine(img, M, (cols,rows))

cv2.imshow('img', dst)
cv2.waitKey(0)
cv2.destroyAllWindows()
# 旋转

img = cv2.imread('touxiang.jpg', 0)
rows, cols = img.shape

M = cv2.getRotationMatrix2D((cols/2,rows/2), 90, 1)#表示旋转的中心点,表示旋转的角度,图像缩放因子
dst = cv2.warpAffine(img, M, (cols, rows))

cv2.imshow('img', dst)
cv2.waitKey(0)
cv2.destroyAllWindows()
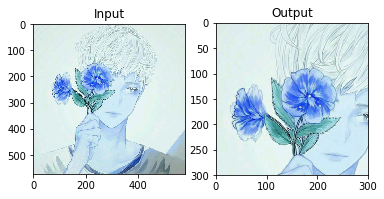
# 仿射变换
# 在仿射变换里,所有原始图片里的平行线在输出的图片里仍然平行


import cv2
import numpy as np
from matplotlib import pyplot as plt
%matplotlib inline

img = cv2.imread('touxiang.jpg')
rows, cols, ch = img.shape

# 要找到转换矩阵,我们需要输入图片的三个点,和他们在输出图片里的对应位置,
# 然后cv2.getAffineTransform会创建一个2x3的矩阵,然后把这个矩阵传给cv2.warpAffine.
pts1 = np.float32([[50,50],[200,50],[50,200]])
pts2 = np.float32([[10,100],[200,50],[100,250]])

M = cv2.getAffineTransform(pts1, pts2)

dst = cv2.warpAffine(img,M,(cols, rows))

plt.subplot(121), plt.imshow(img), plt.title('Input')
plt.subplot(122), plt.imshow(dst), plt.title('Output')
plt.show()
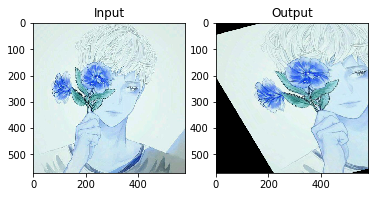
# 透视变换

import cv2
import numpy as np
from matplotlib import pyplot as plt

img = cv2.imread('touxiang.jpg')
rows, cols, ch = img.shape


# 要得到这个转换矩阵,你需要输入图片上的4个点,以及输出图片上对应的点。在这四个点中,3个不能同线。
# 然后cv2.getPerspectiveTransform函数就能得到转换矩阵了,再用cv2.warpPerspective来接收这个3x3的转换矩阵。
pts1 = np.float32([[56,65],[368,52],[28,387],[389,390]])
pts2 = np.float32([[0,0],[300,0],[0,300],[300,300]])

M = cv2.getPerspectiveTransform(pts1,pts2)

dst = cv2.warpPerspective(img, M,(300,300))

plt.subplot(121), plt.imshow(img), plt.title('Input')
plt.subplot(122), plt.imshow(dst), plt.title('Output')
plt.show()