opencv提供了2个转换函数,可以对图像进行任意转换。
cv.warpAffine和cv.warpPerspective.第一种采取2*3的矩阵作为输入。第二种采取3*3的矩阵作为输入。
1.缩放
函数:
cv.resize(src, dsize[, dst[, fx[, fy[, interpolation]]]])
参数:
src:输入图像
dsize:目标尺寸,整形,非0
dst:目标图像,大小为dsize,或由src.size()计算而来
fx:水平轴缩放比例,非0
fy:垂直轴缩放比例,非0
interpolation:插值算法,分为以下几种
| INTER_NEAREST
Python: cv.INTER_NEAREST
|
nearest neighbor interpolation最邻近插值 |
| INTER_LINEAR
Python:
cv.INTER_LINEAR
|
bilinear interpolation双线性插值 |
| INTER_CUBIC
Python: cv.INTER_CUBIC
|
bicubic interpolation双三次插值 |
| INTER_AREA
Python: cv.INTER_AREA
|
resampling using pixel area relation. It may be a preferred method for image decimation, as it gives moire'-free results. But when the image is zoomed, it is similar to the INTER_NEAREST method.基于局部像素的重采样 |
| INTER_LANCZOS4
Python: cv.INTER_LANCZOS4
|
Lanczos interpolation over 8x8 neighborhood.基于8x8像素邻域的Lanczos插值 |
| INTER_LINEAR_EXACT
Python: cv.INTER_LINEAR_EXACT
|
Bit exact bilinear interpolation.位精确双线性插值 |
| INTER_MAX
Python: cv.INTER_MAX
|
mask for interpolation codes.插补码掩码 |
| WARP_FILL_OUTLIERS
Python: cv.WARP_FILL_OUTLIERS
|
flag, fills all of the destination image pixels. If some of them correspond to outliers in the source image, they are set to zero |
| WARP_INVERSE_MAP
Python: cv.WARP_INVERSE_MAP
|
flag, inverse transformation For example, linearPolar or logPolar transforms:
|
举例
import numpy as np
import cv2 as cv


src = cv.imread('4.jpg')
# method 1
res1 = cv.resize(src, None, fx=1.2, fy=1.2, interpolation=cv.INTER_CUBIC)
# method 2 直接设置输出尺寸
height, width = src.shape[:2]  # 获得原尺寸
res2 = cv.resize(src, (int(0.5*width), int(0.5*height)),interpolation=cv.INTER_CUBIC)
while(1):
    cv.imshow("src", src)
    cv.imshow("res1", res1)
    cv.imshow("res2", res2)
    if cv.waitKey(1) & 0xFF == 27:
        break
cv.destroyAllWindows()

平移
平移是物体的移动,如果知道物体平移的坐标(tx,ty),可以创建如下变换矩阵

将其放入类型为np.float32的数组中,将M矩阵赋值给 cv.warpAffine() 函数。即可实现平移
函数
dst=cv.warpAffine(src, M, dsize[, dst[, flags[, borderMode[, borderValue]]]])
参数:
| src | 输入图像 |
| dst | 与src同类型的输出图像 |
| M | 2×3 的变换矩阵 |
| dsize | 输出图像尺寸大小 |
| flags | combination of interpolation methods (see InterpolationFlags) and the optional flag WARP_INVERSE_MAP that means that M is the inverse transformation ( dst→src ).插值矩阵,上一章的表。 |
| borderMode | 边界像素模式,默认为BORDER_CONSTANT ,边界按常数填充 |
| borderValue | 边界填充值; 默认为0,所以默认情况下填充为黑色 |
特别注意:dsize参数是指输出图像的宽高,即对应图像的列,行。
举例
import numpy as np
import cv2 as cv


img = cv.imread('4.jpg', 0)
rows, cols = img.shape
M = np.float32([[1, 0, 300], [0, 1, 50]])

dst = cv.warpAffine(img, M, (cols, rows))
cv.imshow('img', dst)
cv.waitKey(0)
cv.destroyAllWindows()

旋转
平移和旋转都是仿射变换的特例,所用函数都是cv2.warpAffine,只是转换矩阵M有所不同。
图像旋转θ度是由变换矩阵 M 得到的
但是opencv改进了这个矩阵,如下图。使得提供了缩放旋转与可调的旋转中心。


上述矩阵表示绕 center.x,center.y 旋转 θ度
函数:
retval=cv.getRotationMatrix2D(center, angle, scale)获取变换矩阵M
参数:
| center | 旋转中心 |
| angle | Rotation angle in degrees. Positive values mean counter-clockwise rotation (the coordinate origin is assumed to be the top-left corner).旋转角度,角度为正则表示逆时针旋转 |
| scale | 旋转后的缩放系数 |
举例:
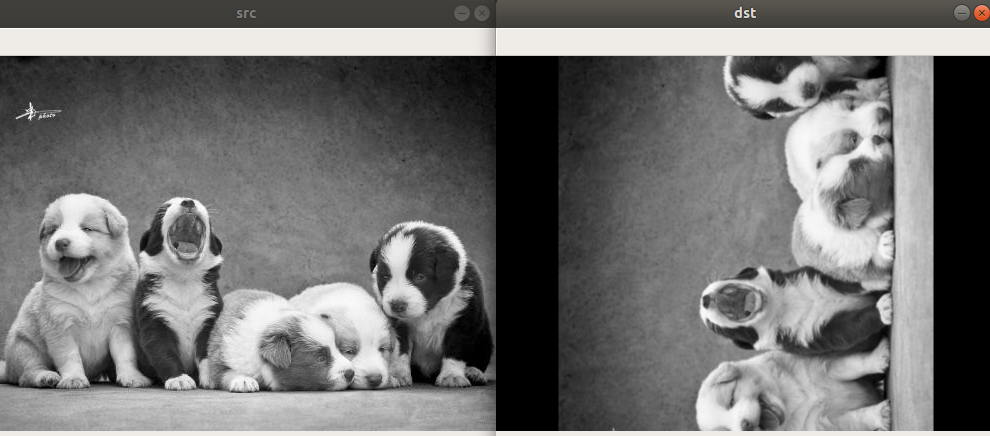
import numpy as np
import cv2 as cv


src = cv.imread('4.jpg', 0)
rows, cols = src.shape
# 旋转中心  旋转角度  缩放系数
M = cv.getRotationMatrix2D(((cols-1) / 2.0,(rows-1)/2.0), 90,1)
# 原图像 变换矩阵 输出图像尺寸中心
dst = cv.warpAffine(src, M, (cols, rows))

while(1):
    cv.imshow('src', src)
    cv.imshow('dst', dst)
    if cv.waitKey(1) & 0xFF == 27:
        break
cv.destroyAllWindows()
仿射变换
在仿射变换中,原图像中的所有平行线在输出图像中仍然是平行的,直线仍然是直线,为了找到变换矩阵,我们需要从输入图像中选取三个点,以及它们在输出图像中的对应位置。利用 cv.getAffineTransform创建一个2*3 的变换矩阵,赋值给cv.warpAffine。
函数
retval=cv.getAffineTransform(src, dst)
参数:
| src | Coordinates of triangle vertices in the source image.原图中3个点所组成的矩阵,数据类型为np.float32 |
| dst | Coordinates of the corresponding triangle vertices in the destination image.目标图中对应的3个点所组成的矩阵,数据类型为np.float32 |
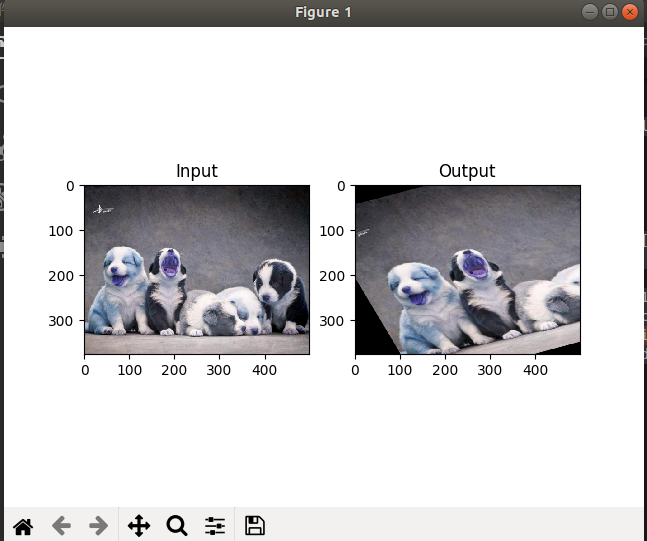
举例
import numpy as np
import cv2 as cv
import matplotlib.pyplot as plt


img = cv.imread('4.jpg')
rows, cols, ch = img.shape

#原图3个点的矩阵

pts1 = np.float32([[50, 50], [200, 50], [50, 200]])

#输出图3个点的矩阵
pts2 = np.float32([[10, 100], [200, 50], [100, 250]])
M = cv.getAffineTransform(pts1, pts2)
dst = cv.warpAffine(img, M, (cols, rows))
plt.subplot(121), plt.imshow(img), plt.title('Input')
plt.subplot(122), plt.imshow(dst), plt.title('Output')
plt.show()