Layui_table模块/数据表格文档
table 模块是我们的又一走心之作,在 layui 2.0 的版本中全新推出,是 layui 最核心的组成之一。它用于对表格进行一些列功能和动态化数据操作,涵盖了日常业务所涉及的几乎全部需求。支持固定表头、固定行、固定列左/列右,支持拖拽改变列宽度,支持排序,支持多级表头,支持单元格的自定义模板,支持对表格重载(比如搜索、条件筛选等),支持复选框,支持分页,支持单元格编辑等等一些列功能。尽管如此,我们仍将对其进行完善,在控制代码量和性能的前提下,不定期增加更多人性化功能。table 模块也将是 layui 重点维护的项目之一。
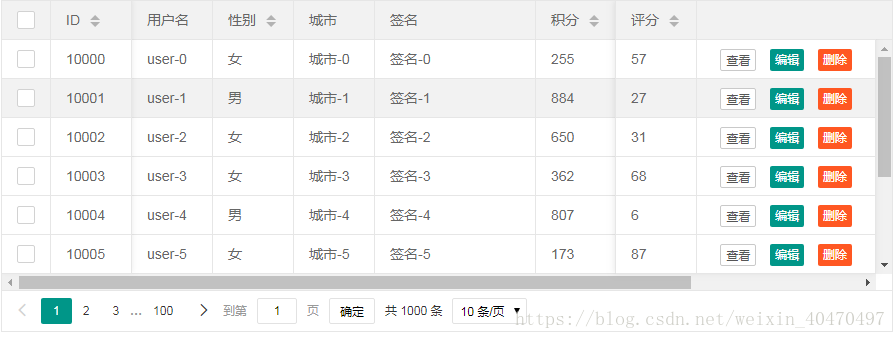
创建一个table实例最简单的方式是,在页面放置一个元素 <table id="test"></table>,然后通过 table.render() 方法指定该容器,如下所示:
|
10000
|
user-0
|
女
|
城市-0
|
签名-0
|
255
|
57
|
作家
|
82830700
|
|
10001
|
user-1
|
男
|
城市-1
|
签名-1
|
884
|
27
|
词人
|
64928690
|
|
10002
|
user-2
|
女
|
城市-2
|
签名-2
|
650
|
31
|
酱油
|
6298078
|
|
10003
|
user-3
|
女
|
城市-3
|
签名-3
|
362
|
68
|
诗人
|
37117017
|
|
10004
|
user-4
|
男
|
城市-4
|
签名-4
|
807
|
6
|
作家
|
76263262
|
|
10005
|
user-5
|
女
|
城市-5
|
签名-5
|
173
|
87
|
作家
|
60344147
|
|
10006
|
user-6
|
女
|
城市-6
|
签名-6
|
982
|
34
|
作家
|
57768166
|
|
10007
|
user-7
|
男
|
城市-7
|
签名-7
|
727
|
28
|
作家
|
82030578
|
|
10008
|
user-8
|
男
|
城市-8
|
签名-8
|
951
|
14
|
词人
|
16503371
|
|
10009
|
user-9
|
女
|
城市-9
|
签名-9
|
484
|
75
|
词人
|
86801934
|
<!DOCTYPE html>
<html>
<head>
  <meta charset="utf-8">
  <title>layui</title>
  <meta name="renderer" content="webkit">
  <meta http-equiv="X-UA-Compatible" content="IE=edge,chrome=1">
    <script src="https://cdn.bootcss.com/jquery/1.12.4/jquery.min.js"></script>
  <meta name="viewport" content="width=device-width, initial-scale=1, maximum-scale=1">
   <link rel="stylesheet" href="/buddhism-heritage2/layui/css/layui.css">
  <script src="/buddhism-heritage2/layui/layui.js" charset="utf-8"></script>
  <!-- 注意:如果你直接复制所有代码到本地,上述css路径需要改成你本地的 -->
</head>
<body>
<div style="margin-bottom: 5px;">


 <table id="demo" lay-filter="demo"></table>
<script type="text/html" id="barDemo">
  <a class="layui-btn layui-btn-primary layui-btn-xs" lay-event="detail">查看</a>
  <a class="layui-btn layui-btn-xs" lay-event="edit">编辑</a>
  <a class="layui-btn layui-btn-danger layui-btn-xs" lay-event="del">删除</a>
</script>


<script>
layui.use('table', function(){
  var table = layui.table;
  //第一个实例
  table.render({
    elem: '#demo'
    ,height: 'full-20'
    ,method:'post'
    ,skin:'row'
    ,even:true
 	,page: true //开启分页
    ,url: '/buddhism-heritage2/building/queryAll' //数据接口
    ,cols: [[ //表头
      {field: 'id', title: 'ID', width:80, sort: true, fixed: 'left'}
      ,{field: 'name', title: '住房名称', width:80}
      ,{field: 'floor', title: '楼层', width:80, sort: true}
      ,{field: 'city', title: '城市', width:80}
      ,{field: 'num', title: '数量', width: 177}
      ,{field: 'money', title: '价格', width: 80, sort: true}
      ,{field: 'houseType', title: '房型', width: 80, }
      ,{field: 'size', title: '大小', width: 80, sort: true}
      ,{field: 'purpose', title: '用途'}
      ,{field: 'decorate', title: '装修'}
      ,{field: 'year', title: '楼龄', width: 135, sort: true}
      ,{fixed: 'right', title: '操作', width:178, align:'center', toolbar: '#barDemo'}
    ]]
  });

});
</script>


</body>
</html>
对应的Controller:
@Controller
@RequestMapping("/building")
public class BuildingController {
	@Autowired
	private BuildingService buildService;
	private static ConcurrentMap<String, Object> concurrentMap = new ConcurrentHashMap<String,Object>();
	@RequestMapping("/queryAll")
	@ResponseBody
	public  ConcurrentMap<String, Object> queryAllBuilding() {
		Integer queryCount = buildService.queryCount();
		List<Building> building = buildService.queryAll();
		concurrentMap.put("count", queryCount);
		concurrentMap.put("data", building);
		concurrentMap.put("code", 0);
		concurrentMap.put("msg", "成功");
		return concurrentMap;
	}
}
后台传递的参数格式:
{
  code: 200,//数据状态的字段名称,默认:code
  msg: "",//状态信息的字段名称,默认:msg
  count: 1000,//数据总数的字段名称,默认:count
  data: []//数据列表的字段名称,默认:data
}

三种渲染方式
在上述“快速使用”的介绍中,你已经初步见证了 table 模块的信手拈来,但其使用方式并不止那一种。我们为了满足各种情况下的需求,对 table 模块做了三种初始化的支持,你可按照个人喜好和实际情况灵活使用。
| 方式 | 机制 | 适用场景 | |
|---|---|---|---|
| 01. | 方法渲染 | 用JS方法的配置完成渲染 | (推荐)无需写过多的 HTML,在 JS 中指定原始元素,再设定各项参数即可。 |
| 02. | 自动渲染 | HTML配置,自动渲染 | 无需写过多 JS,可专注于 HTML 表头部分 |
| 03. | 转换静态表格 | 转化一段已有的表格元素 | 无需配置数据接口,在JS中指定表格元素,并简单地给表头加上自定义属性即可 |
1.方法渲染:
<table id="demo" lay-filter="test"></table>
var table = layui.table;

//执行渲染
table.render({
  elem: '#demo' //指定原始表格元素选择器(推荐id选择器)
  ,height: 315 //容器高度
  ,cols: [{}] //设置表头
  //,…… //更多参数参考右侧目录:基本参数选项
});
其实这是“自动化渲染”的手动模式,本质类似,只是“方法级渲染”将基础参数的设定放在了JS代码中,且原始的 table 标签只需要一个 选择器:
事实上我们更推荐采用“方法级渲染”的做法,其最大的优势在于你可以脱离HTML文件,而专注于JS本身。尤其对于项目的频繁改动及发布,其便捷性会体现得更为明显。而究竟它与“自动化渲染”的方式谁更简单,也只能由各位猿猿们自行体味了。
备注:table.render()方法返回一个对象:var tableIns = table.render(options),可用于对当前表格进行“重载”等操作,详见目录:表格重载
2.自动渲染
所谓的自动渲染,即:在一段 table 容器中配置好相应的参数,由 table 模块内部自动对其完成渲染,而无需你写初始的渲染方法。其特点在上文也有阐述。你需要关注的是以下三点:
1) 带有 class="layui-table" 的 <table> 标签。
2) 对标签设置属性 lay-data="" 用于配置一些基础参数
3) 在 <th> 标签中设置属性lay-data=""用于配置表头信息
按照上述的规范写好table原始容器后,只要你加载了layui 的 table 模块,就会自动对其建立动态的数据表格。下面是一个示例
<table class="layui-table" lay-data="{height:315, url:'/demo/table/user/', page:true, id:'test'}" lay-filter="test">
  <thead>
    <tr>
      <th lay-data="{field:'id', width:80, sort: true}">ID</th>
      <th lay-data="{field:'username', width:80}">用户名</th>
      <th lay-data="{field:'sex', width:80, sort: true}">性别</th>
      <th lay-data="{field:'city'}">城市</th>
      <th lay-data="{field:'sign'}">签名</th>
      <th lay-data="{field:'experience', sort: true}">积分</th>
      <th lay-data="{field:'score', sort: true}">评分</th>
      <th lay-data="{field:'classify'}">职业</th>
      <th lay-data="{field:'wealth', sort: true}">财富</th>
    </tr>
  </thead>
</table>
3.转换静态表格:
<table lay-filter="demo">
  <thead>
    <tr>
      <th lay-data="{field:'username', width:100}">昵称</th>
      <th lay-data="{field:'experience', width:80, sort:true}">积分</th>
      <th lay-data="{field:'sign'}">签名</th>
    </tr>
  </thead>
  <tbody>
    <tr>
      <td>贤心1</td>
      <td>66</td>
      <td>人生就像是一场修行a</td>
    </tr>
    <tr>
      <td>贤心2</td>
      <td>88</td>
      <td>人生就像是一场修行b</td>
    </tr>
    <tr>
      <td>贤心3</td>
      <td>33</td>
      <td>人生就像是一场修行c</td>
    </tr>
  </tbody>
</table>
var table = layui.table;

//转换静态表格
table.init('demo', {
  height: 315 //设置高度
  ,limit: 10 //注意:请务必确保 limit 参数(默认:10)是与你服务端限定的数据条数一致
  //支持所有基础参数
});


分页的情况:<!DOCTYPE html>
<html>
<head>
  <meta charset="utf-8">
  <title>layui</title>
  <meta name="renderer" content="webkit">
  <meta http-equiv="X-UA-Compatible" content="IE=edge,chrome=1">
    <script src="https://cdn.bootcss.com/jquery/1.12.4/jquery.min.js"></script>
  <meta name="viewport" content="width=device-width, initial-scale=1, maximum-scale=1">
   <link rel="stylesheet" href="/buddhism-heritage2/layui/css/layui.css">
  <script src="/buddhism-heritage2/layui/layui.js" charset="utf-8"></script>
  <!-- 注意:如果你直接复制所有代码到本地,上述css路径需要改成你本地的 -->
</head>
<body>
<div style="margin-bottom: 5px;">


 <table id="demo" lay-filter="demo"></table>
<script type="text/html" id="barDemo">
  <a class="layui-btn layui-btn-primary layui-btn-xs" lay-event="detail">查看</a>
  <a class="layui-btn layui-btn-xs" lay-event="edit">编辑</a>
  <a class="layui-btn layui-btn-danger layui-btn-xs" lay-event="del">删除</a>
</script>


<script>
layui.use('table', function(){
  var table = layui.table;
  //第一个实例
  table.render({
    elem: '#demo'
    ,height: 'full-20'
    ,method:'post'
    ,skin:'row'
    ,even:true
 	,page: true //开启分页
    ,url: '/buddhism-heritage2/building/queryAll' //数据接口
    ,cols: [[ //表头
      {field: 'id', title: 'ID', width:80, sort: true, fixed: 'left'}
      ,{field: 'name', title: '住房名称', width:80}
      ,{field: 'floor', title: '楼层', width:80, sort: true}
      ,{field: 'city', title: '城市', width:80}
      ,{field: 'num', title: '数量', width: 177}
      ,{field: 'money', title: '价格', width: 80, sort: true}
      ,{field: 'houseType', title: '房型', width: 80, }
      ,{field: 'size', title: '大小', width: 80, sort: true}
      ,{field: 'purpose', title: '用途'}
      ,{field: 'decorate', title: '装修'}
      ,{field: 'year', title: '楼龄', width: 135, sort: true}
      ,{fixed: 'right', title: '操作', width:178, align:'center', toolbar: '#barDemo'}
    ]]
  });
  //监听表格复选框选择
  table.on('checkbox(demo)', function(obj){
    console.log(obj)
  });
  //监听工具条
  table.on('tool(demo)', function(obj){
    var data = obj.data;
    if(obj.event === 'detail'){
      layer.msg('ID:'+ data.id + ' 的查看操作');
    } else if(obj.event === 'del'){
      layer.confirm('真的删除行么', function(index){
        obj.del();
        layer.close(index);
      });
    } else if(obj.event === 'edit'){
      layer.alert('编辑行:<br>'+ JSON.stringify(data))
    }
  });

  var $ = layui.$, active = {
    getCheckData: function(){ //获取选中数据
      var checkStatus = table.checkStatus('idTest')
      ,data = checkStatus.data;
      layer.alert(JSON.stringify(data));
    }
    ,getCheckLength: function(){ //获取选中数目
      var checkStatus = table.checkStatus('idTest')
      ,data = checkStatus.data;
      layer.msg('选中了:'+ data.length + ' 个');
    }
    ,isAll: function(){ //验证是否全选
      var checkStatus = table.checkStatus('idTest');
      layer.msg(checkStatus.isAll ? '全选': '未全选')
    }
  };

  $('.demoTable .layui-btn').on('click', function(){
    var type = $(this).data('type');
    active[type] ? active[type].call(this) : '';
  });
});
</script>


</body>
</html>
@Controller
@RequestMapping("/building")
public class BuildingController {

	@Autowired
	private BuildingService buildService;

	private static ConcurrentMap<String, Object> concurrentMap = new ConcurrentHashMap<String,Object>();

	@RequestMapping("/queryAll")
	@ResponseBody
	public  ConcurrentMap<String, Object> queryAllBuilding(Integer page,Integer limit) {
		Integer queryCount = buildService.queryCount();
		System.out.println("进入当前展示商品列表的controller");
		List<Building> buildings = buildService.pagePlug(page, limit);
		concurrentMap.put("count", queryCount);
		concurrentMap.put("data", buildings);
		concurrentMap.put("code", 0);
		concurrentMap.put("msg", "成功");
		return concurrentMap;
	}
}