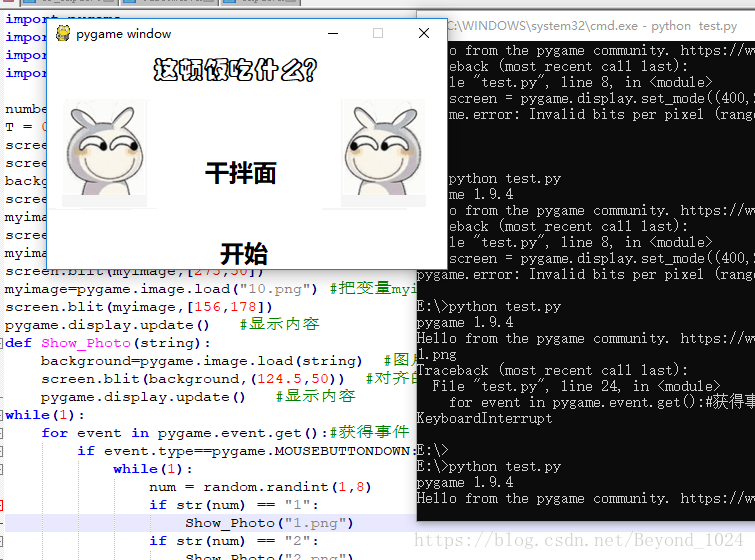
源码:
import pygame
import time
import os
import random

number = 1
T = 0.5
screen = pygame.display.set_mode((400,220),0,32)
screen.fill((255,255,255))
background=pygame.image.load('9.png')  #图片位置    while True:   #循环刷新
screen.blit(background,(0,0))  #对齐的坐标
myimage=pygame.image.load("R.png") #把变量myimage赋给导入的图片
screen.blit(myimage,[0,50])
myimage=pygame.image.load("L.png") #把变量myimage赋给导入的图片
screen.blit(myimage,[275,50])
myimage=pygame.image.load("10.png") #把变量myimage赋给导入的图片
screen.blit(myimage,[156,178])
pygame.display.update()   #显示内容
def Show_Photo(string):
	background=pygame.image.load(string)  #图片位置    while True:   #循环刷新
	screen.blit(background,(124.5,50))  #对齐的坐标
	pygame.display.update()   #显示内容
while(1):
	for event in pygame.event.get():#获得事件
		if event.type==pygame.MOUSEBUTTONDOWN:
			while(1):
				num = random.randint(1,8)
				if str(num) == "1":
					Show_Photo("1.png")
				if str(num) == "2":
					Show_Photo("2.png")
				if str(num) == "3":
					Show_Photo("3.png")
				if str(num) == "4":
					Show_Photo("4.png")
				if str(num) == "5":
					Show_Photo("5.png")
				if str(num) == "6":
					Show_Photo("6.png")
				if str(num) == "7":
					Show_Photo("7.png")
				if str(num) == "8":
					Show_Photo("8.png")
				time.sleep(T)
				number = number + 1
				if number % 5 == 0:
					T = T - 0.1
				if number == 20:
					string = str(num) + ".png"
					print (string)
					break
while(1):
	Show_Photo(string)
代码笔记:
1. 创建窗口并设置颜色
screen = pygame.display.set_mode((400,220),0,32)   #大小400x220的窗口
screen.fill((255,255,255))         #设置窗口背景颜色
2. 在窗口里显示图片
background=pygame.image.load('9.png')  #图片路径/位置
screen.blit(background,(0,0))  #对齐的坐标
    ...
    ...
    ...
pygame.display.update()   #显示内容   不执行这一步图片不会显示出来
3. 鼠标单击事件
while True:
	for event in pygame.event.get():#获得事件
		if event.type==pygame.MOUSEBUTTONDOWN:
                    #鼠标单击成功后执行的东西
注意:在写脚本的过程中,str = str(num) + ".png"。这样会因为变量和关键字重名冲突,导致编译报错。
执行后效果: