swagger2是一个非常好用的接口文档,在开发的过程中方便前后端接口的交接。
下面我们就来讲讲在使用java时,分别在SSM框架,以及springboot+mybatis框架中引入swagger2的方法。
一、在SSM框架中引入swagger2
需要加的maven依赖

1.在com.imooc.utils下创建一个swagger2的配置类
package com.imooc.utils;

import org.springframework.context.annotation.Bean;
import org.springframework.context.annotation.Configuration;
import springfox.documentation.builders.ApiInfoBuilder;
import springfox.documentation.builders.PathSelectors;
import springfox.documentation.builders.RequestHandlerSelectors;
import springfox.documentation.service.ApiInfo;
import springfox.documentation.service.Contact;
import springfox.documentation.spi.DocumentationType;
import springfox.documentation.spring.web.plugins.Docket;
import springfox.documentation.swagger2.annotations.EnableSwagger2;

@Configuration
@EnableSwagger2
public class Swagger2 {

   @Bean
   public Docket createRestApi() {
      return new Docket(DocumentationType.SWAGGER_2).apiInfo(apiInfo()).select()
            .apis(RequestHandlerSelectors.basePackage("com.imooc.web")) //指明controller所在的包
            .paths(PathSelectors.any()).build();
   }
   /**
    * @Description: 构建 api文档的信息
    */
   private ApiInfo apiInfo() {
      return new ApiInfoBuilder()
            // 设置页面标题
            .title("短视频后台管理系统api接口文档")
            // 设置联系人
            .contact(new Contact("联系人姓名", "see more at..","邮箱"))
            // 描述
            .description("controller层接口如下")
            // 定义版本号
            .version("1.0").build();
   }
}
2.在springmvc.xml中进行配置

二、在springboot项目中引入swagger2
添加maven依赖

1.在com.imooc包下创建swagger2的配置类
package com.imooc;
import org.springframework.context.annotation.Bean;
import org.springframework.context.annotation.Configuration;
import springfox.documentation.builders.ApiInfoBuilder;
import springfox.documentation.builders.PathSelectors;
import springfox.documentation.builders.RequestHandlerSelectors;
import springfox.documentation.service.ApiInfo;
import springfox.documentation.service.Contact;
import springfox.documentation.spi.DocumentationType;
import springfox.documentation.spring.web.plugins.Docket;
import springfox.documentation.swagger2.annotations.EnableSwagger2;
@Configuration
@EnableSwagger2
public class Swagger2 {
/**
* @Description:swagger2的配置文件,这里可以配置swagger2的一些基本的内容,比如扫描的包等等
*/
@Bean
public Docket createRestApi() {
return new Docket(DocumentationType.SWAGGER_2).apiInfo(apiInfo()).select()
.apis(RequestHandlerSelectors.basePackage("com.imooc.controller"))
.paths(PathSelectors.any()).build();
}
/**
* @Description: 构建 api文档的信息
*/
private ApiInfo apiInfo() {
return new ApiInfoBuilder()
// 设置页面标题
.title("使用swagger2构建短视频后端api接口文档")
// 设置联系人
.contact(new Contact("联系人姓名", "see more at..","联系人的电子邮箱 "))
// 描述
.description("controller层接口如下")
// 定义版本号
.version("1.0").build();
}
}
2.在springboot的启动类中指明需要扫描的包,只要让swagger2.java被扫描到即可

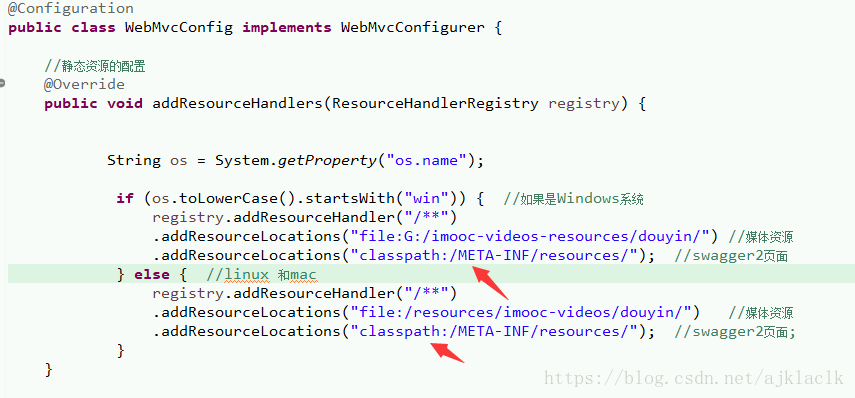
3.在springboot的WebMvcConfig类中配置允许静态资源的访问
============================================================================
通过上面的方法,我们就已经在SSM项目或者springboot项目中成功引入了swagger2 接口文档。
此时我们就可以通过 ip+端口/swagger-ui.html 来访问接口文档,例如 http://localhost:8080/swagger-ui.html
====================================================================
在引入了swagger2之后,我们还需要加上一些注解,才能够达到我们想要的效果,swagger2中常用注解的使用:
https://blog.csdn.net/ajklaclk/article/details/80736042