一、背景
在团队开发中,维护好一份完善且规范的 API 文档能够大大减少团队开发人员的沟通效率且开发效率显著的提升。当我们的项目庞大且开发人员不断的来不断的走,这样的情况下,共同维护的 API 文档可想而知到后面基本废了,即使有一个规范的前提,但还是经受不住开发人员先后的”折磨“。
这种做法存在以下几个问题:
- API 接口众多,细节复杂,需要考虑不同的HTTP请求类型、HTTP头部信息、HTTP请求内容等,想要高质量的完成这份文档需要耗费大量的精力;
- 难以维护。随着需求的变更和项目的优化、推进,接口的细节在不断地演变,接口描述文档也需要同步修订,可是文档和代码处于两个不同的媒介,即使有严格的管理机制,也很容易出现文档、接口不一致的情况。
正所谓,有什么样的痛点,就会伴随着相应的解决方案与技术出来。
Swagger2 的出现就是为了从根本上解决上述问题。它作为一个规范和完整的框架,可以用于生成、描述、调用和可视化 RESTful 风格的 Web 服务:
Swagger2的出现就是为了从根本上解决上述问题。它作为一个规范和完整的框架,可以用于生成、描述、调用和可视化RESTful风格的 Web 服务;- 支持在线接口测试,不依赖第三方工具。
二、集成Swagger2 构建RESTful API
1、pom.xml 添加 Maven 依赖
<!-- swagger-ui -->
<dependency>
    <groupId>io.springfox</groupId>
    <artifactId>springfox-swagger-ui</artifactId>
    <version>2.8.0</version>
</dependency>
<!-- swagger -->
<dependency>
    <groupId>io.springfox</groupId>
    <artifactId>springfox-swagger2</artifactId>
    <version>2.8.0</version>
</dependency>
2、创建 SwaggerConfig.java
package com.riemann.springbootdemo.config;

import org.springframework.context.annotation.Bean;
import org.springframework.context.annotation.Configuration;
import springfox.documentation.builders.ApiInfoBuilder;
import springfox.documentation.builders.PathSelectors;
import springfox.documentation.builders.RequestHandlerSelectors;
import springfox.documentation.service.ApiInfo;
import springfox.documentation.service.Contact;
import springfox.documentation.spi.DocumentationType;
import springfox.documentation.spring.web.plugins.Docket;
import springfox.documentation.swagger2.annotations.EnableSwagger2;

@Configuration
@EnableSwagger2
public class SwaggerConfig {
    @Bean
    public Docket createRestApi() {
        return new Docket(DocumentationType.SWAGGER_2)
                .apiInfo(apiInfo())
                .select()
                // 当前包的路径
                .apis(RequestHandlerSelectors.basePackage("com.riemann.springbootdemo"))
                // 可以根据url路径设置哪些请求加入文档,忽略哪些请求
                .paths(PathSelectors.any())
                .build();
    }

    // 构建api文档的详细信息函数,注意这里的注解引用的是哪个
    private ApiInfo apiInfo() {
        return new ApiInfoBuilder()
                // 页面标题
                .title("Spring Boot 使用 Swagger2 构建RESTful API")
                // 创建人
                .contact(new Contact("riemann","https://blog.csdn.net/riemann_","[email protected]"))
                // 版本号
                .version("1.0")
                // 描述
                .description("API 描述")
                .build();
    }
}
如上代码所示,通过 @Configuration 注解,让 Spring 加载该配置类。再通过 @EnableSwagger2 注解来启用Swagger2。成员方法 createRestApi函数创建 Docket 的Bean之后,apiInfo() 用来创建该 Api 的基本信息(这些基本信息会展现在文档页面中)。select() 函数返回一个 ApiSelectorBuilder实例用来控制哪些接口暴露给 Swagger 来展现,本例采用指定扫描的包路径来定义,Swagger 会扫描该包下所有 Controller 定义的 API,并产生文档内容(除了被 @ApiIgnore 指定的请求)。
3、API 接口编写
在完成了上述配置后,其实已经可以产生文档内容,但是这样的文档主要针对请求本身,而描述主要来源于函数等命名产生,对用户并不友好,我们通常需要自己增加一些说明来丰富文档内容。
package com.riemann.springbootdemo.controller;

import com.riemann.springbootdemo.model.ApiResponse;
import io.swagger.annotations.Api;
import io.swagger.annotations.ApiImplicitParam;
import io.swagger.annotations.ApiOperation;
import org.slf4j.Logger;
import org.slf4j.LoggerFactory;
import org.springframework.web.bind.annotation.RequestMapping;
import org.springframework.web.bind.annotation.RequestMethod;
import org.springframework.web.bind.annotation.RequestParam;
import org.springframework.web.bind.annotation.RestController;

import javax.servlet.http.HttpServletRequest;
import java.util.Random;

/**
 * @author riemann
 * @date 2019/12/16 21:17
 */
@Api(description = "用户操作接口")
@RestController
public class SwaggerController {

    private static final Logger LOGGER = LoggerFactory.getLogger(SwaggerController.class);

    @ApiOperation(value = "获取OTP", notes = "通过手机号获取OTP验证码")
    @ApiImplicitParam(name = "telephone", value = "电话号码", paramType = "query", required = true, dataType = "Integer")
    @RequestMapping(value = "/user/getotp", method= RequestMethod.GET)
    public ApiResponse getOtp(@RequestParam(name = "telephone") String telephone, HttpServletRequest httpServletRequest) {
        // 需要按照一定的规则生成OTP验证码
        Random random = new Random();
        int randomInt = random.nextInt(999999);
        randomInt += 100000;
        String otpCode = String.valueOf(randomInt);

        // 将OTP验证码同对应用户的手机号关联,使用httpsession的方式绑定他的手机号与OTPCode
        httpServletRequest.getSession().setAttribute(telephone, otpCode);
        // 将OTP验证码通过短信通道发送给用户,省略
        LOGGER.info("telphone = {} & otpCode = {}", telephone, otpCode);
        return new ApiResponse("200", "success", otpCode);
    }
}
Swagger 通过注解定制接口对外展示的信息,这些信息包括接口名、请求方法、参数、返回信息等。更多注解类型:
- @Api:修饰整个类,描述Controller的作用
- @ApiOperation:描述一个类的一个方法,或者说一个接口
- @ApiParam:单个参数描述
- @ApiModel:用对象来接收参数
- @ApiProperty:用对象接收参数时,描述对象的一个字段
- @ApiResponse:HTTP响应其中1个描述
- @ApiResponses:HTTP响应整体描述
- @ApiIgnore:使用该注解忽略这个API
- @ApiError :发生错误返回的信息
- @ApiImplicitParam:描述一个请求参数,可以配置参数的中文含义,还可以给参数设置默认值
- @ApiImplicitParams:描述由多个 @ApiImplicitParam 注解的参数组成的请求参数列表
4、启动 SpringBoot 应用
SpringBoot 启动成功后,访问 http://localhost:8080/swagger-ui.html
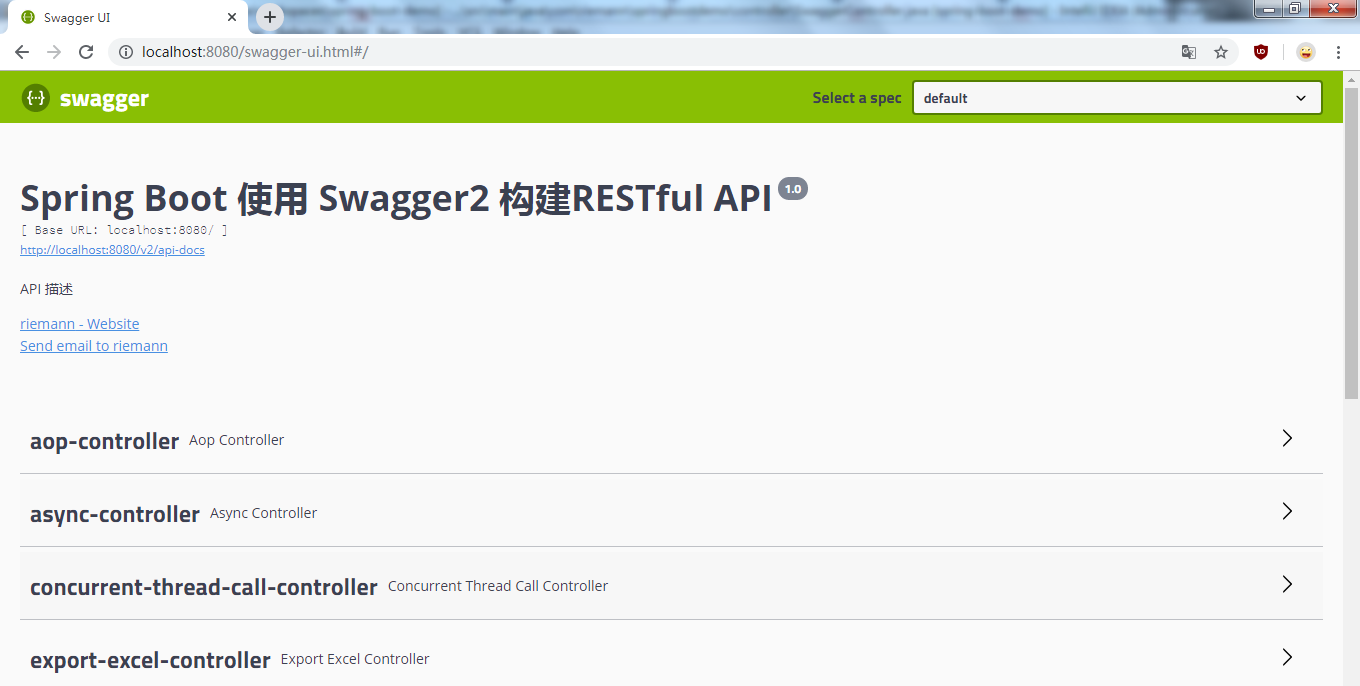
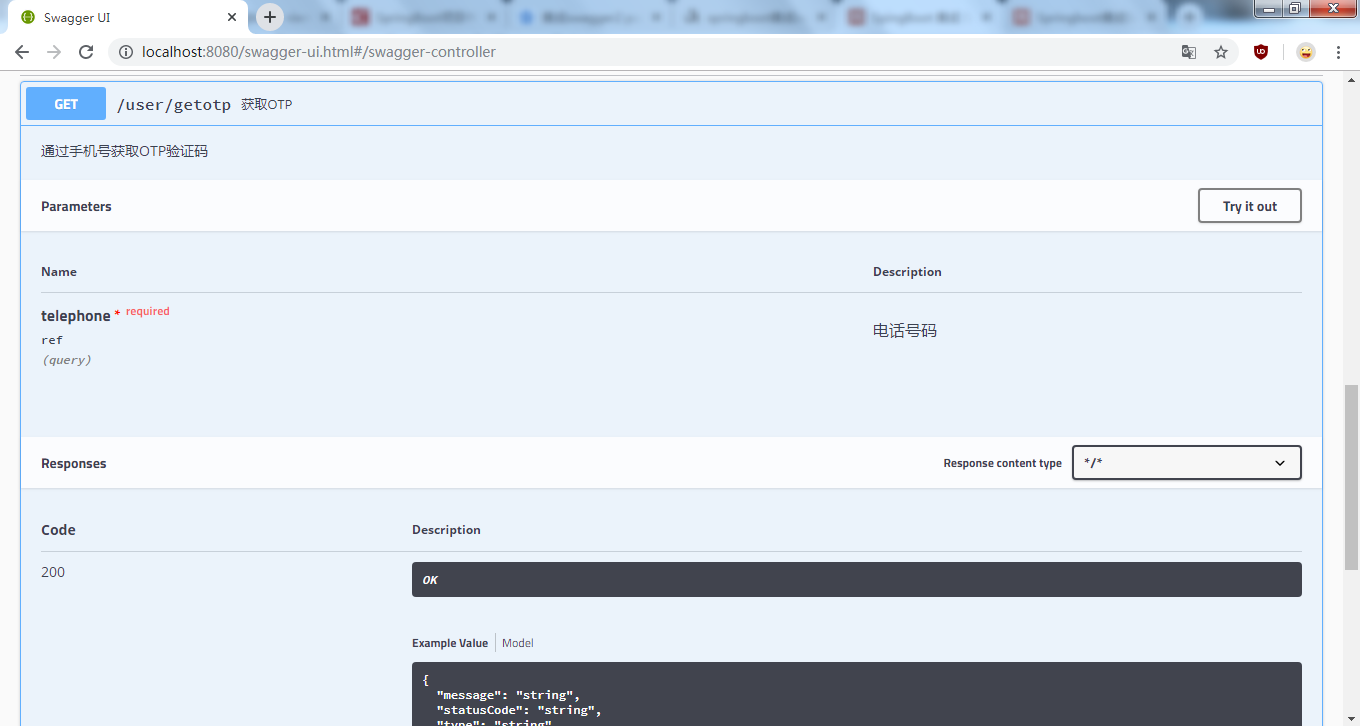
展开类维度的接口列表,如 swagger-controller,页面会列出该类中定义的所有接口。点击任意接口,可查看该接口的 url 路径、请求类型、参数描述和返回码说明等信息。
点击右上角的 “Try it out!”按钮,录入请求信息,点击 Execute 按钮完成一次请求调用!
5、在Spring Security 中的配置
Spring Boot 项目中如果集成了 Spring Security,在不做额外配置的情况下,Swagger2 文档会被拦截。解决方法是在 Security 的配置类中重写 configure 方法添加白名单即可:
@Override
public void configure ( WebSecurity web) throws Exception {
    web.ignoring()
      .antMatchers("/swagger-ui.html")
      .antMatchers("/v2/**")
      .antMatchers("/swagger-resources/**");
}
6、踩坑记录
