前言
spring boot简化了spring的开发, 开发人员在开发过程中省去了大量的配置, 方便开发人员后期维护.
使用spring boot可以快速的开发出restful风格微服务架构.
本文将详细的介绍如何搭建一套spring boot 项目, 实现前后端交互.
开发工具 : IDEA , jdk 8 , mysql
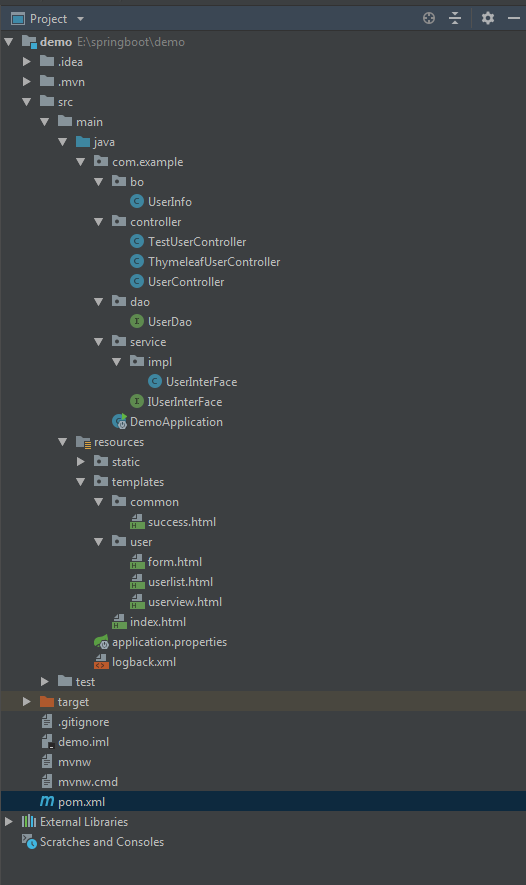
开发完成后目录截图 :
一. 新建项目
file-new-project-Spring Initializr
Project SDK选择JDK1.8, 后面直接下一步就可以

项目新建完成, 我们可以看到初始的目录结构, 修改pom.xml, 配置上项目开发需要的包. xml配置如下 :
<?xml version="1.0" encoding="UTF-8"?>
<project xmlns="http://maven.apache.org/POM/4.0.0" xmlns:xsi="http://www.w3.org/2001/XMLSchema-instance"
    xsi:schemaLocation="http://maven.apache.org/POM/4.0.0 http://maven.apache.org/xsd/maven-4.0.0.xsd">
    <modelVersion>4.0.0</modelVersion>

    <groupId>com.example</groupId>
    <artifactId>demo</artifactId>
    <version>0.0.1-SNAPSHOT</version>
    <packaging>jar</packaging>

    <name>demo</name>
    <description>Demo project for Spring Boot</description>

    <parent>
        <groupId>org.springframework.boot</groupId>
        <artifactId>spring-boot-starter-parent</artifactId>
        <version>2.0.6.RELEASE</version>
        <relativePath/> <!-- lookup parent from repository -->
    </parent>

    <properties>
        <project.build.sourceEncoding>UTF-8</project.build.sourceEncoding>
        <project.reporting.outputEncoding>UTF-8</project.reporting.outputEncoding>
        <java.version>1.8</java.version>
    </properties>

    <dependencies>
        <dependency>
            <groupId>org.springframework.boot</groupId>
            <artifactId>spring-boot-starter-web</artifactId>
        </dependency>

        <dependency>
            <groupId>org.springframework.boot</groupId>
            <artifactId>spring-boot-starter-test</artifactId>
            <scope>test</scope>
        </dependency>

        <dependency>
            <groupId>org.springframework.boot</groupId>
            <artifactId>spring-boot-starter-logging</artifactId>
        </dependency>

        <dependency>
            <groupId>org.mybatis.spring.boot</groupId>
            <artifactId>mybatis-spring-boot-starter</artifactId>
            <version>1.1.1</version>
        </dependency>

        <dependency>
            <groupId>mysql</groupId>
            <artifactId>mysql-connector-java</artifactId>
            <version>5.1.21</version>
        </dependency>

        <dependency>
            <groupId>org.springframework.boot</groupId>
            <artifactId>spring-boot-starter-thymeleaf</artifactId>
        </dependency>

    </dependencies>

    <build>
        <plugins>
            <plugin>
                <groupId>org.springframework.boot</groupId>
                <artifactId>spring-boot-maven-plugin</artifactId>
            </plugin>
        </plugins>
    </build>


</project>
修改application.properties 配置文件, 连接数据库.
spring.datasource.url=jdbc:mysql://localhost:3306/test?useUnicode=true&&characterEncoding=utf8 spring.datasource.username=root spring.datasource.password=123456 spring.datasource.driver-class-name=com.mysql.jdbc.Driver spring.thymeleaf.encoding=utf-8 spring.thymeleaf.cache=false spring.thymeleaf.mode=html5
二.项目开发
1.新建bo包, 存放实体类bean.
2.新建controller包, 存放控制层类.
3.新建dao包, 存放操作类.
4.新建service包, 存放服务接口类和实现类.
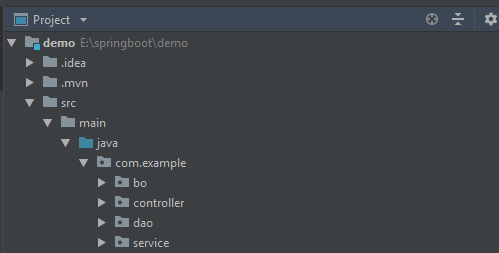
新建完成, 项目结构如下图:
项目包新建完毕, 首先我们新增实体类, UserInfo
package com.example.bo;

public class UserInfo {

    private String psname;
    private String cardno;
    private int id;

    public void setId(int id) {
        this.id = id;
    }

    public void setCardno(String cardno) {
        this.cardno = cardno;
    }

    public void setPsname(String psname) {
        this.psname = psname;
    }

    public String getPsname() {
        return psname;
    }

    public String getCardno() {
        return cardno;
    }

    public int getId() {
        return id;
    }
}
在我们之前新建的接口包里新增接口IUserInterFace , 新建接口实现类UserInterFace, 实现人员信息的查询, 新增, 修改, 删除. 实现类代码如下:
package com.example.service.impl;

import com.example.bo.UserInfo;
import com.example.dao.UserDao;
import com.example.service.IUserInterFace;
import org.springframework.beans.factory.annotation.Autowired;
import org.springframework.stereotype.Service;
import org.slf4j.LoggerFactory;
import org.slf4j.Logger;

import java.util.List;

@Service
public class UserInterFace implements IUserInterFace {

    private final Logger log = LoggerFactory.getLogger(UserInterFace.class);

    @Autowired UserDao ud;
    @Override
    public UserInfo getUserByCardno(String cardno){
        return ud.getUserByCardno(cardno);
    }

    @Override
    public UserInfo getUserById(int id){
        return ud.getUserById(id);
    }

    @Override
    public int getIntUser() {
        return 0;
    }

    @Override
    public int insertUser(String cardno , String psname){
        log.info("UserInterFace insertUser info log start");
        return ud.insertUser(cardno,psname);
    }

    @Override
    public List<UserInfo> getAllUser(){
        log.info("UserInterFace getAllUser info log start");
        return ud.getAllUser();
    }

    @Override
    public int deleteById(int id){
        log.info("UserInterFace deleteById info log start");
        return ud.deleteById(id);
    }

    @Override
    public int updateById(int id , String cardno , String psname){
        log.info("UserInterFace updateById info log start");
        return ud.updateByid(id,cardno,psname);
    }
}
注意: 接口实现类, 调用了DAO层的方法, 在dao包下新建UserDao类 , 实现与数据库的交互, 代码如下 :
package com.example.dao;

import com.example.bo.UserInfo;
import org.apache.ibatis.annotations.*;

import java.util.List;

@Mapper
public interface UserDao {

    /**
     * 通过主键id号码查询人员信息
     */
    @Select("select * from person where id = #{id}")
    UserInfo getUserById(@Param("id") int id);

    /**
     * 通过身份证号码查询人员信息
     */
    @Select("select * from person where cardno = #{cardno}")
    UserInfo getUserByCardno(@Param("cardno") String cardno);

    /**
     * 新增人员信息
     */
    @Insert("insert into person(cardno,psname) values(#{cardno},#{psname})")
    int insertUser(@Param("cardno") String cardno, @Param("psname") String psname);

    /**
     * 查询所有人员信息
     */
    @Select("select * from person")
    List<UserInfo> getAllUser();

    /**
     * 通过id删除人员信息
     */
    @Delete("delete from person where id = #{id}")
    int deleteById(@Param("id") int id);

    @Update("update person set cardno=#{cardno},psname=#{psname} where id=#{id}")
    int updateByid(@Param("id") int id , @Param("cardno") String cardno,@Param("psname") String psname);
}
在controller包中, 新建测试类去调用接口, 测试能不能查到数据. 测试类代码如下:
package com.example.controller;

import com.example.service.IUserInterFace;
import com.example.bo.UserInfo;
import org.slf4j.Logger;
import org.slf4j.LoggerFactory;
import org.springframework.beans.factory.annotation.Autowired;
import org.springframework.stereotype.Controller;
import org.springframework.web.bind.annotation.RequestMapping;
import org.springframework.web.bind.annotation.ResponseBody;

import java.util.List;

@Controller
@RequestMapping(value = "/test")
public class TestUserController {

    private final Logger log = LoggerFactory.getLogger(TestUserController.class);

    @Autowired
    private IUserInterFace iuser;

    @RequestMapping("/num")
    @ResponseBody
    int home(){
        int i = iuser.getIntUser();
        return i;
    }

    @RequestMapping("/getUser")
    @ResponseBody
    List<UserInfo> getUser(){
        //打印日志
        log.info("TestUserController getUser info");
        return iuser.getAllUser();
    }
}
修改 , 新建项目时生成的DemoApplication类,启动项目,修改代码如下:
package com.example;

import org.springframework.boot.SpringApplication;
import org.springframework.boot.autoconfigure.EnableAutoConfiguration;
import org.springframework.context.annotation.ComponentScan;

@EnableAutoConfiguration
@ComponentScan(basePackages={"com.example"})
public class DemoApplication {
    public static void main(String[] args) {
        SpringApplication.run(DemoApplication.class, args);
    }
}
项目启动完成, 我们在网页输入 http://localhost:8080/test/getUser , 既可以查到数据如下 :

至此, 项目已经可以从数据库查询数据返回到页面, 但是返回的是一串字符. 我们如何让返回的数据在页面以列表形式展示, 而且在页面可以直接进行增删改查操作呢? 这就是我们接下来要说的了.
首先在配置文件引入如下包, 最上面的配置文件里面已经引入 .
<dependency>
   <groupId>org.springframework.boot</groupId>
   <artifactId>spring-boot-starter-thymeleaf</artifactId>
</dependency>
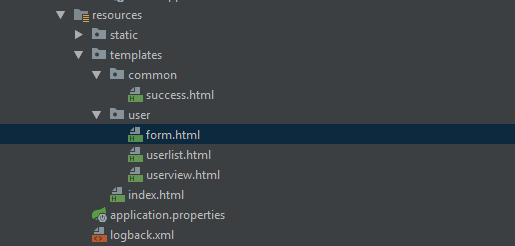
然后在/resources/templates文件夹下面新建我们需要的页面. 新建common文件夹,存放公共的页面, 新建user文件夹, 存放人员相关页面. 新建公共页面success.html做为操作成功提示页面.
新建form.html提交页面, userlist.html列表展示页面, userview.html详细信息展示页面. 新建完目录如下 :
页面代码如下 :
form.html
<!DOCTYPE html>
<html xmlns:th="http://www.thymeleaf.org"
      xmlns:layout= "http://www.ultraq.net.nz/thymeleaf/layout">
<head>
    <meta charset="UTF-8">
    <title>Title</title>
</head>
<body>
    <form action="/user" th:action="@{/user}" method="post" th:object="${user}">
        <input type="hidden" name="id" th:value="*{id}">
        名字<br/>
        <input type="text" name="psname" th:value="*{psname}">
        <br/>
        <input type="text" name="cardno" th:value="*{cardno}">
        <br/>
        <input type="submit" value="提交">
    </form>
</body>
</html>
userlist.html
<!DOCTYPE html>
<html xmlns:th="http://www.thymeleaf.org">
<head>
    <meta content="text/html;charset=UTF-8"/>
    <title>Content</title>
</head>
<body>
<div>
    <a href="/user/form" th:href="@{/user/form}">
        新建用户
    </a>
</div>
<table border="2">
    <thead>
        <tr>
            <td>id</td>
            <td>名字</td>
            <td>证件号码</td>
            <td>管理</td>
        </tr>
        <tr th:each="user:${contents}">
            <td th:text="${user.id}"></td>
            <td th:text="${user.psname}"></td>
            <td><a th:href="@{'/user/'+${user.id}}" th:text="${user.cardno}"></a></td>
            <td><a th:href="@{'/user/delete/'+${user.id}}">删除</a></td>
        </tr>
    </thead>
</table>

</body>
</html>
userview.html
<!DOCTYPE html>
<html xmlns:th="http://www.thymeleaf.org">
<head>
    <meta charset="UTF-8">
    <title>Title</title>
</head>
<body>
    <div>
        <p><strong>ID:</strong><span th:text="${user.id}"></span></p>
        <p><strong>名字:</strong><span th:text="${user.cardno}"></span></p>
        <p><strong>年龄:</strong><span th:text="${user.psname}"></span></p>
    </div>
    <div>
        <a th:href="@{'/user/delete/'+${user.id}}">删除</a>
        <a th:href="@{'/user/edit/'+${user.id}}">修改</a>
    </div>
</body>
</html>
至此, 页面新增完成 , 我们需要新增ThymeleafUserController类, 来与页面实现交互
package com.example.controller;

import com.example.bo.UserInfo;
import com.example.service.IUserInterFace;
import org.slf4j.LoggerFactory;
import org.slf4j.Logger;
import org.springframework.beans.factory.annotation.Autowired;
import org.springframework.stereotype.Controller;
import org.springframework.ui.Model;
import org.springframework.web.bind.annotation.GetMapping;
import org.springframework.web.bind.annotation.PathVariable;
import org.springframework.web.bind.annotation.PostMapping;
import org.springframework.web.bind.annotation.RequestMapping;

@Controller
@RequestMapping(value = "/user")
public class ThymeleafUserController {
    private final Logger log = LoggerFactory.getLogger(ThymeleafUserController.class);

    @Autowired
    private IUserInterFace iuser;

    @GetMapping("/userlist")
    public String userList(Model model){
        //打印日志
        log.info("ThymeleafUserController userList info log start");
        model.addAttribute("contents",iuser.getAllUser());
        return "/user/userlist";
    }

    @GetMapping("/form")
    public String form(Model model){
        log.info("ThymeleafUserController form info log start");
        model.addAttribute("user" , new UserInfo());
        return "/user/form";
    }

    @GetMapping("{id}")
    public String userview(@PathVariable("id") int id , Model model){
        UserInfo user = iuser.getUserById(id);
        model.addAttribute("user",user);
        return "/user/userview";
    }

    @PostMapping
    public String saveUser(UserInfo user){
        log.info("ThymeleafUserController saveUser info log start");
        if(user.getId()==0){
            iuser.insertUser(user.getCardno(),user.getPsname());
        }else{
            int a = iuser.updateById(user.getId(),user.getCardno(),user.getPsname());
        }
        return "/common/success";
    }

    @GetMapping(value = "edit/{id}")
    public String editForm(@PathVariable("id") int id , Model model){
        log.info("ThymeleafUserController editForm info log start");
        UserInfo user = iuser.getUserById(id);
        model.addAttribute("user" , user);
        return "/user/form";
    }

    @GetMapping(value = "delete/{id}")
    public String delete(@PathVariable("id") int id){
        iuser.deleteById(id);
        return "/common/success";
    }

}
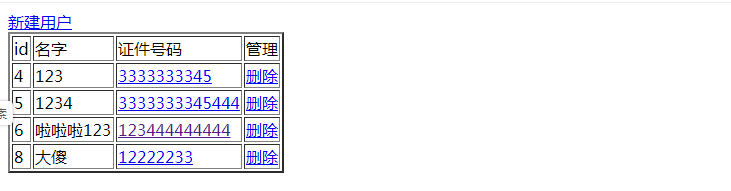
启动项目, 输入网址 http://localhost:8080/user/userlist 查询数据, 显示列表 :
到此, 整个项目的搭建和代码已经完成.
总结
这是博主博客生涯的第一篇博客, 博客内容有参考一些资料, 但代码都是博主自己一行一行实现 . 博文写的不对或不好的地方可以提出意见, 大家一起进步, 谢谢阅读.