项目地址
https://github.com/oujin-nb/vueModel
使用
1
克隆项目 git clone https://github.com/oujin-nb/vueModel.git
2
安装依赖 npm install
3
启动服务 npm run dev
打开localhost:9001
搭建项目步骤
1 用脚手架构建vue项目
 npm install -g vue-cli
 vue init webpack my-project
 cd my-project
 npm install
 npm run dev
2 引入element-ui
npm i element-ui -Smain.js
import ElementUI from 'element-ui'
import 'element-ui/lib/theme-chalk/index.css'
Vue.use(ElementUI)
引入组件
element/index.js
/**
 * UI组件, 统一使用饿了么桌面端组件库(https://github.com/ElemeFE/element)
 *
 * 使用:
 *  1. 项目中需要的组件进行释放(解开注释)
 *
 * 注意:
 *  1. 打包只会包含释放(解开注释)的组件, 减少打包文件大小
 */
import Vue from 'vue'
import {
  Pagination,
  Dialog,
  Autocomplete,
  Dropdown,
  DropdownMenu,
  DropdownItem,
  Menu,
  Submenu,
  MenuItem,
  MenuItemGroup,
  Input,
  InputNumber,
  Radio,
  RadioGroup,
  RadioButton,
  Checkbox,
  // CheckboxButton,
  CheckboxGroup,
  // Switch,
  Select,
  Option,
  // OptionGroup,
  Button,
  ButtonGroup,
  Table,
  TableColumn,
  DatePicker,
  TimeSelect,
  TimePicker,
  Popover,
  Tooltip,
  // Breadcrumb,
  // BreadcrumbItem,
  Form,
  FormItem,
  Tabs,
  TabPane,
  Tag,
  Tree,
  Alert,
  Slider,
  // Icon,
  Row,
  Col,
  Upload,
  // Progress,
  Badge,
  Card,
  // Rate,
  // Steps,
  // Step,
  // Carousel,
  // CarouselItem,
  // Collapse,
  // CollapseItem,
  // Cascader,
  // ColorPicker,
  // Transfer,
  // Container,
  // Header,
  // Aside,
  // Main,
  // Footer,
  Loading,
  MessageBox,
  Message
  // Notification
} from 'element-ui'
Vue.use(Pagination)
Vue.use(Dialog)
Vue.use(Autocomplete)
Vue.use(Dropdown)
Vue.use(DropdownMenu)
Vue.use(DropdownItem)
Vue.use(Menu)
Vue.use(Submenu)
Vue.use(MenuItem)
Vue.use(MenuItemGroup)
Vue.use(Input)
Vue.use(InputNumber)
Vue.use(Radio)
Vue.use(RadioGroup)
Vue.use(RadioButton)
Vue.use(Checkbox)
// Vue.use(CheckboxButton)
Vue.use(CheckboxGroup)
// Vue.use(Switch)
Vue.use(Select)
Vue.use(Option)
// Vue.use(OptionGroup)
Vue.use(Button)
Vue.use(ButtonGroup)
Vue.use(Table)
Vue.use(TableColumn)
Vue.use(DatePicker)
Vue.use(TimeSelect)
Vue.use(TimePicker)
Vue.use(Popover)
Vue.use(Tooltip)
// Vue.use(Breadcrumb)
// Vue.use(BreadcrumbItem)
Vue.use(Form)
Vue.use(FormItem)
Vue.use(Tabs)
Vue.use(TabPane)
Vue.use(Tag)
Vue.use(Tree)
Vue.use(Alert)
Vue.use(Slider)
// Vue.use(Icon)
Vue.use(Row)
Vue.use(Col)
Vue.use(Upload)
// Vue.use(Progress)
Vue.use(Badge)
Vue.use(Card)
// Vue.use(Rate)
// Vue.use(Steps)
// Vue.use(Step)
// Vue.use(Carousel)
// Vue.use(CarouselItem)
// Vue.use(Collapse)
// Vue.use(CollapseItem)
// Vue.use(Cascader)
// Vue.use(ColorPicker)
// Vue.use(Transfer)
// Vue.use(Container)
// Vue.use(Header)
// Vue.use(Aside)
// Vue.use(Main)
// Vue.use(Footer)

Vue.use(Loading.directive)

Vue.prototype.$loading = Loading.service
Vue.prototype.$msgbox = MessageBox
Vue.prototype.$alert = MessageBox.alert
Vue.prototype.$confirm = MessageBox.confirm
Vue.prototype.$prompt = MessageBox.prompt
// Vue.prototype.$notify = Notification
Vue.prototype.$message = Message

Vue.prototype.$ELEMENT = { size: 'medium' }
3 配置vuex
新建一个vuex模块comment,后续根据需要自行建立
export default {
  // 开启命名空间
  namespaced: true,
  state: {
    param1: 'param1'
  },
  mutations: {
    updateParam1 (state, param1) {
      state.param1 = param1
    }
  },
  actions: {
    updateParam1: (context, id) => {
      return context.commit('updateParam1', id)
    }
  }
}
vuex/index.js将新建的模块注入到vuex再将vuex注册到vue
import Vue from 'vue'
import Vuex from 'vuex'
import comment from './modules/comment'
Vue.use(Vuex)
export default new Vuex.Store({
  modules: {
    comment: comment
  }
})
具体参考https://blog.csdn.net/weixin_39168678/article/details/81200890
4 vue-route脚手架已经配好了,在route/index自行配置即可
5 配置http请求
npm install axios --save-dev发送http工具类
import axios from 'axios'
const http = axios.create({
  timeout: 1000 * 30,
  withCredentials: true,
  headers: {
    'Content-Type': 'application/json; charset=utf-8'
  }
})
/**
 * 请求拦截
 */
http.interceptors.request.use(config => {
  return config
}, error => {
  return Promise.reject(error)
})

/**
 * 响应拦截
 */
http.interceptors.response.use(response => {
  return response
}, error => {
  return Promise.reject(error)
})
/**
 * 请求地址处理
 * @param {*} actionName action方法名称
 */
http.adornUrl = (actionName) => {
  return 'http://120.27.213.3:8010' + actionName
}

export default http
在main.js注册该工具类
import httpRequest from '@/http/httpRequest' // api: https://github.com/axios/axiosVue.prototype.$http = httpRequest标准格式
      httpTest() {
            this.$http({
              url: this.$http.adornUrl(''),
              method: 'get',
              params: {}
            }).then(({data}) => {
              console.log(data)
            })
        }
项目结构
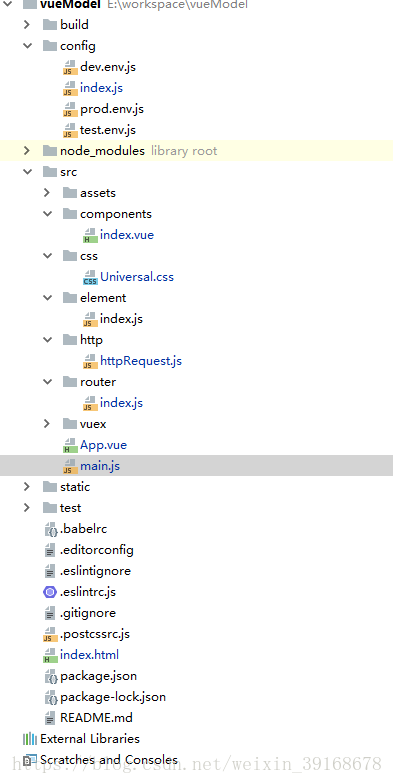
main.js
// The Vue build version to load with the `import` command
// (runtime-only or standalone) has been set in webpack.base.conf with an alias.
import Vue from 'vue'
import App from './App'
import router from './router'
import ElementUI from 'element-ui'
import 'element-ui/lib/theme-chalk/index.css'
import httpRequest from '@/http/httpRequest' // api: https://github.com/axios/axios
import commentCss from './css/Universal.css'
Vue.use(commentCss)
Vue.use(ElementUI)
Vue.config.productionTip = false
Vue.prototype.$http = httpRequest
/* eslint-disable no-new */
new Vue({
  el: '#app',
  router,
  components: { App },
  template: '<App/>'
})
index.html
<!DOCTYPE html>
<html>
  <head>
    <meta charset="utf-8">
    <meta name="viewport" content="width=device-width,initial-scale=1.0">
    <title>y</title>
  </head>
  <body>
    <div id="app" class="content"></div>
    <!-- built files will be auto injected -->
  </body>
</html>
APP.vue
<template>
  <div id="app" class="content">
    <router-view/>
  </div>
</template>

<script>
export default {
  name: 'App'
}
</script>

<style>

</style>