人体姿态估计部分代码解读
前言
openpose是自下而上的人体姿态估计方法,此处我们讨论的是tensorflow的版本。
coco keypoints 标注 以及tf-openpose的标注调整如下图所示(调整顺序为了适应PAF阶段的预测):
| 序号 | coco ori | openpose |
|---|---|---|
| 1 | 鼻子 | 鼻子 |
| 2 | 左眼 | 脖颈 |
| 3 | 右眼 | 右肩 |
| 4 | 左耳 | 右肘 |
| 5 | 右耳 | 右手 |
| 6 | 左肩 | 左肩 |
| 7 | 右肩 | 左肘 |
| 8 | 左肘 | 左手 |
| 9 | 右肘 | 右髋 |
| 10 | 左手 | 右膝 |
| 11 | 右手 | 右脚 |
| 12 | 左髋 | 左髋 |
| 13 | 右髋 | 左膝 |
| 14 | 左膝 | 左脚 |
| 15 | 右膝 | 右眼 |
| 16 | 左脚 | 左眼 |
| 17 | 右脚 | 右耳 |
| 18 | 左耳 |
其中脖颈为左肩和右肩的中点!
heatmap高斯分布生成代码(pose_dataset.py)
函数get_heatmap生成关键点热力图,未在图内且未标注的关键点生成的heatmap所有值都为0。一共19个heatmap,其中最后一个代表背景,
def get_heatmap(self, target_size):
    heatmap = np.zeros((CocoMetadata.__coco_parts, self.height, self.width), dtype=np.float32)
    ##全部heatmap都初始化为0
    for joints in self.joint_list:
        for idx, point in enumerate(joints):
            if point[0] < 0 or point[1] < 0:
                continue
            CocoMetadata.put_heatmap(heatmap, idx, point, self.sigma)
    heatmap = heatmap.transpose((1, 2, 0)) ##self.height, self.width, CocoMetadata.__coco_parts,
    # background
    heatmap[:, :, -1] = np.clip(1 - np.amax(heatmap, axis=2), 0.0, 1.0)
    if target_size:
        heatmap = cv2.resize(heatmap, target_size, interpolation=cv2.INTER_AREA) #插值resize
    return heatmap.astype(np.float16)
注:
1. numpy.clip(a, a_min, a_max, out=None) :clip这个函数将将数组中的元素限制在a_min,
a_max之间,大于a_max的就使得它等于 a_max,小于a_min,的就使得它等于a_min。
函数put_heatmap单个关键点keypoints热力图生成
def put_heatmap(heatmap, plane_idx, center, sigma):
center_x, center_y = center
_, height, width = heatmap.shape[:3]
th = 4.6052
delta = math.sqrt(th * 2)
x0 = int(max(0, center_x - delta * sigma))
y0 = int(max(0, center_y - delta * sigma))
x1 = int(min(width, center_x + delta * sigma))
y1 = int(min(height, center_y + delta * sigma))
for y in range(y0, y1):
for x in range(x0, x1):
d = (x - center_x) ** 2 + (y - center_y) ** 2 ###高斯!!
exp = d / 2.0 / sigma / sigma ##高斯!!
if exp > th:
continue
heatmap[plane_idx][y][x] = max(heatmap[plane_idx][y][x], math.exp(-exp))
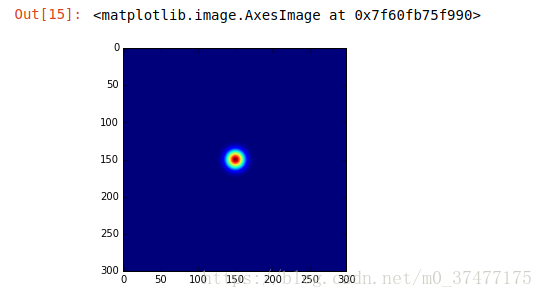
heatmap[plane_idx][y][x] = min(heatmap[plane_idx][y][x], 1.0)一个关键点的测试效果(高斯分布):
vectormap 向量叉乘生成代码(pose_dataset.py)
函数get_vetormap得到PAF标签,vectormap是heatmap的两倍为38个(19*2),因为有19条的关键点连接线,每一条线使用向量表示,分别有x维度的map,以及y轴的map。
此处map上的区域赋值,要限定区域使用的是向量的叉乘:
    def get_vectormap(self, target_size):
        vectormap = np.zeros((CocoMetadata.__coco_parts*2, self.height, self.width), dtype=np.float32)
        countmap = np.zeros((CocoMetadata.__coco_parts, self.height, self.width), dtype=np.int16)
        for joints in self.joint_list:
            for plane_idx, (j_idx1, j_idx2) in enumerate(CocoMetadata.__coco_vecs):
                j_idx1 -= 1
                j_idx2 -= 1
                center_from = joints[j_idx1]
                center_to = joints[j_idx2]

                if center_from[0] < -100 or center_from[1] < -100 or center_to[0] < -100 or center_to[1] < -100:
                    continue
                CocoMetadata.put_vectormap(vectormap, countmap, plane_idx, center_from, center_to)
        vectormap = vectormap.transpose((1, 2, 0))
        nonzeros = np.nonzero(countmap)
        for p, y, x in zip(nonzeros[0], nonzeros[1], nonzeros[2]):
            if countmap[p][y][x] <= 0:
                continue
            vectormap[y][x][p*2+0] /= countmap[p][y][x]
            vectormap[y][x][p*2+1] /= countmap[p][y][x]

        if target_size:
            vectormap = cv2.resize(vectormap, target_size, interpolation=cv2.INTER_AREA)

        return vectormap.astype(np.float16)
函数put_vectormap得到单个向量的map(2个)表示。
  def put_vectormap(vectormap, countmap, plane_idx, center_from, center_to, threshold=8):
        _, height, width = vectormap.shape[:3]

        vec_x = center_to[0] - center_from[0]
        vec_y = center_to[1] - center_from[1]
        min_x = max(0, int(min(center_from[0], center_to[0]) - threshold))
        min_y = max(0, int(min(center_from[1], center_to[1]) - threshold))

        max_x = min(width, int(max(center_from[0], center_to[0]) + threshold))
        max_y = min(height, int(max(center_from[1], center_to[1]) + threshold))
        norm = math.sqrt(vec_x ** 2 + vec_y ** 2)
        if norm == 0:
            return

        vec_x /= norm
        vec_y /= norm

        for y in range(min_y, max_y):
            for x in range(min_x, max_x):
                bec_x = x - center_from[0]
                bec_y = y - center_from[1]
                dist = abs(bec_x * vec_y - bec_y * vec_x)  ##向量叉乘根据阈值选择赋值区域
                if dist > threshold:
                    continue

                countmap[plane_idx][y][x] += 1

                vectormap[plane_idx*2+0][y][x] = vec_x
                vectormap[plane_idx*2+1][y][x] = vec_y
vec_x 以及 vec_y为单位向量,任何向量与单位向量的叉乘即为四边形的面积
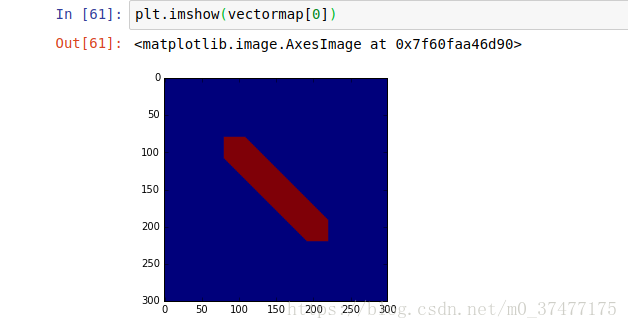
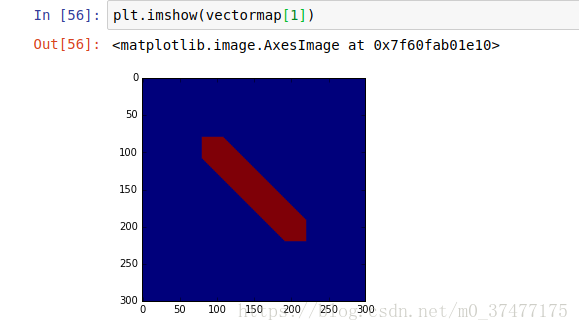
两个点的vectmap标注示意:
vec x
vex y
向量叉乘
首先简单讲讲向量:向量是一种既有方向、又有大小的量(如一个箭头表示就很形象),在平面直角坐标系中,若A的坐标为(x,y),B的坐标为
,则向量AB的方向由A指向B,用表示。
定义:叉乘是向量间的一种运算,设两个向量分别为,那么它们的叉乘就为 ,它也是一个向量,但在本文中,我们不讨论它的方向。
几何意义:
叉乘的几何意义是以两向量为邻边的平行四边形的有向面积!!
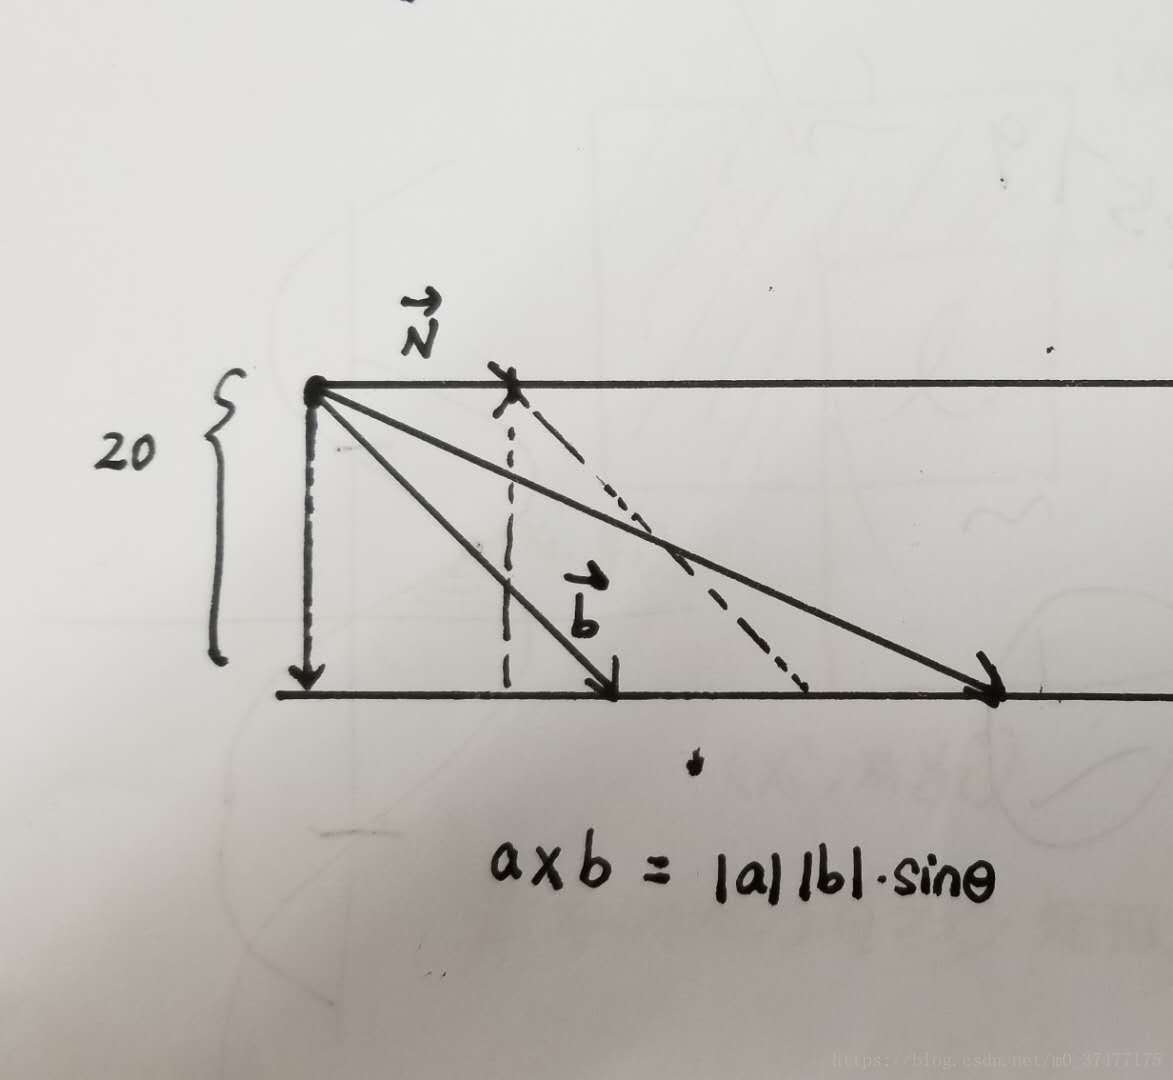
由上图所示,向量由一条起点出发到达另一条平行线(角度小于90度),此向量与其中一条的平行线单位向量进行叉乘,得到的四边形面积保持不变!!从而限定了向量赋值的区域!最后得到的限定区域为下图的六边形。
参考资料:
1.数学基础 —— 向量运算(叉乘)