GrabPass是一个特殊的Pass,它从frame buffer抓取物体所在位置屏幕中将要绘制的内容,将其填充至一个临时的texture,以供同一个Shader中其后的Pass使用。我们现在就要用它来实现高斯模糊的毛玻璃效果。
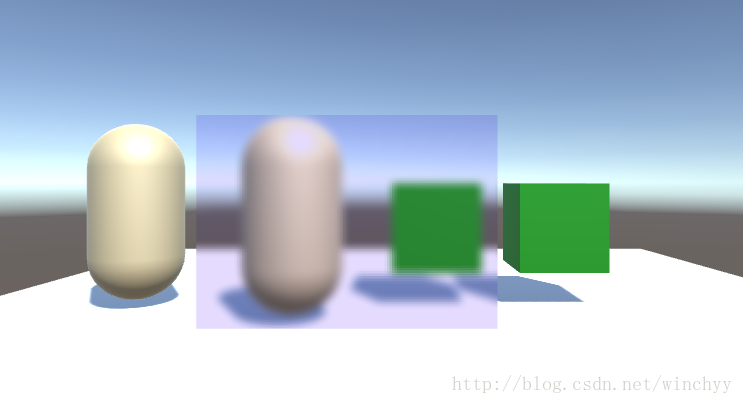
效果:
Shader
首先我们需要声明Shader所需属性:
Properties
{
    _BumpAmt("Distortion", range(0, 2)) = 1
    _TintAmt("Tint Amount", Range(0,1)) = 0.1
    _TintColor("Tint Color", Color) = (1, 1, 1, 1)
    _MainTex("Tint Texture (RGB)", 2D) = "white" {}
    _BumpMap("Normalmap", 2D) = "bump" {}
    _BlurAmt("Blur", Range(0, 10)) = 1
}- _BumpMap 和 _BumpAmt控制扭曲
- _TintColor 和 _TintAmt控制叠加颜色
- _BlurAmt 控制模糊程度
在SubShader中,增加GrabPass,GrabPass中可以是空的,也可以加入一个字符串作为Texture名,或者添加其他必要的Tag。如果GrabPass为空,那Texture名默认为_GrabPassTexture。
GrabPass {}vertex shader 须向fragment shader传递_GrabTexture的uv:
struct v2f
{
    float4 vertex : SV_POSITION;
    float2 texcoord : TEXCOORD0;
    float4 uvgrab : TEXCOORD1;
};
模糊函数:
float blurWeight[49];

half4 blur(half4 col, sampler2D tex, float4 uvrgab) {
    float2 offset = 1.0 / _ScreenParams.xy;
    for (int i = -3; i <= 3; ++i) {
        for (int j = -3; j <= 3; ++j) {
            col += tex2Dproj(tex, uvrgab + float4(offset.x * i * _BlurAmt, offset.y * j * _BlurAmt, 0.0f, 0.0f)) * blurWeight[j * 7 + i + 24];
        }
    }
    return col;
}高斯模糊的原理是对当前像素四周一定范围内的像素采样并按照一定权值叠加,权值计算方法可以参照维基百科。这里_ScreenParams是Unity内置变量,xy代表屏幕大小。这里的权值blurWeight由C#脚本计算并传入,如果不需要动态改变的话也可以hard code进shader。
完整的shader如下:
Shader "Custom/GrabPassBlur"
{
    Properties
    {
        _BumpAmt("Distortion", range(0, 2)) = 1
        _TintAmt("Tint Amount", Range(0,1)) = 0.1
        _TintColor("Tint Color", Color) = (1, 1, 1, 1)
        _MainTex("Tint Texture (RGB)", 2D) = "white" {}
        _BumpMap("Normalmap", 2D) = "bump" {}
        _BlurAmt("Blur", Range(0, 10)) = 1
    }

    SubShader
    {
        //Queue is Transparent so other objects will be rendered first
        Tags { "RenderType" = "Opaque" "Queue" = "Transparent"}
        LOD 100

        GrabPass {}

        Pass
        {
            CGPROGRAM

            #pragma vertex vert
            #pragma fragment frag
            #include "UnityCG.cginc"

            struct appData {
                float4 vertex : POSITION;
                float2 texcoord : TEXCOORD0;
            };

            struct v2f {
                float4 vertex : SV_POSITION;
                float2 texcoord : TEXCOORD0;
                float4 uvgrab : TEXCOORD1;
            };

            float _BumpAmt;
            float _TintAmt;
            float _BlurAmt;
            float4 _TintColor;
            sampler2D _MainTex;
            sampler2D _BumpMap;
            sampler2D _GrabTexture;
            float4 _GrabTexture_TexelSize;

            //https://en.wikipedia.org/wiki/Gaussian_blur
            float blurWeight[49];

            half4 blur(half4 col, sampler2D tex, float4 uvrgab) {
                float2 offset = 1.0 / _ScreenParams.xy;
                for (int i = -3; i <= 3; ++i) {
                    for (int j = -3; j <= 3; ++j) {
                        //col += tex2Dproj(tex, uvrgab + float4(_GrabTexture_TexelSize.x * i * _BlurAmt, _GrabTexture_TexelSize.y *j * _BlurAmt, 0.0f, 0.0f)) * blurWeight[j * 7 + i + 24];
                        col += tex2Dproj(tex, uvrgab + float4(offset.x * i * _BlurAmt, offset.y * j * _BlurAmt, 0.0f, 0.0f)) * blurWeight[j * 7 + i + 24];
                    }
                }
                return col;
            }

            v2f vert(appData v) {
                v2f o;
                o.vertex = UnityObjectToClipPos(v.vertex);
                o.texcoord = v.texcoord;
                o.uvgrab = ComputeGrabScreenPos(o.vertex);
                return o;
            }

            half4 frag(v2f i) : COLOR{
                half4 mainColor = tex2D(_MainTex, i.texcoord);
                half2 distortion = UnpackNormal(tex2D(_BumpMap, i.texcoord)).rg * _BumpAmt;
                half4 col = half4(0, 0, 0, 0);
                float4 uvgrab = float4(i.uvgrab.x + distortion.x, i.uvgrab.y + distortion.y, i.uvgrab.z, i.uvgrab.w);
                col = blur(col, _GrabTexture, uvgrab);
                return lerp(col, col * mainColor, _TintAmt) * _TintColor;
            }

            ENDCG
        }
    }
}
注意,这里Queue为Transparent,所以其他非透明物体可以先渲染。我们通过Unity内置方法ComputeGrabScreenPos获得校正后的uv,并用tex2Dproj方法采样。
C#脚本
C#脚本主要用来计算采样权值,完整代码如下:
using UnityEngine;

[ExecuteInEditMode]
public class GrabPassBlur : MonoBehaviour {

    [SerializeField]
    private float deviation = 1.0f;

    private float currentDeviation = 0.0f;

    private Material material;

    //https://en.wikipedia.org/wiki/Gaussian_blur
    float[] GaussianMatrix = new float[49]{
                0.00000067f,  0.00002292f,  0.00019117f,  0.00038771f,  0.00019117f,  0.00002292f,  0.00000067f,
                0.00002292f,  0.00078634f,  0.00655965f,  0.01330373f,  0.00655965f,  0.00078633f,  0.00002292f,
                0.00019117f,  0.00655965f,  0.05472157f,  0.11098164f,  0.05472157f,  0.00655965f,  0.00019117f,
                0.00038771f,  0.01330373f,  0.11098164f,  0.22508352f,  0.11098164f,  0.01330373f,  0.00038771f,
                0.00019117f,  0.00655965f,  0.05472157f,  0.11098164f,  0.05472157f,  0.00655965f,  0.00019117f,
                0.00002292f,  0.00078633f,  0.00655965f,  0.01330373f,  0.00655965f,  0.00078633f,  0.00002292f,
                0.00000067f,  0.00002292f,  0.00019117f,  0.00038771f,  0.00019117f,  0.00002292f,  0.00000067f
            };

    void Start () {
#if UNITY_EDITOR
        currentDeviation = 0;
        CalculateGaussianMatrix(deviation);
        currentDeviation = deviation;
#endif
    }

    void Update () {
#if UNITY_EDITOR
        if (currentDeviation == deviation) return;
        CalculateGaussianMatrix(deviation);
        currentDeviation = deviation;
#endif
    }

    void CalculateGaussianMatrix(float d) {
        int x = 0;
        int y = 0;

        float sum = 0.0f;
        for (x = -3; x <= 3; ++x) {
            for (y = -3; y <= 3; ++y) {
                GaussianMatrix[y * 7 + x + 24] = Mathf.Exp(-(x * x + y * y)/(2.0f * d * d)) / (2.0f * Mathf.PI * d * d);
                sum += GaussianMatrix [y * 7 + x + 24];
            }
        }

        //normalize
        sum = 1.0f / sum;
        for (int i = 0; i < GaussianMatrix.Length; i++) {
            GaussianMatrix [i] *= sum;
        }

        material = GetComponent<MeshRenderer>().sharedMaterial;
        material.SetFloatArray ("blurWeight", GaussianMatrix);
    }

}
小结
以上我们介绍了通过GrabPass实现高斯模糊的效果,这里我们在C#中计算二维高斯矩阵然后传入Shader,除了这种方法,还可以x、y方向分别混合,那样的话需要多次执行GrabPass,并且权值一般写死,相关讨论参见(https://forum.unity3d.com/threads/simple-optimized-blur-shader.185327/)。
既然我们通过GrabPass获得了对应的Texture,我们就可以把它当作普通的Texture,做很多其他有意思的效果,比如改变灰度、对比度,或者模拟折射等效果。
其他关于Blur的文章
An investigation of fast real-time GPU-based image blur algorithms
Gaussian blur – Wikipedia