刷知乎的时候发现dlib做特征点检测和人脸识别的效果都好于OpenCV,就想着动手玩一下。没想到也是遇坑重重。
首先,在官网 install命令和setup.py文件进行安装时报错,先是报错cmake没有找到,添加了环境变量之后仍然报错c++11需要在vs2015下才能运行。后来找到的资料也说明了要想在vs2013下开发需要安装较早的版本。不想再重新安装vs了,可是官网也找不到早期的dlib版本,幸好有人做了汇总。下载了18.17版本,发现文件夹中没有setup文件,这时应该还需要cmake进行编译。
Cmake编译已经很熟悉了,选择编译的源文件和生成文件的目的地址,目的地址可以选择dlib主目录下新建的文件夹。第一步是configuration,要选择和自己vs版本对应的配置。Vs2013win32就选择visual studio 12 2013 (没有ARM)。下一步generation,然后就可以打开sln或者open project了。
然后就是新建c++工程,配置包含目录、库目录、附加依赖项。Vs2013预编译头已经包含了stdafx.h,不必在cpp文件中重新包含,否则会报错。期间遇到了LNK2019: 无法解析的外部符号的问题,不用说,链接库肯定没添加对。错误各有各的错法,我遇到的是在cmake的时候就出错了:configuration应该选择和自己vs平台一样的,我的是vs2013win32版的,却选择了win64,后来改成arm还是不对,只能是下图中所选的。

这下编译终于通过了,但是在读入shape_predictor_5_face_landmarks.dat中就异常中断了,中断处的代码显示是未能正确打开文件。郁闷了半天才意识到应该是路径中有中文连接符号-。把文件放到工作目录就解决问题了。

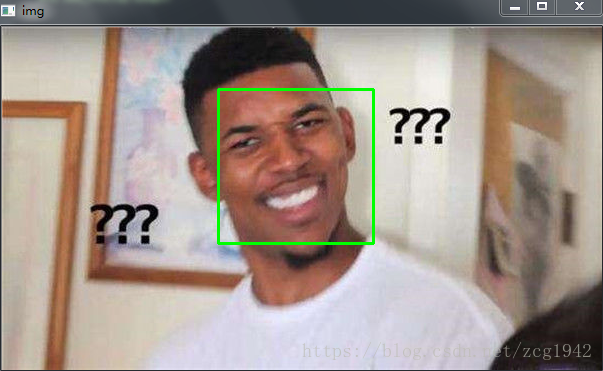
可以看到程序已经实现了在图像中检测人脸位置并将人脸中标志性的符号(如眼角,嘴角)标记出来,可以根据这些标志信息进一步知道人脸的表情信息(或者说动作pose)。实现人脸位置检测的是frontal_face_detector,实现标志提取的是shape_predictor,前者使用传统的HOG特征和线性分类器、图像金字塔、滑窗实现,后者通过根据2014年的一篇CVPR文章训练好的网络模型实现。在网上可以找到两个模型,一个可以找出68个人脸中的特征点,一个可以找到5个特征点。更换对应的.dat文件就可以实现,当然特征点更少时耗时更少。

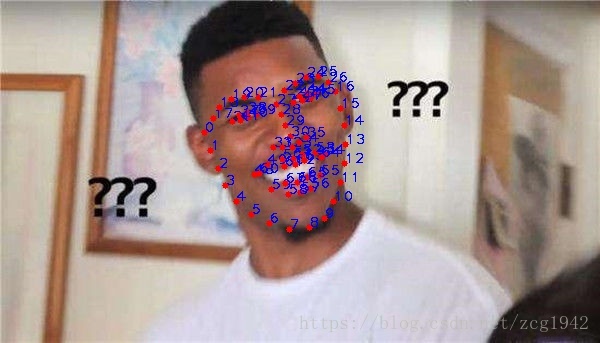
P.s 更改模型文件后要记得更改绘制特征点圆圈的for循环中的循环次数,不然会溢出中断。
在这里的代码中使用了OPenCV实现图像导入和最后的显示和保存,在官网提供的例子中,可以全部使用dlib库完成。
	/*dlib::deserialize("D:\\program\Anaconda2\\Tools\dlib-18.17\\shape_predictor_68_face_landmarks.dat") >> pose_model;
	cv::Mat img = imread("D:\\program\Anaconda2\\Tools\dlib-18.17\\zkaj.jpg", 1);*/
#include <dlib/opencv.h>
#include <opencv2/opencv.hpp>
#include <dlib/image_processing/frontal_face_detector.h>
#include <dlib/image_processing/render_face_detections.h>
#include <dlib/image_processing.h>
#include <dlib/gui_widgets.h>

	using namespace dlib;
	using namespace std;

	int main()
	{
		try
		{
			// Load face detection and pose estimation models.
			frontal_face_detector detector = get_frontal_face_detector();//正脸检测器,得到人脸的边界框
			//检测器使用经典的HOG特征和线性分类器,图像金字塔和滑窗完成
			shape_predictor pose_model;//shape_predictor用于预测脸上标志的位置
			deserialize("shape_predictor_68_face_landmarks.dat") >> pose_model;//读取已经训练好的模型,在 iBUG 300-W人脸数据集(禁止商用)上训练得到 http://dlib.net/files/shape_predictor_68_face_landmarks.dat.bz2.

			// Grab and process frames until the main window is closed by the user.

			// Grab a frame
			cv::Mat temp;
			//cap >> temp;
			temp = cv::imread("timg.jpg", 1);
			//cv::VideoCapture cap(0);也可以从摄像头获取当前画面

			cv_image<bgr_pixel> cimg(temp);//拷贝赋值 dlib的图像格式是array2d
			// Detect faces
			std::vector<rectangle> faces = detector(cimg);
			// Find the pose of each face.
			std::vector<full_object_detection> shapes;//用于存放特征点的容器
			for (unsigned long i = 0; i < faces.size(); ++i)
				shapes.push_back(pose_model(cimg, faces[i]));//68个点组成人脸pose

			if (!shapes.empty())
			{
				for (int j = 0; j < shapes.size(); j++)//遍历每个检测到的人脸
				{
					for (int i = 0; i < 68; i++)//遍历每个人脸的68个特征点
					{
						circle(temp, cvPoint(shapes[j].part(i).x(), shapes[j].part(i).y()), 3, cv::Scalar(0, 0, 255), -1);//半径是3,颜色是红色。-1表示圆被填充
						putText(temp, to_string(i), cvPoint(shapes[j].part(i).x(), shapes[j].part(i).y()), CV_FONT_HERSHEY_PLAIN, 1, cv::Scalar(255, 0, 0), 1, 4);//线条宽度是1,字形是4邻域。to_string将int转为string,这是c++11新添加的
					}
				}
			}

			//Display it all on the screen
			imshow("Dlib特征点", temp);
			imwrite("Dlib特征点1.jpg", temp);

			cv::waitKey(0);
		}
		catch (serialization_error& e)
		{
			cout << "You need dlib's default face landmarking model file to run this example." << endl;
			cout << "You can get it from the following URL: " << endl;
			cout << "   http://dlib.net/files/shape_predictor_68_face_landmarks.dat.bz2" << endl;
			cout << endl << e.what() << endl;
		}
	}
Python接口的配置
直接下载安装包更方便。https://pypi.org/project/dlib/18.17.100/#files注意还是要选择和自己python版本和机器相符合的安装包。通过命令pip install dlib-18.17.100-cp35-none-win_amd64.whl进行安装。我遇到的问题是pip版本不够高,使用python -m pip install --upgrade pip进行升级。总是弄不清楚到底进不进入python命令行,现在看来看来命令行中含python的就可以直接在cmd中执行。Pip也是直接在cmd中执行。
但是在pycharmn中的python版本是anaconda(python2.7),没有安装opencv。在https://www.lfd.uci.edu/~gohlke/pythonlibs/#numpy中找到了opencv的安装包。
使用pip install命令安装opencv,注意应该将D:\Anaconda3\Scripts(这是我电脑的安装目录)加入到环境变量,这样就可以使用pip命令。
一切就绪以后以管理员身份运行cmd或PowerShell。依次输入以下命令:
pip install --upgrade setuptools
pip install opencv-python
虽然网络还可以,顺利下载成功,但是依然无法import。原来pip自动下载也可能版本不对,于是下载了whl安装包(名字叫轮子?),再使用pip安装。
然后又遇到了numpy无法导入的问题,也是先卸载,重新安装。conda remove numpy;conda install numpy。
最后一个问题是cv2.rectangle的使用,我的opencv版本没有cv2.LINE_AA这个参数,注释掉就好了。
反正就是一步步走,一个个解决问题。终于看到了结果:
Reference:
- 手把手https://blog.csdn.net/eternity1118_/article/details/79083757
- Python:https://blog.csdn.net/ezhchai/article/details/79087046
- 摄像头https://blog.csdn.net/qq_15807167/article/details/68944673
- Python接口https://blog.csdn.net/ezhchai/article/details/79087046
- https://blog.csdn.net/Snowing_ST/article/details/75283587
- Cv2:https://blog.csdn.net/Yeah_snow/article/details/79438097
- Uninstall:https://blog.csdn.net/zyfortirude/article/details/70176705