RPN流程:
1.每一张图片生成固定数量的锚节点,锚节点个数是最后一次特征图大小,比如说最后一层特征大小为(37,50),所以有37*50个锚节点.锚节点之间的步长为16像素点,这是因为vgg16有4次maxpool,所有图像缩小了16倍,所以步长为16像素。
每一个锚节点又生成9个区域图,所以生成的锚节点区域图就有9*37*50个.对应了rpn生成坐标的个数.
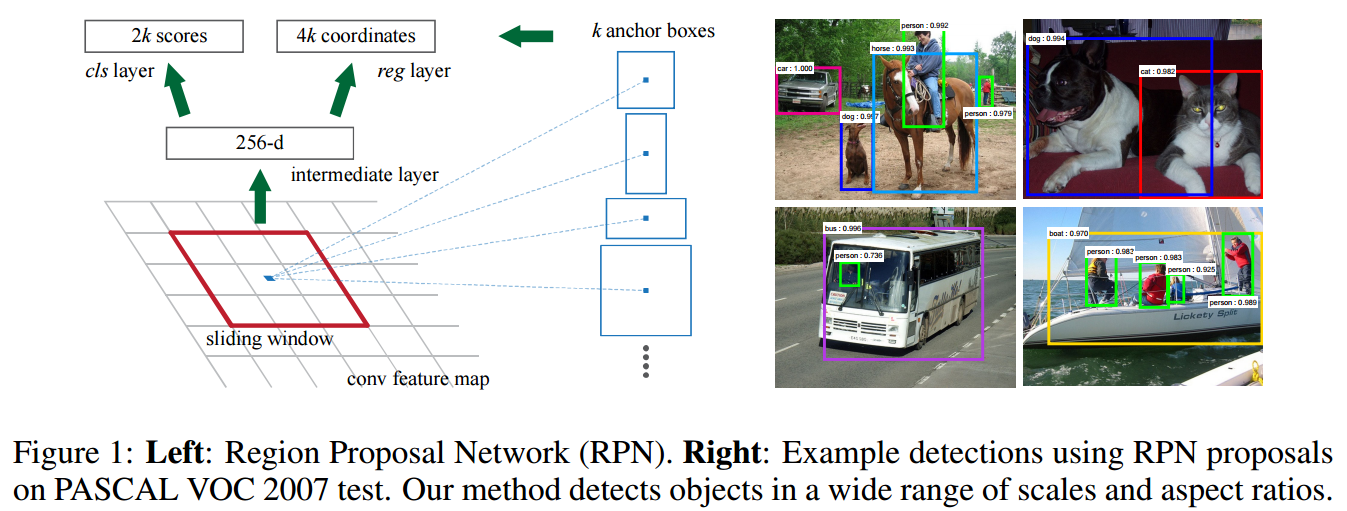
2.将前面提取的特征进行一次卷积后分别传入边界框分类层cls layer 和边界框回归层reg layer。如下图所示:
分类层cls layer 判断的是这个区域是否是背景.
要注意的是RPN内部有两个loss层,一个是BBox的loss,该loss通过减小ground-truth-box与预测的anchor-box之间的差异来进行参数学习,从而使RPN网络中的权重能够学习到预测box的能力。实现细节是每一个位置的anchor-box与ground-truth里面的box进行比较,选择IOU最大的一个作为该anchor-box的真值,若没有,则将之class设为背景(概率值0,否则1),这样背景的anchor-box的损失函数中每个box乘以其class的概率后就不会对bbox的损失函数造成影响。另一个loss是class-loss,该处的loss是指代的前景背景并不是实际的框中物体类别,它的存在可以使得在最后生成roi时能快速过滤掉预测值是背景的box。也可实现bbox的预测函数不受影响,使得anchor-box能(专注于)正确的学习前景框的预测,正如前所述。所以,综合来讲,整个RPN的作用就是替代了以前的selective-search方法,因为网络内的运算都是可GPU加速的,所以一下子提升了ROI生成的速度。可以将RPN理解为一个预测前景背景,并将前景框定的一个网络,并进行单独的训练,实际上论文里面就有一个分阶段训练的训练策略,实际上就是这个原因。
上面这段来自原文:https://blog.csdn.net/MLlearnerTJ/article/details/53709766
3.再将输出的获得的坐标通过nms极大值抑制获得符合条件的roi框2000个.就是把9*50*37个框中的前景合并成2000个.
4.最后输出边界框分类和边界框回归值以及roi和roi索引(大小为2000个,全是0),锚节点框.
    def forward(self, x, img_size, scale=1.):
        n, _, hh, ww = x.shape
        # print self.anchor_base
        # print self.anchor_base.shape

        # 所有特征图上9种锚点的坐标
        anchor = _enumerate_shifted_anchor(
            np.array(self.anchor_base),
            self.feat_stride, hh, ww)
        # print anchor
        # print anchor.shape
        n_anchor = anchor.shape[0] // (hh * ww)
        h = F.relu(self.conv1(x))

        rpn_locs = self.loc(h)
        # UNNOTE: check whether need contiguous
        # A: Yes
        rpn_locs = rpn_locs.permute(0, 2, 3, 1).contiguous().view(n, -1, 4)
        rpn_scores = self.score(h)
        rpn_scores = rpn_scores.permute(0, 2, 3, 1).contiguous()
        rpn_softmax_scores = F.softmax(
            rpn_scores.view(n, hh, ww, n_anchor, 2), dim=4)
        rpn_fg_scores = rpn_softmax_scores[:, :, :, :, 1].contiguous()
        rpn_fg_scores = rpn_fg_scores.view(n, -1)
        rpn_scores = rpn_scores.view(n, -1, 2)

        # 经过nms(极大值抑制)获得的roi
        rois = list()
        roi_indices = list()
        for i in range(n):
            roi = self.proposal_layer(
                rpn_locs[i].cpu().data.numpy(),
                rpn_fg_scores[i].cpu().data.numpy(),
                anchor, img_size,
                scale=scale)
            batch_index = i * np.ones((len(roi),), dtype=np.int32)
            rois.append(roi)
            roi_indices.append(batch_index)

        # 将list转为numpy格式,这个作者有毒,一直用奇葩的方式转格式
        rois = np.concatenate(rois, axis=0)
        roi_indices = np.concatenate(roi_indices, axis=0)

        return rpn_locs, rpn_scores, rois, roi_indices, anchor
def generate_anchor_base(base_size=16, ratios=[0.5, 1, 2],
anchor_scales=[8, 16, 32]):
py = base_size / 2.
px = base_size / 2.
anchor_base = np.zeros((len(ratios) * len(anchor_scales), 4),
dtype=np.float32)
for i in six.moves.range(len(ratios)):
for j in six.moves.range(len(anchor_scales)):
h = base_size * anchor_scales[j] * np.sqrt(ratios[i])
w = base_size * anchor_scales[j] * np.sqrt(1. / ratios[i])
index = i * len(anchor_scales) + j
anchor_base[index, 0] = py - h / 2.
anchor_base[index, 1] = px - w / 2.
anchor_base[index, 2] = py + h / 2.
anchor_base[index, 3] = px + w / 2.
return anchor_base
生成了9个锚点坐标。
def _enumerate_shifted_anchor_torch(anchor_base, feat_stride, height, width):
    # 将所有的锚点坐标存储并且将数组转为torch.cudatensor
    # Enumerate all shifted anchors:
    #
    # add A anchors (1, A, 4) to
    # cell K shifts (K, 1, 4) to get
    # shift anchors (K, A, 4)
    # reshape to (K*A, 4) shifted anchors
    # return (K*A, 4)

    # !TODO: add support for torch.CudaTensor
    # xp = cuda.get_array_module(anchor_base)
    import torch as t
    shift_y = t.arange(0, height * feat_stride, feat_stride)
    shift_x = t.arange(0, width * feat_stride, feat_stride)
    shift_x, shift_y = xp.meshgrid(shift_x, shift_y)
    shift = xp.stack((shift_y.ravel(), shift_x.ravel(),
                      shift_y.ravel(), shift_x.ravel()), axis=1)

    A = anchor_base.shape[0]
    K = shift.shape[0]
    anchor = anchor_base.reshape((1, A, 4)) + \
        shift.reshape((1, K, 4)).transpose((1, 0, 2))
    anchor = anchor.reshape((K * A, 4)).astype(np.float32)
    return anchor
生成所有特征区域图每个坐标的9个锚节点窗口。